


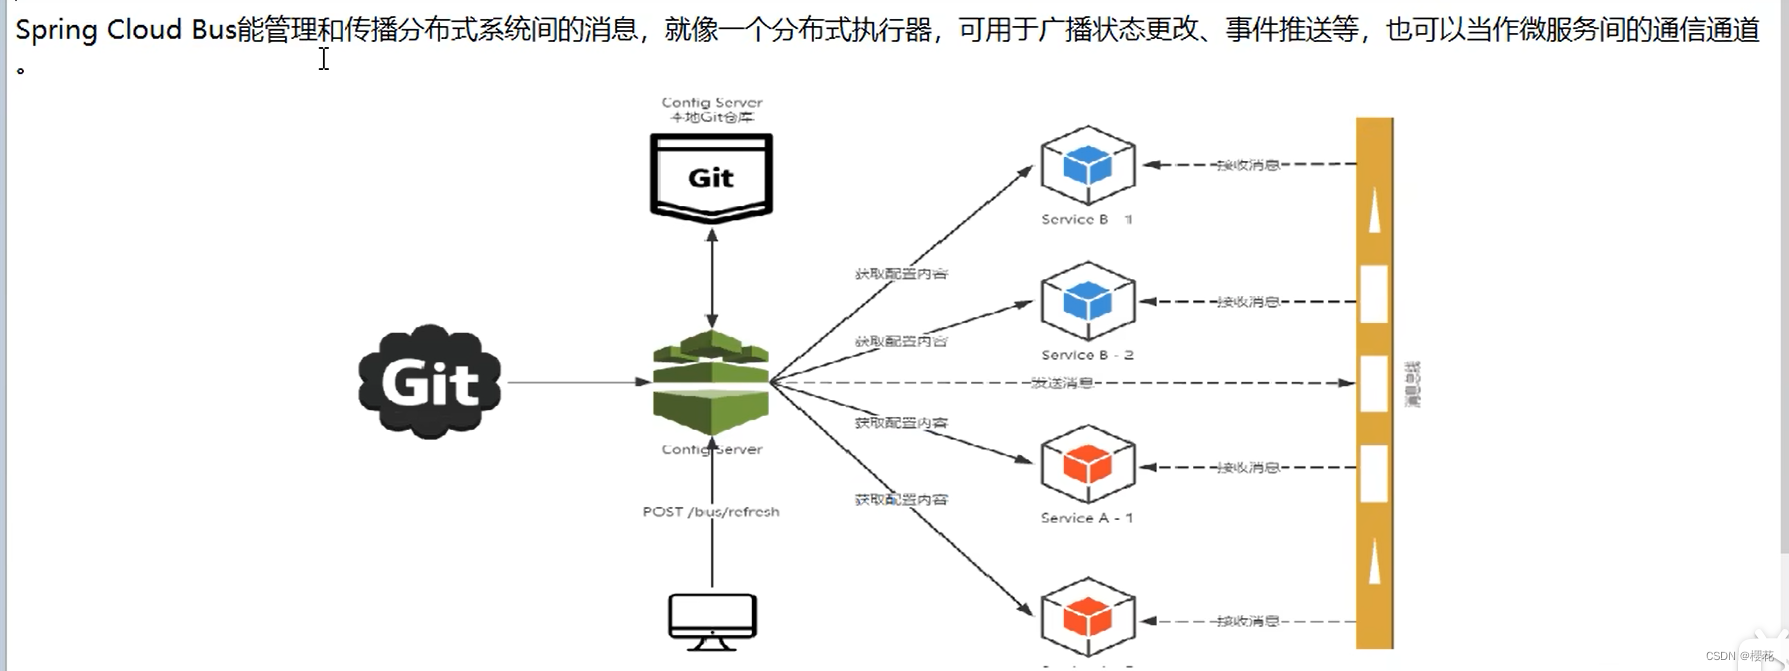
简介

Bus之RabbitMQ环境配置
-
安装Erlang
-
安装RabbitMQ
-
打开cmd进入RabbitMQ安装目录下的sbin目录
-
输入以下命令启动管理功能
rabbitmq-plugins enable rabbitmq _management
-
访问地址查看是否安装成功:http://localhost:15672/
-
输入账号密码并登录:guest guest
具体安装 Erlang 和 RabbitMQ 请访问: https://editor.csdn.net/md/?articleId=130800154
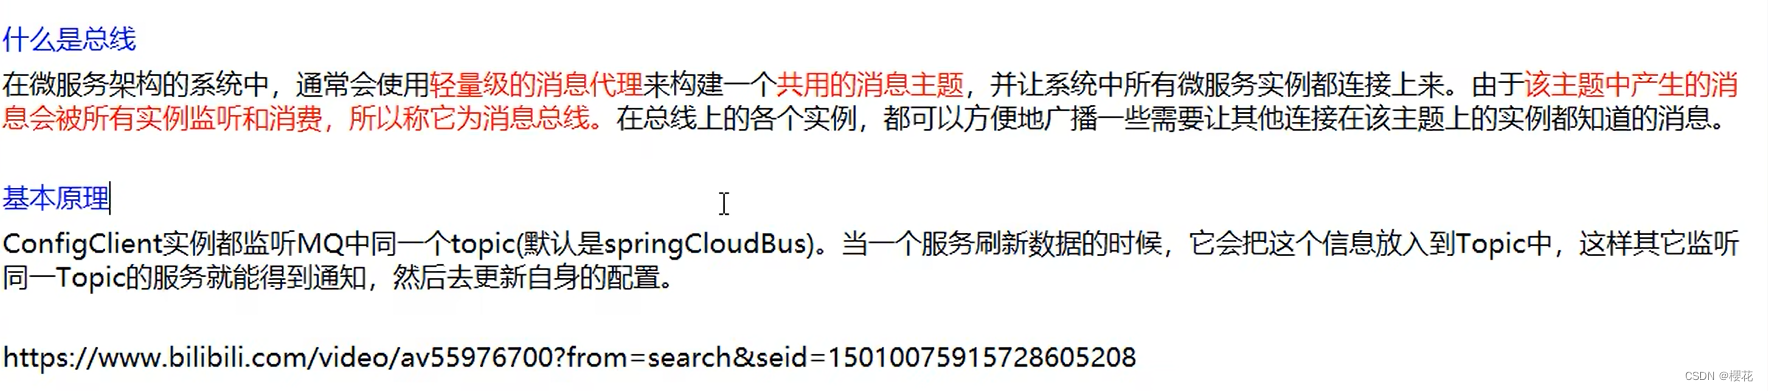
Bus动态刷新全局广播的设计思想和选型
必须先具备良好的RabbitMQ环境先
演示广播效果,增加复杂度,再以3355为模板再制作一个3366
1.新建cloud-config-client-3366
2. pom.xml
<?xml version="1.0" encoding="UTF-8"?>
<project xmlns="http://maven.apache.org/POM/4.0.0"
         xmlns:xsi="http://www.w3.org/2001/XMLSchema-instance"
         xsi:schemaLocation="http://maven.apache.org/POM/4.0.0 http://maven.apache.org/xsd/maven-4.0.0.xsd">
    <modelVersion>4.0.0</modelVersion>
    <parent>
        <groupId>com.atguigu.springcloud</groupId>
        <artifactId>cloud2020</artifactId>
        <version>1.0-SNAPSHOT</version>
    </parent>

    <artifactId>cloud-config-client-3366</artifactId>

    <dependencies>
        <!--添加消息总线RabbitMQ支持-->
        <dependency>
            <groupId>org.springframework.cloud</groupId>
            <artifactId>spring-cloud-starter-bus-amqp</artifactId>
        </dependency>
        <dependency>
            <groupId>org.springframework.cloud</groupId>
            <artifactId>spring-cloud-starter-config</artifactId>
        </dependency>
        <dependency>
            <groupId>org.springframework.cloud</groupId>
            <artifactId>spring-cloud-starter-netflix-eureka-client</artifactId>
        </dependency>
        <dependency>
            <groupId>org.springframework.boot</groupId>
            <artifactId>spring-boot-starter-web</artifactId>
        </dependency>
        <dependency>
            <groupId>org.springframework.boot</groupId>
            <artifactId>spring-boot-starter-actuator</artifactId>
        </dependency>

        <dependency>
            <groupId>org.springframework.boot</groupId>
            <artifactId>spring-boot-devtools</artifactId>
            <scope>runtime</scope>
            <optional>true</optional>
        </dependency>
        <dependency>
            <groupId>org.projectlombok</groupId>
            <artifactId>lombok</artifactId>
            <optional>true</optional>
        </dependency>
        <dependency>
            <groupId>org.springframework.boot</groupId>
            <artifactId>spring-boot-starter-test</artifactId>
            <scope>test</scope>
        </dependency>
    </dependencies>

</project>
3. bootstrap.yml
server:
  port: 3366

spring:
  application:
    name: config-client
  cloud:
    #Config客户端配置
    config:
      label: master #分支名称
      name: config #配置文件名称
      profile: dev #读取后缀名称   上述3个综合:master分支上config-dev.yml的配置文件被读取http://config-3344.com:3344/master/config-dev.yml
      uri: http://localhost:3344 #配置中心地址

  #rabbitmq相关配置 15672是Web管理界面的端口;5672是MQ访问的端口
  rabbitmq:
    host: localhost
    port: 5672
    username: guest
    password: guest

#服务注册到eureka地址
eureka:
  client:
    service-url:
      defaultZone: http://localhost:7001/eureka

# 暴露监控端点
management:
  endpoints:
    web:
      exposure:
        include: "*"
4. 主启动类
package com.atguigu.springcloud;

import org.springframework.boot.SpringApplication;
import org.springframework.boot.autoconfigure.SpringBootApplication;

@SpringBootApplication
public class ConfigClientMain3366 {
    public static void main(String[] args) {
        SpringApplication.run(ConfigClientMain3366.class, args);
    }
}
5. 创建类 controller.ConfigClientController,添加@RefreshScope 注解
package com.atguigu.springcloud.controller;

import org.springframework.beans.factory.annotation.Value;
import org.springframework.cloud.context.config.annotation.RefreshScope;
import org.springframework.web.bind.annotation.GetMapping;
import org.springframework.web.bind.annotation.RestController;

@RestController
@RefreshScope
public class ConfigClientController {
    @Value("${server.port}")
    private String serverPort;

    @Value("${config.info}")
    private String configInfo;

    @GetMapping("/configInfo")
    public String configInfo()
    {
        return "serverPort: "+serverPort+"\t\n\n configInfo: "+configInfo;
    }
}
设计思想


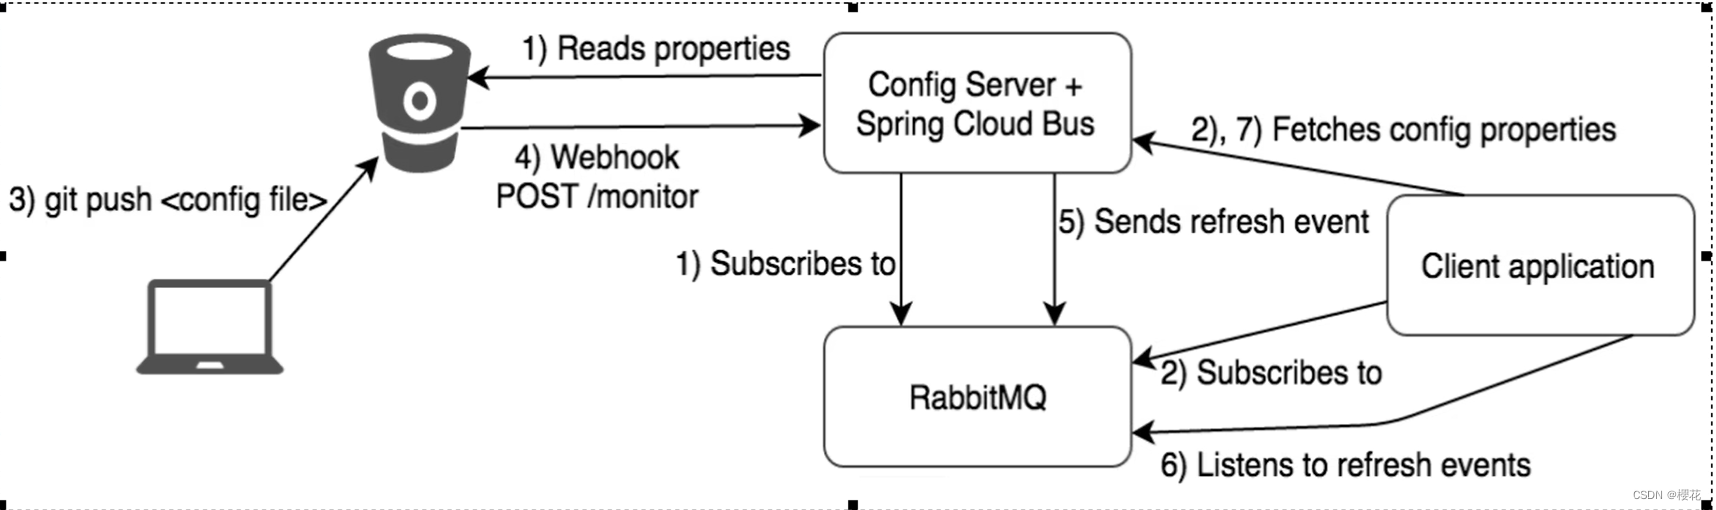
Bus动态刷新全局广播配置实现
1. 给cloud-config-center-3344配置中心服务端添加消息总线支持
- pom.xml 添加以下依赖
<!--添加消息总线RabbitNQ支持-->
<dependency>
	<groupId>org.springframework.cloud</groupId>
	<artifactId>spring-cloud-starter-bus-amap</artifactId>
</dependency>
<dependency>
	<groupId>org-springframework.boot</groupId>
	<artifactId>spring-boot-starter-actuator</artifactId>
</dependency>
- application.yml
server:
  port: 3344

spring:
  application:
    name:  cloud-config-center #注册进Eureka服务器的微服务名
  cloud:
    config:
      server:
        git:
          uri: git@github.com:zzyybs/springcloud-config.git #GitHub上面的git仓库名字
          ####搜索目录
          search-paths:
            - springcloud-config
      ####读取分支
      label: master
#rabbitmq相关配置<--------------------------
rabbitmq:
  host: localhost
  port: 5672
  username: guest
  password: guest

#服务注册到eureka地址
eureka:
  client:
    service-url:
      defaultZone: http://localhost:7001/eureka

##rabbitmq相关配置,暴露bus刷新配置的端点<--------------------------
management:
  endpoints: #暴露bus刷新配置的端点
    web:
      exposure:
        include: 'bus-refresh'
2. 给cloud-config-center-3344配置中心服务端添加消息总线支持
- pom.xml 添加以下依赖
<!--添加消息总线RabbitNQ支持-->
<dependency>
	<groupId>org.springframework.cloud</groupId>
	<artifactId>spring-cloud-starter-bus-amap</artifactId>
</dependency>
<dependency>
	<groupId>org-springframework.boot</groupId>
	<artifactId>spring-boot-starter-actuator</artifactId>
</dependency>
- bootstrap.yml
server:
  port: 3355

spring:
  application:
    name: config-client
  cloud:
    #Config客户端配置
    config:
      label: master #分支名称
      name: config #配置文件名称
      profile: dev #读取后缀名称   上述3个综合:master分支上config-dev.yml的配置文件被读取http://config-3344.com:3344/master/config-dev.yml
      uri: http://localhost:3344 #配置中心地址k

  #rabbitmq相关配置 15672是Web管理界面的端口;5672是MQ访问的端口<----------------------
  rabbitmq:
    host: localhost
    port: 5672
    username: guest
    password: guest

#服务注册到eureka地址
eureka:
  client:
    service-url:
      defaultZone: http://localhost:7001/eureka

# 暴露监控端点
management:
  endpoints:
    web:
      exposure:
        include: "*"
3. 给cloud-config-client-3366客户端添加消息总线支持
- pom.xml 添加以下依赖
<!--添加消息总线RabbitNQ支持-->
<dependency>
	<groupId>org.springframework.cloud</groupId>
	<artifactId>spring-cloud-starter-bus-amap</artifactId>
</dependency>
<dependency>
	<groupId>org-springframework.boot</groupId>
	<artifactId>spring-boot-starter-actuator</artifactId>
</dependency>
- bootstrap.yml
server:
  port: 3366

spring:
  application:
    name: config-client
  cloud:
    #Config客户端配置
    config:
      label: master #分支名称
      name: config #配置文件名称
      profile: dev #读取后缀名称   上述3个综合:master分支上config-dev.yml的配置文件被读取http://config-3344.com:3344/master/config-dev.yml
      uri: http://localhost:3344 #配置中心地址

  #rabbitmq相关配置 15672是Web管理界面的端口;5672是MQ访问的端口<-----------------------
  rabbitmq:
    host: localhost
    port: 5672
    username: guest
    password: guest

#服务注册到eureka地址
eureka:
  client:
    service-url:
      defaultZone: http://localhost:7001/eureka

# 暴露监控端点
management:
  endpoints:
    web:
      exposure:
        include: "*"
4. 测试
- 启动
- EurekaMain7001
- ConfigcenterMain3344
- ConfigclientMain3355
- ConfigclicntMain3366
- 运维工程师
- 修改Github上配置文件内容,增加版本号
- 发送POST请求
- curl -X POST “http://localhost:3344/actuator/bus-refresh”
- —次发送,处处生效
- 配置中心
- http://config-3344.com:3344/config-dev.yml
- 客户端
- http://localhost:3355/configlnfo
- http://localhost:3366/configInfo
- 获取配置信息,发现都已经刷新了
—次修改,广播通知,处处生效
Bus动态刷新定点通知


案例

执行命令:
注意: config-client:3355 是服务名称加端口号

总结


 1442
1442


 被折叠的 条评论
为什么被折叠?
被折叠的 条评论
为什么被折叠?
 到【灌水乐园】发言


