


1-1 Mixin 混入的基础语法
Mixin:混入,这个混入是怎么个“混”法呢?看下面的代码就能明白:
<script>
  const mix = {
    data () {
      return {
        number: 3
      }
    },
    created () {
      console.log('mixin created')
    },
    methods: {
      handleBtnClick() {
        console.log('mixin handleBtnClick')
      }
    }
  }

  const app = Vue.createApp({
    data() {
      return {
        number: 1,
      }
    },
    mixins: [mix],
    created () {
      console.log('created')
    },
    methods: {
      handleBtnClick() {
        console.log('handleBtnClick')
      }
    },
    template: `
      <div>{{number}}</div>
      <button @click="handleBtnClick">切换</button>
    `
  })
  const vm = app.mount('#root');
</script>
看上面的代码,运行一下

用法:用mixins注册要混入的内容
注意:
- 组件 data, methods 优先级高于 mixin data, methods优先级
- 生命周期函数,先执行 mixin 里面的,再执行组件里面的
上面这种属于是局部的mixin,看个例子
<script>
  const mix = {
    data () {
      return {
        count: 3
      }
    },
  }
  const app = Vue.createApp({
    data() {
      return {
        number: 1,
      }
    },
    mixins: [mix],
    template: `
      <div>{{number}}</div>
      <div>{{count}}</div>
      <child />
    `
  })

  app.component('child', {
    template: `
      <div>{{count}}</div>
    `
  })
  const vm = app.mount('#root');
</script>
在子组件child里面,不能直接使用mixin里的count,需要在子组件里也注册一下mixins:[mix]才能使用,这就是局部mixin
接下来看看全局mixin:
<script>

  const app = Vue.createApp({
    data() {
      return {
        number: 1,
      }
    },
    template: `
      <div>{{number}}</div>
      <div>{{count}}</div>
      <child />
    `
  })

  app.mixin({
    data () {
      return {
        count: 4
      }
    }
  })

  app.component('child', {
    template: `
      <div>{{count}}</div>
    `
  })
  const vm = app.mount('#root');
</script>
全局mixin:每个组件创建的时候就会自动注入这个全局mixin,但是不推荐使用,维护性不高。
补充一个知识点:自定义属性,先看代码
<script>
  const myMixin = ({
    number: 10
  })

  const app = Vue.createApp({
    mixins: [myMixin],
    number: 20,
    template: `
      <div>{{this.$options.number}}</div>
    `
  })
  const vm = app.mount('#root');
</script>
这个number既不属于data,也不属于methods等,它就是自定义属性,我们要用自定义属性时,需要this.$options.number,这样使用,$options是什么呢,这个vue组件上,所有内容做处理后都会挂载到这个$options上面,所以就可以通过它调用自定义属性
运行结果是:
所以也可以得出一个结论:自定义的属性,组件中的属性优先级高于 mixin 属性的优先级。
关于这种自定义属性,vue 还提供了一种可以修改优先级的方式
app.config.optionMergeStrategies.number = (mixinVal, appValue) => {
  return mixinVal || appValue
}
这样mixin的优先级就更高了,页面就会显示10
vue3推出后,建议用compositionAPI代替mixin,因为mixin的维护性真的不高
1-2 开发实现 Vue 中的自定义指令
先看一个情况:
<script>
  const app = Vue.createApp({
    mounted () {
      this.$refs.input.focus()
    },
    template: `
      <input ref="input" />
    `
  })
  const vm = app.mount('#root');
</script>
打开页面,input框自动聚焦,这样写复用性不是很强,假如我们再写很多个input框,那么每一个框都要写一次this.$refs.input.focus(),很麻烦,所以可以用自定义指令
<script>
  const app = Vue.createApp({
    template: `
      <input v-focus />
    `
  })

  app.directive('focus', {
    mounted (el) {
      el.focus()
    }
  })
  const vm = app.mount('#root');
</script>
这个directive里面还可以写其他的生命周期函数的钩子,自己试试就行了,上面这个是全局自定义指令,局部的这样写:
<script>
  const directive = {
    focus: {
      mounted(el) {
        el.focus()
      }
    }
  }
  const app = Vue.createApp({
    directives: directive,
    template: `
      <input v-focus />
    `
  })
  const vm = app.mount('#root');
</script>
生命周期函数也是先执行自定义指令里面的,执行beforemount,mounted,beforeUnmount,Unmounted
自定义指令传值
先看一个代码:
<script>
  const directive = {
    pos: {
      mounted (el) {
        el.style.top = '200px'
      }
    }
  }
  const app = Vue.createApp({
    directives: directive,
    template: `
    <div>
      <input v-pos class="header" />
    </div>
    `
  })
  const vm = app.mount('#root');
</script>
这样写,如果我们要修改input的top值,只能在pos里面修改,这样写是不太好的,我想达到的效果是,v-pos传一个值,top就等于这个值,就可以做下面的优化:
<script>
  const directive = {
    pos: {
      mounted (el, binding) {
        el.style.top = (binding.value + 'px')
      }
    }
  }
  const app = Vue.createApp({
    directives: directive,
    data () {
      return {
        top: 200
      }
    },
    template: `
    <div>
      <input v-pos="top" class="header" />
    </div>
    `
  })
  const vm = app.mount('#root');
</script>
这样子写就很完美啦^ ^
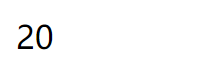
但是发现一个问题,我在控制台修改top的值的时候:

但是input框的位置并没有发生变化,为什么呢?
仔细看上面的代码就会发现,我们是把逻辑写在mounted里面的,我们只需要在updated生命周期函数
里再写一次逻辑就好了
pos: {
  mounted (el, binding) {
    el.style.top = (binding.value + 'px')
  },
  updated (el, binding) {
    el.style.top = (binding.value + 'px')
  }
}
这样就ok了
像上面这样写其实看起来还挺多的,那还有个更简洁的ヾ(●´∀`●)
pos: (el, binding) => {
  el.style.top = (binding.value + 'px')
}
是不是so easy!
其实像上面这样写还不够完美,我们知道有些事件,例如v-on:click这种书写格式,那是不是还可以v-pos:abc这样写呢?试一下:
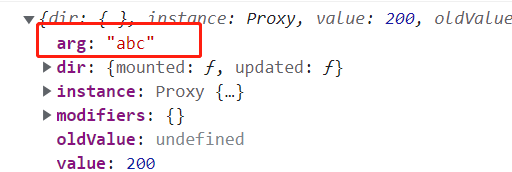
会发现这个abc在arg里面,那么我就可以这样写:
<script>
  const directive = {
    pos: (el, binding) => {
      el.style[binding.arg] = (binding.value + 'px')
    }
  }
  const app = Vue.createApp({
    directives: directive,
    data () {
      return {
        distance: 200
      }
    },
    template: `
    <div>
      <input v-pos:left="distance" class="header" />
    </div>
    `
  })
  const vm = app.mount('#root');
</script>
这样就比较完美啦(๑╹◡╹)ノ"""
1-3 Teleport 传送门功能(vue3 新特性)
先看一段代码:
  <style>
    .area {
      position: absolute;
      left: 50%;
      top: 50%;
      transform: translate(-50%, -50%);
      width: 200px;
      height: 300px;
      background: #000;
    }
  </style>
</head>

<body>
  <div id="root"></div>
</body>
<script>
  const app = Vue.createApp({
    template: `
    <div class="area">
    </div>
    `
  })
  const vm = app.mount('#root');
</script>
需要注意到的是style里面的translate不能写成
transform: translateX(-50%)
transform: translateY(-50%)
这样写的话,下面的那一个会吧上面的覆盖掉
回顾一下transform 属性向元素应用 2D 或 3D 转换。该属性允许我们对元素进行旋转、缩放、移动、倾斜。
translateX和translateY就是在 x 和 y 轴上移动
接着这一节的主题,我想实现的效果是点击按钮,整个屏幕出现蒙层,先看下面的代码:
  <style>
    .area {
      position: absolute;
      left: 50%;
      top: 50%;
      transform: translate(-50%, -50%);
      width: 200px;
      height: 300px;
      background: pink;
    }
    .mask {
      position: absolute;
      left: 0;
      right: 0;
      top: 0;
      bottom: 0;
      background: #000;
      opacity: 0.5;
    }
  </style>
</head>

<body>
  <div id="root"></div>
</body>
<script>
  const app = Vue.createApp({
    data () {
      return {
        show: false
      }
    },
    methods: {
      handleBtnClick() {
        this.show = !this.show
      }
    },
    template: `
    <div class="area">
      <button @click="handleBtnClick">按钮</button>
      <div class="mask" v-show="show"></div>
    </div>
    `
  })
  const vm = app.mount('#root');
</script>
这样写运行出来的效果是:

只在area这个区块有蒙层,那么要实现全屏有蒙层,就需要用到teleport这个新特性了
<teleport to="body">
  <div class="mask" v-show="show"></div>
</teleport>
这样子就ok了

1-4 插件的定义和使用
plugin插件:把通用性的功能封装起来
写一个插件就是写一个对象
const myPlugin = {
  install(app, options) {
    console.log(app, options)
  }
}
install()方法,插件执行的时候会走的一个逻辑,它接收两个参数,可以打印一下

第一个参数就是app实例,第二个是使用插件的时候可以传参数
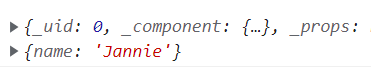
app.use(myPlugin, {name: 'Jannie'})
插件可以做些什么呢?既然我们能够得到app实例,那么我们可以在app上做很多的扩展
举一些例子:
-
provideconst myPlugin = { install(app, options) { app.provide('name', 'Jannie') } } app.component('my-title', { inject:['name'], template: `<div>{{name}}</div>` }) -
directive<script> const myPlugin = { install(app, options) { app.directive('focus', { mounted (el) { el.focus() } }) } } const app = Vue.createApp({ template: ` <my-title /> ` }) app.component('my-title', { template: `<div><input v-focus /></div>` }) app.use(myPlugin) const vm = app.mount('#root'); </script>打开浏览器,
input框已经是聚焦状态了 -
mixinconst myPlugin = { install(app, options) { app.mixin({ mounted () { console.log('mixin') } }) } }运行后会发现
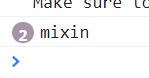
mixin打印了两遍,这是为什么呢?app.mixin...也就是app下每个组件挂载的时候都会打印一遍mixin,看上面的代码,app还挂载了一个子组件my-title,所以会打印两次 -
还可以调用更加底层的代码
globalPropertiesapp.config.globalProperties.$sayHello = 'hello world',在vue底层扩展了$sayHello这个全局属性子组件的
mounted里打印一下console.log(this.$sayHello)这个
$就表示扩展底层私有属性
1-5 数据校验插件开发实例
先上一个初始代码:
<script>
  const app = Vue.createApp({
    data () {
      return {
        name: 'Jannie',
        age: 21
      }
    },
    rules: {
      age :{
        validate: age => age > 25,
        message: 'too young,too simple'
      },
      name: {
        validate: name => name.length >= 4,
        message: 'name is too short'
      }
    },
    template: `
    <div>name: {{name}}, age: {{age}}</div>
    `
  })

  app.mixin({
    created () {
      for(let key in this.$options.rules) {
        const item = this.$options.rules[key]
        this.$watch(key, (value) => {
          const result = item.validate(value);
          if(!result) console.log(item.message)
        })
      }
    }
  })

  const vm = app.mount('#root');
</script>
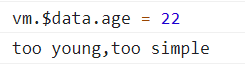
重点是看mixin里面,一开始我没注意到$watch,我还在疑问,为什么rules里面的age就是data里面的age?。?(简直是大错特错了!!)
传入的key,先打印一下
console.log(key, typeof key)
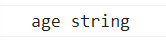
这时候我才悟过来,这个$watch监听传入key,此age非data里的age,$watch监听的是data里的age,这里的age其实就是变量名!但不是age这个变量(有点绕,但其实也很好理解)
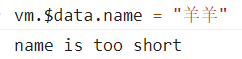
name同理上^ ^
当我们在控制台改变data里age的值:
修改name的值:
ok,上面是写在mixin里面的,现在是要把它转移到plugin里面
1-4 里面写plugin是:
const xxx = {
	install (app, options) {
		xxxx
	}
}
这里介绍另一种写法(直接用箭头函数):
const validatorPlugin = (app, options) => {}
然后:
<script>
  const app = Vue.createApp({
    data() {
      return {
        name: 'Jannie',
        age: 21
      }
    },
    rules: {
      age: {
        validate: age => age > 25,
        message: 'too young,too simple'
      },
      name: {
        validate: name => name.length >= 4,
        message: 'name is too short'
      }
    },
    template: `
    <div>name: {{name}}, age: {{age}}</div>
    `
  })

  const validatorPlugin = (app, options) => {
    app.mixin({
      created() {
        for (let key in this.$options.rules) {
          const item = this.$options.rules[key]
          console.log(key, typeof key)
          this.$watch(key, (value) => {
            const result = item.validate(value);
            if (!result) console.log(item.message)
          })
        }
      }
    })
  }

  app.use(validatorPlugin)
  const vm = app.mount('#root');
</script>
plugin方便的地方是,它里面可以扩展很多方法,不会像比如单独写一个mixin,里面就只有mixin里的内容了。
上面的代码很简单,自己理解^ ^


 被折叠的 条评论
为什么被折叠?
被折叠的 条评论
为什么被折叠?
 到【灌水乐园】发言


