


本文目录
1、数组
1.1、声明方式
// 声明
var arr1 [3]int
// 声明并初始化
arr2 := [3]int{1,2,3}
// 声明并初始化,编译时长度自动推断
arr3 := [...]int{1,2,3,4}

// arr1: [3]int, arr2: [3]int, arr3: [4]int
fmt.Printf("arr1: %T, arr2: %T, arr3: %T\n", arr1, arr2, arr3)
1.2、数组赋值于复制
func main() {
	a := [3]int{1, 2, 3}
	fmt.Printf("a array address is : %p\n", &a)
	// 作为参数传递
	testArrayCopy(a)
	// 赋值
	c := a
	fmt.Printf("c array address is : %p\n", &c)
}

func testArrayCopy(b [3]int) {
	fmt.Printf("b array address is : %p\n", &b)
}

// 输出结果:
// a array address is : 0xc00000c150
// b array address is : 0xc00000c180
// c array address is : 0xc00000c198
1.3、编译时结构
// Array contains Type fields specific to array types.
type Array struct {
	Elem  *Type // element type
	Bound int64 // number of elements; <0 if unknown yet
}
不难看出,编译阶段记录了保存的元素以及元素的数量
1.4、编译时内存优化
值得注意的是:在编译阶段,会将长度小于4的数组放在栈中,大于4的则会放在静态只读区中,下面通过一个例子来验证一下
示例代码:
func testArrayAddress() {
	arr1 := [3]int{1, 2, 3}
	arr2 := [3]int{1, 2, 3}
	arr3 := [3]int{1, 2, 3}
	arr4 := [3]int{1, 2, 3}
	fmt.Printf("arr1: %p, arr2: %p, arr3: %p, arr4: %p\n", &arr1, &arr2, &arr3, &arr4)
}
// 第一次执行,输出
// arr1: 0xc00000c150, arr2: 0xc00000c168, arr3: 0xc00000c180, arr4: 0xc00000c198

// 修改代码后再执行一次
func testArrayAddress() {
	arr1 := [3]int{1, 2, 3}
	arr2 := [3]int{1, 2, 3}
	arr3 := [5]int{1, 2, 3}
	arr4 := [3]int{1, 2, 3}
	fmt.Printf("arr1: %p, arr2: %p, arr3: %p, arr4: %p\n", &arr1, &arr2, &arr3, &arr4)
}
// 第二次执行,输出
// arr1: 0xc00000c150, arr2: 0xc00000c168, arr3: 0xc00000a390, arr4: 0xc00000c180
对比两次输出的结果不难看出,arr3的长度从3变成5之后,其内存地址就不再和arr1、arr2、arr4紧挨着了,也就是没有被分配在栈中了
2、切片
相比较数组,切片的长度是可变的,因此也不需要指定长度
2.1、切片声明
func main() {
	var s1 []int                // 长度和容量默认都是0
	var s2 = []int{1, 2, 3}     // 长度和容量都为元素个数
	var s3 = make([]int, 5)     // 长度和容量都为5
	var s4 = make([]int, 5, 10) // 长度为5,容量为10
	// s1: []int, s2: []int
	fmt.Printf("【切片类型】 s1: %T, s2: %T, s3: %T, s4: %T\n", s1, s2, s3, s4)
	fmt.Printf("【元素数量】 s1: %d, s2: %d, s3: %d, s4: %d\n", len(s1), len(s2), len(s3), len(s4))
	fmt.Printf("【切片容量】 s1: %d, s2: %d, s3: %d, s4: %d\n", cap(s1), cap(s2), cap(s3), cap(s4))
}

// 输出
// 【切片类型】 s1: []int, s2: []int, s3: []int, s4: []int
// 【元素数量】 s1: 0, s2: 3, s3: 5, s4: 5
// 【切片容量】 s1: 0, s2: 3, s3: 5, s4: 10
2.2、切片的数据结构
// SliceHeader is the runtime representation of a slice.
// It cannot be used safely or portably and its representation may
// change in a later release.
// Moreover, the Data field is not sufficient to guarantee the data
// it references will not be garbage collected, so programs must keep
// a separate, correctly typed pointer to the underlying data.
type SliceHeader struct {
	Data uintptr
	Len  int
	Cap  int
}
SliceHeader是切片在运行时的表示,内部有指向真正的数据结构的指针、当前长度和切片容量
2.3、切片截取
下面是切片截取的简单代码示例:
func testCutOut() {
	nums1 := []int{1, 2, 3, 4, 5, 6, 7}
	nums2 := nums1[2:4] // 截取区间 [2,4)
	fmt.Printf("nums2: %v\n", nums2)
}
下面是图解和示例:
func testCutOut() {
	nums1 := []int{1, 2, 3, 4, 5, 6, 7}
	nums2 := nums1[2:4] // 截取区间 [2,4)
	fmt.Printf("nums2: %v\n", nums2)
	// 修改nums2
	nums2[0] = 0
	nums2[1] = 0
	// 输出 nums1: [1 2 0 0 5 6 7]
	fmt.Printf("nums1: %v\n", nums1)
}
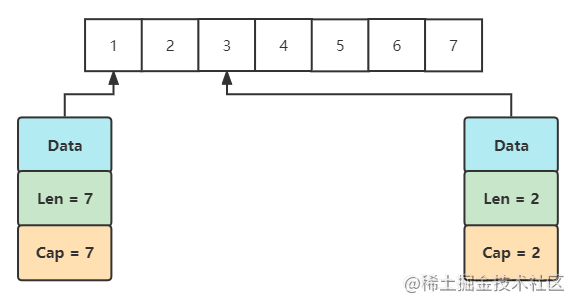
在上面的例子中nums2截取自nums1,修改了nums2后,nums1也发生了变化,说明他们所指向的是同一份数据,再结合前面说到过的切片的数据结构,如下图所示:
2.4、切片赋值于复制
func testSliceCopy() {
	nums1 := []int{1, 2, 3, 4, 5, 6, 7}
	nums2 := nums1
	nums2[0] = 100
	// 输出 nums1: [100 2 3 4 5 6 7]
	fmt.Printf("nums1: %v\n", nums1)
}
切片的赋值于切片的截取一样,本质上都是值赋值,这里说的值复制指的是对SliceHeader 结构体的值复制,就作用而言,又与引用传递没什么区别,指向的是同一份数据
2.5、切片的扩容公原理
切片扩容的源码在runtime/slice.go中的,核心代码如下所示:
func growslice(et *_type, old slice, cap int) slice {

	newcap := old.cap
	doublecap := newcap + newcap
	if cap > doublecap {
		newcap = cap
	} else {
		if old.cap < 1024 {
			newcap = doublecap
		} else {
			// Check 0 < newcap to detect overflow
			// and prevent an infinite loop.
			for 0 < newcap && newcap < cap {
				newcap += newcap / 4
			}
			// Set newcap to the requested cap when
			// the newcap calculation overflowed.
			if newcap <= 0 {
				newcap = cap
			}
		}
	}

}
解释一下上面源码的逻辑:
这里为了方便解释,以oldcap代表旧长度,以newcap代表新长度
- 首先如果
newcap > oldcap * 2,则最终的长度为newcap - 如果
newcap < 1024 && newcap < oldcap * 2,则新的长度为oldcap * 2 - 如果
newcap > 1024,则新长度为oldcap + oldcap / 4
通俗的说,如果新的容量大于原来的2倍,则不作特殊处理,否则根据新容量是否大于1024来选择进行2倍扩容,否则不断扩容1/4直至满足为止。
2.6、make初始化
在runtime/slice.go文件中还有两个方法,分别是makeslice和makeslice64,当我们使用make对切片进行初始化的时候,便会调用这两个方法中的其中一个。这两个的区别分别是什么呢?以及调用的时机是怎样的?下面我们仔细分析:
makeslice源码:
func makeslice(et *_type, len, cap int) unsafe.Pointer {
	mem, overflow := math.MulUintptr(et.size, uintptr(cap))
	if overflow || mem > maxAlloc || len < 0 || len > cap {
		mem, overflow := math.MulUintptr(et.size, uintptr(len))
		if overflow || mem > maxAlloc || len < 0 {
			panicmakeslicelen()
		}
		panicmakeslicecap()
	}

	return mallocgc(mem, et, true)
}
makeslice64源码:
func makeslice64(et *_type, len64, cap64 int64) unsafe.Pointer {
	len := int(len64)
	if int64(len) != len64 {
		panicmakeslicelen()
	}

	cap := int(cap64)
	if int64(cap) != cap64 {
		panicmakeslicecap()
	}

  // 最终还会调用makeslice
	return makeslice(et, len, cap)
}
通过比对会发现,makeslice方法会去判断mem > maxAlloc,这里是mem指的是切片的大小,而maxAlloc,我们按住Ctrl+鼠标左键找到它,会看到下面的源码,简单翻译一下,可以知道,这是理论上能分配的最大空间,在64位系统上,理论上可以分配1<<32bit的内存,也就是4GB。
// maxAlloc is the maximum size of an allocation. On 64-bit,
// it's theoretically possible to allocate 1<<heapAddrBits bytes. On
// 32-bit, however, this is one less than 1<<32 because the
// number of bytes in the address space doesn't actually fit
// in a uintptr.
maxAlloc = (1 << heapAddrBits) - (1-_64bit)*1
在cmd/compile/internal/walk/builtin.go文件中的walkMakeSlice方法中有下面这样一段注释:
// n escapes; set up a call to makeslice.
// When len and cap can fit into int, use makeslice instead of
// makeslice64, which is faster and shorter on 32 bit platforms.
2.7、切片的内存逃逸
在cmd/compile/internal/ir/cfg.go中存在一个变量MaxImplicitStackVarSize ,这是切片分配在栈中的最大大小,默认是64KB,换句话说,如果通过make进行初始化时候切片大小大于64KB则会发送内存逃逸,最终这个切片会被分配到堆中
// maximum size of implicit variables that we will allocate on the stack.
//   s := make([]T, n)    allocating [n]T on the stack
// Note: the flag smallframes can update this value.
MaxImplicitStackVarSize = int64(64 * 1024)


 6146
6146


 被折叠的 条评论
为什么被折叠?
被折叠的 条评论
为什么被折叠?
 到【灌水乐园】发言


