


一、ThreadLocal 数据结构
在日常的开发中,我们使用 ThreadLocal 的方式如下:
public class ThreadLocalTest {
	// ThreadLocal variable to store each thread's ID
	private static final ThreadLocal<Integer> threadId = ThreadLocal.withInitial(() -> (int) (Math.random() * 1000));

	public static void main(String[] args) {
		// Create multiple threads
		Thread thread1 = new Thread(new Task(), "Thread-1");
		Thread thread2 = new Thread(new Task(), "Thread-2");
		Thread thread3 = new Thread(new Task(), "Thread-3");

		// Start the threads
		thread1.start();
		thread2.start();
		thread3.start();
	}

	// Task to be executed by each thread
	static class Task implements Runnable {
		@Override
		public void run() {
			// Get the thread's unique ID
			Integer id = threadId.get();
			System.out.println(Thread.currentThread().getName() + " has ID: " + id);

			// Do some work
			for (int i = 0; i < 5; i++) {
				System.out.println(Thread.currentThread().getName() + " working with ID: " + id);
				try {
					Thread.sleep(100);
				} catch (InterruptedException e) {
					e.printStackTrace();
				}
			}

			// Remove the thread-local variable
			threadId.remove();
		}
	}
}
输出结果:
Thread-1 has ID: 911
Thread-1 working with ID: 911
Thread-3 has ID: 52
Thread-3 working with ID: 52
Thread-2 has ID: 687
Thread-2 working with ID: 687
Thread-3 working with ID: 52
Thread-1 working with ID: 911
Thread-2 working with ID: 687
Thread-3 working with ID: 52
Thread-1 working with ID: 911
Thread-2 working with ID: 687
Thread-2 working with ID: 687
Thread-1 working with ID: 911
Thread-3 working with ID: 52
Thread-2 working with ID: 687
Thread-3 working with ID: 52
Thread-1 working with ID: 911

Process finished with exit code 0
这一段代码含义:
- 定义了一个 ThreadLocal 变量为 threadId,对应的初始值为 0 到 1000 之间的随机数;
- 创建线程并启动,每个线程执行 Task 任务
- 在每个线程中使用 ThreadLocal 变量,每个线程从 ThreadLocal 的获取其唯一 ID 并打印出来;
- 模拟工作,例如操作数据库等;
- 移除 ThreadLocal 变量。
它们各个线程之间的数据不会出现错乱,那其底层是怎么实现的呢?其数据结构如下: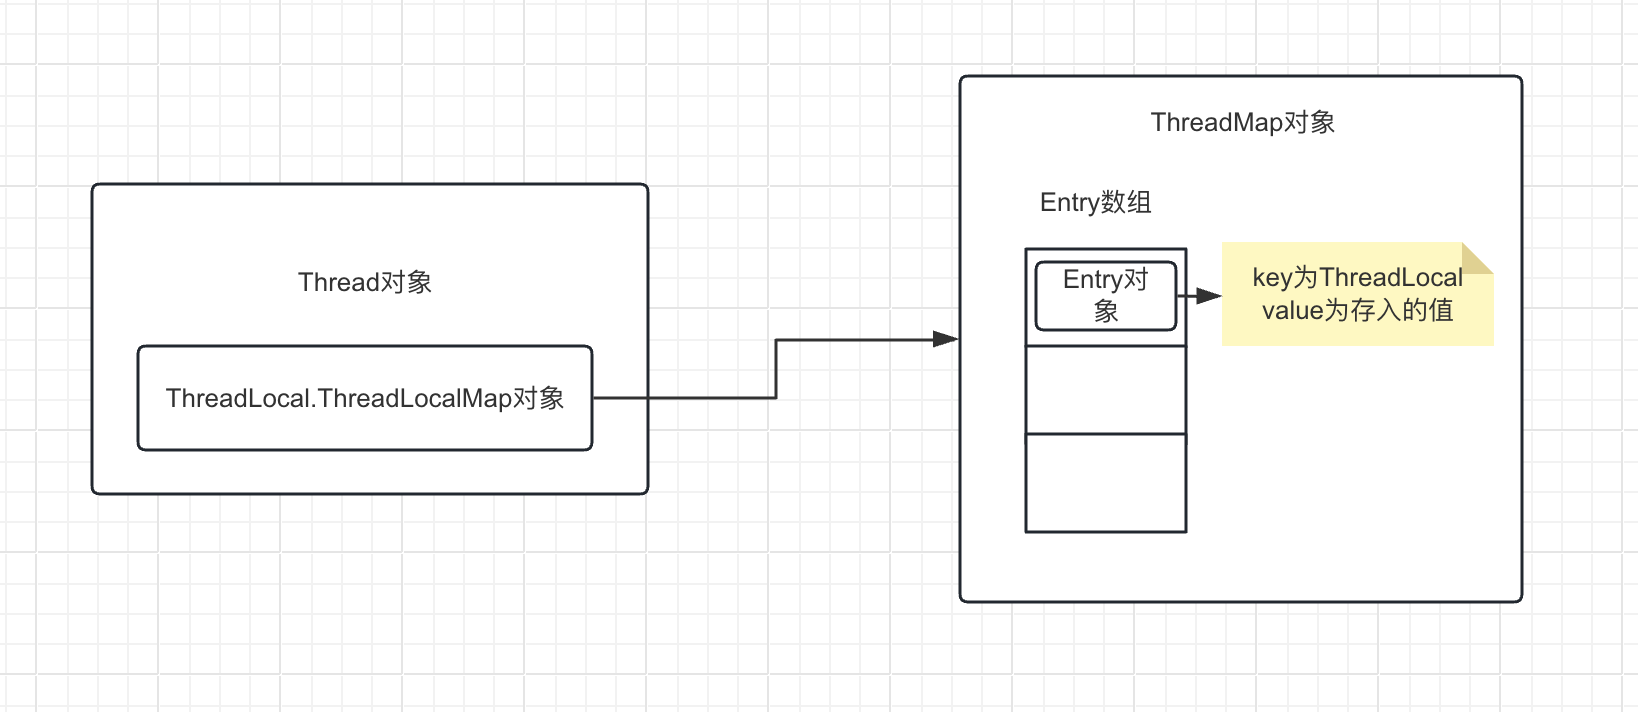
每一个 Thread 对象都有一个名为 threadLocals 的成员变量,对应的类型为 ThreadLocal.ThreadLocalMap。在 ThreadLocal.ThreadLocalMap 对象的内部有一个 Entry 数组,其中存储的 Entry 对象的 key 为 ThreadLocal,value 就是我们绑定到线程上的值。ThreadLocal 之所以可以做到线程间数据隔离,那是基于它每个线程内部都拥有一个独立的 ThreadLocalMap 对象,每个线程对自己的 ThreadLocalMap 对象进行操作不会影响到其他线程的数据。
二、源码学习
withInitial 设置初始值
/**
 * Creates a thread local variable. The initial value of the variable is
 * determined by invoking the {@code get} method on the {@code Supplier}.
 *
 * <p>创建线程局部变量。变量的初始值是通过调用Supplier上的get方法来确定的</p>
 *
 * @param <S> the type of the thread local's value 线程本地值的类型
 * @param supplier the supplier to be used to determine the initial value
 *                 <br>用于确认初始值的供应商
 * @return a new thread local variable 一个新的线程局部变量
 * @throws NullPointerException if the specified supplier is null
 * @since 1.8
 */
public static <S> ThreadLocal<S> withInitial(Supplier<? extends S> supplier) {
    return new SuppliedThreadLocal<>(supplier);
}
在上面的示例代码中就使用了 withInitial 进行设置 ThreadLocal 返回的初始值为 0 到 1000 之间的随机数。需要注意的是:如果该线程没有调用 set() 方法,那么第一次调用 get() 方法返回的就是这个设置的初始值,后续如果调用了 remove() 方法之后,再次调用 get() 方法也会返回这里设置的默认值(当然如果你设置的是随机数,那么返回的肯定不是同一个值)。
这里还有一个细节点就是使用了 Supplier,它有什么好处?先看看类的定义:
/**
 * Represents a supplier of results.
 * 代表结果供应商。

 *
 * <p>There is no requirement that a new or distinct result be returned each
 * time the supplier is invoked.
 * 不要求每次调用时都返回新的或独特的结果。这是一个功能接口,其功能方法是 get()。
 *
 * <p>This is a <a href="package-summary.html">functional interface</a>
 * whose functional method is {@link #get()}.
 *
 * @param <T> the type of results supplied by this supplier
 * 该供应商提供的结果类型代表结果供应商。
 *
 * @since 1.8
 */
@FunctionalInterface
public interface Supplier<T> {

    /**
     * Gets a result.
     *
     * @return a result
     */
    T get();
}
这里能看到它只有一个 get() 方法用于获取结果。
set(T Value) 向 ThreadLocal 设置值
源码:
/**
 * Sets the current thread's copy of this thread-local variable
 * to the specified value.  Most subclasses will have no need to
 * override this method, relying solely on the {@link #initialValue}
 * method to set the values of thread-locals.
 *
 * <p>将此线程本地变量的当前线程副本设置为指定值。大多数子类无需重载此方法,只需依赖 initialValue 方法来设置线程本地变量的值。
 *
 * @param value the value to be stored in the current thread's copy of
 *        this thread-local.
 * <p>当前线程的线程本地变量副本中要存储的值
 */
public void set(T value) {
    // 获取当前线程
    Thread t = Thread.currentThread();
    // 获取当前线程的ThreadLocal.ThreadLocalMap对象
    ThreadLocalMap map = getMap(t);
    // 如果ThreadLocalMap不为空,把key为自身ThreadLocal对象,value为要存放的值
    if (map != null) {
        map.set(this, value);
    } else {
        // 创建ThreadLocalMap,key为自身ThreadLocal对象,value为要存放的值
        createMap(t, value);
    }
}

ThreadLocalMap getMap(Thread t) {
    return t.threadLocals;
}

void createMap(Thread t, T firstValue) {
    t.threadLocals = new ThreadLocalMap(this, firstValue);
}
这里的逻辑就比较简单了,先获取到当前线程,然后调用 getMap() 方法,内部就是返回当前线程的 threadLocals 对象也就是 ThreadLocal.ThreadLocalMap,如果获取到的 threadLocals 不为空,则把 key 为自身 ThreadLocal 对象,value 为要存放的值;如果获取到的 threadLocals 为空,则调用 createMap() 方法进行创建 ThreadLocalMap 对象并把 key 为自身 ThreadLocal 对象,value 为要存放的值。
ThreadLocalMap#Entry
在上面的 set() 方法可以看到数据要么是调用 map.set() 或者 createMap() --> new ThreadLocalMap(this, firstValue) 方法,但是无论调用那种方式,最终数据都是保存到 Entry 数组里。那就来看看 Entry 的定义:
static class Entry extends WeakReference<ThreadLocal<?>> {
    /** The value associated with this ThreadLocal. */
    Object value;

    Entry(ThreadLocal<?> k, Object v) {
        super(k);
        value = v;
    }
}
这里看到 Entry 继承了 WeakReference 对象,这里有必须要提一下 Java 的四种引用,毕竟与 GC 有关,GC 会根据可达性分析算法,沿着 GC Roots 一直找到对象没有被其他对象引用,那代表该对象可以被 GC,但是这里的引用又分为四种:
- 强引用:普通的变量引用
public static User user = new User();
- 软引用:将对象用 SoftReference 软引用类型的对象包裹,正常情况不会被回收,但是 GC 做完后发现释放不出空间存放新的对象,则会把这些软引用的对象回收掉。软引用可用来实现内存敏感的高速缓存。
public static SoftReference<User> user = new SoftReference<User>(new User());
软引用在实际中有重要的应用,例如浏览器的后退按钮🔘。按后退时,这个后退时显示的网页内容是重新进行请求还是从缓存中取出呢?这就要看具体的实现策略了。
- 如果一个网页在浏览结束时就进行内容的回收,则按后退查看前面浏览过的页面时,需要重新构建。
- 如果将浏览过的网页存储到内存中会造成内存的大量浪费,甚至会造成内存溢出。
- 弱引用:将对象用 WeakReference 软引用类型的对象包裹,弱引用跟没引用查不到,GC 会直接回收掉,很少用。
public static WeakReference<User> user = new WeakReference<User>(new User());
- 虚引用:虚引用也称为幽灵引用或者幻影引用,它是最弱的一种引用关系,几乎不用。
那为什么这里 Entry 保存 ThreadLocal 类型的 key 需要使用弱引用?其实也是为了防止 OOM,如果 ThreadLocal 作为 Key 不使用弱引用,那么当前线程并没有结束,可以通过当前线程关联到其 threadLocals 属性对应的 ThreadLocalMap,再关联到 Entry 中的 ThreadLocal 对象,这时候 ThreadLocal 就无法被回收。
我们可以启动一个线程执行死循环,然后在里面无限创建 ThreadLocal 并设置值,看看这一段代码会不会出现 OOM。
public static void test() {
    new Thread(() -> {
        while (true) {
            ThreadLocal<String> threadLocal = new ThreadLocal<>();
            threadLocal.set("1");
        }
    }).start();
}
最终发现这一段代码并不会出现 OOM,这是因为 ThreadLocal 是弱引用指向,在发生 GC 的时候就会被回收。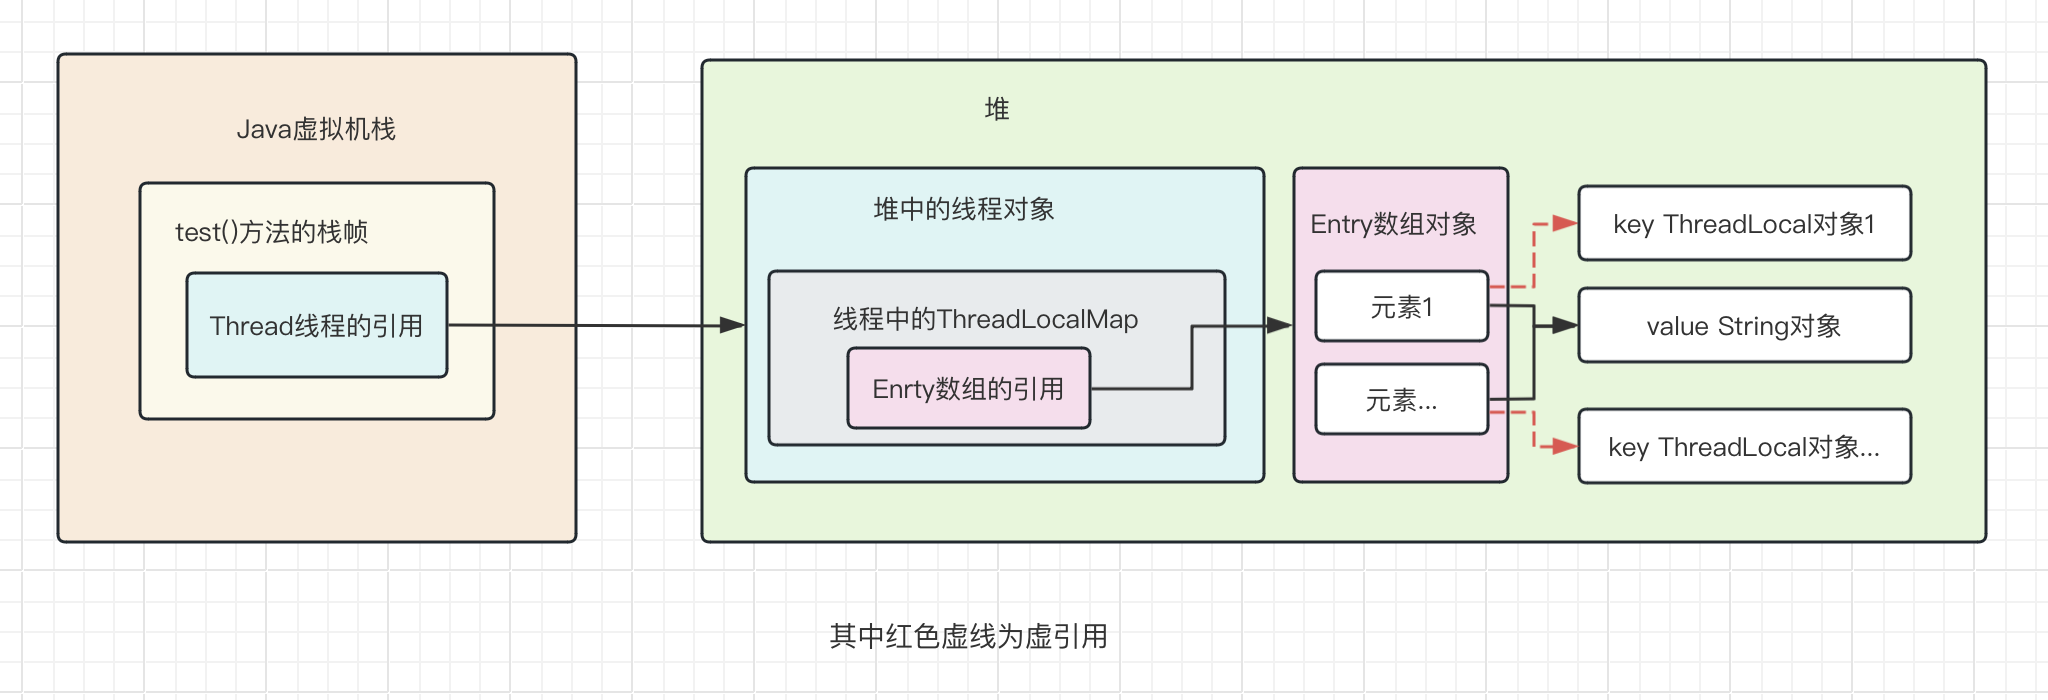
细心的小伙伴会发现这里其实还有一个问题,虽然 ThreadLocal 被回收了,但是 Entry 数组一直在塞入 Entry,回收之后就相当于 Enrty 的 key 为 null,value 还是有值的,那么为什么不会出现 OOM 呢?原因就是万 ThreadLocalMap 塞入元素的时候,会删除过时的元素(也就是 Entry 中的 key 弱引用持有的 ThreadLocal 为 null 的元素)。
ThreadLocalMap 构造方法
ThreadLocalMap(ThreadLocal<?> firstKey, Object firstValue) {
    // 初始化容量为16
    table = new Entry[INITIAL_CAPACITY];
    // hash散列获取下标
    int i = firstKey.threadLocalHashCode & (INITIAL_CAPACITY - 1);
    // 存入Entry数组中
    table[i] = new Entry(firstKey, firstValue);
    size = 1;
    // 设置下一次扩容阈值 threshold = INITIAL_CAPACITY * 2 / 3;
    setThreshold(INITIAL_CAPACITY);
}
这里就只需要留意两个点即可:
- 初始化 Entry 数组容量为 16;
- 设置的扩容阈值为 Entry 数组长度的 2/3。
ThreadLocalMap#set(ThreadLocal<?> key, Obejct value)
private void set(ThreadLocal<?> key, Object value) {

    // We don't use a fast path as with get() because it is at
    // least as common to use set() to create new entries as
    // it is to replace existing ones, in which case, a fast
    // path would fail more often than not.

    Entry[] tab = table;
    int len = tab.length;
    int i = key.threadLocalHashCode & (len-1);

    for (Entry e = tab[i];
         e != null;
         // 寻址:+1往后寻找,环状的遍历数组
         e = tab[i = nextIndex(i, len)]) {
        ThreadLocal<?> k = e.get();

        // 相同的key直接覆盖
        if (k == key) {
            e.value = value;
            return;
        }

        if (k == null) {
            replaceStaleEntry(key, value, i);
            return;
        }
    }

    tab[i] = new Entry(key, value);
    int sz = ++size;
    if (!cleanSomeSlots(i, sz) && sz >= threshold)
        rehash();
}
从上面来看 ThreadLocalMap#set 方法可以分为两步:
- 从开放寻址的方式找到合适的位置进行存储数据;
- 向数组中放入新的 Entry,有需要的话会进行扩容。
开放寻址的方式找到合适的位置进行存储数据
这一步的代码是在这个 for 循环里面:
Entry[] tab = table;
int len = tab.length;
int i = key.threadLocalHashCode & (len-1);

for (Entry e = tab[i];
     e != null;
     // 寻址:+1往后寻找,环状的遍历数组
     e = tab[i = nextIndex(i, len)]) {
    ThreadLocal<?> k = e.get();

    // 相同的key直接覆盖
    if (k == key) {
        e.value = value;
        return;
    }

    if (k == null) {
        replaceStaleEntry(key, value, i);
        return;
    }
}
对应的 nextIndex 代码如下:
private static int nextIndex(int i, int len) {
    return ((i + 1 < len) ? i + 1 : 0);
}
这是啥意思呢?分析如下所示: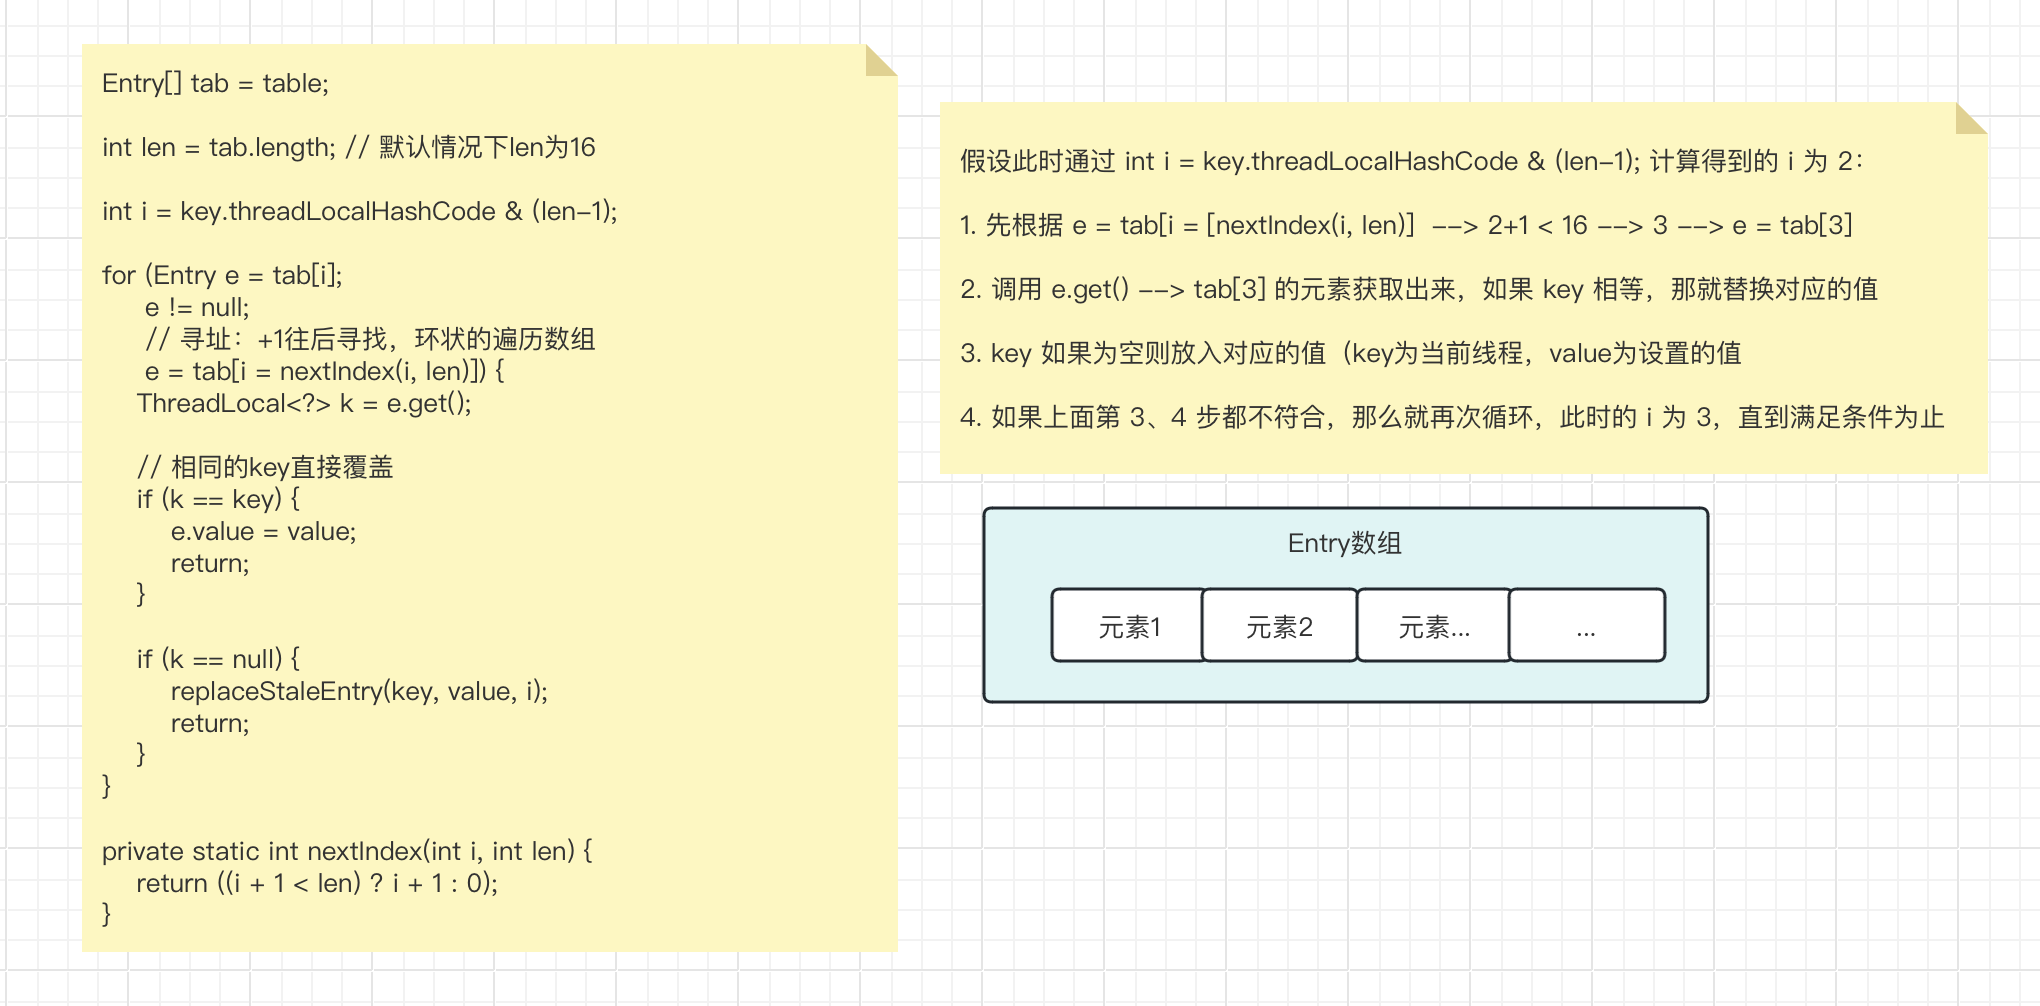
总结:
- ThreadLocalMap#set 方法通过 for 循环遍历,直到在 Entry 数组中找到一个为 null 的位置或者是两个 key 相同进行覆盖原来的值才会跳出 for 循环;
- 第一个 if 意味着相同的 ThreadLocal 会进行覆盖之前的旧值;
- 第二个 if 意味着原来霸占着 Entry 数组这个位置的 ThreadLocal 因为是弱引用类型从而被 GC 垃圾回收了,但是为了避免对应的 value 值没有被回收导致内存泄漏的问题,这里就通过 replaceStaleEntry 进行覆盖。
向数组中放入新的 Entry,有需要的话会进行扩容
在上面 for 循环中进行的条件是 e != null,e 是 Enrty 数组中的元素,那么 for 循环结束的时候,除了成功覆盖了原有的元素的情况,还有就是找到了一个可以使用的位置。此时逻辑如下:
// 插入的新的Enrty
tab[i] = new Entry(key, value);
// 数组大小++
int sz = ++size;
// 调用cleanSomeSlots尝试清理一些未在使用的位置,如果清理失败则调用rehash进行扩容
if (!cleanSomeSlots(i, sz) && sz >= threshold)
    rehash();
我们能看到进行 rehash 需要满足两个条件:
- cleanSomeSlots 方法进行清理一些未在使用的位置失败,也就代表着在 Entry 数组中没有因为 GC 而导致的 ThreadLocal 被清除的情况;
- 数组的大小大于扩容的阈值(在上面我们说过扩容的阈值为 Entry 数组容量的 2/3)
感兴趣的小伙伴可以自己去看看 cleanSomeSlots 的代码,这里就不分析了。下面就来看看 rehash 的代码:
private void rehash() {
    // 删除过时的条目
    expungeStaleEntries();

    // Use lower threshold for doubling to avoid hysteresis
    // 使用较低的加倍阈值以避免滞后
    if (size >= threshold - threshold / 4)
        resize();
}

/**
 * Double the capacity of the table.
 */
private void resize() {
    Entry[] oldTab = table;
    int oldLen = oldTab.length;
    // 扩容为原来的两倍
    int newLen = oldLen * 2;
    Entry[] newTab = new Entry[newLen];
    int count = 0;

    for (int j = 0; j < oldLen; ++j) {
        Entry e = oldTab[j];
        if (e != null) {
            ThreadLocal<?> k = e.get();
            // 如果对应的ThreadLocal被回收了,那么对应的value也进行删除
            if (k == null) {
                e.value = null; // Help the GC
            } else {
                // 开放式寻址找到合适的位置进行存放
                int h = k.threadLocalHashCode & (newLen - 1);
                while (newTab[h] != null)
                    h = nextIndex(h, newLen);
                newTab[h] = e;
                count++;
            }
        }
    }

    // 修改扩容阈值
    setThreshold(newLen);
    // 设置size为有效的个数
    size = count;
    table = newTab;
}
总结:
- 先清除过时的条目;
- 进行扩容为原来的两倍,并把旧的数据从旧的 Entry 数组拷贝到新的 Enrty 数组中:
- 如果 key 为 null(也就是 ThreadLocal 被 GC 回收了),那么把对应的 value 值也设置为 null(从而没有地方引用了对应的 vaule),方便 GC 回收;
- 通过开放式寻址的方式找到合适的位置存放对应的元素。
ThreadLocal#get() 获取当前线程绑定到 ThreadLocal 上的值
public T get() {
    Thread t = Thread.currentThread();
    // 获取当前线程的ThreadLocalMap
    ThreadLocalMap map = getMap(t);
    if (map != null) {
        // 已当前ThreadLocal作为key找到对应存放的值
        ThreadLocalMap.Entry e = map.getEntry(this);
        // 如果不为空,则直接返回
        if (e != null) {
            @SuppressWarnings("unchecked")
            T result = (T)e.value;
            return result;
        }
    }
    // 如果没有找到,或者当前线程的ThreadLocalMap为null,调用setInitialValue返回默认值
    return setInitialValue();
}
这部分代码可以分成两部分:
- 获取 ThreadLocalMap 中的值;
- 如果没有设置 ThreadLocalMap,则调用 setInitialValue 进行返回默认值。
获取 ThreadLocalMap 中的值
我们从上面的代码能看到通过 ThreadLocal 为 key 进行获取 ThreadLocalMap 的值的代码在 getEntry 中:
private Entry getEntry(ThreadLocal<?> key) {
    int i = key.threadLocalHashCode & (table.length - 1);
    Entry e = table[i];
    // 如果获取的e不为空,并且对应的key为当前ThreadLocal,那直接返回对应值
    if (e != null && e.get() == key)
        return e;
    else
        // 如果没有值,或者ThreadLocal和当前的key不相等,那么调用开放性寻址的方式去寻找
        return getEntryAfterMiss(key, i, e);
}

// getEntryAfterMiss
private Entry getEntryAfterMiss(ThreadLocal<?> key, int i, Entry e) {
    Entry[] tab = table;
    int len = tab.length;

    while (e != null) {
        // 获取到对应的ThreadLocal
        ThreadLocal<?> k = e.get();
        // 和当前的ThreadLocal相等则返回
        if (k == key)
            return e;
        // 如果ThreadLocal已经被GC回收,则清理被回收的元素
        if (k == null)
            expungeStaleEntry(i);
        else
            // 开放性寻址,寻址在一个位置
            i = nextIndex(i, len);
        // 重新获取值
        e = tab[i];
    }
    // 如果还是没找到,那就代表之前没有调用set方法存放过值
    return null;
}
总结:
- 先获取到当前 ThreadLocal 在 Entry 数组中存放的位置 i;
- 通过下标获取到对应的 Entry,如果 Entry 不为空并且对应的 key 等于当前 ThreadLocal,则直接返回对应的 Entry;
- 如果没有值或者对应的 Entry 的 key 不等于当前 ThreadLocal,那么调用 getEntryAfterMiss 方法进行开放性寻址的方式进行获取对应的值;
- 判断当前 Entry 的 key 是否等于当前 ThreadLocal,相等则直接返回;
- 如果 ThreadLocal 已经被 GC 回收,则清理被回收的元素;
- 还找不到,则继续通过开放性寻址的方式进行获取下一个下标,从而获取到对应的 Entry 进行走上面的逻辑;
- 最后还是找不到则返回 null,代表之前就没有调用 set 方法进行存储过值。
如果没有设置 ThreadLocalMap
如果没有设置 ThreadLocalMap,则调用 setInitialValue 进行返回默认值。
private T setInitialValue() {
    // 子类可以自定义实现这个类用于设置默认值,默认情况下可以使用SuppliedThreadLocal这个类
    // 也就是直接使用ThreadLocal#withInitial方法进行设置默认值
    T value = initialValue();
    Thread t = Thread.currentThread();
    ThreadLocalMap map = getMap(t);
    if (map != null) {
        map.set(this, value);
    } else {
        createMap(t, value);
    }
    if (this instanceof TerminatingThreadLocal) {
        TerminatingThreadLocal.register((TerminatingThreadLocal<?>) this);
    }
    return value;
}
这里子类可以直接去实现 ThreadLocal 然后重写 initialValue 方法,用于返回默认值。这里有一个默认的实现类 SuppliedThreadLocal:
static final class SuppliedThreadLocal<T> extends ThreadLocal<T> {

    private final Supplier<? extends T> supplier;

    SuppliedThreadLocal(Supplier<? extends T> supplier) {
        this.supplier = Objects.requireNonNull(supplier);
    }

    @Override
    protected T initialValue() {
        return supplier.get();
    }
}
看到构造方法入参是一个 Supplier,也就是可以按照下面的方式进行设置默认值:
private static final ThreadLocal<Integer> threadId = ThreadLocal.withInitial(() -> 100);
这里示例代码是设置每个 ThreadLocal 的默认值为 100,当然你可以根据实际业务情况设置。


 322
322

 被折叠的 条评论
为什么被折叠?
被折叠的 条评论
为什么被折叠?
 到【灌水乐园】发言


