


IOC
Spring控制反转(IOC)
什么是Spring IOC
IOC即控制反转,意思是对象的创建不通过手动 new,而是把对象的创建权交给Spring来完成。主要实现依赖注入DI
DI 即依赖注入,意思是 Spring主动创建被调用类的对象,然后把这个对象注入到我们自己的类中,使我们能使用它
IOC的优点是什么?
IOC 或 依赖注入把应用的代码量降到最低。
- 它使应用容易测试,单元测试不再需要单例和JNDI查找机制。
- 最小的代价和最小的侵入性使松散耦合得以实现。
- IOC容器支持加载服务时的饿汉式初始化和懒加载
Spring IOC 的实现机制
Spring 中的 IOC 的实现原理就是工厂模式加反射机制
了解下工厂模式+反射机制使用好处
我们首先看一下不用反射机制时的工厂模式
interface fruit{
    public abstract void eat();
}
class Apple implements fruit{
     public void eat(){
         System.out.println("Apple");
     }
}
class Orange implements fruit{
     public void eat(){
         System.out.println("Orange");
     }
}
//构造工厂类 ,也就是说以后如果我们在添加其他的实例的时候只需要修改工厂类就行了 ,实现java的多态性
class Factory{
     public static fruit getInstance(String fruitName){
         fruit f=null;
         if("Apple".equals(fruitName)){
             f=new Apple();
         }
         if("Orange".equals(fruitName)){
             f=new Orange();
         }
         return f;
     }
}
class hello{
     public static void main(String[] a){
         fruit f=Factory.getInstance("Orange");
         f.eat();
     }
}
上面写法的缺点是当我们再添加一个子类的时候,就需要修改工厂类了。如果我们添加太多的子类的时候,改动就会很多
下面用反射机制实现工厂模式:
interface fruit{
     public abstract void eat();
}
class Apple implements fruit{
public void eat(){
         System.out.println("Apple");
     }
}
class Orange implements fruit{
public void eat(){
        System.out.println("Orange");
    }
}
class Factory{
    public static fruit getInstance(String ClassName){
        fruit f=null;
        try{
        // Class.forName("")返回的是类
		// Class.forName("").newInstance()返回的是object
            f=(fruit)Class.forName(ClassName).newInstance();
        }catch (Exception e) {
            e.printStackTrace();
        }
        return f;
    }
}
class hello{
    public static void main(String[] a){
        fruit f=Factory.getInstance("Reflect.Apple");
        if(f!=null){
            f.eat();
        }
    }
}
现在就算我们添加任意多个子类的时候,工厂类都不需要修改。使用反射机制实现的工厂模式可以通过反射取得接口的实例,但是需要传入完整的包和类名。而且用户也无法知道一个接口有多少个可以使用的子类,所以我们通过属性文件的形式配置所需要的子类。
下面编写使用反射机制并结合属性文件的工厂模式(即IOC)。首先创建一个fruit.properties的资源文件:
apple=Reflect.Apple
orange=Reflect.Orange
然后编写主类代码:
interface fruit{
    public abstract void eat();
}
class Apple implements fruit{
    public void eat(){
        System.out.println("Apple");
    }
}
class Orange implements fruit{
    public void eat(){
        System.out.println("Orange");
    }
}
//操作属性文件类
class init{
    public static Properties getPro() throws FileNotFoundException, IOException{
        Properties pro=new Properties();
        File f=new File("fruit.properties");
        if(f.exists()){
            pro.load(new FileInputStream(f));
        }else{
            pro.setProperty("apple", "Reflect.Apple");
            pro.setProperty("orange", "Reflect.Orange");
            pro.store(new FileOutputStream(f), "FRUIT CLASS");
        }
        return pro;
    }
}
class Factory{
    public static fruit getInstance(String ClassName){
        fruit f=null;
        try{
            f=(fruit)Class.forName(ClassName).newInstance();
        }catch (Exception e) {
            e.printStackTrace();
        }
        return f;
    }
}
class hello{
    public static void main(String[] a) throws FileNotFoundException, IOException{
        Properties pro=init.getPro();
        fruit f=Factory.getInstance(pro.getProperty("apple"));
        if(f!=null){
            f.eat();
        }
    }
}
运行结果:Apple,这是IOC代码基于Properties 配置文件加载展示
spring应用application.xml配置展示创建对象
引入依赖
1、创建一个maven工厂,不使用骨架
2、修改pom.xml
    <dependencies>
        <dependency>
            <groupId>org.springframework</groupId>
            <artifactId>spring-context</artifactId>
            <version>5.0.2.RELEASE</version>
        </dependency>
    </dependencies>
创建业务层接口和实现类
package com.oceanstar.service;
/*
 *          操作账户:业务层接口
 * /
public interface IAccountService {
    /*
     * 模拟保存账户
     * */
    void saveAccount();
}

/**
 *
 *  账户业务实现
 */
public class AccountServiceImpl implements IAccountService {
    private IAccountDao accountDao = new AccountDaoImpl();

     public void saveAccount() {
        accountDao.saveAccount();
     }

}
创建持久层接口和实现类
/**
* 账户的持久层接口
*/
public interface IAccountDao {
/**
* 保存账户
*/
void saveAccount();
}

/**
* 账户的持久层实现类
*/
public class AccountDaoImpl implements IAccountDao {
@Override
public void saveAccount() {
System.out.println("保存了账户");
} }
基于xml的配置,创建配置文件,并配置代码service层和dao层的bean属性
<?xml version="1.0" encoding="UTF-8"?>
<beans xmlns="http://www.springframework.org/schema/beans"
       xmlns:xsi="http://www.w3.org/2001/XMLSchema-instance"
       xsi:schemaLocation="http://www.springframework.org/schema/beans http://www.springframework.org/schema/beans/spring-beans.xsd">
    <!--把对象的创建交给spring来管理
    bean标签:	用于配置让spring创建对象,并且存入ioc容器之中
    id属性:     对象的唯一标识
    class属性:  指定要创建对象的全限定类名
    -->
    <bean id="accountService" class="com.oceanstar.service.impl.AccountServiceImpl"></bean>
    <bean id="accountDao" class="com.oceanstar.dao.impl.AccountDaoImpl"></bean>
</beans>
测试配置是否成功
/*
* 表现层到业务层
* */
public class Client {
    /*
    * 获取spring容器的Ioc核心容器,并根据id获取对象
    * */
    public static void main(String[] args) {
		//获取spring配置文件,两种方式
		//第一种实例化IOC容器方式,通过文件名查找
		String conf="applicationContext.xml";
		ApplicationContext applicationContext=new ClassPathXmlApplicationContext(conf);
		// 第二种实例化IOC容器方式,通过路径查找,默认是工程下找  所以要加个src路径
		String conf="src\\applicationContext.xml";
		ApplicationContext applicationContext=new FileSystemXmlApplicationContext(conf);

		// 由配置文件返回对象
		//根据bean的id获取对象 这里需要强转
		IAccountService iAccountService = (IAccountService) applicationContext.getBean("accountService");
		 System.out.println(iAccountService);
		IAccountDao iAccountDao = (IAccountDao) applicationContext.getBean("accountDao");
        System.out.println(iAccountDao);

		//不想强转的化就使用下面这个方式,多加个参数是我们在applicationContext.xml组件配置的id name值
		IAccountService iAccountService= applicationContext.getBean("accountService",accountService.class);
		IAccountDao iAccountDao= applicationContext.getBean("accountDao",accountService.class);

		applicationContext.close();
    }
}
运行结果:

Spring 通过 XML 配置模式装载 Bean 的过程:
1) 将程序内所有 XML 或 Properties 配置文件加载入内存中;
2)Java类里面解析xml或properties里面的内容,得到对应实体类的字节码字符串以及相关的属性信息;
3)使用反射机制,根据这个字符串获得某个类的Class实例;
4)动态配置实例的属性
===============================================
IOC中bean标签对应管理对象作用
bean标签及其作用:
用于配置对象让spring来创建的
默认情况下它调用的是类中的无参构造函数。如果没有无参构造函数则不能创建成功。
属性:
创建对象的方式
id:给对象在容器中提供一个唯一标识。用于获取对象
class:指定类的全限定类名。用于反射创建对象。默认情况下创建无参构造函数
factory-method:通过factory-methon属性创建对象
factory-bean:是工厂Bean。 工厂Bean返回的不是一个实例,而是由工厂类中方法返回的对象
创建对象的时机
lazy-init:延迟加载
创建对象的模式
scope:指定对象的作用范围:
singleton:默认值,单例
prototype:多例
request:web项目中,Spring创建一个bean对象,将对象存入到request域中
session:web项目中,Spring创建一个bean对象,将对象存入到session域中
global session: web项目中,应用在portlet环境,如果没有portlet环境那么globalsession相当于session
创建对象的初始化和销毁方法
init-method:指定类中的初始化方法名称
destory-method:指定类中销毁方法名称
======================================================
以下代码展示说明
Spring通过容器创建对象的三种方式
①构造器实例化
创建实体类
package com.mengma.instance.constructor;
public class Person {

}```
配置xml

```xml
<?xml version="1.0" encoding="UTF-8"?>
<beans xmlns="http://www.springframework.org/schema/beans"   xmlns:xsi="http://www.w3.org/2001/XMLSchema-instance" xmlns:p="http://www.springframework.org/schema/p"   xsi:schemaLocation="http://www.springframework.org/schema/beans    http://www.springframework.org/schema/beans/spring-beans-3.2.xsd">
    <bean id="person" class="com.mengma.instance.constructor.Person"/>
</beans>
测试类
package com.mengma.instance.constructor;import org.junit.Test;
import org.springframework.context.ApplicationContext;
import org.springframework.context.support.ClassPathXmlApplicationContext;
public class InstanceTest1 {
    @Test
    public void test() {
        // 定义Spring配置文件的路径
        String xmlPath = "com/mengma/instance/constructor/ApplicationContext.xml";
        // 初始化Spring容器,加载配置文件,并对bean进行实例化
        ApplicationContext applicationContext = new ClassPathXmlApplicationContext(xmlPath);
        // 通过容器获取id为person的实例
        System.out.println(applicationContext.getBean("person"));
    }
}
上述文件中,首先在 test() 方法中定义了 Spring 配置文件的路径,然后 Spring 容器会加载配置文件。在加载的同时,Spring 容器会通过实现类 Person1 中默认的无参构造函数对 Bean 进行实例化,这种就是bean创建管理的对象
②静态工厂方式实例化
通过factory-method属性有两种方式,一种是静态的(方法必须是静态的),另一种是动态的**,这里是静态
创建静态工厂类,MyBeanFactory 的类,并在该类中创建一个名为 createBean() 的静态方法,用于创建 Bean 的实例
package com.mengma.instance.static_factory;
public class MyBeanFactory {
// 创建Bean实例的静态工厂方法
    public static Person createBean() {
        return new Person();
    }
}
定义了一个 id 为 person 的 Bean.xml,其中 class 属性指定了其对应的工厂实现类为 MyBeanFactory,而 factory-method 属性用于告诉 Spring 容器调用工厂类中的 createBean() 方法获取 Bean 的实例
<?xml version="1.0" encoding="UTF-8"?>
<beans xmlns="http://www.springframework.org/schema/beans"    xmlns:xsi="http://www.w3.org/2001/XMLSchema-instance" xmlns:p="http://www.springframework.org/schema/p"    xsi:schemaLocation="http://www.springframework.org/schema/beans    http://www.springframework.org/schema/beans/spring-beans-3.2.xsd">
    <bean id="person" class="com.mengma.instance.static_factory.MyBeanFactory"  factory-method="createBean" />
</beans>
静态工厂方式实例化的好处在于,不用创建MyBeanFactory 类的对象,静态方法在类加载时候会初始化执行这个方法,就会 return new Person();对象
③实例工厂方式实例化
这里factory-method属性的动态使用
创建实体类
package com.mengma.instance.factory;
public class MyBeanFactory {
    public MyBeanFactory() {
        System.out.println("person工厂实例化中");
    }
    // 创建Bean的方法
    public Person createBean() {
        return new Person();
    }
}
创建 Spring 的配置文件 applicationContext.xml
<?xml version="1.0" encoding="UTF-8"?>
<beans xmlns="http://www.springframework.org/schema/beans"    xmlns:xsi="http://www.w3.org/2001/XMLSchema-instance" xmlns:p="http://www.springframework.org/schema/p"    xsi:schemaLocation="http://www.springframework.org/schema/beans    http://www.springframework.org/schema/beans/spring-beans-3.2.xsd">
    <!-- 配置实例工厂 -->
    <bean id="myBeanFactory" class="com.mengma.instance.factory.MyBeanFactory" />
    <!-- factory-bean属性指定一个实例工厂(是id标签指向的工厂类),factory-method属性确定使用工厂中的哪个方法 -->
    <bean id="person" factory-bean="myBeanFactory" factory-method="createBean" />
</beans>
是个普通的Bean;
返回静态方法定义创建的实例
是工厂Bean,工厂Bean返回的不是一个实例,而是由工厂createBean方法返回的对象
==========================================================
创建对象的模型,时机,初始化和销毁方法
scope:指定对象的作用范围:
singleton:默认值,单例
prototype:多例
azy-init:延迟加载
init-method:指定类中的初始化方法名称
destory-method:指定类中销毁方法名称
首先定义一个接口,定义方法
public interface UserDAO {
	void show();
}
定义一个实现类
public class UserDaoImpl implements UserDAO {
	public  UserDaoImpl() {
		System.out.println("实例化DAO");
	}
	@Override
	public void show() {
		System.out.println("展示实体类");
	}
	//添加一个初始化的方法
	public void myinit() {
		System.out.println("初始化DAO");
	}
	//销毁
	public void mydestory() {
		System.out.println("销毁DAO");
	}
}
这样简单的工厂模式的接口和实现类就定义好了,配置文件定义一个application.xml
<?xml version="1.0" encoding="UTF-8"?>
<beans xmlns="http://www.springframework.org/schema/beans"
    xmlns:xsi="http://www.w3.org/2001/XMLSchema-instance"
    xsi:schemaLocation="
        http://www.springframework.org/schema/beans http://www.springframework.org/schema/beans/spring-beans.xsd">
<!-- 这里的bean id参数就是我们在代码获取application.xml通过bean创建对象引用的值,静态方法调用 factory-method="getDAO"-->

<!-- 单例模式
		①初始化和销毁方法,自带的不需要再写了
		init-method="init"
		destroy-method="destroy"
		②延迟设置
		如果是单例,容器实例化时,创建bean组件 可以通过在bean中添加lazy-init=“true”或者在beans(根标记)中
	添加default-lazy-init=“true”延迟实例化
		如果是原型(多元),容器是在调用getbean()方法时创建bean组件-->
	<bean id="UserDao"
	class="com.xms.dao.UserDaoImpl"
	scope="singleton"
	lazy-init="true"></bean>
</beans>

<!--多元模式 当该bean为多例时,spring容器不负责容器的销毁工作,需要向下面配置项中我们自己手动添加初始化和销毁方法-->
 	<bean id="UserDao"
	class="com.xms.dao.UserDaoImpl"
	scope="prototype"
	init-method="myinit"
	destroy-method="mydestroy"
	></bean>
然后我们在写一个test类
package com.xms.test;
import org.junit.Test;
import org.springframework.context.ApplicationContext;//spring  接口
import org.springframework.context.support.ClassPathXmlApplicationContext;
import org.springframework.context.support.FileSystemXmlApplicationContext;
import com.xms.dao.UserDAO;
import com.xms.dao.UserDaoImpl;
public class Test {
	//研究单例和多元模式的创建时机
	/*
	*如果是单例,容器实例化时,创建bean组件 可以通过在bean中添加lazy-init=“true”或者
	在beans(根标记)中添加default-lazy-init=“true”延迟实例化
	如果是原型,容器是在调用getbean()方法时创建bean组件
	*/
	@Test
	public void test2() {
		String conf="applicationContext.xml";
		AbstractApplicationContext ac=new ClassPathXmlApplicationContext(conf);
		 ac.getBean("jdbcUserDao");
		 ac.close();
	}

	//查看创建模式 是单例还是元素模式
	@Test
	public void test1() {
		String conf="applicationContext.xml";
		ApplicationContext ac=new ClassPathXmlApplicationContext(conf);
		UserDAO dao1=(UserDAO) ac.getBean("UserDao");
		UserDAO dao2=(UserDAO) ac.getBean("UserDao");
		System.out.println(dao1==dao2);
		ac.close();
	}
}
}
容器相关问题整理:
①容器如何管理bean组件
通过id 和class定义管理
②容器实例化对象方式
是通过bean创建实例 还是通过fanctorybean创建对象
(1) 使用默认无参构造函数
(2) spring管理静态工厂—使用静态工厂的方法创建对象
(3) spirng管理实例工厂—使用实例工厂的方法创建对象
③容器创建bean组件的模式作用域
Spring框架支持以下五种bean的作用域:
- singleton : bean在每个Spring ioc 容器中只有一个实例。
- prototype:一个bean的定义可以有多个实例。
- request:每次http请求都会创建一个bean,该作用域仅在基于web的SpringApplicationContext情形下有效。
- session:在一个HTTP Session中,一个bean定义对应一个实例。该作用域仅在基于web的
- Spring ApplicationContext情形下有效。global-session:在一个全局的HTTP Session中,一个bean定义对应一个实例。该作用域仅在基于web的Spring ApplicationContext情形下有效。
④容器创建bean组件的时机
是否延迟加载
a.延迟加载的好处
创建模式的时机选择在合适的时间进行创建所需实例,节省空间,提升性能
b.如果是单例,容器实例化时,创建bean组件 可以通过在bean中添加lazy-init=“true”或者在beans(根标记)中
添加default- lazy-init=“true”延迟实例化
如果是原型(多元),容器是在调用getbean()方法时创建bean组件
⑤如何指定初始化和销毁
在spring的配置文件中
init-method=“init”
说明在创建完对象后,立刻执行init方法,用来进行初始化
destroy-method=“destroy”
当该bean为单例模式,才能调用该方法,destroy方法在容器销毁的时候被调用,一个人一个厨房一个锅,别的还在继续使用,删除就不能使用,所有只有单例可以删除。destory方法:向服务器发送请求,为了防止大量初始化数据需要处理,这里进行释放空间 进行删除单例模式需要处理
当该bean为多例时,spring容器不负责容器的销毁工作
如果该bean为多例时,当我们不需要该bean时,应该手动的销毁,自行定义初始化和销毁方法
init-method=“myinitMethod”
destroy-method=“mydestroyMethod”
Spring框架中的单例bean是线程安全的吗?
不是,Spring框架中的单例bean不是线程安全的。
spring 中的 bean 默认是单例模式,spring 框架并没有对单例 bean 进行多线程的封装处理。
实际上大部分时候 spring bean 无状态的(比如 dao 类),所有某种程度上来说 bean 也是安全
的,但如果 bean 有状态的话(比如 view model 对象),那就要开发者自己去保证线程安全了,
最简单的就是改变 bean 的作用域,把“singleton”变更为“prototype”,这样请求 bean 相当于
new Bean()了,所以就可以保证线程安全了。有状态就是有数据存储功能。无状态就是不会保存数据
BeanFactory和ApplicationContex,FactoryBean
BeanFactory和ApplicationContext区别是什么
①作用范围
beanFaactory是Spring容器种的顶层接口,管理bean的加载、实例化,控制bean的生命周期,维护bean之间的依赖关系,ApplicationContext是他的子接口,除此之外还继承了别的接口,功能更多,该接口定义了一个 refresh 方法,此方法用于刷新整个容器,即重新加载/刷新所有的bean。
②作用时机:延迟加载
BeanFactory和ApplicationContext的区别:创建对象的时间点不一样。
ApplicationContext:只要一读取配置文件,默认情况下就会创建对象。
BeanFactory:什么时候使用什么时候创建对象
ApplicationContext通常的实现是什么
ApplicationConext接口的实现类
ClassPattXmlApplicationContext: 从类的根路径下加载配置文件
FileSystemXmlApplicationContext:从磁盘路径上加载配置文件,配置文件可以在磁盘的任意位置。
AnnotationConfigApplicationContext: 当我们使用注解配置容器对象时,使用此类对象来创建spring容器。它用来读取注
BeanFactory和FactoryBean的区别
BeanFactory 与 FactoryBean的区别, 两个名字很像,所以容易搞混
- BeanFactory: 以Factory结尾,表示它是一个工厂类,是用于管理Bean的一个工厂
- FactoryBean:以Bean结尾,表示它是一个Bean,不同于普通Bean的是:它是实现了FactoryBean接口的Bean,根据该Bean的Id从BeanFactory中获取的实际上是FactoryBean的getObject()返回的对象,而不是FactoryBean本身, 如果要获取FactoryBean对象,可以在id前面加一个&符号来获取。
11.DI 依赖注入
依赖注入:是spring框架核心IoC的具体实现
什么是Spring的依赖注入
是spring框架核心IoC的具体实现
依赖注入,是IOC的一个方面,是个通常的概念,它有多种解释。这概念是说你不用创建对象,而只需要描述它如何被创建。你不在代码里直接组装你的组件和服务,但是要在配置文件里描述哪些组件需要哪些服务,之后一个容器(IOC容器)负责把他们组装起来
依赖注入的基本原则
依赖注入的基本原则是:应用组件不应该负责查找资源或者其他依赖的协作对象。配置对象的工作
应该由IOC容器负责,“查找资源”的逻辑应该从应用组件的代码中抽取出来,交给IOC容器负责。
容器全权负责组件的装配,它会把符合依赖关系的对象通过属性(JavaBean中的setter)或者是构
造器传递给需要的对象
依赖注入有什么优势
依赖注入之所以更流行是因为它是一种更可取的方式:让容器全权负责依赖查询,受管组件只需要暴露JavaBean的setter方法或者带参数的构造器或者接口,使容器可以在初始化时组装对象的依赖关系。其与依赖查找方式相比,主要优势为:
查找定位操作与应用代码完全无关。
不依赖于容器的API,可以很容易地在任何容器以外使用应用对象。
不需要特殊的接口,绝大多数对象可以做到完全不必依赖容器
依赖注入的几种形式
set方法注入
就是在类中提供需要注入成员的set方法
/**
 *  账户业务实现
 */
public class AccountServiceImpl implements IAccountService {
    private String name;
    private Integer age;
    private Date bithday;
    public void setName(String name) {
        this.name = name;
    }
    public void setAge(Integer age) {
        this.age = age;
    }
    public void setBithday(Date bithday) {
        this.bithday = bithday;
    }
    public void saveAccount() {
        System.out.printf("name:" + name
        + " age:" + age
        + " bithday:" + bithday);
     }
}
通过配置文件给 bean 中的属性传值:使用 set 方法的方式
涉及的标签:
property
属性:
name:找的是类中 set 方法后面的部分
ref:给属性赋值是其他 bean 类型的,也实际上ref引用的是对象
value:给属性赋值是基本数据类型和 string 类型的
实际开发中,此种方式用的较多
    <bean id="accountService" class="com.oceanstar.service.impl.AccountServiceImpl">
        <property name="name" value="oceanstar"></property>
        <property name="age" value="18"></property>
        <property name="bithday" ref="now"></property>
    </bean>

    <bean id="now" class="java.util.Date"></bean>
构造函数注入
/**
 *  账户业务实现
 */
public class AccountServiceImpl implements IAccountService {
    private String name;
    private Integer age;
    private Date bithday;
    public AccountServiceImpl(String name, Integer age, Date bithday) {
        this.name = name;
        this.age = age;
        this.bithday = bithday;
    }
    public void saveAccount() {
        System.out.printf("name:" + name
        + " age:" + age
        + " bithday:" + bithday);
     }
}
使用构造函数的方式,给service中的属性传值。
要求:
类中需要提供一个对应参数列表的构造函数。
涉及的标签:
constructor-arg
属性:
index:指定参数在构造函数参数列表的索引位置
type:指定参数在构造函数中的数据类型
name:指定参数在构造函数中的名称 用这个找给谁赋值
=上面三个都是找给谁赋值,下面两个指的是赋什么值的========
value:它能赋的值是基本数据类型和 String 类型
ref:它能赋的值是其他 bean 类型,也就是说,必须得是在配置文件中配置过的 bean
    <bean id="accountService" class="com.oceanstar.service.impl.AccountServiceImpl">
        <constructor-arg name="name" value="oceanstar"></constructor-arg>
        <constructor-arg name="age" value="18"></constructor-arg>
        <constructor-arg name="bithday" ref="now"></constructor-arg>
    </bean>
    <bean id="now" class="java.util.Date"></bean>
注入集合属性
就是给类中的集合成员传值,也是调用set注入,只不过变量的数据类型都是集合。
/**
 *  账户业务实现
 */
public class AccountServiceImpl implements IAccountService {
    private String[] myStrs;
    private List<String> myList;
    private Set<String> mySet;
    private Map<String , String> myMap;
    private Properties myProps;
    public void setMyStrs(String[] myStrs) {
        this.myStrs = myStrs;
    }
    public void setMyList(List<String> myList) {
        this.myList = myList;
    }
    public void setMySet(Set<String> mySet) {
        this.mySet = mySet;
    }
    public void setMyMap(Map<String, String> myMap) {
        this.myMap = myMap;
    }
    public void setMyProps(Properties myProps) {
        this.myProps = myProps;
    }
    public void saveAccount() {
        System.out.printf(Arrays.toString(myStrs));
        System.out.println(myList);
        System.out.println(mySet);
        System.out.println(myMap);
        System.out.println(myProps);
     }
}
注入集合数据
List 结构的 array,list,
setMap 结构的map,entry,props,prop
<?xml version="1.0" encoding="UTF-8"?>
<beans xmlns="http://www.springframework.org/schema/beans"
       xmlns:p="http://www.springframework.org/schema/p"
       xmlns:xsi="http://www.w3.org/2001/XMLSchema-instance"
       xsi:schemaLocation="http://www.springframework.org/schema/beans http://www.springframework.org/schema/beans/spring-beans.xsd">
    <!--把对象的创建交给spring来管理
    bean标签:用于配置让spring创建对象,并且存入ioc容器之中
    id属性:      对象的唯一标识
    class属性:  指定要创建对象的全限定类名
    -->
    <bean id="accountService"
          class="com.oceanstar.service.impl.AccountServiceImpl">
        <!-- 在注入集合数据时,只要结构相同,标签可以互换 -->
        <!-- 给数组注入数据 -->
        <property name="myStrs">
            <set>
                <value>AAA</value>
                <value>BBB</value>
                <value>CCC</value>
            </set>
        </property>
        <!-- 注入 list 集合数据 -->
        <property name="myList">
            <array>
                <value>AAA</value>
                <value>BBB</value>
                <value>CCC</value>
            </array>
        </property>
        <!-- 注入 set 集合数据 -->
        <property name="mySet">
            <list>
                <value>AAA</value>
                <value>BBB</value>
                <value>CCC</value>
            </list>
        </property>
        <!-- 注入 Map 数据 -->
        <property name="myMap">
            <props>
                <prop key="testA">aaa</prop>
                <prop key="testB">bbb</prop>
            </props>
        </property>
        <!-- 注入 properties 数据 -->
        <property name="myProps">
            <map>
                <entry key="testA" value="aaa"></entry>
                <entry key="testB"> <value>bbb</value></entry>
            </map>
        </property>
        </bean>
</beans>
构造器依赖注入和 Setter方法注入的区别
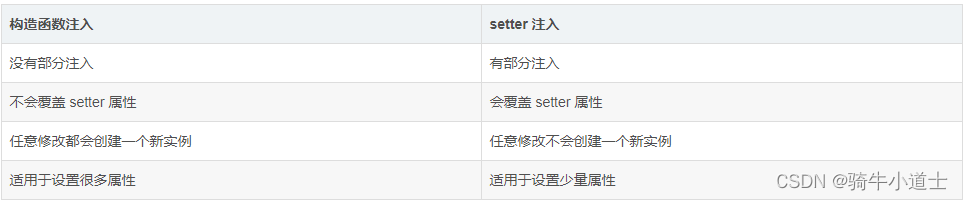 两种依赖方式都可以使用,构造器注入和Setter方法注入。最好的解决方案是用构造器参数实现强制依赖(index要对应的),setter方法实现可选依赖
Spring基于xml注入bean的几种方式?
(1)Set方法注入;
(2)构造器注入:①通过index设置参数的位置;②通过type设置参数类型;
(3)静态工厂注入;
(4)实例工厂;


 2837
2837


 被折叠的 条评论
为什么被折叠?
被折叠的 条评论
为什么被折叠?
 到【灌水乐园】发言


