文章目录
1. HBase安装部署
-
集群配置
s1 s2 s3 s4 gracal HBase HMaster HRegionServer HRegionServer HMaster(备用) HRegionServer HRegionServer HRegionServer -
保证Zookeeper以及Hadoop处于部署并且正常启动的状态
#脚本启动hadoop myhadoop.sh start #脚本启动Zookeeper zk.sh start -
解压HBase安装包到/opt/module目录
-
配置环境变量并分发
[gaochuchu@s1 module]$ sudo vim /etc/profile.d/my_env.sh #HBASE_HOME export HBASE_HOME=/opt/module/hbase-2.4.11 export PATH=$PATH:$HBASE_HOME/bin -
修改配置文件hbase-env.sh
[gaochuchu@s1 conf]$ cd /opt/module/hbase-2.4.11/conf
[gaochuchu@s1 conf]$ vim hbase-env.sh
export HBASE_MANAGES_ZK=false
其最后添加:export HBASE_MANAGES_ZK=false;关闭由HBase管理自身的Zookeeper实例
-
修改base-site.xml内容:
[gaochuchu@s1 conf]$ vim hbase-site.xml <property> <name>hbase.zookeeper.quorum</name> <value>s1,s2,s3,s4,gracal</value> <description>The directory shared by RegionServers. </description> </property> <!-- <property>--> <!-- <name>hbase.zookeeper.property.dataDir</name>--> <!-- <value>/export/zookeeper</value>--> <!-- <description> 记得修改 ZK 的配置文件 --> <!-- ZK 的信息不能保存到临时文件夹--> <!-- </description>--> <!-- </property>--> <property> <name>hbase.rootdir</name> <value>hdfs://s1:8020/hbase</value> <description>The directory shared by RegionServers. </description> </property> <property> <name>hbase.cluster.distributed</name> <value>true</value> </property> -
配置RegionServers
[gaochuchu@s1 conf]$ vim regionservers s1 s2 s3 s4 gracal -
解决HBase和Hadoop的log4j兼容性问题,修改HBase的jar包,使用Hadoop的jar包
[gaochuchu@s1 conf]$ mv /opt/module/hbase-2.4.11/lib/client-facing-thirdparty/slf4j-reload4j-1.7.33.jar /opt/module/hbase-2.4.11/lib/client-facing-thirdparty/slf4j-reload4j-1.7.33.jar.bak -
分发HBase
2.HBase服务的启动
-
单点启动和停止
[gaochuchu@s1 hbase-2.4.11]$ bin/hbase-daemon.sh start master [gaochuchu@s1 hbase-2.4.11]$ bin/hbase-daemon.sh start regionserver -
群启和停止(推荐)
[gaochuchu@s1 hbase-2.4.11]$ bin/start-hbase.sh [gaochuchu@s1 hbase-2.4.11]$ bin/stop-hbase.sh -
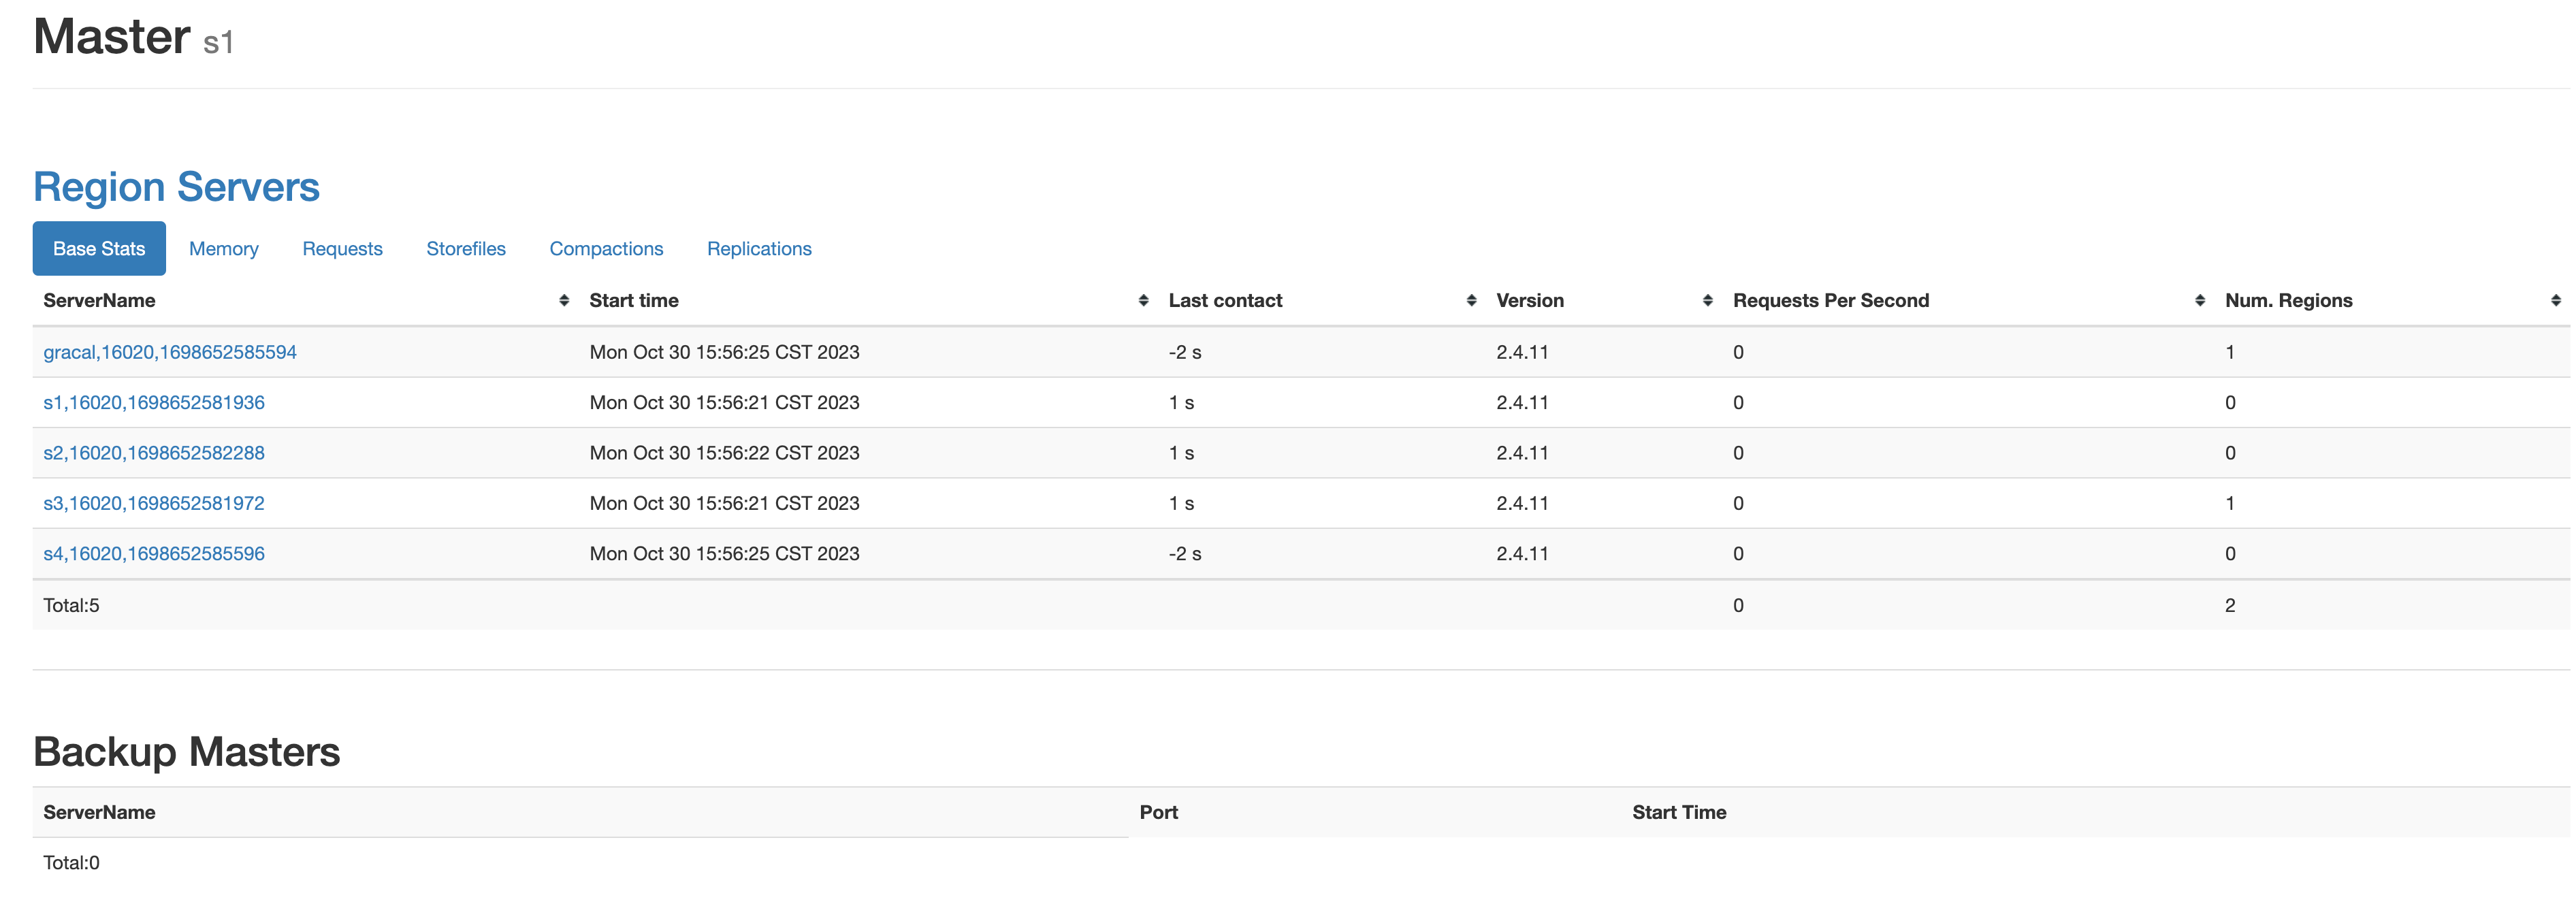
查看HBase的Web页面
启动成功后,通过访问http://s1:16010查看HBase的管理页面

3.HBase部署高可用(可选)
-
在 HBase 中 HMaster 负责监控 HRegionServer 的生命周期,均衡 RegionServer 的负载,如果 HMaster 挂掉了,那么整个 HBase 集群将陷入不健康的状态,并且此时的工作状态并不会维持太久。所以 HBase 支持对 HMaster 的高可用配置。
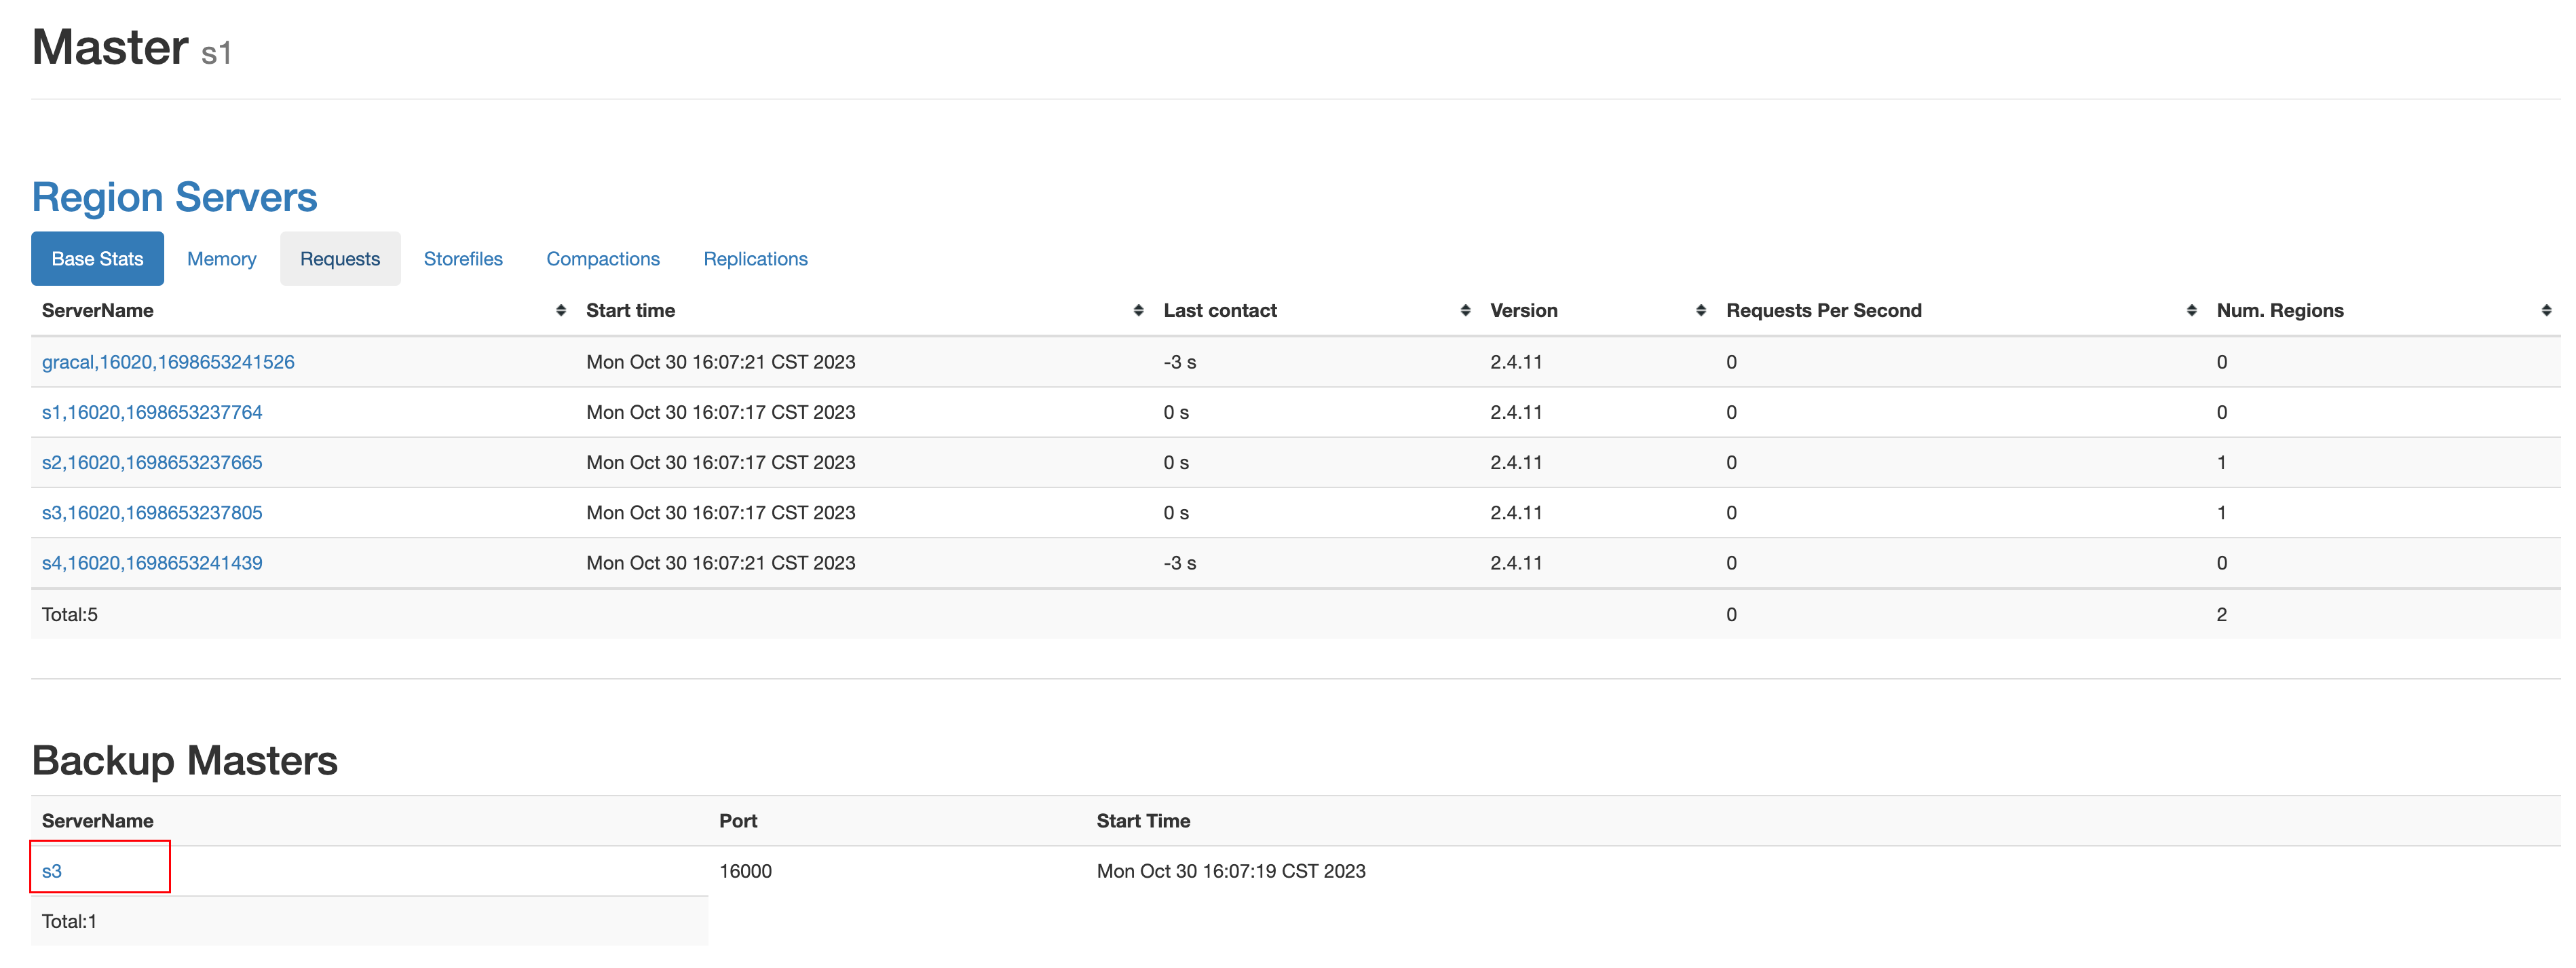
#conf目录下创建backup-masters文件 [gaochuchu@s1 hbase-2.4.11]$ touch conf/backup-masters #在backup-masters文件配置高可用节点 [gaochuchu@s1 hbase-2.4.11]$ vim conf/backup-masters s3 #将conf目录分发 [gaochuchu@s1 conf]$ xsync backup-masters -
此时重新启动HBase,访问http://s1:16010,可以看到多了备用master节点

4. HBase整合Phoenix
- Phoenix 是 HBase 的开源 SQL 皮肤。可以使用标准 JDBC API 代替 HBase 客户端 API来创建表,插入数据和查询 HBase 数据
- 为什么使用Phoenix
- 官方给的解释为:在 Client 和 HBase 之间放一个 Phoenix 中间层不会减慢速度,因为用户编写的数据处理代码和 Phoenix 编写的没有区别,不仅如此Phoenix 对于用户输入的 SQL 同样会有大量的优化手段(就像 hive 自带 sql 优化器一样)。
- 其能将用户编写的SQL语句改写为HBase的API
4.1 安装Phoenix
-
安装Phoenix
#上传并解压Phoenix安装包到/opt/module [gaochuchu@s1 softs]$ tar -zxvf phoenix-hbase-2.4-5.1.2-bin.tar.gz -C /opt/module/ #改名为phoenix [gaochuchu@s1 module]$ mvphoenix-hbase-2.4-5.1.2-bin/ phoenix #复制phoenix的server包并且拷贝到各个节点中 [gaochuchu@s1 phoenix]$ cp phoenix-server-hbase-2.4-5.1.2.jar /opt/module/hbase-2.4.11/lib/ [gaochuchu@s1 phoenix]$ xsync /opt/module/hbase-2.4.11/lib/phoenix-server-hbase-2.4-5.1.2.jar #配置环境变量 [gaochuchu@s1 module]$ sudo vim /etc/profile.d/my_env.sh #phoenix export PHOENIX_HOME=/opt/module/phoenix export PHOENIX_CLASSPATH=$PHOENIX_HOME export PATH=$PATH:$PHOENIX_HOME/bin [gaochuchu@s1 module]$ source /etc/profile #重启HBase [gaochuchu@s1 module]$ stop-hbase.sh [gaochuchu@s1 module]$ start-hbase.sh -
连接Phoenix
[gaochuchu@s1 phoenix]$ bin/sqlline.py s1,s2,s3,s4,gracal:2181
4.2 Phoenix Shell 操作
-
显示表
0: jdbc:phoenix:s1,s2,s3,s4,gracal:2181> !table 0: jdbc:phoenix:s1,s2,s3,s4,gracal:2181> !tables -
创建表:直接指定单个列作为RowKey,相当于sql中的主键
CREATE TABLE IF NOT EXISTS student(
id VARCHAR primary key,
name VARCHAR,
age BIGINT,
addr VARCHAR);
在 phoenix 中,表名等会自动转换为大写,若要小写,使用双引号,如"us_population"。
执行上述语句,查看表,发现表名为大写

-
创建表:直接指定多个列的联合为RowKey
CREATE TABLE IF NOT EXISTS student1 ( id VARCHAR NOT NULL, name VARCHAR NOT NULL, age BIGINT, addr VARCHAR CONSTRAINT my_pk PRIMARY KEY (id, name));-
注:Phoenix 中建表,会在 HBase 中创建一张对应的表。为了减少数据对磁盘空间的占用,Phoenix 默认会对 HBase 中的列名做编码处理。具体规则可参考官网链接:https://phoenix.apache.org/columnencoding.html,若不想对列名编码,可在建表语句末尾加上 COLUMN_ENCODED_BYTES = 0;
-
可以看到,这里的列名没有显示对应的string,而是做了编码处理

-
-
插入数据
upsert into student values('1001','gcc', 23, 'changsha'); -
查询记录
select * from student; select * from student where id='1001'; -
删除记录
delete from student where id='1001'; -
删除表
drop table student; -
退出命令行
!quit
4.3 表的映射
-
表的关系
默认情况下, HBase 中已存在的表,通过 Phoenix 是不可见的。如果要在 Phoenix 中操作 HBase 中已存在的表,可以在 Phoenix 中进行表的映射。映射方式有两种:视图映射和表映射
-
在HBase的shell命令行创建test表格
RowKey info1 info2 Id name Address create 'test','info1','info2' put 'test','1001','info1:name','gcc' put 'test','1001','info1:address','changsha' -
视图映射
Phoenix 创建的视图是只读的,所以只能用来做查询,无法通过视图对数据进行修改等操作,即删除视图对原数据无影响。在 phoenix 中创建关联 test 表的视图
#创建视图 create view "test"( id varchar primary key, "info1"."name" varchar, "info2"."address" varchar); #查看视图,小写的表名需要加双引号 select * from "test"; #删除视图,小写的表名需要加双引号 drop view "test"; -
表映射
在 Pheonix 创建表去映射 HBase 中已经存在的表,是可以修改删除 HBase 中已经存在的数据的。而且,删除 Phoenix 中的表,那么 HBase 中被映射的表也会被删除。
特别注意:进行表映射时,不能使用列名编码,需将 column_encoded_bytes 设为 0。因为编码会导致Pheonix的表无法和HBase映射
create table"test"( id varchar primary key, "info1"."name" varchar, "info2"."address" varchar)column_encoded_bytes=0; -
关于数字类型说明
HBase 中的数字,底层存储为补码,而 Phoenix 中的数字,底层存储为在补码的基础上,将符号位反转。故当在 Phoenix 中建表去映射 HBase 中已存在的表,当 HBase 中有数字类型的字段时,会出现解析错误的现象。
常见的解决方案:
- Phoenix 种提供了 unsigned_int,unsigned_long 等无符号类型,其对数字的编码解码方式和 HBase 是相同的,如果无需考虑负数,那在 Phoenix 中建表时采用无符号类型是最合适的选择。
- 如需考虑负数的情况,则可通过 Phoenix 自定义函数,将数字类型的最高位,即符号位反转即可,自定义函数可参考如下链接:https://phoenix.apache.org/udf.html
-
4.4 Phoenix二级索引
-
HBase是没有二级索引的概念的,利用Phoenix中间层,可以为其建立二级索引
-
需要添加如下配置到HBase的HRegionServer节点的hbase-site.xml
[gaochuchu@s1 hbase-2.4.11]$ vim conf/hbase-site.xml
<!-- phoenix regionserver 配置参数-->
<property>
 <name>hbase.regionserver.wal.codec</name>
<value>org.apache.hadoop.hbase.regionserver.wal.IndexedWALEditCodec</value>
</property>
[gaochuchu@s1 hbase-2.4.11]$ xsync conf/hbase-site.xml
#Hbase重启
[gaochuchu@s1 hbase-2.4.11]$ stop-hbase.sh
[gaochuchu@s1 hbase-2.4.11]$ start-hbase.sh
4.4.1 全局索引(global index)
-
Global Index 是默认的索引格式,创建全局索引时,会在 HBase 中建立一张新表。也就是说索引数据和数据表是存放在不同的表中的,因此全局索引适用于多读少写的业务场景。写数据的时候会消耗大量开销,因为索引表也要更新,而索引表是分布在不同的数据节点上的,跨节点的数据传输带来了较大的性能消耗
-
在读数据的时候 Phoenix 会选择索引表来降低查询消耗的时间。
-
创建单个字段的全局索引
CREATE INDEX my_index ON my_table (my_col);-
举例
create index my_index on student1(age);
-
此时创建了MY_INDEX的单独的索引表,保存相关的索引信息
-
-
查看二级索引是否有效:执行explainPlan计划,有二级索引会变为范围扫描
explain select id,name from student1 where age = 10;
注意:如果想查询的字段不是索引字段的话索引表不会被使用,也就是说不会带来查询速度的提升。
explain select id,name,addr from student1 where age = 10;
因为id,name是主键构成的联合索引,age是全局索引,addr不是索引,因此这时候查询是全表扫描
-
删除索引
DROP INDEX my_index ON my_table-
举例
drop index my_index on student1;
-
4.4.2 包含索引(covered index)
-
创建携带其他字段的全局索引(本质还是全局索引)。
CREATE INDEX my_index ON my_table (v1) INCLUDE (v2);-
举例
create index my_index on student1(age) include (addr); -
此时我们仍运行4.4.1中原本走全表扫描的例子
explain select id,name,addr from student1 where age = 10;
此时走了范围查询,因为age为全局索引,其携带了addr字段
-
4.4.3 本地索引(local index)
-
Local Index 适用于写操作频繁的场景。索引数据和数据表的数据是存放在同一张表中(且是同一个 Region),避免了在写操作的时候往不同服务器的索引表中写索引带来的额外开销。
CREATE LOCAL INDEX my_index ON my_table (my_column); #其中my_column可以是多个,类似于组合索引本地索引会将所有的信息存在一个影子列族中,虽然读取的时候也是范围扫描,但是没有全局索引快,优点在于不用写多个表了。
-
举例
0: jdbc:phoenix:s1,s2,s3,s4,gracal:2181> drop index my_index on student1; CREATE LOCAL INDEX my_index ON student1 (age,addr); -
此时我们执行执行计划
explain select id,name,addr from student1 where age = 10;
-
5. HBase和Hive集成
-
如果大量的数据已经存放在 HBase 上面,需要对已经存在的数据进行数据分析处理,那么 Phoenix 并不适合做特别复杂的 SQL 处理,此时可以使用 hive 映射 HBase 的表格,之后写 HQL 进行分析处理。
-
在hive-site.xml中添加zookeeper的属性:
[gaochuchu@s1 conf]$ vim hive-site.xml <property> <name>hive.zookeeper.quorum</name> <value>s1,s2,s4,s4,gracal</value> </property> <property> <name>hive.zookeeper.client.port</name> <value>2181</value> </property> #启动Hive客户端 [gaochuchu@s1 hive-3.1.2]$ hive -
实例1
-
目标:建立Hive表,关联HBase表,插入数据到Hive表的同时能够影响HBase表。
-
在Hive中创建表同时关联HBase
CREATE TABLE hive_hbase_emp_table(
 empno int,
 ename string,
 job string,
 mgr int,
 hiredate string,
 sal double,
 comm double,
 deptno int
)STORED BY 'org.apache.hadoop.hive.hbase.HBaseStorageHandler'
WITH SERDEPROPERTIES ("hbase.columns.mapping" =
":key,info:ename,info:job,info:mgr,info:hiredate,info:sal,info:comm,info:deptno")
TBLPROPERTIES ("hbase.table.name" = "hbase_emp_table");
此时在Hive中出现这个表:

同时在Hbase中也出现了这个表:

-
在Hive中创建临时中间表,用于load文件中的数据
注意不能将数据直接load进Hive所关联HBase的那张表中,因为创建的Hive表格和HBase关联,结构比较复杂
CREATE TABLE emp( empno int, ename string, job string, mgr int, hiredate string, sal double, comm double, deptno int ) row format delimited fields terminated by '\t'; -
向Hive临时表中load 数据
hive> load data local inpath '/opt/softs/emp.txt' into table emp; -
通过insert命令将中间表中的数据导入Hive关联的Hbase的那张表中
hive> insert into table hive_hbase_emp_table select * from emp; -
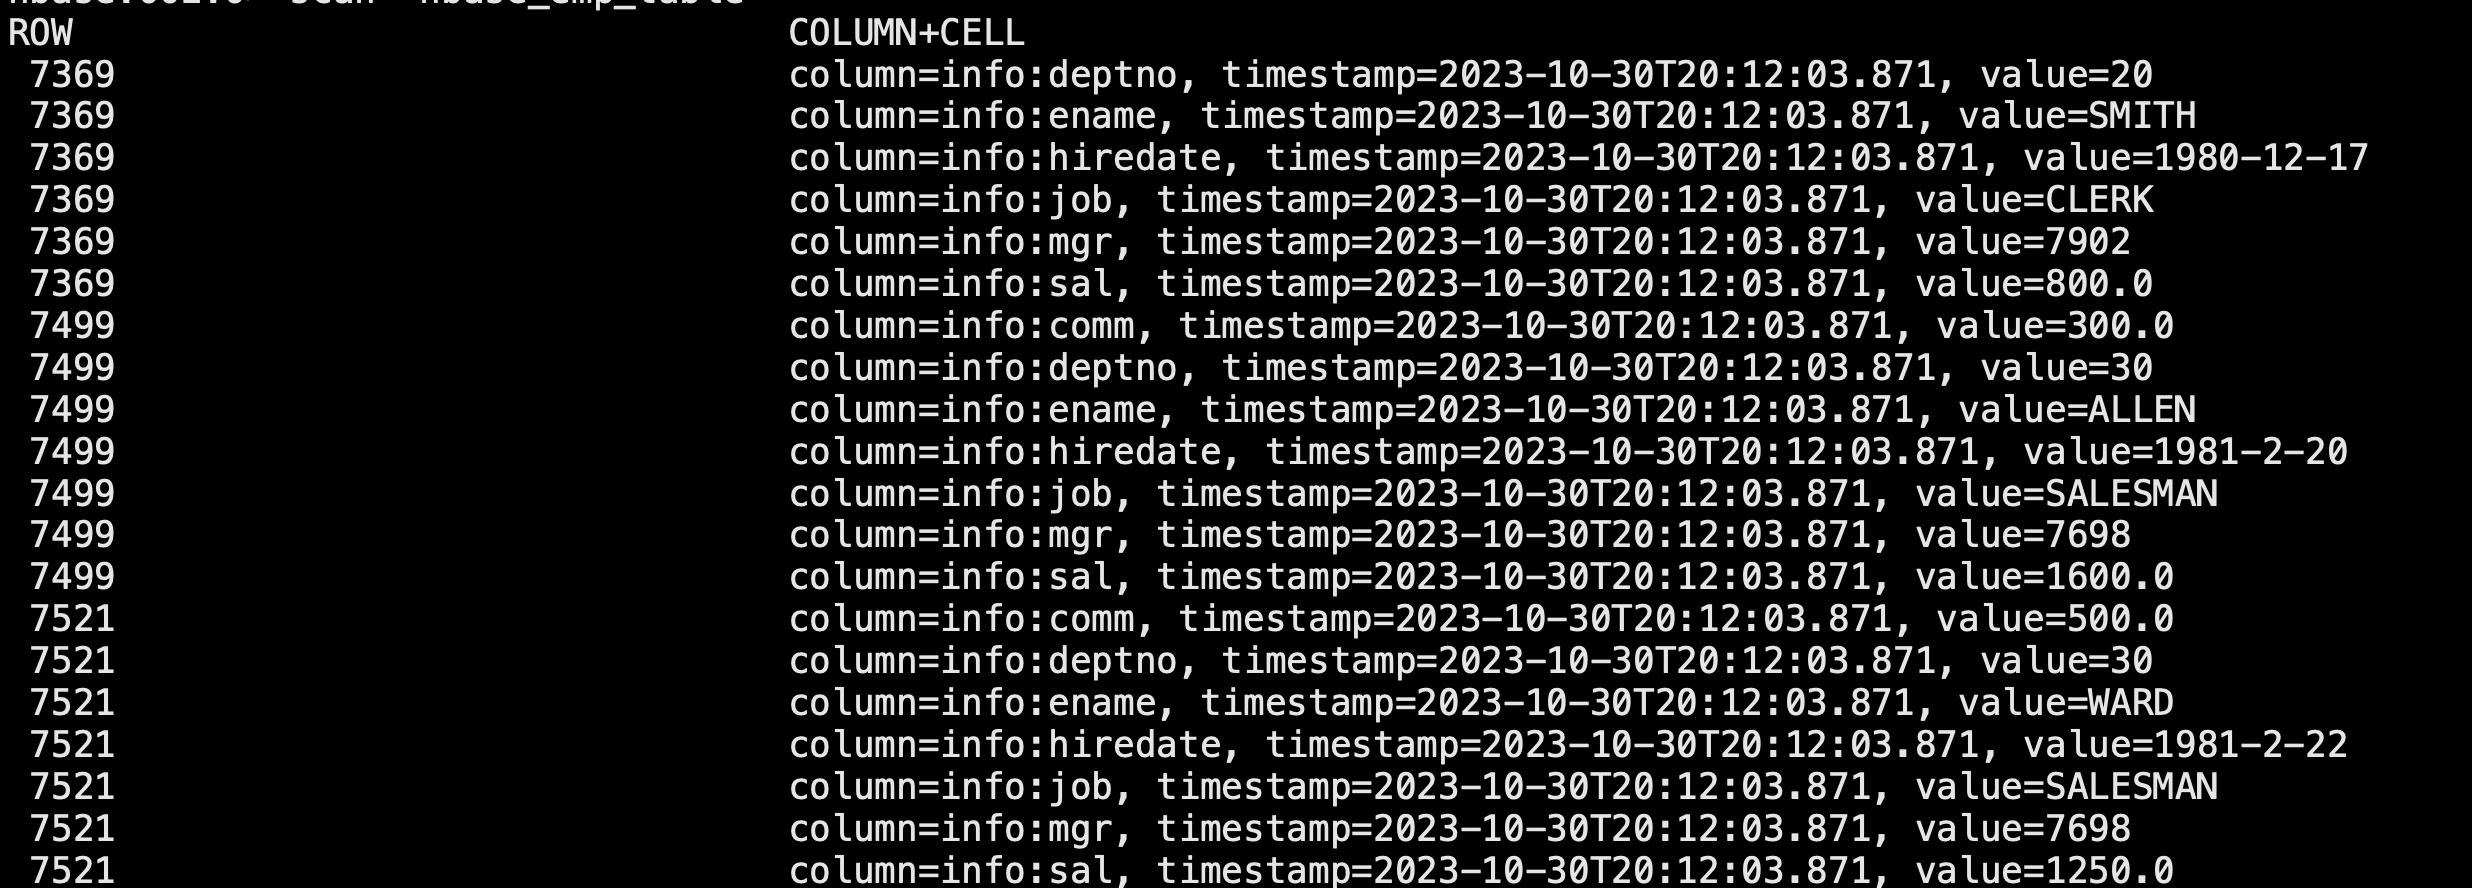
查看Hive以及相关联的HBase表中是否已经成功同步插入了数据
hive> select * from hive_hbase_emp_table;
Hbase> scan 'hbase_emp_table'
-
-
实例2
目标:在 HBase 中已经存储了某一张表 hbase_emp_table,然后在 Hive 中创建一个外部表来关联 HBase 中的 hbase_emp_table 这张表,使之可以借助 Hive 来分析 HBase 这张表中的数据。
-
Hive中创建外部表
CREATE EXTERNAL TABLE relevance_hbase_emp( empno int, ename string, job string, mgr int, hiredate string, sal double, comm double, deptno int )STORED BY 'org.apache.hadoop.hive.hbase.HBaseStorageHandler' WITH SERDEPROPERTIES ("hbase.columns.mapping" = ":key,info:ename,info:job,info:mgr,info:hiredate,info:sal,info:comm,info:deptno") TBLPROPERTIES ("hbase.table.name" = "hbase_emp_table"); -
关联后就可以使用Hive函数进行一些分析操作如
hive (default)> select deptno,avg(sal) monery from relevance_hbase_emp group by deptno ;
-


 3052
3052


 被折叠的 条评论
为什么被折叠?


