


一、Thymeleaf 介绍
Thymeleaf 的主要目标是将优雅的自然模板带到开发工作流程中,并将 HTML 在浏览器中正确显示,并且可以作为静态原型,让开发团队能更容易地协作。Thymeleaf 能够处理HTML,XML,JavaScript,CSS 甚至纯文本。
长期以来,jsp 在视图领域有非常重要的地位,随着时间的变迁,出现了一位新的挑战者:Thymeleaf,Thymeleaf 是原生的,不依赖于标签库.它能够在接受原始 HTML 的地方进行编辑和渲染.因为它没有与Servelet规范耦合,因此Thymeleaf模板能进入jsp所无法涉足的领域。
二、Thymeleaf 基本使用
1.创建项目
2.修改 POM 文件,添加 Thymeleaf 启动器依赖
		<!--添加Thymeleaf启动器-->
        <dependency>
            <groupId>org.springframework.boot</groupId>
            <artifactId>spring-boot-starter-thymeleaf</artifactId>
        </dependency>
3.创建 Controller
Thymeleaf页面要放在main/resources/templates目录下。该目录类似与war工程的WEB-INF目录,只能由转发访问该目录下的页面,提高了安全性。因此需要创建controller。
/**
 * 页面跳转 Controller
 */
@Controller
public class PageController {
    @GetMapping("show")
    public String showPage(Model model){
        model.addAttribute("msg","Hello Thymeleaf");
        return "index";
    }
}
4.创建视图
<!DOCTYPE HTML PUBLIC "-//W3C//DTD HTML 4.01 Transitional//EN"
        "http://www.w3.org/TR/html4/loose.dtd">
<html>
<head>
    <title>Thymelaf</title>
</head>
<body>
<!-- th:text="" 是Thymeleaf的一个标记,表示以text的格式输出内容,用来做数据处理 -->
<span th:text="你好"></span>
<br/>
<span th:text="${msg}"></span>
</body>
</html>
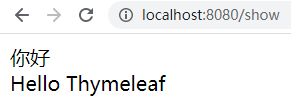
访问结果
三、Thymeleaf 语法讲解
命名空间:xmlns:th=“http://www.thymeleaf.org”(添加到html标签里)
1.字符串与变量输出操作
th:text :在页面中输出值。(会覆盖掉标签中的值)
th:value:可以将一个值放入到 input 标签的 value 中
2.字符串操作
Thymeleaf 提供了一些内置对象,内置对象可直接在模板中使用。这些对象是以#引用的。
使用内置对象的语法
注意:(1) 引用内置对象需要使用# (2)大部分内置对象的名称都以 s 结尾。如:strings、numbers、dates
表达式:
- ${#strings.isEmpty(key)}:判断字符串是否为空,如果为空返回 true,否则返回 false
- ${#strings.contains(msg,‘T’)}:判断字符串是否包含指定的子串,如果包含返回 true,否则返回 false
- ${#strings.startsWith(msg,‘a’)}:判断当前字符串是否以子串开头,如果是返回 true,否则返回 fals
- ${#strings.endsWith(msg,‘a’)}:判断当前字符串是否以子串结尾,如果是返回 true,否则返回 false
- ${#strings.length(msg)}:返回字符串的长度
- ${#strings.indexOf(msg,‘h’)}:查找子串的位置,并返回该子串的下标,如果没找到则返回-1
- ${#strings.substring(msg,2)}
${#strings.substring(msg,2,5)}
截取子串,用户与 jdk String 类下 SubString 方法相同 - ${#strings.toUpperCase(msg)}
${#strings.toLowerCase(msg)}
字符串转大小写。
3.日期格式化处理
- ${#dates.format(key)}:格式化日期,默认的以浏览器默认语言为格式化标准
- ${#dates.format(key,‘yyyy/MM/dd’)}:按照自定义的格式做日期转换
- ${#dates.year(key)}:取年
${#dates.month(key)}:取月
${#dates.day(key)}:取日
4.条件判断
[1] th:if
<div>
    <span th:if="${sex}=='男'">
        性别:男
    </span>
    <span th:if="${sex}=='女'">
        性别:女
    </span>
</div>
sex为attribute中的对象
[2]th:switch / th:case
th:switch / th:case 与 Java 中的 switch 语句等效,有条件地显示匹配的内容。如果有多个匹配结果只选择第一个显示。
th:case="“表示 Java 中 switch 的 default,即没有 case 的值为 true 时则显示 th:case=”" 的内容。
<div th:switch="${id}">
    <span th:case="1">id为1</span>
    <span th:case="2">id为2</span>
    <span th:case="3">id为3</span>
    <span th:case="*">id不为1、2、3</span>
</div>
id为attribute中的一个对象。
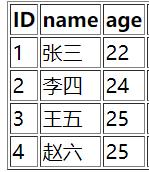
5.迭代遍历
<table border="1px">
    <tr>
        <th>ID</th>
        <th>name</th>
        <th>age</th>
    </tr>
    <!-- userList为Attribute中的list对象 -->
    <tr th:each="user:${userList}">
        <td th:text="${user.id}"></td>
        <td th:text="${user.name}"></td>
        <td th:text="${user.age}"></td>
    </tr>
</table>
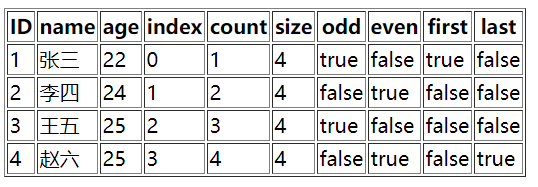
th:each 状态变量
- index:当前迭代器的索引 从 0 开始
- count:当前迭代对象的计数 从 1 开始
- size:被迭代对象的长度
- odd/even:布尔值,当前循环是否是偶数/奇数 从 0 开始
- first:布尔值,当前循环的是否是第一条,如果是返回 true 否则返回 false
- last:布尔值,当前循环的是否是最后一条,如果是则返回 true 否则返回 false
<table border="1px">
    <tr>
        <th>ID</th>
        <th>name</th>
        <th>age</th>
        <th>index</th>
        <th>count</th>
        <th>size</th>
        <th>odd</th>
        <th>even</th>
        <th>first</th>
        <th>last</th>
    </tr>
     <!-- suibian是自定义的状态变量名,和第一个变量用逗号隔开 -->
    <tr th:each="user,suibian:${userList}">
        <td th:text="${user.id}"></td>
        <td th:text="${user.name}"></td>
        <td th:text="${user.age}"></td>
        <td th:text="${suibian.index}"></td>
        <td th:text="${suibian.count}"></td>
        <td th:text="${suibian.size}"></td>
        <td th:text="${suibian.odd}"></td>
        <td th:text="${suibian.even}"></td>
        <td th:text="${suibian.first}"></td>
        <td th:text="${suibian.last}"></td>
    </tr>
</table>
6. th:each 迭代 Map
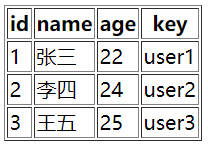
Controller中添加到Attribute中的map
		Map<String,User> map=new HashMap<>();
        map.put("user1",new User(1,"张三",22));
        map.put("user2",new User(2,"李四",24));
        map.put("user3",new User(3,"王五",25));
        model.addAttribute("map",map);
前端页面
<table border="1px">
    <tr>
        <th>id</th>
        <th>name</th>
        <th>age</th>
        <th>key</th>
    </tr>
    <tr th:each="m:${map}">
        <td th:text="${m.value.id}"></td>
        <td th:text="${m.value.name}"></td>
        <td th:text="${m.value.age}"></td>
        <td th:text="${m.key}"></td>
    </tr>
</table>
7.操作域对象
[1]HttpServletRequest
request.setAttribute("req", "HttpServletRequest");
方法一:<span th:text="${#httpServletRequest.getAttribute('req')}"></span>
方法二:<span th:text="${#request.getAttribute('req')}"></span>
[2]HttpSession
request.getSession().setAttribute("sess", "HttpSession");
方法一:<span th:text="${session.ses}"></span><br/>
方法二:<span th:text="${#session.getAttribute('ses')}"></span><br/>
[3]ServletContext
request.getSession().getServletContext().setAttribute("app","Application");
方法一:<span th:text="${application.app}"></span>
方法二:<span th:text="${#servletContext.getAttribute('app')}"></span>
[4]示例
Controller中存储的三种域对象
req.setAttribute("req","HttpServletRequest");
req.getSession().setAttribute("ses","HttpSession");
req.getSession().getServletContext().setAttribute("app","application");
前端页面
HttpServletRequest:<span th:text="${#httpServletRequest.getAttribute('req')}"></span>
                   <span th:text="${#request.getAttribute('req')}"></span><br/>
HttpSession:<span th:text="${session.ses}"></span>
            <span th:text="${#session.getAttribute('ses')}"></span><br/>
ServletContext:<span th:text="${application.app}"></span>
               <span th:text="${#servletContext.getAttribute('app')}"></span>
结果

8.URL 表达式
[1]语法
在 Thymeleaf 中 URL 表达式的语法格式为@{}
[2]URL 类型
- 绝对路径
<a th:href="@{http://www.baidu.com}">打开百度</a>
- 相对路径
(1)相对于当前项目的根
在Controller中添加一个方法
 <!-- 访问show2时跳转至index2.html页面 -->
 @GetMapping("show2")
    public String showPage2(){
        return "index2";
    }
前端页面
<a th:href="@{/show2}">打开index2</a>
(2)相对于服务器的根
tomcat下的webapps可部署多个项目,使用该方式可以跨项目访问
<a th:href="@{~/project2/resourcename}">相对于服务器的根</a>
[3]在 URL 中传递参数
普通URL传递参数方式
<a th:href="@{/show2?id=1&name=张三}">普通URL传递参数方式一</a><hr/>
<a th:href="@{/show2(id=2,name='李四')}">普通URL传递参数方式二</a><hr/>
从EL表达式中获取参数的值
Attribute
 model.addAttribute("id",100);
 model.addAttribute("name","王五");
标签
<a th:href="@{'/show2?id='+${id}+'&name='+${name}}">普通URL动态传递参数方式一</a><hr/>
<a th:href="@{/show2(id=${id},name=${name})}">普通URL动态传递参数方式二</a><hr/>
在 restful 格式的 URL 中传递参数
Controller接收参数
 @GetMapping("show3/{id}/{name}")
    public String showPage3(@PathVariable int id,@PathVariable String name){
        System.out.println(id+"\t"+name);
        return "index2";
    }
前端页面
<!--在 restful 格式的 URL 中传递参数-->
<a th:href="@{/show3/{id}/{name}(id=200,name='李四')}">在restful格式的URL中传递参数方式一</a>
<a th:href="@{/show3/{id}(id=300,name='王五')}">在restful格式的URL中传递参数方式二</a>
<a th:href="@{/show3/{id}/{name}(id=${id},name=${name})}">在restful格式的URL中传递参数方式三</a>
9.在配置文件中配置Thymeleaf
spring.thymeleaf.prefix=classpath:/templates/suibian/
spring.thymeleaf.suffix=.html
spring.thymeleaf.mode=HTML #配置视图模板类型,如果视图模板使用的是 html5 需要配置。如果是html4,则不需要。
spring.thymeleaf.encoding=utf-8
spring.thymeleaf.servlet.content-type=text/html #响应类型
#配置页面缓存,一般设置为false。应为有些页面被缓存后,即使服务器发生了变化,还是显示的是原来的内容,在我们开发时比较麻烦。
spring.thymeleaf.cache=false


 1454
1454


 被折叠的 条评论
为什么被折叠?
被折叠的 条评论
为什么被折叠?
 到【灌水乐园】发言


