


页面布局

实现步骤
页面分为两个个部分
1、头部
2、菜单+显示区
头部代码 top.vue
<template>
    <div style="background: rgb(245,245,245);height:70px">
        <h3 :style="title_style">{{title}}</h3>
        <img :src="img_addr" :style="img_style">
    </div>
</template>
<script>
export default {
  data () {
    return {
      title: '模组管理系统',
      title_style: {
        'display': 'inline-block',
        'text-align': 'center'
      },
      img_addr: require('../assets/images/exit.png'),
      img_style: {
        'height': '20px',
        'width': '20px',
        'position': 'absolute',
        'top': '35px',
        'right': '3%'
      }
    }
  }
}
</script>
<style>
</style>
菜单+Slider.vue
<template>
    <div>
        <div class="basic slider_style">
            <ul>
                <!-- //根据组件数量加载菜单 -->
                <li v-for="menu in menus" :key="menu.id">
                    <a @click="withdrawal(menu.vueName)">{{menu.title}}</a>
                </li>
            </ul>
        </div>
        <div class="basic main_style">
            <component :is="who"></component>
        </div>
    </div>
</template>
<script>
import update from './Update.vue'
import other from './Other.vue'
export default {
  components: {
    'update': update,
    'other': other
  },
  methods: {
    withdrawal (vueName) {
      this.who = vueName
    }
  },
  data () {
    return {
      // 设置默认加载的组件
      who: 'update',
      // 页面中所有组件
      menus: [
        {
          title: '更新',
          vueName: 'update'
        },
        {
          title: '其他',
          vueName: 'other'
        }
      ]
    }
  }
}
</script>
<style>
  .basic{
      margin: 0vh;
      padding: 0vh;
      border: 0vh;
  }
  .slider_style {
      background: rgb(150,180,125);
      float: left;
      width: 15%;
      height: 100vh;
    }
    ul,li{
        list-style:none;
        padding:0;
        margin-top:25px;
        margin-bottom: 25px;
        color: #fff;
        font-size: 16px;
    }
    .main_style{
        height:100vh;
        width:85%;
        float: left;
    }
</style>
将两个组件放到页面对应位置`
<template>
    <div id="all">
        <div id="headerBar">
            <top></top>
        </div>
        <div id="sliderBar">
            <slider></slider>
        </div>
    </div>
</template>

<script>
import slider from './Slider.vue'
import top from './Top.vue'
export default {
  name: 'Layout',
  components: {
    top,
    slider
  }
}
</script>

<style>
    #all{
        background-color:white;
        height:100%;
        width:100%;
    }
    #headerBar{
        display: inline-block;
        width: 100%;
        height: 20%;
        margin: 0%;
        padding: 0%;
        border: 0%;
    }
    #slider{
        width: 100%;
    }
</style>
通过router/index.js设置App.vue切换的组件
app.vue 主组件,所有页面都是在App.vue下进行切换
import Vue from 'vue'
import Router from 'vue-router'
import Layout from '@/components/Layout'
Vue.use(Router)

export default new Router({
  mode: 'history',
  routes: [
    {
      path: "/index.html",
      name: 'Layout',
      component: Layout
    }
  ]
})
代码结构
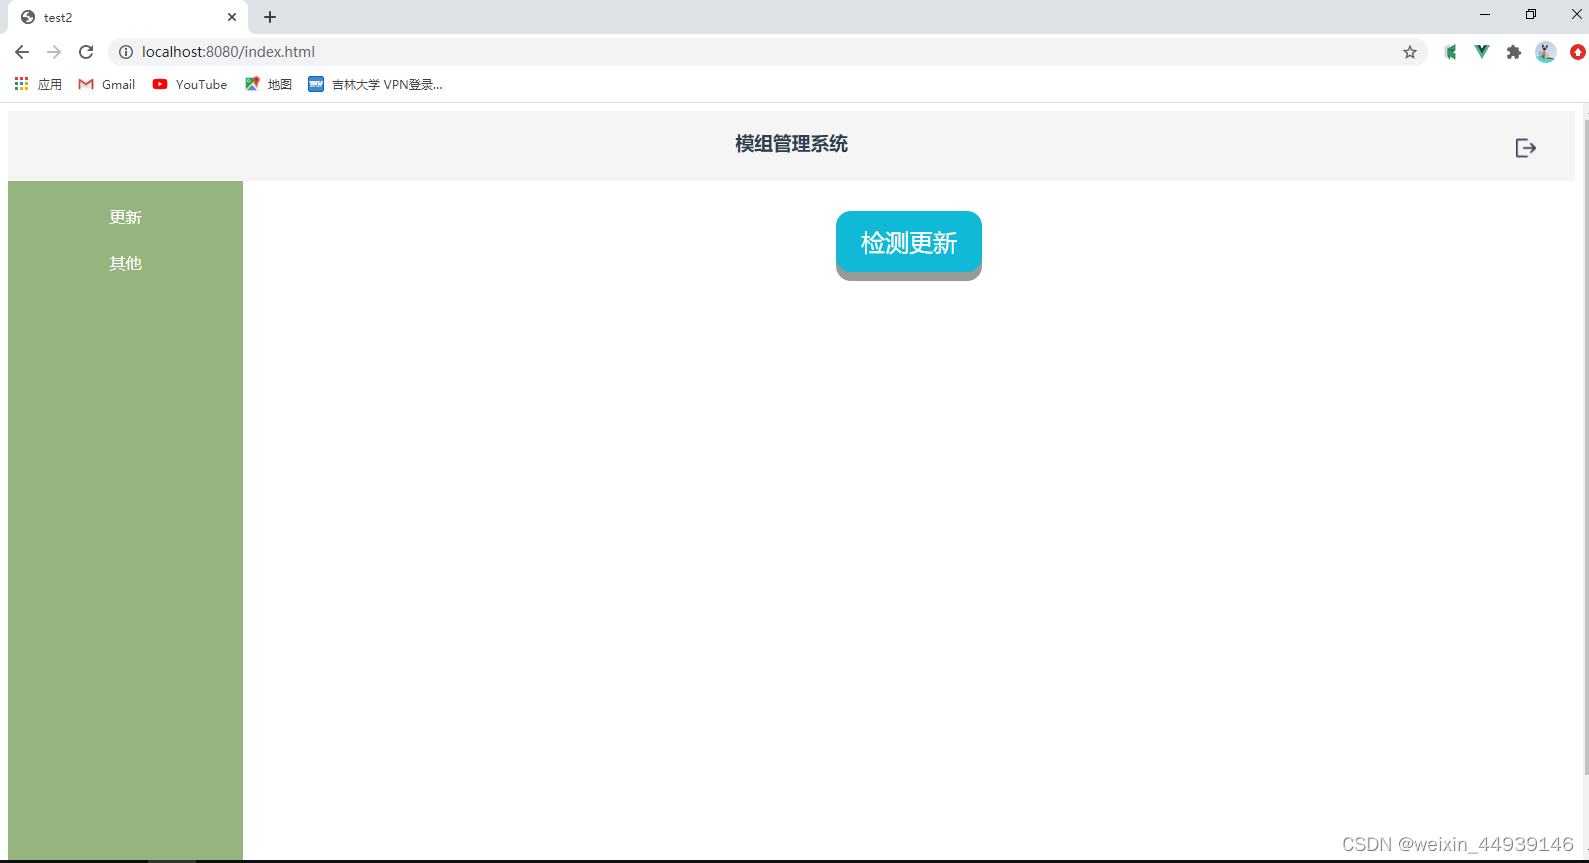
最后实现的效果
开发过程遇到的问题
1、 页面布局问题
第一步将页面分为上下两个部分,上部分为整个网站的标题,下部分分为菜单部分和显示区域部分,根据菜单部分,使用代码:<div class="basic main_style"><component :is="who"></component></div>调整显示部分显示的组件
使用float将
转换行内元素
2、盒子高度问题
使用height:XXX设置盒子高度,当时有XX%时盒子没有内容无法支撑盒子,但是使用XXvh,即使盒子没有内容盒子也会有固定高度


 3625
3625


 被折叠的 条评论
为什么被折叠?
被折叠的 条评论
为什么被折叠?
 到【灌水乐园】发言


