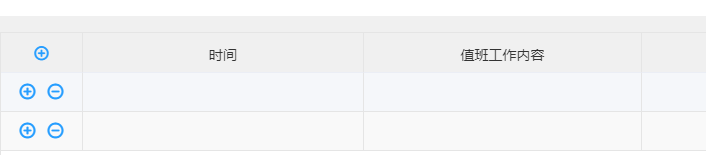
element中table表格表头添加按钮,并添加点击事件

效果图:
在这里插入图片描述

添加:render-header=“renderHeader”

<el-table-column
                 prop="oper"
                 align="center"
                 :render-header="renderHeader"
                 width="82px"
                 >
    <template slot-scope="scope">
        <span @click="handelAddRow(scope.$index,scope.row)" class="oper-btn">
            <i class="dse-function-icon zeng"></i>
        </span>
        <span
              v-if="tableData.length>1"
              @click="handelDelete(scope.$index,scope.row.id)"
              class="oper-btn"
              >
            <i class="dse-function-icon jian"></i>
        </span>
    </template>
</el-table-column>

添加按钮元素和样式,并绑定点击事件:onClick={this.handelAddRow}

methods: {
    renderHeader(h, { column, $index }) {
        return (
            <span onClick={this.handelAddRow} class="oper-btn">
            <i class="dse-function-icon zeng"></i>
    </span>
    )
},
handelAddRow() {
    this.tableData.push({
         id: '',
         tm: '',
         name: '',
         weight: '',
     })
 },
}
  • 1
    点赞
  • 7
    收藏
    觉得还不错? 一键收藏
  • 0
    评论
好的,下面是一个简单的示例,演示如何在element-ui的表格实现点表头控制密码列加密显示的功能。 首先,我们需要在表格的列定义,为密码列添加一个 `formatter` 属性。这个属性用来指定密码列的显示方式。在我们的示例,我们将使用一个自定义的 `passwordFormatter` 函数来控制密码列的显示。这个函数的作用是根据密码列的当前显示状态,来决定是显示加密后的密码,还是显示原始的明文密码。 ```html <template> <el-table :data="tableData" style="width: 100%"> <el-table-column prop="username" label="用户名"></el-table-column> <el-table-column prop="password" label="密码" :formatter="passwordFormatter"></el-table-column> </el-table> </template> ``` 接下来,我们需要在表头添加一个按钮,用来触发密码列的加密显示。我们可以使用 `slot-scope` 属性来自定义表头的内容,并在其添加一个 `el-button` 按钮。当用户点这个按钮时,我们将调用 `togglePasswordDisplay` 方法,来切换密码列的显示状态。 ```html <template> <el-table :data="tableData" style="width: 100%"> <el-table-column prop="username" label="用户名"></el-table-column> <el-table-column prop="password" label="密码" :formatter="passwordFormatter"> <template slot-scope="{ column }"> <el-button @click="togglePasswordDisplay(column)"> {{ column.showPassword ? '隐藏密码' : '显示密码' }} </el-button> </template> </el-table-column> </el-table> </template> ``` 最后,我们需要在组件的 `methods` ,实现 `passwordFormatter` 和 `togglePasswordDisplay` 两个方法。`passwordFormatter` 方法用来控制密码列的显示方式,而 `togglePasswordDisplay` 方法用来切换密码列的显示状态。具体实现如下: ```javascript <script> export default { data() { return { tableData: [ { username: 'user1', password: 'password1' }, { username: 'user2', password: 'password2' }, { username: 'user3', password: 'password3' }, ], }; }, methods: { passwordFormatter(row, column, cellValue) { if (column.showPassword) { return cellValue; } else { return '******'; } }, togglePasswordDisplay(column) { column.showPassword = !column.showPassword; this.$forceUpdate(); }, }, }; </script> ``` 在 `passwordFormatter` 方法,我们根据 `column.showPassword` 属性的值来决定密码列的显示方式。如果这个属性为 `true`,则显示原始的明文密码;否则则显示加密后的密码。 在 `togglePasswordDisplay` 方法,我们将切换 `column.showPassword` 属性的值,并调用 `$forceUpdate` 方法来强制更新表格的显示。这个方法的作用是告诉Vue,我们已经修改了组件的状态,需要重新渲染组件以反映这些修改。 这样,我们就完成了在element-ui的表格实现点表头控制密码列加密显示的功能。

“相关推荐”对你有帮助么?

  • 非常没帮助
  • 没帮助
  • 一般
  • 有帮助
  • 非常有帮助
提交
评论
添加红包

请填写红包祝福语或标题

红包个数最小为10个

红包金额最低5元

当前余额3.43前往充值 >
需支付:10.00
成就一亿技术人!
领取后你会自动成为博主和红包主的粉丝 规则
hope_wisdom
发出的红包
实付
使用余额支付
点击重新获取
扫码支付
钱包余额 0

抵扣说明:

1.余额是钱包充值的虚拟货币,按照1:1的比例进行支付金额的抵扣。
2.余额无法直接购买下载,可以购买VIP、付费专栏及课程。

余额充值