SpringBoot中编写Swagger配置类

文章介绍了如何在前后端分离的开发模式中利用Swagger来管理和生成API文档,强调了Swagger的及时性、规范性和一致性特点。文章进一步讲解了如何集成knife4j增强Swagger的功能,并提供了添加依赖、配置类的步骤,以及如何在实体类和Controller上使用相关注解来实现接口说明和测试。最后,展示了启动项目后的访问路径和使用示例。

摘要生成于 C知道 ,由 DeepSeek-R1 满血版支持, 前往体验 >

编写Swagger配置类
1. Swagger介绍

前后端分离开发模式中,API文档是最好的沟通方式。Swagger 是一个规范和完整的框架,用于生成、描述、调用和可视化 RESTful 风格的 Web 服务。具有以下几个特点:
1、及时性 (接口变更后,能够及时准确地通知相关前后端开发人员)
2、规范性 (并且保证接口的规范性,如接口的地址,请求方式,参数及响应格式和错误信息)
3、一致性 (接口信息一致,不会出现因开发人员拿到的文档版本不一致,而出现分歧)
4、可测性 (直接在接口文档上进行测试,以方便理解业务)

2. 集成knife4j

文档地址:https://doc.xiaominfo.com/
knife4j是为Java MVC框架集成Swagger生成Api文档的增强解决方案。
knife4j属于service模块公共资源,因此我们集成到service-uitl模块

3. 添加依赖

common模块添加依赖

<dependency>
    <groupId>com.github.xiaoymin</groupId>
    <artifactId>knife4j-spring-boot-starter</artifactId>
</dependency>
4. 添加配置类
/**
 * Swagger2配置信息
 */
@Configuration
@EnableSwagger2WebMvc
public class Swagger2Config {

    @Bean
    public Docket webApiConfig(){
        List<Parameter> pars = new ArrayList<>();
        ParameterBuilder tokenPar = new ParameterBuilder();
        tokenPar.name("userId")
                .description("用户token")
                //.defaultValue(JwtHelper.createToken(1L, "admin"))
                .defaultValue("1")
                .modelRef(new ModelRef("string"))
                .parameterType("header")
                .required(false)
                .build();
        pars.add(tokenPar.build());

        Docket webApi = new Docket(DocumentationType.SWAGGER_2)
                .groupName("webApi")
                .apiInfo(webApiInfo())
                .select()
                //只显示api路径下的页面
                .apis(RequestHandlerSelectors.basePackage("com.atguigu.ssyx"))
                .paths(PathSelectors.regex("/api/.*"))
                .build()
                .globalOperationParameters(pars);
        return webApi;
    }

    @Bean
    public Docket adminApiConfig(){
        List<Parameter> pars = new ArrayList<>();
        ParameterBuilder tokenPar = new ParameterBuilder();
        tokenPar.name("adminId")
                .description("用户token")
                .defaultValue("1")
                .modelRef(new ModelRef("string"))
                .parameterType("header")
                .required(false)
                .build();
        pars.add(tokenPar.build());

        Docket adminApi = new Docket(DocumentationType.SWAGGER_2)
                .groupName("adminApi")
                .apiInfo(adminApiInfo())
                .select()
                //只显示admin路径下的页面
                .apis(RequestHandlerSelectors.basePackage("com.atguigu.ssyx"))
                .paths(PathSelectors.regex("/admin/.*"))
                .build()
                .globalOperationParameters(pars);
        return adminApi;
    }

    private ApiInfo webApiInfo(){
        return new ApiInfoBuilder()
                .title("网站-API文档")
                .description("本文档描述了尚上优选网站微服务接口定义")
                .version("1.0")
                .contact(new Contact("atguigu", "http://atguigu.com", "atguigu"))
                .build();
    }

    private ApiInfo adminApiInfo(){
        return new ApiInfoBuilder()
                .title("后台管理系统-API文档")
                .description("本文档描述了尚上优选后台系统服务接口定义")
                .version("1.0")
                .contact(new Contact("atguigu", "http://atguigu.com", "atguigu"))
                .build();
    }
}
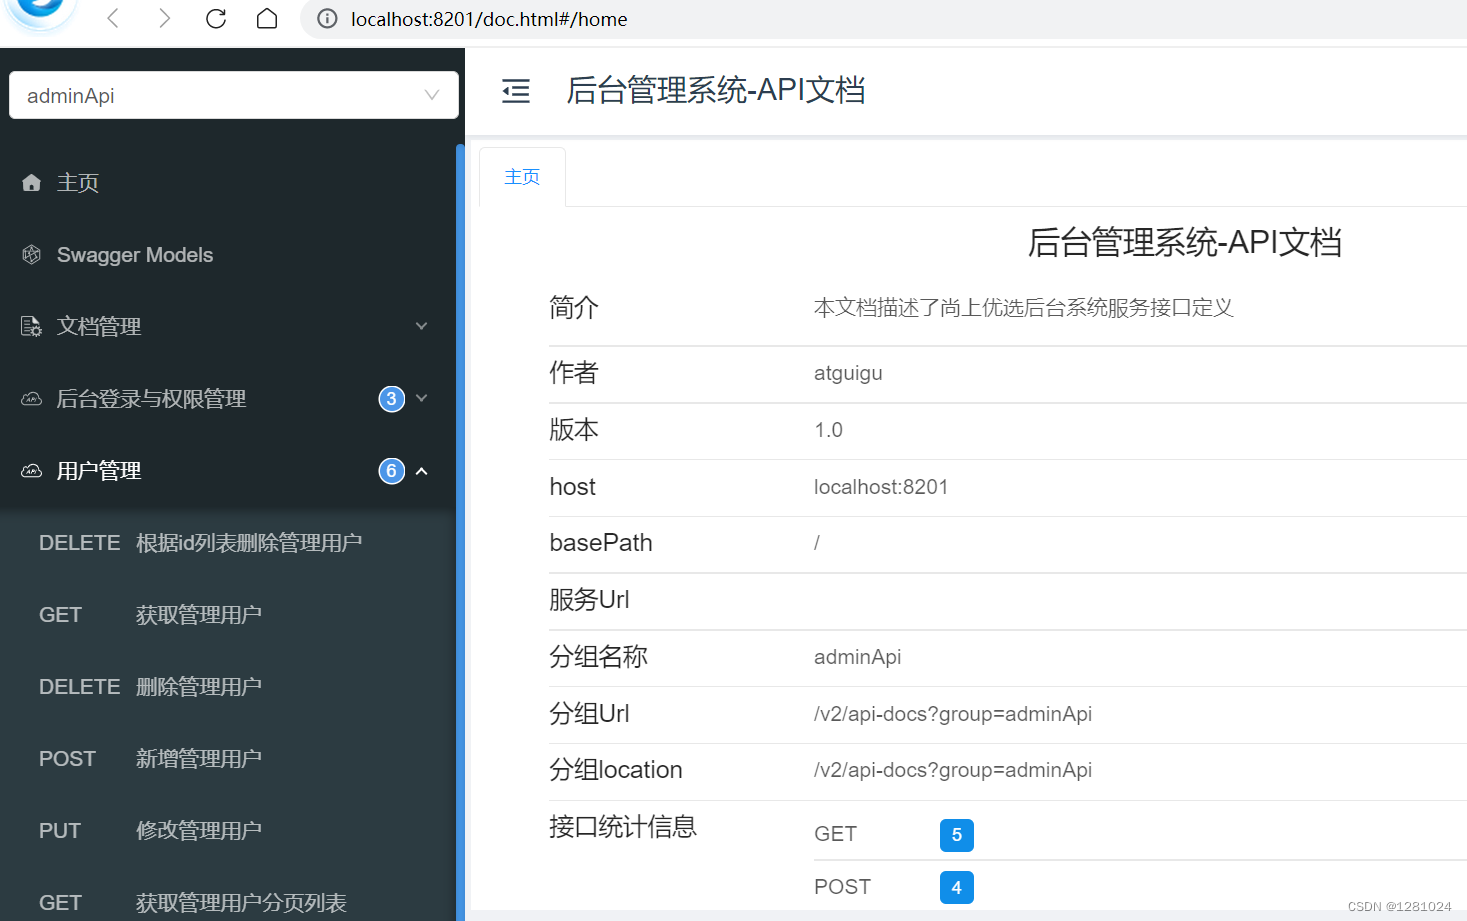
5. 启动项目,访问路径 http://localhost:8201/doc.html 进行接口测试,访问页面如下所示:

在这里插入图片描述

6.使用示例
用在实体类上
@Data     //lombok注解
@ApiModel(description = "角色") //swagger注解提示
@TableName("role")   //实体类对应角色表role
public class Role extends BaseEntity {
	
	private static final long serialVersionUID = 1L;
	
	@ApiModelProperty(value = "角色名称")   //swagger注解提示
	@TableField("role_name")    //属性对应的表的字段 role_name
	private String roleName;

	@ApiModelProperty(value = "备注")
	@TableField("remark")       //属性对应的表的字段 remark
	private String remark;
}
用在controller上
/**
 * 角色管理
 */
@RestController
@RequestMapping("/admin/acl/role")
@Api(tags = "用户管理")
@Slf4j
public class RoleController {
    @Autowired
    private RoleService roleService;

    @ApiOperation(value = "获取角色分页列表")
    @GetMapping("{page}/{limit}")
    public Result index(
            @ApiParam(name = "page", value = "当前页码", required = true)
            @PathVariable Long page,

            @ApiParam(name = "limit", value = "每页记录数", required = true)
            @PathVariable Long limit,

            @ApiParam(name = "roleQueryVo", value = "查询对象", required = false)
            RoleQueryVo roleQueryVo) {
        Page<Role> pageParam = new Page<>(page, limit);
        IPage<Role> pageModel = roleService.selectPage(pageParam, roleQueryVo);
        return Result.ok(pageModel);
    }
}
### Spring Boot 2.7 中正确配置 Swagger 的最佳实践 在 Spring Boot 2.7 版本中,由于框架内部对路径匹配机制进行了调整,传统的基于 `WebMvcConfigurer` 和 `@EnableWebMvc` 的方式可能会引发一些兼容性问题。以下是针对该版本的最佳实践。 #### 1. 添加依赖项 为了集成 Swagger UI 和 OpenAPI 文档支持,需引入以下 Maven 或 Gradle 依赖: 对于 Maven 用户: ```xml <dependency> <groupId>io.springfox</groupId> <artifactId>springfox-boot-starter</artifactId> <version>3.0.0</version> </dependency> ``` 对于 Gradle 用户: ```groovy implementation 'io.springfox:springfox-boot-starter:3.0.0' ``` 需要注意的是,Springfox 是目前最常用的 Swagger 集成工具之一,但在高版本的 Spring Boot 下可能存在一定的适配挑战[^1]。 --- #### 2. 解决路径匹配器冲突 Spring Boot 2.6 及更高版本默认使用 `PathPatternParser` 替代了旧版中的 `AntPathMatcher`。这可能导致某些 Swagger 插件无法正常工作,具体表现为错误提示 `Failed to start bean ‘documentationPluginsBootstrapper’`[^2]。 解决方法如下: - **全局设置回退到 Ant 路径匹配器** 通过自定义 Bean 来强制恢复为 `AntPathMatcher`: ```java import org.springframework.context.annotation.Bean; import org.springframework.context.annotation.Configuration; import org.springframework.web.servlet.config.annotation.PathMatchConfigurer; import org.springframework.web.util.UrlPathHelper; @Configuration public class WebConfig { public void configurePathMatch(PathMatchConfigurer configurer) { UrlPathHelper urlPathHelper = new UrlPathHelper(); urlPathHelper.setRemoveSemicolonContent(false); configurer.setUrlPathHelper(urlPathHelper); configurer.setUseRegisteredSuffixPatternMatchers(true); // 使用注册过的模式匹配器 } } ``` 此操作可以有效规避因路径解析策略变化带来的不兼容问题。 --- #### 3. 创建 Swagger 配置类 创建一个专门用于初始化 Swagger 功能的 Java 配置类: ```java import springfox.documentation.builders.ApiInfoBuilder; import springfox.documentation.builders.PathSelectors; import springfox.documentation.builders.RequestHandlerSelectors; import springfox.documentation.service.ApiInfo; import springfox.documentation.spi.DocumentationType; import springfox.documentation.spring.web.plugins.Docket; import org.springframework.context.annotation.Bean; import org.springframework.context.annotation.Configuration; @Configuration public class SwaggerConfiguration { @Bean public Docket api() { return new Docket(DocumentationType.OAS_30) .select() .apis(RequestHandlerSelectors.basePackage("com.example.controller")) // 设置扫描包路径 .paths(PathSelectors.any()) .build() .apiInfo(apiInfo()); } private ApiInfo apiInfo() { return new ApiInfoBuilder() .title("Spring Boot REST API") // 自定义文档标题 .description("描述信息:这是一个示例项目接口文档") // 描述 .version("1.0.0") // 版本号 .license("Apache License Version 2.0") // 许可证 .build(); } } ``` 上述代码片段展示了如何构建并暴露 OAS (OpenAPI Specification) v3.0 格式的 API 文档。 --- #### 4. 启动类上的注意事项 如果需要扩展额外的功能(如跨域支持),可以在启动类上添加特定注解。然而,为了避免潜在冲突,建议仅保留必要注解而不随意加入其他修饰符。例如: ```java @SpringBootApplication @EnableSwagger2 // 如果使用 springdoc-openapi,则替换为此注解 public class DemoApplication { public static void main(String[] args) { SpringApplication.run(DemoApplication.class, args); } } ``` 注意:当启用 `@EnableWebMvc` 注解时,可能会影响自动配置行为,因此除非确实需要完全接管 MVC 层逻辑,否则应谨慎使用它。 --- #### 5. 测试访问地址 完成以上步骤后,可以通过浏览器打开以下 URL 查看生成好的交互式 API 文档界面: ``` http://localhost:8080/swagger-ui/index.html#/ ``` 或者直接下载 JSON/YAML 文件形式的元数据: ``` http://localhost:8080/v3/api-docs ``` --- ### 总结 综上所述,在 Spring Boot 2.7 上成功部署 Swagger 主要涉及以下几个方面的工作:合理选用第三方库版本、妥善处理新老路径匹配算法之间的差异以及科学编写相关配置文件等内容。
评论
添加红包

请填写红包祝福语或标题

红包个数最小为10个

红包金额最低5元

当前余额3.43前往充值 >
需支付:10.00
成就一亿技术人!
领取后你会自动成为博主和红包主的粉丝 规则
hope_wisdom
发出的红包
实付
使用余额支付
点击重新获取
扫码支付
钱包余额 0

抵扣说明:

1.余额是钱包充值的虚拟货币,按照1:1的比例进行支付金额的抵扣。
2.余额无法直接购买下载,可以购买VIP、付费专栏及课程。

余额充值