


此文全部内容全部写在QT项目下的main.qml下测试执行
经常需要在同一项目下,对部分控件或某一模型需要重复使用,以下提供两种思路例子
1、使用Column和Row进行布局加上Repeater对模型进行重复使用
思路:
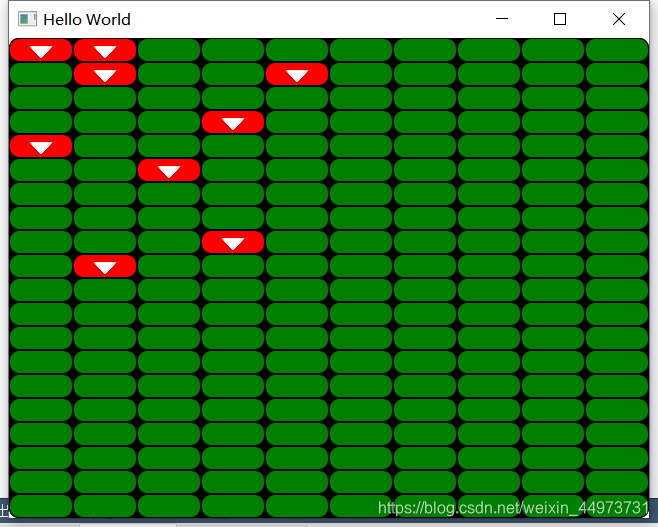
此部分设计一个矩形模型,矩形中包含一个居中图片和一个鼠标事件
重复利用该矩形模型实现一个10*20的矩阵
//main.qml
import QtQuick 2.12
import QtQuick.Window 2.12

Window {
    id:_root
    visible: true
    width: 640
    height: 480
    title: qsTr("Hello World")

    Rectangle {
        width: parent.width; height: parent.height
        border.width: 1
        color: "black"
        border.color: "black"
        radius: 10

        Column {
            Repeater {
                model: 20
                Row{
                    Repeater {
                        model: 10
                        Rectangle {
                            width: _root.width/10; height: _root.height/20
                            border.width: 1
                            color: "green"
                            border.color: "black"
                            radius: 10
                            property bool icon_vis: false
                            Image {
                                visible: icon_vis
                                width: parent.width<parent.height?parent.width:parent.height
                                height: parent.width<parent.height?parent.width:parent.height
                                anchors.horizontalCenter: parent.horizontalCenter
                                anchors.verticalCenter: parent.verticalCenter
                                source: "qrc:/image/sjx.svg"
                            }
                            MouseArea{
                                width: parent.width
                                height: parent.height
                                acceptedButtons: Qt.LeftButton | Qt.RightButton//启用左右键
                                //hoverEnabled: true
                                onClicked: {//左键抬起,image显示,Rectangle矩形颜色变化,右键抬起,恢复到初始化
                                    if(mouse.button === Qt.RightButton){
                                        parent.color = "green"
                                        icon_vis = false
                                    }
                                    else{
                                        parent.color = "red"
                                        icon_vis = true
                                    }
                                }
                                onPressed: {//左键按下,如果点击事件已经触发过,则不再处理,右键不做任何事
                                    if(mouse.button === Qt.RightButton)
                                        return
                                    if(!icon_vis)
                                        parent.color = "blue"
                                }
                                onExited: {//当鼠标移除该区域时,判断点击事件是否处理完成,未完成时恢复初始化。此处防止按下鼠标时没有松开就将鼠标移出了该区域,此时不会再触发松开指令
                                    if(icon_vis === false)
                                        parent.color = "green"
                                }
                            }
                        }
                    }
                }
            }
        }
    }
}
效果图:
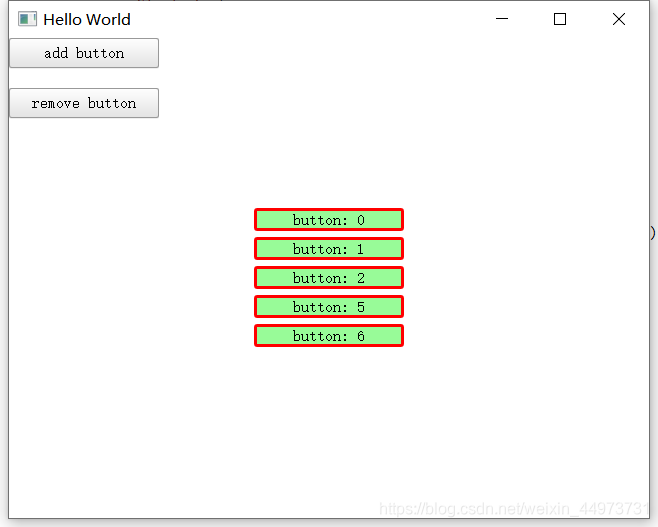
2、使用ColumnLayout布局,使用ListModel进行添加控件和信息传递
思路:
此部分设计一个Button模型,使用ListModel::append进行对模型的添加和信息传递
每次使用::append都会添加一个模型
每次使用::remove都会删除一个模型
//main.qml
import QtQuick.Window 2.12
import QtQuick 2.0
import QtQuick.Controls 1.4
import QtQuick.Controls.Styles 1.4
import QtQuick.Layouts 1.12
Window {
    id:_root
    visible: true
    width: 640
    height: 480
    title: qsTr("Hello World")

    property var color1: "red"
    property var color2: "palegreen"

    ColumnLayout{
        anchors.centerIn: parent//居中
        width: 150
        Repeater{
            model:ListModel {id:test_model}
            Button{
                text: _name
                Layout.fillWidth: true //中间对齐
                style: ButtonStyle {
                    background: Rectangle {
                        color: !control.pressed ? color2 : color1                   //按键按下时颜色转变
                                radius: 3                                           //圆角
                                border.color: control.pressed ? "blue" : color1     //边框颜色按下时转换
                                border.width: 3                                     //边框宽度
                    }
                }
                onClicked: {
                    console.log(_param1)//append时传递的_name和_param1是该Button模型的变量,可以被使用和修改
                }
            }
        }
    }
    Button{
        text: "add button"
        x:0;y:0
        width: 150;height: 30
        property var num : 0
        onClicked: {
            test_model.append({_name:("button: "+num.toString()),_param1:num++})
        }
    }
    Button{
        text: "remove button"
        x:0;y:50
        width: 150;height: 30
        onClicked: {
            if(_model.count>0)
                _model.remove(_model.count-1)
            //_model.clear()
        }
    }
}
效果图:


 1478
1478


 被折叠的 条评论
为什么被折叠?
被折叠的 条评论
为什么被折叠?
 到【灌水乐园】发言


