


一.完成内存登录
1.步骤

2.导入依赖
  <!-- SpringSecurity 对 Web 应用进行权限管理 -->
  <dependency>
      <groupId>org.springframework.security</groupId>
      <artifactId>spring-security-web</artifactId>
  </dependency>
  <!-- SpringSecurity 配置 -->
  <dependency>
      <groupId>org.springframework.security</groupId>
      <artifactId>spring-security-config</artifactId>
  </dependency>
  <!-- SpringSecurity 标签库 -->
  <dependency>
      <groupId>org.springframework.security</groupId>
      <artifactId>spring-security-taglibs</artifactId>
  </dependency>
3.在web.xml设置SpringSecurity的过滤器
<!--    <filter-name>springSecurityFilterChain</filter-name> 标 签 中 必 须 是-->
<!--    springSecurityFilterChain。因为 springSecurityFilterChain 在 IOC 容器中对应真正执行权限-->
<!--    控制的二十几个 Filter,只有叫这个名字才能够加载到这些 Filter。-->
<!-- Spring Security需要的过滤器   -->
<filter>
    <filter-name>springSecurityFilterChain</filter-name>
    <filter-class>org.springframework.web.filter.DelegatingFilterProxy</filter-class>
</filter>
<filter-mapping>
    <filter-name>springSecurityFilterChain</filter-name>
    <url-pattern>/*</url-pattern>
</filter-mapping>
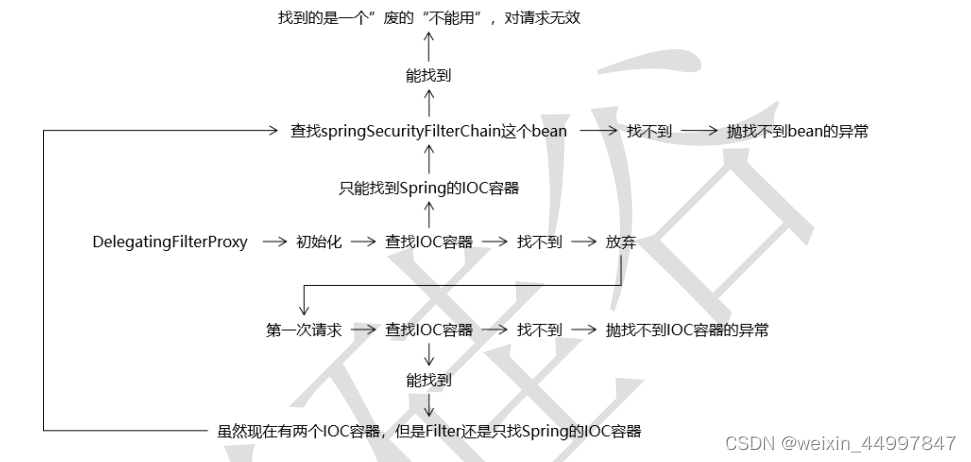
4.SpringSecurity的内部bug
①出错原因
首先:ContextLoaderListener 初始化,创建 Spring 的 IOC 容器
其次:DelegatingFilterProxy 初始化,查找 IOC 容器、查找 bean
最后:DispatcherServlet 初始化,创建 SpringMVC 的 IOC 容器
项目在初始化的时候先加载listener再加载Filter最后才进行加载的Servlet
因为我们的SpringSecurity的配置文件是放在SpringMVC的容器中的
这样就导致在初始化SpringSecurity的时候,找不到springMVC的ioc容器,这样就会报一个NoSuchBean的异常
②修改错误
修改源码,在本地简历一个和源文件相同的包和类
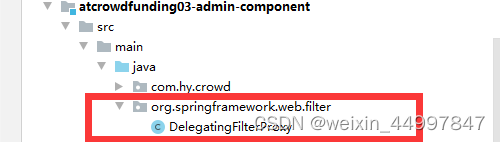
修改点1 在第一次初始化时直接跳过查找IOC容器
    @Override
    protected void initFilterBean() throws ServletException {
        synchronized (this.delegateMonitor) {
            if (this.delegate == null) {
                // If no target bean name specified, use filter name.
                if (this.targetBeanName == null) {
                    this.targetBeanName = getFilterName();
                }
				//	将以下代码注销就可以在第一次初始化时跳过查找IOC容器
//                WebApplicationContext wac = findWebApplicationContext();
//                if (wac != null) {
//                    this.delegate = initDelegate(wac);
//                }
            }
        }
    }
修改点2 在第一次访问时直接寻找SpringMVC的IOC容器
@Override
public void doFilter(ServletRequest request, ServletResponse response, FilterChain filterChain)
        throws ServletException, IOException {

    // Lazily initialize the delegate if necessary.
    Filter delegateToUse = this.delegate;
    if (delegateToUse == null) {
        synchronized (this.delegateMonitor) {
            delegateToUse = this.delegate;
            if (delegateToUse == null) {
                // 把原来的注释掉
//                    WebApplicationContext wac = findWebApplicationContext();
                // 按照我们的需求自己进行编写
                // 1.获取ServletContext对象
                ServletContext sc = this.getServletContext();

                // 2.拼接SpringMVC将IOC容器存入ServletContext域的时候使用的属性名
                String servletName = "DispatcherServlet";
                String attrName = FrameworkServlet.SERVLET_CONTEXT_PREFIX + servletName;

                // 3.根据attrName获取到mvc的容器对象
                WebApplicationContext wac = (WebApplicationContext) sc.getAttribute(attrName);

                if (wac == null) {
                    throw new IllegalStateException("No WebApplicationContext found: " +
                            "no ContextLoaderListener or DispatcherServlet registered?");
                }
                delegateToUse = initDelegate(wac);
            }
            this.delegate = delegateToUse;
        }
    }

    // Let the delegate perform the actual doFilter operation.
    invokeDelegate(delegateToUse, request, response, filterChain);
}
5.在配置类中完成基本的配置
package com.hy.crowd.mvc.config;

import com.hy.crowd.constant.CrowdConstant;
import org.springframework.beans.factory.annotation.Autowired;
import org.springframework.context.annotation.Configuration;
import org.springframework.security.access.AccessDeniedException;
import org.springframework.security.config.annotation.authentication.builders.AuthenticationManagerBuilder;
import org.springframework.security.config.annotation.method.configuration.EnableGlobalMethodSecurity;
import org.springframework.security.config.annotation.web.builders.HttpSecurity;
import org.springframework.security.config.annotation.web.configuration.EnableWebSecurity;
import org.springframework.security.config.annotation.web.configuration.WebSecurityConfigurerAdapter;
import org.springframework.security.crypto.bcrypt.BCryptPasswordEncoder;
import org.springframework.security.web.access.AccessDeniedHandler;

import javax.servlet.ServletException;
import javax.servlet.http.HttpServletRequest;
import javax.servlet.http.HttpServletResponse;
import java.io.IOException;

@Configuration
@EnableWebSecurity
@EnableGlobalMethodSecurity(proxyTargetClass = false)
public class WebAppSecurityConfig extends WebSecurityConfigurerAdapter {

    @Override
    protected void configure(HttpSecurity security) throws Exception {
        security
                .authorizeRequests()//表示给请求授权
                .antMatchers("/bootstrap/**")//表示匹配的路径
                .permitAll()//无条件访问
                .antMatchers("/css/**")
                .permitAll()
                .antMatchers("/fonts/**")
                .permitAll()
                .antMatchers("/img/**")
                .permitAll()
                .antMatchers("/jquery/**")
                .permitAll()
                .antMatchers("/layer/**")
                .permitAll()
                .antMatchers("/script/**")
                .permitAll()
                .antMatchers("/ztree/**")
                .permitAll()
                .antMatchers("/crowd/**")
                .permitAll()
                .antMatchers("/index.jsp")
                .permitAll()
                .anyRequest()//所有的请求
                .authenticated()//登录后才能访问
                .and()
                .formLogin()//使用表单形式登录
                .loginPage("/to/login.html")//指定登录页面(如果没有指定会访问SpringSecurity自带的登录页)
                .permitAll()
                .loginProcessingUrl("/security/do/login.html")//指定提交登录表单的地址
                .permitAll()
                .usernameParameter("loginAcct")//设置登录账号的name值
                .passwordParameter("loginPswd")//设置登录密码的name值
                .defaultSuccessUrl("/to/admin/main.html")//指定登录成功后去的页面
                .and()
                .csrf()
                .disable()
                .logout()
                .logoutUrl("/security/do/logout.html")//设置登出的页面
                .logoutSuccessUrl("/to/admin/main.html")//设置登录退出后的页面
                .and()
                .exceptionHandling()//对异常进行处理
                .accessDeniedHandler(new AccessDeniedHandler() {
                    @Override
                    public void handle(HttpServletRequest request, HttpServletResponse response, AccessDeniedException accessDeniedException) throws IOException, ServletException {
                        request.setAttribute(CrowdConstant.ATTR_NAME_MESSAGE,accessDeniedException.getMessage());
                        request.getRequestDispatcher("/WEB-INF/system-error.jsp").forward(request,response);
                    }
                })
                ;
    }

    @Override
    protected void configure(AuthenticationManagerBuilder builder) throws Exception {
        builder.inMemoryAuthentication()//设置为内存登录
                .withUser("Jack")//用户名
              	.password("123123")//密码
                .roles("admin");//拥有角色
}

关闭配置类中的拦截器
6.对登录的表单进行修改
admin-login.jsp
<form action="security/do/login.html" method="post" class="form-signin" role="form">
二.完成从数据库认证登录
1.步骤
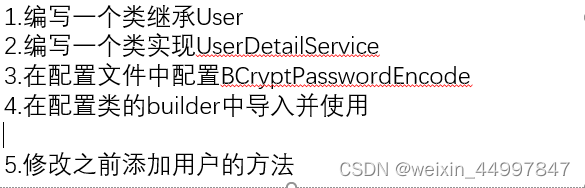
2.继承User类
package com.hy.crowd.mvc.config;

import com.hy.crowd.entity.Admin;
import org.springframework.security.core.GrantedAuthority;
import org.springframework.security.core.userdetails.User;
import java.util.List;

public class SecurityAdmin extends User {

    private Admin original;

    public SecurityAdmin(Admin original, List<GrantedAuthority> authorityList){
        super(original.getLoginAcct(),original.getLoginPswd(),authorityList);
        this.original = original;

        // 将原始Admin对象中的密码擦除
        this.original.setLoginPswd(null);
    }

    public Admin getOriginal() {
        return original;
    }

    public void setOriginal(Admin original) {
        this.original = original;
    }
}
3.实现UserDetailService接口
CrowdUserDetailService
package com.hy.crowd.mvc.config;

import com.hy.crowd.entity.Admin;
import com.hy.crowd.entity.Auth;
import com.hy.crowd.entity.Role;
import com.hy.crowd.mapper.AdminMapper;
import com.hy.crowd.service.api.AdminService;
import com.hy.crowd.service.api.AuthService;
import org.springframework.beans.factory.annotation.Autowired;
import org.springframework.context.annotation.Bean;
import org.springframework.security.core.GrantedAuthority;
import org.springframework.security.core.authority.SimpleGrantedAuthority;
import org.springframework.security.core.userdetails.UserDetails;
import org.springframework.security.core.userdetails.UserDetailsService;
import org.springframework.security.core.userdetails.UsernameNotFoundException;
import org.springframework.stereotype.Component;

import java.util.ArrayList;
import java.util.List;

@Component
public class CrowdUserDetailService implements UserDetailsService {

    @Autowired
    private AdminService adminService;

    @Autowired
    private AuthService authService;

    @Override
    public UserDetails loadUserByUsername(String username) throws UsernameNotFoundException {
        // 1.通过用户名获取到用户
        Admin admin = adminService.getAdminByLoginAcct(username);

        // 2.获取用户的角色信息
        List<Role> assignRole = adminService.getAssignRole(admin.getId());

        // 3.获取用户的权限信息
        List<Auth> authList = authService.getAuthByLoginAcct(admin.getId());

        System.out.println("**************************");
        authList.forEach(System.out::println);
        List<GrantedAuthority> grantedAuthorities = new ArrayList<>();

        // 4.遍历role的列表,将其加入到Authority的列表中
        for (Role role :
                assignRole) {
            String roleName = "ROLE_"+role.getName();

            grantedAuthorities.add(new SimpleGrantedAuthority(roleName));
        }

        // 5.遍历auth的列表,将其加入到Authority的列表中
        for (Auth auth :
                authList) {
            grantedAuthorities.add(new SimpleGrantedAuthority(auth.getName()));
        }

        // 6.创建一个SecurityAdmin的对象并返回
        SecurityAdmin securityAdmin = new SecurityAdmin(admin, grantedAuthorities);

        return securityAdmin;
    }
}
AdminService
    @Override
    // 通过用户名获取用户
    public Admin getAdminByLoginAcct(String username) {

        AdminExample  adminExample = new AdminExample();

        adminExample.createCriteria().andLoginAcctEqualTo(username);

        List<Admin> admins = adminMapper.selectByExample(adminExample);

        return admins.get(0);
    }


	@Override
	// 通过用户id获取角色
    public List<Role> getUnAssignRole(Integer adminId) {
        List<Role> unAssignRole =  adminMapper.selectUnAssignRole(adminId);
        return unAssignRole;
    }
AdminMapper
<!--通过用户id获取角色-->
  <!--  List<Role> selectUnAssignRole(Integer adminId);-->
  <select id="selectUnAssignRole" resultType="com.hy.crowd.entity.Role">
    select id,name
    from t_role
    where id not in
    (
        select role_id
        from inner_admin_role
        where admin_id = #{adminId}
    )
    order by id asc
  </select>
AuthService
// 通过用户id获取权限列表
 @Override
 public List<Auth> getAuthByLoginAcct(Integer id) {
     return authMapper.selectAuthByLoginAcct(id);
 }
AuthService
<!--通过用户id获取权限列表-->
<!--  List<Auth> selectAuthByLoginAcct(Integer id);-->
<select id="selectAuthByLoginAcct" resultMap="BaseResultMap">
  SELECT DISTINCT t_auth.id, t_auth.name, t_auth.title, t_auth.category_id
  FROM t_auth
  LEFT JOIN inner_role_auth ON t_auth.`id` = inner_role_auth.`auth_id`
  LEFT JOIN inner_admin_role ON inner_role_auth.`role_id` = inner_admin_role.`role_id`
  WHERE inner_admin_role.`admin_id` = #{id} AND t_auth.`name` != "";
</select>
4.配置BCryptPasswordEncode
在spring-webmvc的配置文件中配置BCryptPasswordEncode
 <bean id="BCryptPasswordEncoder" class="org.springframework.security.crypto.bcrypt.BCryptPasswordEncoder">
 </bean>
5.在配置类中进行声明使用
package com.hy.crowd.mvc.config;

import com.hy.crowd.constant.CrowdConstant;
import org.springframework.beans.factory.annotation.Autowired;
import org.springframework.context.annotation.Configuration;
import org.springframework.security.access.AccessDeniedException;
import org.springframework.security.config.annotation.authentication.builders.AuthenticationManagerBuilder;
import org.springframework.security.config.annotation.method.configuration.EnableGlobalMethodSecurity;
import org.springframework.security.config.annotation.web.builders.HttpSecurity;
import org.springframework.security.config.annotation.web.configuration.EnableWebSecurity;
import org.springframework.security.config.annotation.web.configuration.WebSecurityConfigurerAdapter;
import org.springframework.security.crypto.bcrypt.BCryptPasswordEncoder;
import org.springframework.security.web.access.AccessDeniedHandler;

import javax.servlet.ServletException;
import javax.servlet.http.HttpServletRequest;
import javax.servlet.http.HttpServletResponse;
import java.io.IOException;

/**
 * @author hy
 * @create 2022-08-24 13:16
 * @Description
 */
@Configuration
@EnableWebSecurity
@EnableGlobalMethodSecurity(proxyTargetClass = false)
public class WebAppSecurityConfig extends WebSecurityConfigurerAdapter {

    @Autowired
    private CrowdUserDetailService crowdUserDetailService;

    @Autowired
    private BCryptPasswordEncoder bCryptPasswordEncoder;

    @Override
    protected void configure(AuthenticationManagerBuilder builder) throws Exception {
        builder
                .userDetailsService(crowdUserDetailService)
                .passwordEncoder(bCryptPasswordEncoder);
    }
}
三.关于SpringSecurity的一些设置
1.在页面显示相关的信息
引入标签
<%@ taglib uri="http://www.springframework.org/security/tags" prefix="security" %>
直接调用principal使用
/** 以下是 principal的值
  com.hy.crowd.mvc.config.SecurityAdmin@31a7df:
  Username: jack; Password: [PROTECTED]; Enabled: true;
  AccountNonExpired: true;
  credentialsNonExpired: true;
  AccountNonLocked: true;
  Granted Authorities:
  ROLE_Role1,ROLE_Role12,ROLE_Role2,ROLE_Role3,ROLE_Role9,
  role:delete,role:get,user:delete  **/
 // 以下显示的就是用户名
<security:authentication property="principal.Username"></security:authentication>
2.权限控制的方案
两种对访问的资源进行权限限制的方法
①配置类中进行设置
security
.antMatchers("/admin/get/page.html")// 针对分页显示 Admin 数据设定访问控制
.hasRole("经理") // 要求具备经理角色
设置必须具有经理这个角色才能访问分页页面
②使用注解的方式声明
要想使用注解的方式声明必须现在配置类上加上@EnableGlobalMethodSecurity
启用全局方法权限控制功能,并且设置 prePostEnabled = true。保证@PreAuthority、@PostAuthority、@PreFilter、@PostFilter 生效
@EnableGlobalMethodSecurity(prePostEnabled = true)
public class WebAppSecurityConfig extends WebSecurityConfigurerAdapter {
}
@PreAuthorize(“hasRole(‘部长’)”)设置了只有具有部长这个角色才能访问
 @PreAuthorize("hasRole('部长')")
 @RequestMapping("/do/role/page.json")
 @ResponseBody
 public ResultEntity<PageInfo<Role>> getRolePageInfo(
         @RequestParam(value = "pageNum",defaultValue = "1")Integer pageNum,
         @RequestParam(value = "pageSize",defaultValue = "5")Integer pageSize,
         @RequestParam(value = "keyword",defaultValue = "")String keyword
 ){

     PageInfo<Role> rolePageInfo = roleService.getRolePageInfo(pageNum,pageSize,keyword);

     ResultEntity resultEntity = ResultEntity.successWithOutData(rolePageInfo);

     return resultEntity;
 }
3.页面元素的权限控制
①作用
页面上的局部元素,根据访问控制规则进行控制。
②使用
<security:authorize access="hasRole('经理')">
<!-- 开始和结束标签之间是要进行权限控制的部分。检测当前用户是否有权限,有权限
就显示这里的内容,没有权限就不显示。 --> ……
</security:authorize>
access 属性可以传入权限控制相关的表达式。
③异常
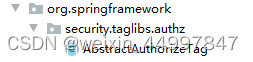
No visible WebSecurityExpressionHandler instance could be found
原因:AbstractAuthorizeTag 类默认是查找“根级别”的 IOC 容器。而根级别的IOC 容器中没有扫描 SpringSecurity 的配置类,
所以没有相关的 bean。
解决办法:修改 AbstractAuthorizeTag 类的源码。
建立一个同名的包和类,并把AbstractAuthorizeTag类复制过来
然后修改其中的getExpressionHandler()
    private SecurityExpressionHandler<FilterInvocation> getExpressionHandler()
            throws IOException {
        //注释掉之前的代码
//        ApplicationContext appContext = SecurityWebApplicationContextUtils.findRequiredWebApplicationContext(getServletContext());

        // 1.获取到ServletContext对象
        ServletContext servletContext = this.getServletContext();

        // 2.构建SpringMVCIOC容器的名字
        String servletName = "springDispatcherServlet";

        String attrName = FrameworkServlet.SERVLET_CONTEXT_PREFIX + servletName;
        // 3.获取到SringMVC的IOC容器
        WebApplicationContext appContext = (WebApplicationContext)servletContext.getAttribute(attrName);

        Map<String, SecurityExpressionHandler> handlers = appContext
                .getBeansOfType(SecurityExpressionHandler.class);

        for (SecurityExpressionHandler h : handlers.values()) {
            if (FilterInvocation.class.equals(GenericTypeResolver.resolveTypeArgument(
                    h.getClass(), SecurityExpressionHandler.class))) {
                return h;
            }
        }

        throw new IOException(
                "No visible WebSecurityExpressionHandler instance could be found in the application "
                        + "context. There must be at least one in order to support expressions in JSP 'authorize' tags.");
    }


 338
338


 被折叠的 条评论
为什么被折叠?
被折叠的 条评论
为什么被折叠?
 到【灌水乐园】发言


