


中央仓库 Open Source Software Repository Hosting 简称 OSSRH
实现目标:将自定义项目上传至maven中央仓库,其他人只需引入maven坐标即可直接使用
上传步骤:亲测有效
- 注册账号(去它平台)
- 提交工单(叫它做事)
- 人工审核及确认(它说好的)
- 上传SNAPSHOT版本(我给测试版)
- 上传release版本(我给稳定版)
- 完美maven坐标引用(我直接用)
一、注册jira账号
步骤不多说,密码记住,之后要频繁用到

二、创建Issue问题工单
- 类型:默认
- Group Id:填域名,github提供免费个人域名io.github.xxx
- Project URL:项目地址
- SCM url:项目git地址
- username:登录用户名
- Already Synced:初次创建填 No
 工单创建完成,等待邮件回复。
三、确认回复邮件
邮件回复内容一般为:
内容有两个:
- 创建一个公开的仓库,以验证仓库所有者是你
- 将工单状态Response修改为Open
To continue the registration process, please follow these steps:
                    # Create a temporary, public repository called https://github.com/xxx/OSSRH-91364 to verify github account ownership.
                    # *Edit this ticket* and set Status to Open.

If you do not own this github account, you must define a new groupId.
More info: https://central.sonatype.org/publish/requirements/coordinates/ and https://central.sonatype.org/faq/verify-ownership/
四、上传至中央仓库
官方验证完后会邮件回复你,通知你的中央仓库已激活,分别上传你项目的SNAPSHOT和release版本至指定地址
Congratulations! Welcome to the Central Repository!
io.github.xxx has been prepared, now user(s) xxxx.com can:
Publish snapshot and release artifacts to *s01.oss.sonatype.org*
Have a look at this section of our official guide for deployment instructions:
https://central.sonatype.org/publish/publish-guide/#deployment

Depending on your build configuration, your first component(s) might be released automatically after a successful deployment.
If that happens, you will see a comment on this ticket confirming that your artifact has synced to Maven Central.
If you do not see this comment within an hour or two, you can follow the steps in this section of our guide:
https://central.sonatype.org/publish/release/
1、上传SNAPSHOT版本(快照版本)
参考文档地址:OSSRH Guide - The Central Repository Documentation
流程:下载GPG签名工具->生成秘钥->配置settings.xml->配置pom.xml->上传
下载GPG签名工具:
下载地址:https://www.gnupg.org/download/index.html
命令生成秘钥:
 生成:
gpg --gen-key

 Real name: 名字(英文)
 Email address: 邮箱(自己的邮箱)
 You selected this USER-ID:
 "xxx[xxx@qq.com](mailto:xxx@qq.com)"
 Change (N)ame, (E)mail, or (O)kay/(Q)uit? o
 之后往下,会让你输入用户名和邮箱,还有一个Passphase(输入两次,务必牢记,建议先找个地方记下来,后续要用到)
查看公钥
gpg --list-keys

查询结果:
--------------------------------------------------
pub   rsa2048 2021-02-02 [SC] [expires: 2023-02-02]
      453294371E0A38D70216B1E527EDC1D957E41325
uid           [ultimate] xxxxx <xxxxx@qq.com>
sub   rsa2048 2021-02-02 [E] [expires: 2023-02-02]


pub就是公钥:453294371E0A38D70216B1E527EDC1D957E41325
发布公钥:
gpg --keyserver hkp://keyserver.ubuntu.com:11371 --send-keys 453294371E0A38D70216B1E527EDC1D957E41325

查询发布公钥是否成功
gpg --keyserver hkp://keyserver.ubuntu.com:11371 --recv-keys 453294371E0A38D70216B1E527EDC1D957E41325

成功的话会有如下结果
gpg: key 27EDC1D952E45891: "xxxxxx <xxxxx@qq.com>" not changed
gpg: Total number processed: 1
gpg:              unchanged: 1
配置settings.xml
配置本地maven的配置文件
  <servers>
	  <server>
        <id>ossrh</id>
        <username>xxxx@qq.com(SonaType账号)</username>
        <password>填你注册SonaType时填写的密码</password>
	  </server>
  </servers>

  <profiles>
    <profile>
      <id>ossrh</id>
      <activation>
        <activeByDefault>true</activeByDefault>
      </activation>
      <properties>
        <!--这里填你安装的GnuPG位置-->
        <gpg.executable>/usr/local/MacGPG2/bin/gpg</gpg.executable>
        <gpg.passphrase>填写你生成秘钥时输入的密码</gpg.passphrase>
        <!--这里填你秘钥在磁盘上的位置,可通过上面步骤的 gpg --list-keys找到-->
        <gpg.homedir>C:/Users/laohan/.gnupg</gpg.homedir>
      </properties>
    </profile>
  </profiles>
配置Pom.xml
    <properties>
        <project.build.sourceEncoding>UTF-8</project.build.sourceEncoding>
        <!-- 此处配置的名称要和maven配置文件对应的serverId一致 -->
        <github.global.server>github</github.global.server>
    </properties>

    <dependencies>
        <!--自家项目依赖-->
    </dependencies>

    <!--gav信息-->
    <groupId>io.github.lindaifeng</groupId>
    <artifactId>auto-sensitive</artifactId>
    <!--需要特别注意,你上传的是SNAPSHOT仓库,所以此处版本号后缀必须带SNAPSHOT-->
    <version>1.0.0-SNAPSHOT</version>

    <!--项目信息...-->
    <name>auto-sensitive</name>
    <description>data sensitive</description>
    <url>https://github.com/lindaifeng/auto-sensitive</url>

    <!--开源协议...-->
    <licenses>
        <license>
            <name>The Apache Software License, Version 2.0</name>
            <url>http://www.apache.org/licenses/LICENSE-2.0.txt</url>
        </license>
    </licenses>

    <!--开发者信息-->
    <developers>
        <developer>
            <id>qingfeng</id>
            <name>qingfeng</name>
            <email>xxxx@qq.com</email>
            <roles>
                <role>Project Manager</role>
                <role>Architect</role>
            </roles>
            <timezone>+8</timezone>
        </developer>
    </developers>

    <!--项目在github或其它托管平台的地址-->
    <scm>
        <connection>https://github.com/lindaifeng/auto-sensitive.git</connection>
        <developerConnection>scm:git:ssh://git@github.com:lindaifeng/auto-sensitive.git</developerConnection>
        <url>https://github.com/lindaifeng/auto-sensitive</url>
    </scm>

    <profiles>
        <profile>
            <!--注意,此id必须与setting.xml中指定的一致,不要自作聪明改它名字-->
            <id>ossrh</id>
            <activation>
                <activeByDefault>true</activeByDefault>
            </activation>
            <build>
                <!--发布到中央SNAPSHOT仓库插件-->
                <plugins>
                    <plugin>
                        <groupId>org.sonatype.plugins</groupId>
                        <artifactId>nexus-staging-maven-plugin</artifactId>
                        <version>1.6.7</version>
                        <extensions>true</extensions>
                        <configuration>
                            <serverId>ossrh</serverId>
                            <nexusUrl>https://s01.oss.sonatype.org/</nexusUrl>
                            <autoReleaseAfterClose>true</autoReleaseAfterClose>
                        </configuration>
                    </plugin>

                    <!--生成源码插件-->
                    <plugin>
                        <groupId>org.apache.maven.plugins</groupId>
                        <artifactId>maven-source-plugin</artifactId>
                        <version>2.2.1</version>
                        <executions>
                            <execution>
                                <id>attach-sources</id>
                                <goals>
                                    <goal>jar-no-fork</goal>
                                </goals>
                            </execution>
                        </executions>
                    </plugin>

                    <!--生成API文档插件-->
                    <plugin>
                        <groupId>org.apache.maven.plugins</groupId>
                        <artifactId>maven-javadoc-plugin</artifactId>
                        <version>2.9.1</version>
                        <executions>
                            <execution>
                                <id>attach-javadocs</id>
                                <goals>
                                    <goal>jar</goal>
                                </goals>
                                <configuration>
                                    <!--忽略非标准javadoc注释-->
                                    <additionalparam>-Xdoclint:none</additionalparam>
                                 <!--自己本地的jdk安装路径中javadoc路径-->    <javadocExecutable>/Library/Java/JavaVirtualMachines/zulu-8.jdk/Contents/Home/bin/javadoc</javadocExecutable>
                                </configuration>
                            </execution>
                        </executions>
                    </plugin>

                    <!--gpg插件-->
                    <plugin>
                        <groupId>org.apache.maven.plugins</groupId>
                        <artifactId>maven-gpg-plugin</artifactId>
                        <version>1.5</version>
                        <executions>
                            <execution>
                                <id>sign-artifacts</id>
                                <phase>verify</phase>
                                <goals>
                                    <goal>sign</goal>
                                </goals>
                            </execution>
                        </executions>
                    </plugin>

                </plugins>
            </build>

            <distributionManagement>
                <snapshotRepository>
                    <!--注意,此id必须与setting.xml中指定的一致-->
                    <id>ossrh</id>
                    <url>https://s01.oss.sonatype.org/content/repositories/snapshots</url>
                </snapshotRepository>
                <repository>
                    <id>ossrh</id>
                    <url>https://s01.oss.sonatype.org/service/local/staging/deploy/maven2/</url>
                </repository>
            </distributionManagement>
        </profile>

    </profiles>
尝试maven打包 clean package
build success则可以上传,有报错则根据错误信息解决错误
上传项目
通过maven打包clean,deploy 弹出对话框输入生成gpg时填写的密码,success则上传成功。
浏览器访问Nexus Repository Manager,登录查看你的maven项目
快照仓库查看:https://s01.oss.sonatype.org/content/repositories/snapshots
2、上传release版本(稳定版本)
流程和上传SNAPSHOT步骤一致,下面仅说明差异点:
保持SNAPSHOT原样,修改如下内容即可:
修改:settings.xml
<!--将原来server标签和profile标签中的的ossrh替换为release-->
<id>release</id>
修改:Pom.xml
<!--修改GAV中的版本号,把SNAPSHOT后缀去掉-->
<version>1.0.0</version>

<!--将原来server标签和profile标签中的的ossrh替换为release-->
<id>release</id>
                <!--移除发布到中央SNAPSHOT仓库插件:nexus-staging-maven-plugin,并替换为发布到中央release仓库的插件:maven-release-plugin-->
                    <plugin>
                        <groupId>org.sonatype.plugins</groupId>
                        <artifactId>nexus-staging-maven-plugin</artifactId>
                        <version>1.6.7</version>
                        <extensions>true</extensions>
                        <configuration>
                            <serverId>ossrh</serverId>
                            <nexusUrl>https://s01.oss.sonatype.org/</nexusUrl>
                            <autoReleaseAfterClose>true</autoReleaseAfterClose>
                        </configuration>
                    </plugin>

                    <!--替换为-->

                    <plugin>
                        <groupId>org.apache.maven.plugins</groupId>
                        <artifactId>maven-release-plugin</artifactId>
                        <version>2.5.3</version>
                        <configuration>
                            <autoVersionSubmodules>true</autoVersionSubmodules>
                            <useReleaseProfile>false</useReleaseProfile>
                            <releaseProfiles>release</releaseProfiles>
                            <goals>deploy</goals>
                        </configuration>
                    </plugin>
发布:release
上面执行完成之后,登陆nexus:https://s01.oss.sonatype.org/#stagingRepositories,登上jira账号之后就能看到我们刚刚发布的内容
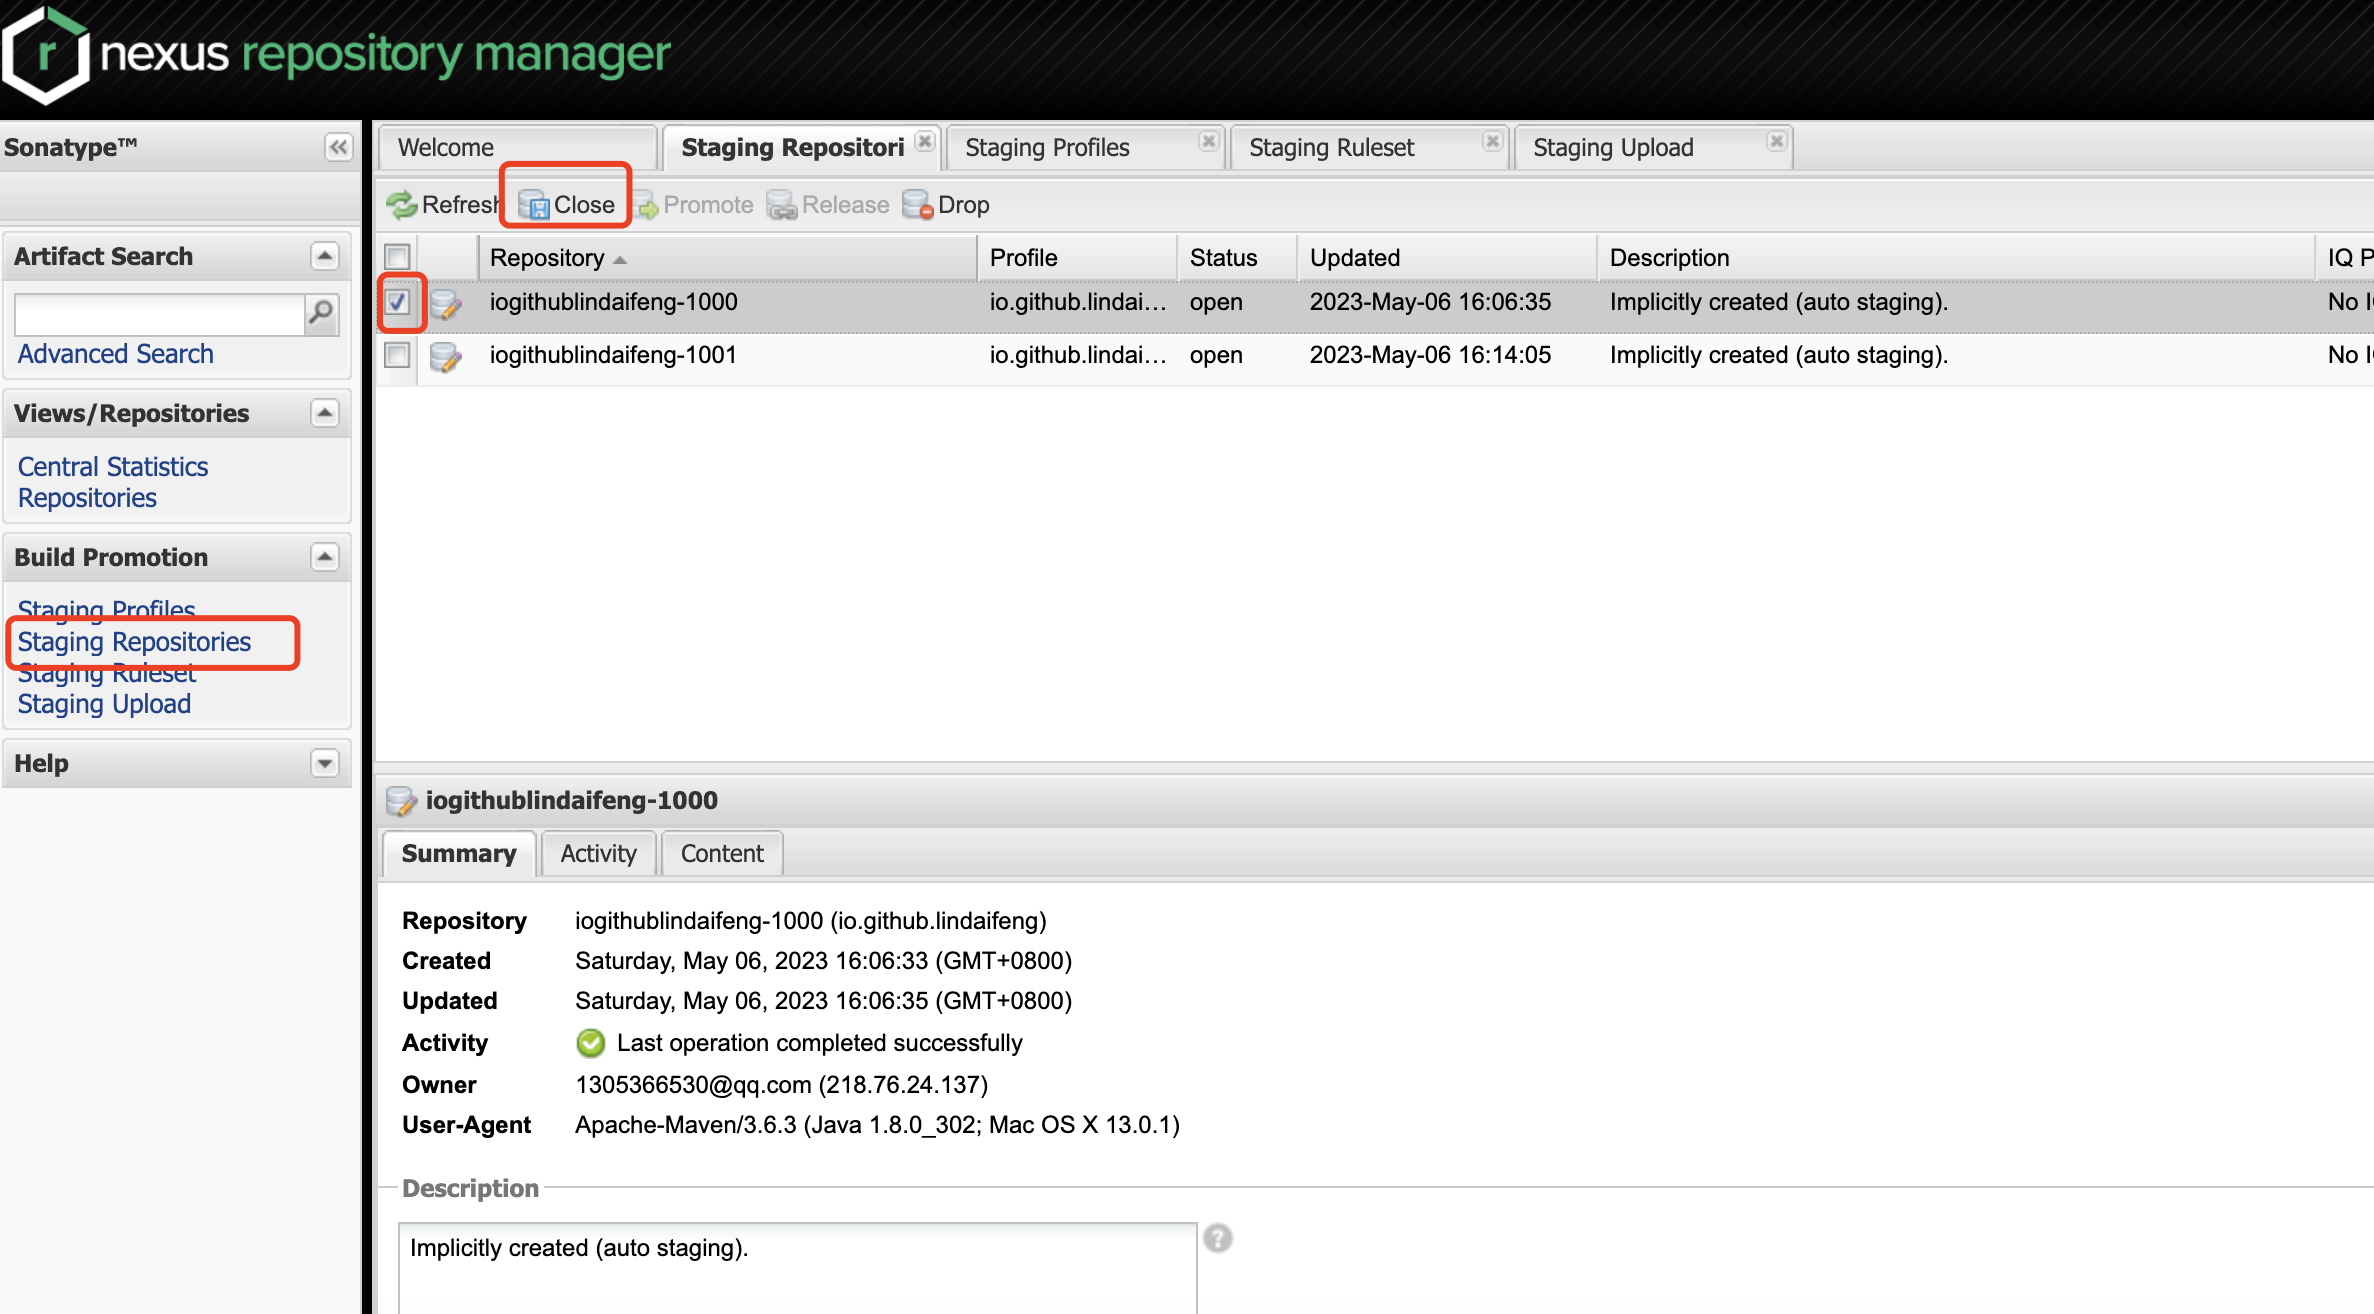
选中后点击上方的Close,他会检测你的jar包是否存在问题,如果存在问题,点击下方的Activity即可查看具体的问题或者发送邮件给你了,主要影响release的问题大部分都是打包时漏了一些东西,照着问题修复即可。
(轻微问题不修复也可以release)
检测完成后上方的release就会变成可点击的状态,点击release后,你会收到一份邮件:
大致内容为你的稳定版仓库已激活,大约30分钟后你能在中央仓库搜索到依赖
Central sync is activated for io.github.lindaifeng. After you successfully release, your component will be available to the public on Central https://repo1.maven.org/maven2/, typically within 30 minutes, though updates to https://search.maven.org can take up to four hours.
最后你就可以通过maven坐标直接引用你的项目依赖了
常见报错问题:
Unable to find javadoc command: The environment variable JAVA_HOME is not correctly set.
解决方案:需要指定javadoc路径
<!--生成API文档插件-->
  <plugin>
    <groupId>org.apache.maven.plugins</groupId>
    <artifactId>maven-javadoc-plugin</artifactId>
    <version>2.9.1</version>
    <executions>
      <execution>
        <id>attach-javadocs</id>
        <goals>
        <goal>jar</goal>
        </goals>
        <configuration>
        <javadocExecutable>/Library/Java/JavaVirtualMachines/zulu-8.jdk/Contents/Home/bin/javadoc</javadocExecutable>
        </configuration>
      </execution>
    </executions>
  </plugin>
报错File encoding has not been set, using platform encoding UTF-8, i.e. build is platform dependent!
解决方案:指定项目编码
在pom.xml文件中加入以下配置
 <properties>
        <project.build.sourceEncoding>UTF-8</project.build.sourceEncoding>
 </properties>
错误: 未知标记:@ Author
解决方案:配置非标准javadoc注释
<!--忽略非标准javadoc注释-->
 <configuration>
 	<additionalparam>-Xdoclint:none</additionalparam>
 </configuration>
提示403:Received status code 403 from server: Forbidden
可能是因为group id不正确
修改域名为申请Maven 时填写的域名。
提示400:Received status code 400 from server: Bad Request
可能是想要上传的版本号在Maven仓库中已存在了


 1万+
1万+


 被折叠的 条评论
为什么被折叠?
被折叠的 条评论
为什么被折叠?
 到【灌水乐园】发言


