


面向对象OOP和UML类图
typescript介绍
- 是javascript的超集(super-set)
- 引入了静态类型
- 单元测试、自动化测试
- 最终会被编译为javascript
- ts在线编译
值类型:
- boolean
- number
- string
- symbol
- any(慎用,不要AnyScript)
数组:
number[] 或 Array< number >
元祖:
Array < number | string >
对象 object - 不常用不专业,一般会用interface或class代替
函数Function - 不常用不专业,一般会用自定义type代替
- 参数类型
- 返回值类型,有void
类型断言:让TS计算你需要的类型,而不用自己定义
自定义type
type infoType = string | number
let info: infoType = 100;

type fnType = (a: number, b: number) => void //函数 细节
const fn1: fnType = (a: number, b: number) =>{
	//....
}
接口interface
type fnType = (a: number, b: number) => void
interface IPerson{
	name: string
	age: number
	fn1: fnType
}
// interface用于object
const zhangsan: IPerson = {
	name: '张三',
	age: 20,
	fn1(a: number, b:number){}
}
类 class
//interface用于class
class Person implements IPerson{
	name: string,
	age: string,

	constructor(name: string, age: number){
		this.name = name;
		this.age = age;
	}

	fn1(a: number, b: number): void{

	}
}
静态属性
- 普通属性是 实例属性/对象属性
- static静态属性
class Foo{
	// 静态属性,只能通过 Foo.flag 获取,而不能通过 实例.flag 获取
	static flag: string = 'abc'
	static getFlag(){
		// this === Foo
		return this.flag
	}
}
面向对象
- OOP-Object Oriented Program
- 将抽象的编程概念,想象成一个对象,更好理解
- 90年代随着Java一起发展壮大,现在依然是主流
类和对象:类即模版,对象即实例,一个类可以new出很多个对象
class People {
	name: string,
	age: number
	constructor(name: string, age: number){
		this.name = name
		this.age = age
	}
	eat(){ alert(`${this.name} eat something`) }
	speak(){ alert(`My name is ${this.name}, age ${this.age}`) }
}

const zhangsan = new People('张三', 20)
zhangsan.eat()
zhangsan.speak()
面向对象三要素
- 继承 - 抽离公共代码,实现代码复用
class Student extends People {
	school: string,
	constructor(name: string, age: number, school: string){
		super(name, age);
		this.school = school;
	}
	study(){}
}
// 可继续派生其他子类
- 封装 - 高内聚 低耦合
	// 可见性修饰符
	// public - 外部可访问,默认
	// protected - 当前类、子类可调用,外部不可访问
	// private - 只有内部能访问
	protected weight: number
	private girlfriend: string
- 多态 - 更好的扩展性
重写:覆盖父组件的方法
重载:支持多种参数形式
interface IStyleInfo {
	[key: string]: string
}

class JQuery{
	css(key: string, value: string): void
	css(styleInfo: IStyleInfo): void
	// 最后要兼容上面所有的类型
	css(keyOrInfo: string | IStyleInfo, value?: string): void{
		if(typeof keyOrInfo === 'string'){
			// key value
		}else{
		    // object
		}
	}
}
const j = new JQuery();
j.css('font-size', '15px');
j.css({'font-size': '15px',  'color': 'red'})
Vue React 组件,也是对象
组件定义就相当于class,组件使用就相当于new class
UML类图
- 统一建模语言 Unified Modeling Language
- 软件设计的绘图标准
- 包含类图、用例图、对象图、顺序图、协作图、状态图、活动图、组件图、配置图
单个类
- 三个区域:名称、属性、方法
- 权限描述:+ (public) , #(protected), -(private)


类之间的关系
- 实现 - 实现接口
- 泛化 - 继承父类
- 关联 - A是B的属性
实现接口
interface IPerson{
	name: string
	age: number
	sayHi(otherName: string) : void
}

class Person implements IPerson {
	name: string
	age: number
	constructor(name: string, age: number){
		this.name = name;
		this.age = age;
	}
	sayHi(otherName: string){
		alert(`Hi, ${otherName}`)
	}
}
注意:TS 的 interface 和 Java 的不一样,TS有属性,Java的没有属性。而UML类图是依据 Java 而画的(没有属性区域),所以这里也合到一个区域了

泛化(继承父类)

关联
class TimeCard {
	// ...
}

class Employee {
	name: string
	timeCard: TimeCard
	constructor(name: string, TimeCard: TimeCard){
		this.name = name
	}
}

关联关系的细化
-
聚合 - 整体包含部分,部分可以脱离整体而单独存在

-
组合 - 整体包含部分,部分不可以脱离整体

-
依赖 - 不是属性关系,而是函数参数或返回值

设计原则 - 设计模式只是套路,设计原则是指导思想
SOLID五大设计原则
- S 单一职责原则
一个程序只做好一件事,每个部分保持独立 - O 开放封闭原则(最重要)
对修改封闭 对扩展开放。当需求发生变化时,根据这种机制扩展代码,而不是修改原有的代码 - L 李氏置换原则
子类能覆盖父类,父类能出现的地方子类就能出现 - 前端应用较少 - I 接口独立原则
保持接口的单一独立,避免出现“胖接口” - D 依赖导致原则
面向接口编程,依赖于抽象而不依赖于具体。写代码时用到具体类时,不与具体类交互,而与具体类的上层接口交互。
如function fn(p: Student){}依赖的是具体的类,不推荐,function fn(p: IPerson){}依赖接口,推荐
function loadImg(src: string){
	// <HTMLImageElement> 泛型
	const promise = new Promise<HTMLImageElement>((resolve, reject) => {
		const img = document.createElement('img')
		img.onload = () =>{
			resolve(img)
		}
		img.onerror = () =>{
			reject('图片加载失败')
		}
		img.src = src
		return promise
	})
}

const src = 'xxx.png'
const res = loadImg(src)
// 单一职责原则:每个then的逻辑只做好一件事,如果要做多个就用多个then
// 开放封闭原则:如果这个需求要修改,去扩展then即可,现有的逻辑不用修改,即对扩展开放、对修改封闭
res.then((img: HTMLImageElement) => {
	console.log(image.width)
	return img
}).then((img: HTMLImageElement) =>{
	console.log(image.height)
}).catch(err =>{
	console.log(err)
})
Unix/Linux设计哲学
- 小即是美
- 让每个程序只做一件事
- 快速建立原型
- 舍弃高效率,而更关注可移植性和扩展性
- 采用纯文本方式来存储数据
- 充分利用软件的杠杆效应(软件复用,代码复用)
- 避免强制性的用户界面
- 允许用户定制环境(考虑多环境,扩展性)
- 寻求90%的解决方案
从设计到模式
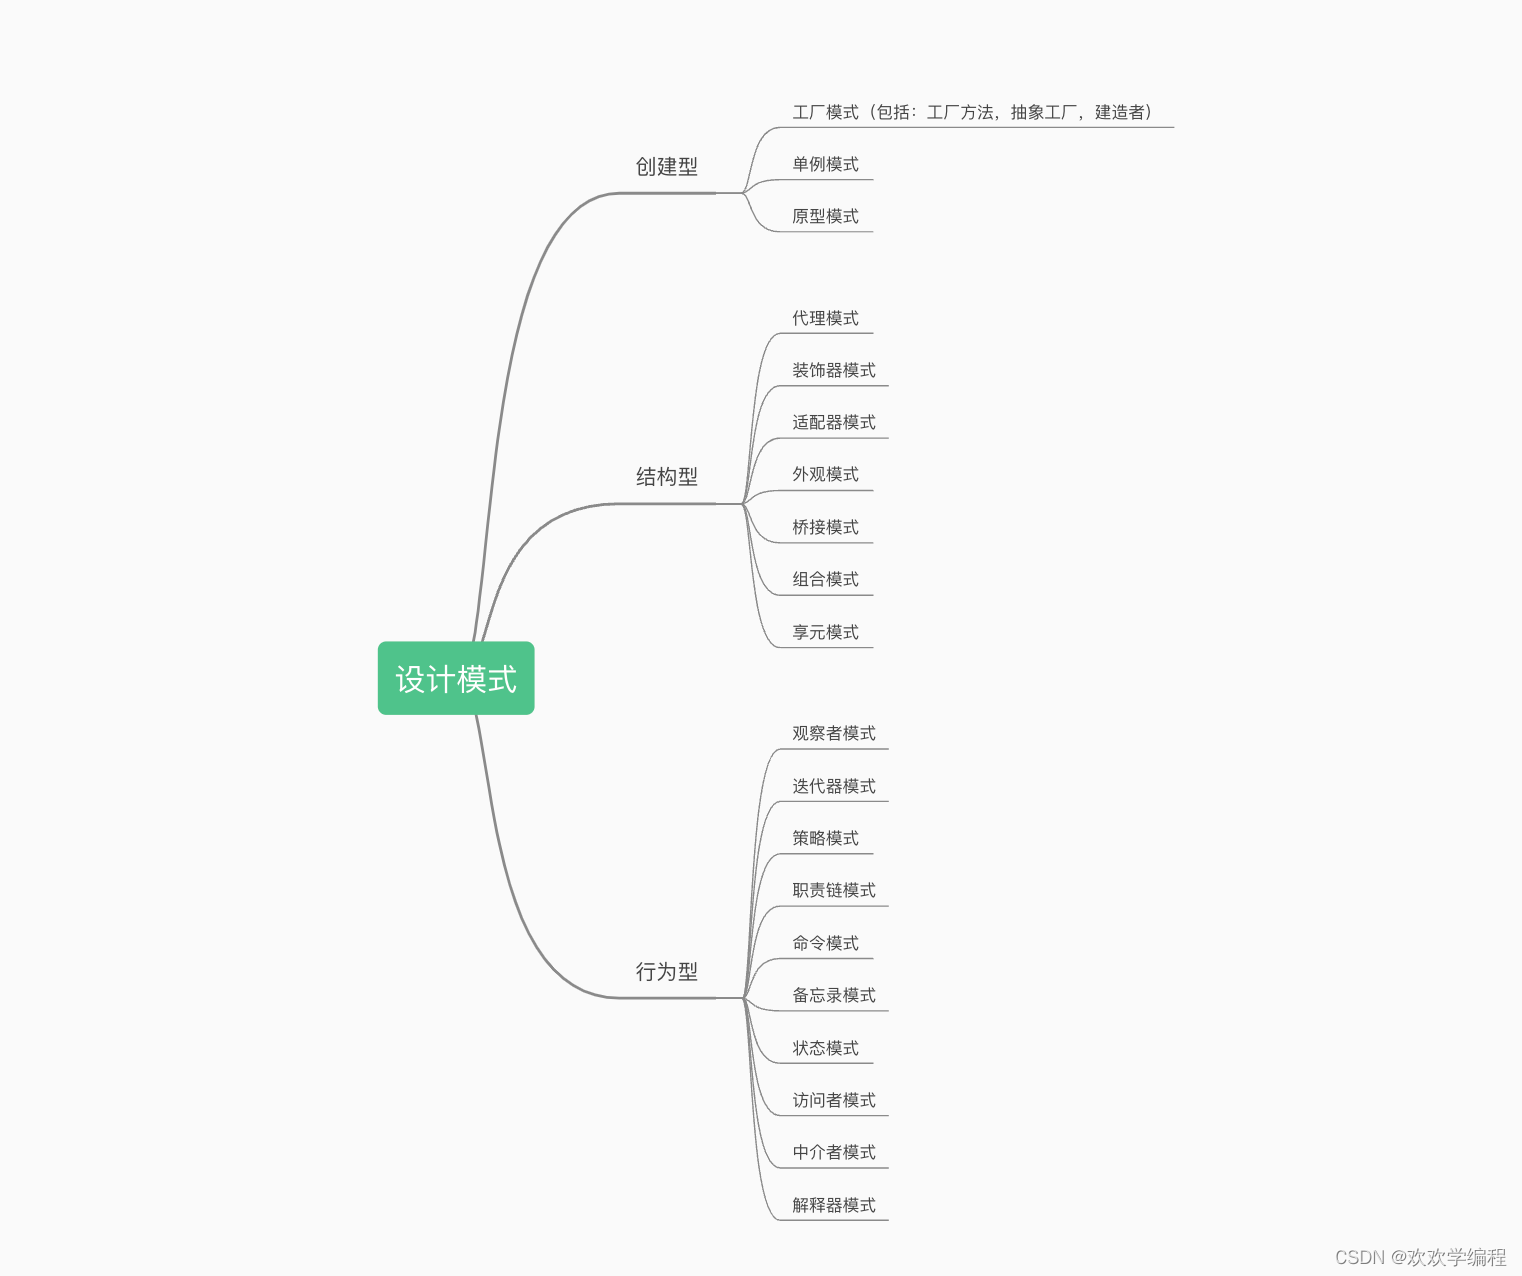
工厂模式
- 创建对象的一种方式,不用每次都亲自创建对象,而是通过一个既定的工厂来生产对象
- 遇到 new Class 的地方,就要考虑工厂模式
伪代码
let f1
class Foo{}
if(a){
  f1 = Foo(x)
}
if(b){
  f2 = Foo(x, y)
}
// 此时就需要一个“工厂”,把创建者和class分离,符合开放封闭原则
// 工厂
function create(x, y){
	if(a){
		return Foo(x)
	}
	if(b){
	    return Foo(x, y)
	}
}
const f1 = create(a, b)
const f2 = create(a, b)
const f3 = create(a)
简易的工厂模式

class Product {
	name: string
	constructor(name: string){
		this.name = name
	}
	fn1(){
		alert('product fn1')
	}
	fn2(){
		alert('product fn2')
	}
}
// 工厂
class Create {
	create(name: string): Product {
		return new Product(name)
	}
}
// test
const create = new Creator()
const p1 = creator.create('p1')
const p2 = creator.create('p2')
const p3 = creator.create('p3')
标准的工厂模式

interface IProduct {
	name: string
	fn1(): () => void
	fn2(): () => void
}

class Product1 implements Iproduct {
	name: string,
	constructor(name: string){
		this.name = name
	}
	fn1() {
		alert('product1 fn1')
	}
	fn2() {
		alert('product fn2')
	}
}

class Product2 implements Iproduct {
	name: string,
	constructor(name: string){
		this.name = name
	}
	fn1() {
		alert('product1 fn1')
	}
	fn2() {
		alert('product fn2')
	}
}

class Creator {
	// 依赖倒置原则
	create(type: string, name: string): IProduct {
		if(type === 'p1'){
			return new Product1(name)
		}
		if(type === 'p2'){
			return new Product2(name)
		}
		throw new Error('Invalid type')
	}
}

const creator = new Creator()
const p1 = creator.create('p1', 'name1')
const p2 = creator.create('p2', 'name2')
是否符合设计原则
- 工厂和类分离,解耦
- 可以扩展很多类(派生类,或平行的类)
- 工厂的创建逻辑也可以自由扩展
工厂模式 - 场景
- jQuery $
class JQuery {
	selector: string,
	length: number,
	// 伪代码,演示jquery实例的结构
	// const jquery = {
	//   selector: 'div',
	//   length: 3,
	//   '0': div1,
	//   '1': div2,
	//   '2': div3,
	//}
	constructor(selector: string){
		const domList = Array.proptotype.slice.call(document.querySelectorAll(selector))
		const length = domList.length
		for(let i = 0; i <length; i++){
			this[i] = domList[0]
		}
		this.selector = selector
		this.length = length
	}
	append(elem: HTMLElement): JQuery {
		// append的操作
		return this;
	}
	addClass(className: string): JQuery {
		// addClass的操作
		return;
	}
}
// 不用工厂模式
// const $div = new JQuery('div');
// const $p = new JQuery('p');

// 用工厂模式
window.$ = (selector: string)=>{
	return new JQuery(selector); // 逻辑封装
}
const $div = $('div');
const $p = $('p');
如果开放给用户的不是 $,而是让用户自己去new JQuery,带来的问题:
1.不方便链式操作,如 $(‘div’).append(‘#p1’).html();
2.不宜将构造函数暴露给用户,尽量高内聚、低耦合
- Vue_createElementVNode
https://vue-next-template-explorer.netlify.app/
<div>Hello World</div>
<span class="new class" id="new id"> happy</span>
经过编译,创建vnode,这就是工厂函数
import { createElementVNode as _createElementVNode, Fragment as _Fragment, openBlock as _openBlock, createElementBlock as _createElementBlock } from "vue"

export function render(_ctx, _cache, $props, $setup, $data, $options) {
  return (_openBlock(), _createElementBlock(_Fragment, null, [
    _createElementVNode("div", null, "Hello World"),
    _createElementVNode("span", {
      class: "new class",
      id: "new id"
    }, " happy")
  ], 64 /* STABLE_FRAGMENT */))
}
- React createElement
const profile = <div>
	<img src="avatar.png" className="profile"/>
	<h3>{[user.firstName, user.lastName].join('')}</h3>
</div>
编译为
const profile = React.createElement("div", null,
	React.createElement("img", { src: "avatar.png", className: "profile" }),
	React.createElement("h3", null,[user.firstName, user.lastName].join(""))
);
单例模式
- 前端对单例模式并不常用,但单例的思想随处可见
- 一个 对象/实例 只能被创建一次
- 创建之后缓存起来,以后继续使用
- 一个系统只有一个
例如:
- 登录框,遮罩层,一个系统只有一个即可,多了无用
- Vue Redux 的 store,一个系统中只能有一个,多了出错
typescript演示
class SingleTon {
	name: string

	// private 无法在外面实例化 new
	private constructor(name: string){
		this.name =name
	}

	// 单例的对象 private 无法在外面获取
	private static instance: SignleTon | null

	// 获取单例
	static getInstance(name): SingleTon {
		if(SingleTon.instance == null){
			SingleTon.instance = new SingleTon(name)
		}
		return SignleTon.instance // 单例模式
	}
}

const s1 = SingleTon.getInstance('张三') // 正确获取单例对象的方式
const s2 = SingleTon.getInstance('张三')
console.log(s1 === s2) // true

// SingleTon.instance // 报错
UML类图
静态属性方法, 使用下划线

javascript 代码演示
使用闭包
function getGetInstance(){
	let instance

	class Singleton {}

	return () => {
		if(instance == null){
			instance = new Singleton()
		}
		return instance
	}
}
const getInstance = genGetInstance()
const s1 = getInstance
const s2 = getInstance
console.log(s1 === s1) //true
使用模块化
let instance
class Singleton {}

export default() =>{
	if(instance == null){
		instance = new Singleton
	}
	return instance
}
是否符合设计原则
- 内部封装 getInstance, 高内聚,低耦合
注意
- JS是单线程语言,如果是Java等多线程语言,单例模式需要加线程锁
单例模式的场景 - 登录框
class LoginForm {
	private state: string = 'hide'  // hide | show

	private constructor(){}

	show(){
		if(this.state === 'show'){
			console.log('已经显示了')
			return
		}
		console.log('显示 LoginForm')
		// ....
		this.state = 'show'
	}

	hide(){
		if(this.state === 'hide'){
			console.log('已经隐藏了')
			return
		}
		console.log('隐藏 LoginForm')
		// ....
		this.state = 'hide'
	}

	private static instance: LoginForm | null =null;
	static getInstance(): LoginForm {
		if(LoginForm.instance == null){
			LoginForm.instance = new LoginForm()
		}
		return LoginForm.instance
	}
}

const loginForm1 = LoginForm.getInstance()
const loginForm2 = LoginForm.getInstance()
console.log(loginForm1 === loginForm2) //true
其他场景
- 自定义事件 EventBus 全局唯一
- Vuex Redux 的 store 全局唯一
观察者模式
UML图和代码演示

// 主题
class Subject {
	private state: number = 0
	private observers: Observer[] = []

	getState(): number {
		return this.state
	}

	setState(newState: number){
		this.state = newState
		this.notify() //通知
	}

	attach(observer: Observe){
		this.observers.push(observer)
	}

	// 通知
	private notify() {
		this.observers.forEach(observer=>{
			observer.update(this.state)
		})
	}
}

// 观察者
class Observer{
	name: string
	constructor(name: string){
		this.name = name
	}
	update(state: number){
		console.log(`${this.name} updated, state is ${state}` )
	}
}

const sub = new Subject()
const observer1 = new Observer('A');
sub.attach(observer1)
const observer2 = new Observer('B');
sub.sttach(observer2)

sub.setState(1)
- Observer 和 Subject 分离,解耦
- Observer 可自由扩展
- Subject 可自由扩展
场景 - DOM事件
const $btn1 = $('#btn1')
$btn1.click(function(){
	console.log(1)
})
$btn1.click(function(){
	console.log(2)
})
$btn1.click(function(){
	console.log(3)
})
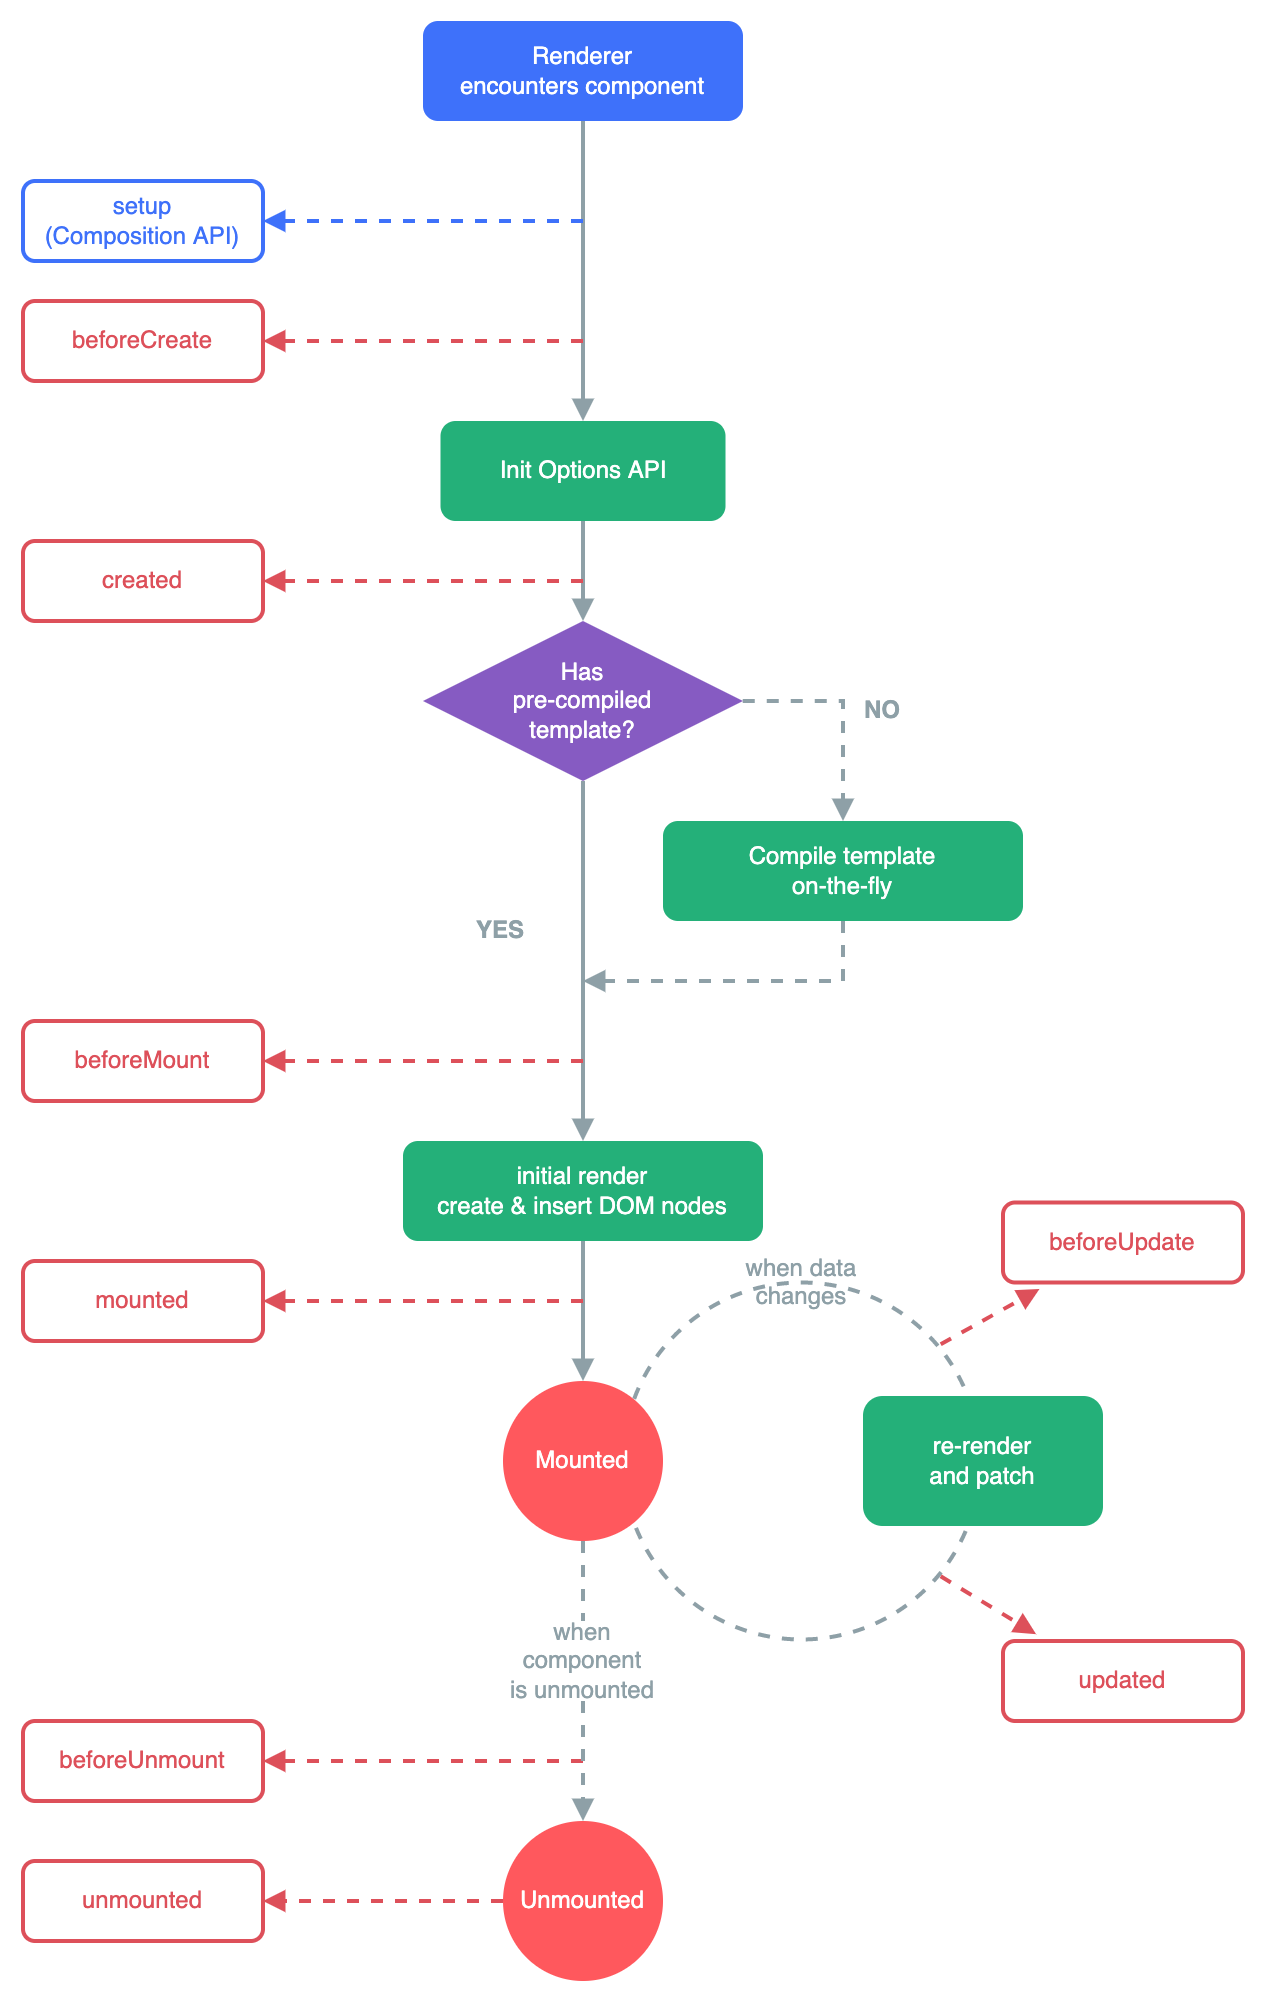
场景 - Vue组件生命周期
场景 - Vue watch
// vue2
{
	data(){
		name: Jack
	},
	watch: {
		name(newVal, val){
			console.log(newValue, val)
		}
	}
}
// vue3
const nameRef = ref()
// 监听ref格式
watch(
	[nameRef],
	(newValues, values) => {
		console.log('name', newValues, values)
	}
)
// reactive函数形式
watch(
	() => state,
	() => {
		console.log('city', state.info.city);
	},
	{ deep: true }
)
// 	初始化即刻触发
watchEffect(()=>{
	console.log('name', nameRef.value)
})
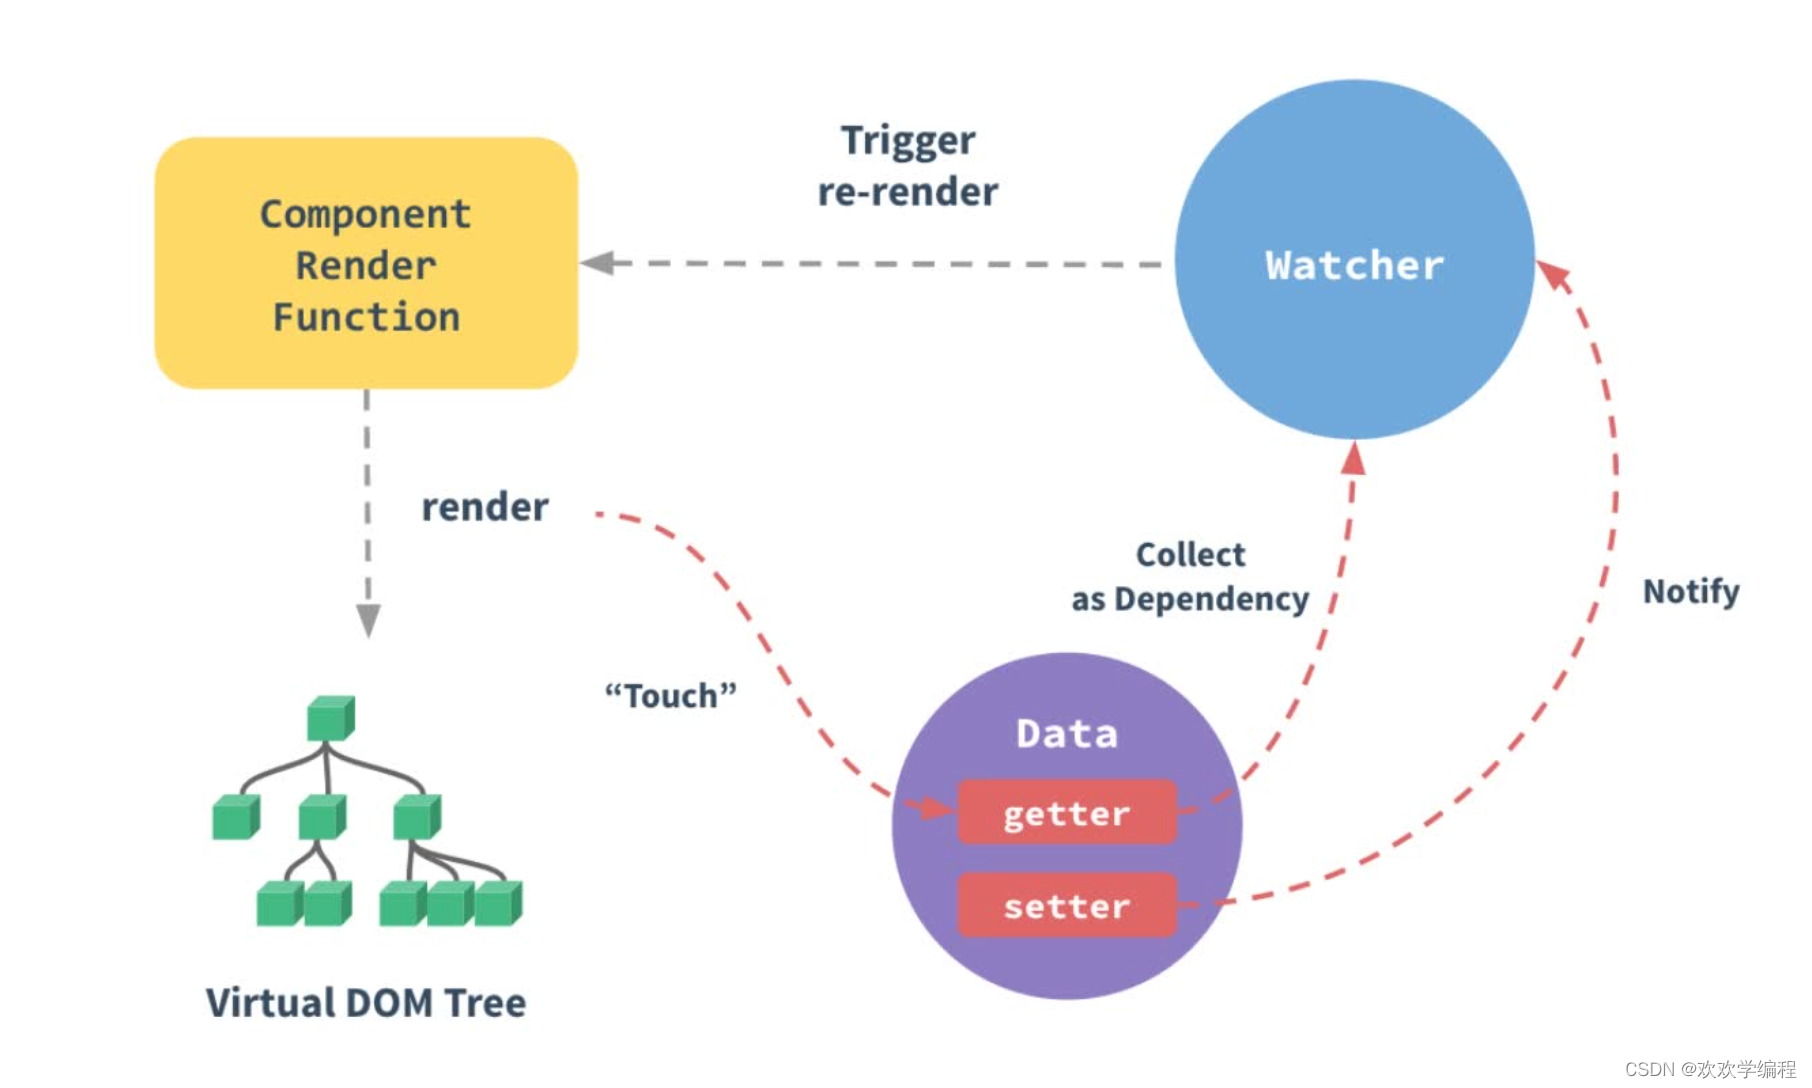
场景 - Vue 组件更新过程
场景 - 各种异步的回调
- 定时器
setTimeout setInterval
- Promise then 回调
- nodejs stream
const fs = require('fs')
const readStream = fs.createReadStream('./data/file1.txt') // 读取文件的stream

// 文件字符的长度
let length = 0
readStream.on('data', function(chunk){
	length += chunk.toString().length
})
readStream.on('end', function(){
	console.log(lengthguo)
})
- nodejs readline
const readline = require('readline')
const fs = require('fs')

const rl = readline.createInterface({
	input: fs,createReadStram('./data/file1.txt')
})

// 文件有多少行
let lineNum = 0
rl.on('line', function(line){
	lineNum++;
})
rl.on('close', function(){
	console.log('lineNum', lineNum)
})
- nodejs http server回调
const http = require('http')
function serverCallBack(req, res){
	console.log('get 请求不处理', req.url)
	res.end('hello')
}
http.createServer(serverCallback).listen(8081)
console.log('监听8081端口')
- Mutation Observer
<div id="container">
	<p>A</p>
	<p>B</p>
</div>

function callback(records: MutationRecord[], observer: MutationObserver){
	for(let record of records){
		console.log('record', record)
	}
}
const observer = new MutationObserver(callback)

const containerElem = document.getElementById('container')
const options = {
	attributes: true, // 监听属性变化
	attributeOldValue: true, // 变化之后,记录旧属性值
	childList: true, // 监听子节点变化(新增删除)
	characterData: true, // 监听节点内容或文本变化
	characterDataOldValue: true, // 变化之后,记录旧记录
	subtree: true, //递归监听所有下级节点
}
//开始监听
observer.observe(containerElem!, options)

//停止监听
observer.disonnect()
观察者模式 vs 发布订阅模式
- 发布订阅模式不属于传统的23种设计模式
- 是观察者模式的另一种实现形式
- 实际工作中,不会区分的那么细致
event.on('event-key',()=>{
	// 事件1
})
event.on('event-key',()=>{
	// 事件1
})

// 触发执行   核心区别:是否需要自己去触发
event.emit('event-key')
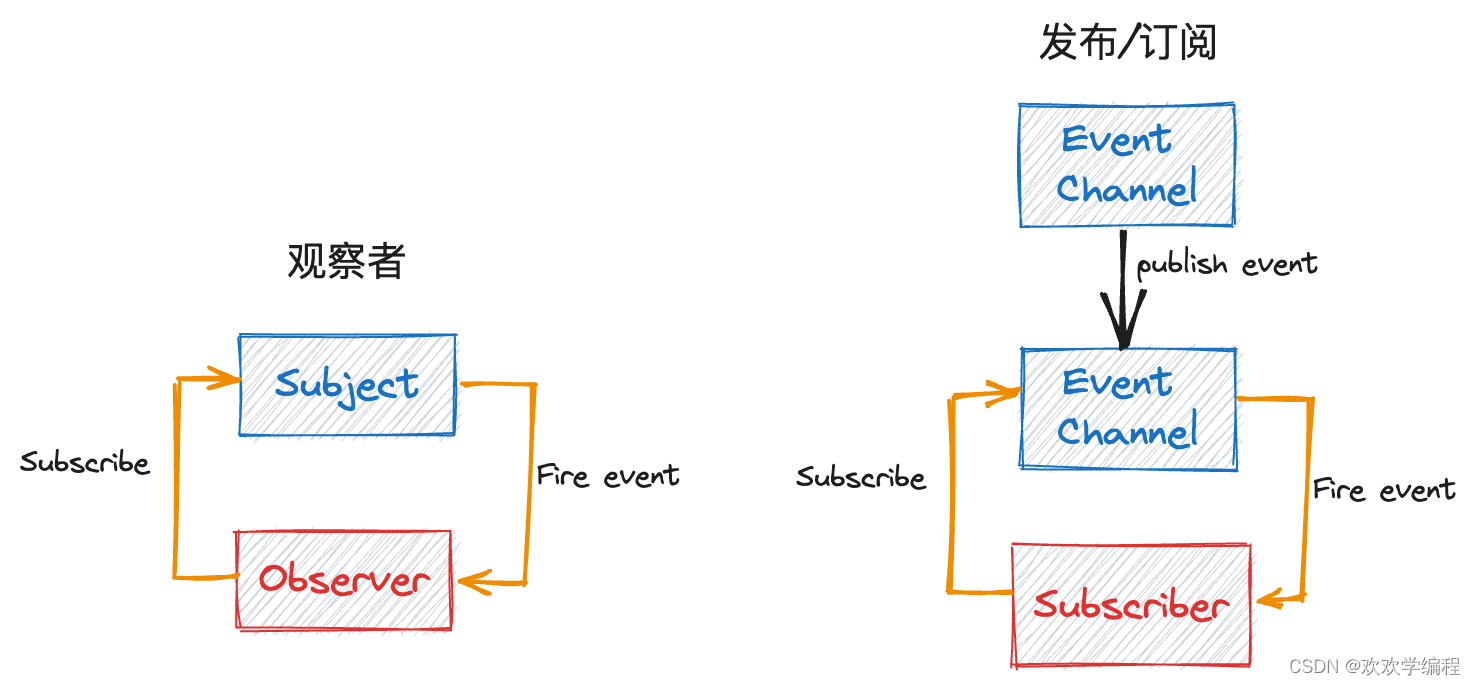
区别
- 观察者:Subject 和 Observer 直接绑定,中间无媒介,如addEventListener绑定事件
- 发布订阅: Publisher 和 Observer 互不相识,中间有媒介,如自定义事件、postMessage通讯
- 【看是否需要手动触发 emit】
发布订阅场景 - 自定义事件
Vue2本身就是一个EventBus,Vue3不再自带EventBus功能,推荐使用mitt 或 event-emitter
import mitt from 'mitt'

const emitter = mitt()
emitter.on('change', ()=>{
	console.log(change1)
})
emitter.on('change', ()=>{
	console.log(change2)
})
emitter.emit('change')
const eventEmitter from 'event-emitter'
const emitter = eventEmitter()

emitter.on('change', (value: string) =>{
	console.log('change1', value)
})
// emitter.once 只触发一次
emitter.once('change', () =>{
	console.log('change3')
})
emitter.emit('change', 'abc')
emitter.emit('change', 'abc')
发布订阅模式 - postMessage通讯
- 网页和 iframe 的通讯
- 其他: 多进程(nodejs WebWorker)通讯,WebSocket 通讯等
// 通过window.postMessage发送消息。注意第二个参数,可以限制域名,如发送敏感信息,要限制域名

// 父页面向iframe发送信息
window.iframe1.contentWindow.postMessage('hello',('*'))
// iframe向父页面发送消息
window.parent.postMessage('world', '*')

// 可监听message来接收消息,可使用event.origin来判断信息来源是否合法,可选择不接受
window.addEventListener('message', event=>{
	console.log('origin', event.origin)
	console.log('child received', event.data)
})
注意事项
- 组件销毁之前off,避免内存泄漏
- off要传入之前的函数,不能使用匿名函数
created(){
	emitter.on('change', this.changeHandler)
},
methods:{
	changeHandler(){
		console.log('change1')
	}
}.
beforeUnmount(){
	emitter.off('change', this.changeHandler)
}
迭代器模式
迭代器介绍
用于顺序访问集合对象的元素,不需要知道集合对象的底层表示
for循环不是迭代器模式,因为for循环需要知道对象的内部结构,如需要知道数组的长度,要知道通过arr[i]形式得到item
简易迭代器
有些对象,并不知道他的内部结构,不知道长度,不知道如何获取,就属于简易的迭代器,如forEach就是最简易的迭代器
const pList = document.querySelectorAll('p')
pList.forEach(p => console.log(p))

class DataIterator{
	private data: number[]
	private index = 0
	constructor(container: DataContainer){
		this.data = container.data
	}
	next(): number | null{
		if(this.hasNext()){
			return this.data[this.index++] // 返回下一个值 & 累加index
		}
		return null
	}
	hasNext(): boolean {
		if(this.index >= this.data.length) return false
		return true
	}
}

class DataContainer {
	data: number[] = [10, 20, 30, 40, 50]
	getIterator(){
		//获取迭代器
		return new DataIterator(this)
	}
}

const container = new DataContainer()
const iterator = container.getIterator() // 获取迭代器
while(iterator.hasNext()){
	const num = iterator.next()
	console.log(num)
}
是否符合设计原则
- 使用者和目标分离,解耦
- 目标能自行控制其内部逻辑
- 使用者不关心目标的内部结构
场景 - Symbol.iterator
js有序对象,都内置迭代器
- 字符串
- 数组
- NodeList等DOM集合
- Map
- Set
- arguments
【注意】:对象Object不是有序结构
所有的有序结构,都内置了 Symbol.iterator属性,属性值是一个函数
执行该函数返回iterator迭代器,有next方法,执行返回 { value: done } 结构
const arr = [10, 20, 30]
const iterator = arr[Symbol.iterator]()cpm
iterator.next() // {value: 10, done: false}
iterator.next() // {value: 20, done: false}
iterator.next() // {value: 30, done: false}
iterator.next() // {value: undefined, done: true}
const map = new Map([['k1', 'v1'], ['k2', 'v2']])
const mapIterator = map[Symbol.iterator]()
mapIterator.next() // {value: ['k1', 'v1'], done: false}
mapIterator.next() // {value: ['k2', 'v2'], done: false}
mapIterator.next() // {value: undefined, done: true}
自定义迭代器
interface IteratorRes {
	value: number | undefined
	done: boolean
}
class CustomIterator{
	private length = 3
	private index = 0
	next () : IteratorRes {
		this.index ++
		if(this.index <= this.length){
			return { value: this.index, done: false}
		}
		return {value: undefined, done: true}
	}
	[symbol.iterator](){
		return this
	}
}
迭代器的作用
- 用于for…of…所有Symbol.iterator的都可以用for of
- 数组操作:解构、扩展运算符、Array.from
- 用于创建 set 和 map
- Promise.all 和 Promise.race
迭代器 - generator生成器
function* genNums(){
	yield* [11, 21, 31] // 有序结构,已经实现了 [Symbol.Iterator]
}
const numsIterator = getNums()
for(let n of numsIterator){
	console.log(n)
}
Generator + yield 遍历DOM树
function traverse(elemList: Element[]): any {
	for(const elem of elemList){
		yield elem

		const children = Array.from(elem.children)
		if(children.length){
			yield* traverse(children)
		}
	}
}
const container = document.getElementById('container')
if(container){
	for(let node of traverse([container])){
		console.log(node)
	}
}
原型模式
用一个已经创建的实例作为原型,通过复制该原型对象来创建一个和原型相同或相似的新对象
UML图和代码演示

class CloneDemo {
	name: string = 'clone demo'

	clone(): CloneDemo{
		return new CloneDemo()
	}
}
原型和原型链
- JS中所有函数都有一个prototype属性,自定义函数也有
- JS中所有的引用类型对象都是通过函数创建的,都有__proto__,指向其构造函数的prototype,访问对象的属性或API时,首先查找自己的属性,然后查找它的__proto__
const obj = {} // 相当于new Object
obj.__proto__ === Object.prototype //true
const arr = [] // 相当于new Array
arr.__proto__ === Array.prototype //true

const f1 = new Foo('张三', 20)
f1.__propto__ === Foo.prototype //true
const f2 = new Foo('李四', 22)
f2.__proto__ === Foo.prototype //true
- 值类型没有__proto__,但它可以依然访问API,因为JS会先将它包装为引用类型,然后触发API
const str = 'abc'
str.slice(0, 1) //调用String.prototype.string
- 一个对象的__proto__指向了它的构造函数的prototype,而prototype本身也是一个对象,也会指向它的构造函数的prototype,于是就形成了原型链
- class是函数的语法糖
场景 - Object.create
- Object.create()可以指定原型
- 通过已有对象创建新对象,并且新对象的隐式原型指向已有对象的显示原型
{} 和 Object.create({}) 有什么区别?
{} 的隐式原型指向Object.prototype,但是Object.create({}) 的__proto__ 指向的是 {}的prototype
js对象属性描述符
- 获取属性描述符
const obj = {x : 100}
obj.getOwnPropertyDescriptor(obj, 'x')
//{
//	configurable: true,
//	enumerable: true,
//	value: 100,
//	writable: true
//}
- 设置属性描述符
Object.defineProperty(obj, 'y', {
	value: 200,
	wraitable: false
})
【注意】:使用Object.defineProperty定义新属性,属性描述符会默认为false {configurable: false, enumerable: false, writable :false }; 而用 { x: 10 } 字面量形式定义属性,属性描述符默认为 true
- value :值,如果没有value,那打印obj就看不到属性
- configurable:是否可以通过delete删除并重新定义,是否可以修改其他属性描述符配置,是否可以修改get set
const obj = {x: 100}
Object.defineProperty(obj, 'y', {
	value: 200,
	configurable: false
})
Object.defineProperty(obj, 'y', {
	value: 300,
	configurable: true
})
delete obj.y // 不成功
// 重新修改y报错(而修改z就不会报错)
Object.defineProperty(obj, 'y', {
	value: 210
})
- writable:属性值是否可被修改
const obj = { x: 100 }
Object.defineProperty(obj, 'x', {
	writable: false
})
obj.x = 101
obj.x // 依旧是100
【区分】object.freeze 冻结:1.现有属性不可被修改 2.不可添加新属性
const obj = { x: 100, y: 200 }
Object.freeze()
obj.x = 101
Object.getOwnPropertyDescriptor(obj, 'x') // {configurable: false, writable: false}
Object.isFrozen() // true
【区分】object.seal 密封对象:1.现有属性可以修改 2.不可添加新属性
const obj = { x: 100, y: 200 }
Object.seal()
obj.x = 101 //成功
obj.z = 101 //不成功,不能再添加新属性
Object.getOwnPropertyDescriptor(obj, 'x') // {configurable: false, writable: true}
Object.isSealed() // true
【注意】:Object.freeze() 和 Object.seal()都是浅操作,不会递归下一层
enumerable
const obj = { x: 100 }
Object.defineProperty(obj, 'y', {
	value: 200,
	enumerable: false
})
Object.defineProperty(obj, 'z', {
	value: 300,
	enumerable: true
})
for(const key in obj){
	console.log(key) // 'x' 'z'
}
console.log('y' in obj) // true --- 只能限制 for in 无法限制 in
- Object 的 Symbol 属性,即便 enumerable: true 也无法通过 for… in 遍历,获取可用 getOwnPropertySymbols 或Reflect.ownKeys
const n = Symbol('b');
const obj = { a: 100, [b]: 200 }
for(key in obj) console.log(key) //a
Object.getOwnPropertyDescriptor(obj, b) //enumerable: true
Object.keys(obj) // ['a']
Object.getOwnPropertyNames(obj) //['a']
Object.getOwnPropertySymbols(obj) //['b']
Reflect.ownKeys(obj) //['a', 'b']
装饰器模式
装饰器模式允许向一个现有的对象添加新的功能,同时又不改变其结构,这种类型的设计模式属于结构型模式,它是作为现有的类的一个包装。动态地给一个对象添加一些额外的职责,就增加功能来说,装饰器模式相比生成子类更加灵活
UML类图和代码演示

class Circle{
	draw(){
		console.log('画一个圆')
	}
}

class Decorator {
	private circle: Circle
	constructor(circle: Circle){
		this.circle = circle
	}
	draw(){
		this.circle.draw() // 原有功能
		this.setBorder() // 装饰
	}
	private setBorder(){
		console.log('设置边框颜色')
	}
}

const circle = new Circle()
const decorator = new Decorator(circle)
decorator.draw()
符合开放封闭原则,对扩展开放,对修改封闭
- 装饰器和目标分离,解耦
- 装饰器可自行扩展
- 目标也可自行扩展
场景 - 装饰class
ES6中引入了Decorator语法,TS也支持(在tsconfig.json中加入experimentalDecorators: true)
//装饰器的工厂函数
function testable(val: boolean){
	return function(target: any){
		target.isTestable = val
	}
}

@testable(false)
class Foo{
	static isTestable?: boolean
}
console.log(Foo.isTestable) // false
场景 - 装饰class方法
/*
* @params target 实例
* @params key key
* @params descriptor 属性描述符
*/
function readOnly(target: any, key: string, descriptor: PropertyDescriptor){
	descriotor.writable = false
}
function configurable(val: boolean){
	return function(target: any, key: string. descriptor: PropertyDescriptor){
		descriptor.configurable = val
	}
}
class Foo {
	private name = '张三'
	private age = 20

	//readonly
	@readonly
	getName() {
		return this.name
	}
	@configurable(false)
	getAge() {
		return this.age
	}
}
场景 - Angular 定义组件
https://angular.io/start
import { Component, OnInit } from '@angular/core'

// 装饰器,定义class为组件
@Component({
	selector: 'app-product-alerts',
	templateUrl: './products-alerts.component.html',
	styleUrls: ['./products-alerts.components.css']
})
export class ProductAlertsComponent implements OnInit {
	constructor() {}
	ngOnInit() {}
}
场景 - react-redux
https://www.redux.org.cn/docs/basics/UsageWithReact.html
import { connect } from 'react-redux'

// 装饰器
@connect(mapStateToProps, mapDispatchToProps)
export default VisibleTodoList extends React.Component()
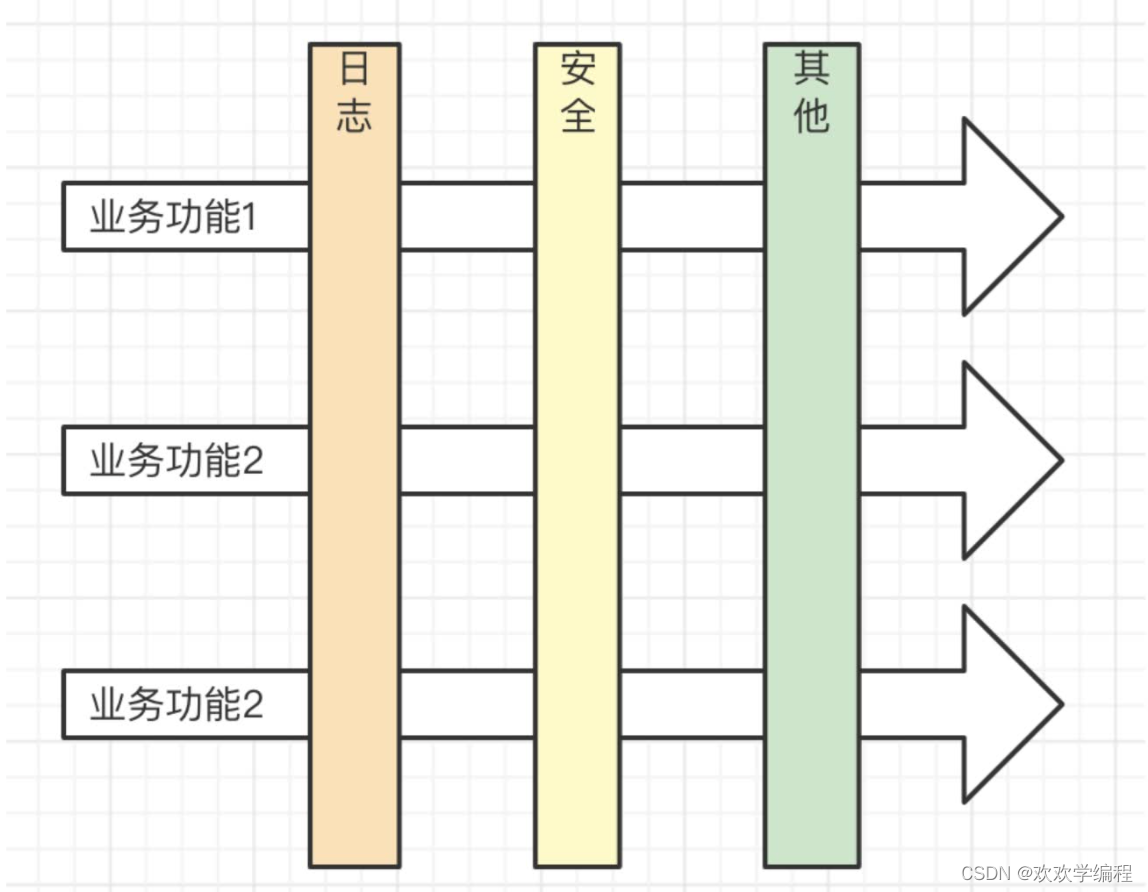
AOP
- Aspect Oriented Program 面向切面变成
- 业务和系统基础功能分离,和Decorator很配
- AOP和OOP并不冲突
function log(target: any, key: string, descriptor: PropertyDescriptor){
	const oldValue = descriptor.value // fn1 函数

	// 重新定义fn1函数
	descriptor.value = function(){
		console.log('记录日志....')
		return oldValue.apply(this, arguments)
	}
}
class Foo {
	@log	//不影响业务功能的代码,只是加了一个log的切面
	fn1(){
		console.log('业务功能')
	}
}
代理模式
- 针对一个对象
- 设置代理,控制这个对象的访问
- 用户不得直接访问对象,而要通过代理

UML类图和代码演示

class RealImg {
	fileName: string,
	constructor(fileName: String){
		this,fireName = fileName
	}
	display(){
		this.loadFromDist()
		console.log('display...', this.fileName)
	}
	private loadFromDist(){
		console.log('loading', this.fileName)
	}
}

class ProxyImg {
	realImg: RealImg
	constructor(fileName: string){
		this.realImg = new RealImg(fileName)
	}
	// 代理
	display(){
		this.realImg.display()
	}
}
- 装饰器模式:不能改变该原始对象的行为
- 代理模式:可以改变原始对象的行为
- 符合开放封闭原则
- 代理和目标分离,解耦
- 代理可自行扩展逻辑
- 目标也可自行扩展逻辑
场景 - DOM事件代理
- 事件绑定到父容器上,而非目标节点
- 适合目标比较多或数量不确定(如无限加载的瀑布流图片)
<div id="div1">
	<a href="#">a1</a>
	<a href="#">a2</a>
	<a href="#">a3</a>
	<a href="#">a4</a>
</div>
<button>点击增加一个a标签</button>

<script>
	var div1 = document.getElementById('div1')
	// DOM 事件代理(委托)
	div1.addEventListener('click', event=>{
		const target = event.target as Element
		if(target.nodeName === 'A'){
			alert(target.innerHTML)
		}
	})
</script>
场景 - webpack devServer proxy
- 开发环境,前端请求服务端API
- 代理到本地服务器,或者mock接口
- 正向代理
// webpack.config.js
module.exports = {
	//其他配置
	devServer: {
		proxy: {
			'/api': 'http://localhost:8081'
		}
	}
}
场景 - nginx反向代理
https://www.runoob.com/w3cnote/nginx-setup-intro.html
server {
	listen 8000;
	location / {
		proxy_pass http://localhost:8001
	}
	location /api/ {
		proxy_pass http://localhost:8002
		proxy_set_header Host $host;
	}
}
Proxy - 语法
Vue3就使用Proxy做data响应式
class star = {
	name: '章三',
	age: 25,
	phone: '18611111111',
	price: 0 // 明星不谈钱
}
const agent = new Proxy(star, {
	get(target, key){
		if(key === 'phone'){
			return '13966667777' //经纪人的电话,明星的电话不能泄漏
		}
		if(key === 'price'){
			return 100 * 1000 // 报价
		}
		return Reflect.get(target, key);
	}
	set(target, key, val): boolean {
		if(key === 'price'){
			if(val < 100 * 1000){
				throw new Error('价格太低了')
			}else {
				console.log('报价成功,合作愉快', val)
				return Reflect.set(target, key, val)
			}
		}
		// 其他属性不可设置
		return false
	}
})
proxy - 跟踪属性访问
const user = {
	name: '张三'
}
const proxy = new Proxy(user,{
	get(target, key){
		console.log('get')
		return Reflect.get(target, key)
	}
	set(target, key, val){
		return Reflect.set(target,key, va)
	}
})
proxy - 隐藏属性
const hiddenProps = ['girlfriend']
const user = [
	name: '张三',
	age: 25,
	girlfriend: '小红'
]

const proxy = new Proxy(user, {
	get(target, key){
		if(hiddenProps.includes(key as string)) return undefined
		return Relect.get(target, key)
	}
	has(target, key){
		if(hiddenProps.includes(key as string)) return undefined
		return Relect.has(target, key)
	}
	set(target, key){
		if(hiddenProps.includes(key as string)) return false
		return Reflect.set(target, key, val)
	}
})
proxy - 验证属性格式
const user = {
	name: '张三',
	age: 25,
}
const proxy = new Proxy(user, {
	set(target, key, val){
		if(key === 'age'){
			if(typeof val!=='number') return false
		}
		return Reflect.set(target, key, val)
	}
})
proxy - 记录实例
const userList = new WeakSet() //每次初始化 user,都记录在这里
class User {
	name: string,
	constructor(name: string){
		this.name = name
	}
}
const ProxyUser = new Proxy(User, {
	construct(...args){
		const user = Reflect.construct(...args)
		userList.add(user)
		return user
	}
})
const user1 = new ProxyUser('张三')
const user2 = new ProxyUser('李四')
proxy注意事项 - 捕获器不变式
const obj = { x: 100, y: 0 }
Object.defineProperty(obj, 'y', {
	value: 200,
	writable: false,
	configurable: false
})
const proxy = new Proxy(obj, {
	get(){
		return 'abc'
	}
})
console.log(proxy.x) // 'abc'
console.log(proxy.y) // y属性描述符被修改,proxy不能修改它的值
proxy注意事项 - this
const user = {
	name: '张三',
	getName(){
		console.log('this...', this) //this在执行时确定
		return this.name
	}
}
const proxy = new Proxy(user, {})
user.getName() //执行this是 user
proxy.getName() //执行this是 proxy
其他设计模式
职责链模式
- 一个流程,需要多个角色处理
- 把多个角色分开,通过一个“链”串联起来
- 各个角色相互分离,互不干扰
Jquery链式操作
$('#div1')
	.show()
	.css('color','red')
	.append('$('<p>123</p>')')
Promise链式操作
策略模式
- 多个条件分支
- 不用很多if…else或switch…case
- 每个分支单独处理,相互隔离
// 修改前
//class User {
//	private type: string
//	constructor(type: string){
//		this.type = type
//	}
//	buy(){
//		const { type } = this
//		if(type === 'ordinary'){
//			console.log('普通用户的购买')
//		}
//		if(type === 'member'){
//			console.log('会员用户的购买')
//		}
//		if(type === 'ordinary'){
//			console.log('vip 用户购买')
//		}
//	}
//}

//使用策略模式
interface IUser {
	buy: ()=> void
}

class OrdinaryUser implements IUser {
	buy(){
		console.log('普通用户的购买')
	}
}
class MemberUser implements IUser {
	buy(){
		console.log('会员的购买')
	}
}
class VIPUser implements IUser {
	buy(){
		console.log('vip用户的购买')
	}
}
适配器模式
- 我们要使用一个对象
- 而它的API返回格式不一定完全适合我们
- 需要通过适配器转换一下
computed:{
	userNameList(){
		return this.userList.map(user=>user.name)
	}
}


 3592
3592


 被折叠的 条评论
为什么被折叠?
被折叠的 条评论
为什么被折叠?
 到【灌水乐园】发言


