


Vue-router
vue-router
一、vue-router是Vue.js官方的路由插件,它和vue.js是深度集成的,适合用于构建单页面应用。
二、vue-router是基于路由和组件的
1.路由用于设定访问路径,将路径和组件映射起来。
2.在vue-router的单页面应用中,页面的路径的改变就是组件的切换。
vue-router安装和配置方式
步骤一:安装vue-router
npm install vue-router --save
步骤二:在模块化工程中使用它(因为是一个插件,所以可以通过Vue.use()来安装路由功能)
1.导入路由对象,并且调用Vue.use(VueRouter)
2.创建路由实例,并且传入路由的映射配置
3.在Vue实例中挂载创建的路由实例
// 配置路由相关的信息
// 安装的框架中导入vue-router对象
import VueRouter from 'vue-router'
import Vue from 'vue'
1.通过Vue.use(插件),安装插件
Vue.use(VueRouter)
2.创建路由(VueRouter)对象
//单独抽取出来的routes数组,用于配置路由和组件间的关系
const routes = [

]
const router = new VueRouter({
	//在routes对象中配置路由和组件之间的应用关系
	//可以将routes创建为数组单独提出,更为清晰
	routes
})
3.将router对象导出
export default router
4.将router对象传入到Vue实例中(main.js (new Vue))
import Vue from 'vue'
import App from './App'
// 导入
import router from './router'

new Vue({
  el: '#app',
  //挂载
  router,
  render: h => h(App)
})
vue-router配置对应的映射关系
使用vue-router的步骤:
第一步:创建路由组件
第二步:配置路由映射:组件和路径映射关系
第三步:使用路由:通过和
第一步创建路由组件:
于components目录下配置两个组件(首页组件以及关于页面组件)
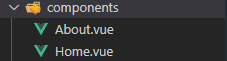
首页组件:Home.vue
<template>
    <div>
        <h2>我是首页</h2>
        <p>我是首页中的内容</p>
    </div>
</template>

<script>
    export default {
        name:'Home',
        props:[''],
        data () {
            return {
            };
        },
    }
</script>

<style lang='' scoped>

</style>
关于组件:About.vue
<template>
    <div>
        <h2>我是关于页面</h2>
        <p>我是关于页面中的内容</p>
    </div>
</template>

<script>
    export default {
        name:'About',
        props:[''],
        data () {
            return {
            };
        },
    }
</script>

<style lang='' scoped>

</style>
第二步:配置路由映射:组件和路径映射关系
在2.创建的vuetourer对象中的routes属性内配置映射关系
一个映射关系就是一个对象:
// 导入组件
import Home from '../components/Home'
import About from '../components/About'

// 2.创建路由(VueRouter)对象
// 在外面直接写一个数组更清晰
const routes = [
  // 配置路由的映射关系
  {
    path:'',
    // 重定向:
    redirect: '/home'
  },
  {
  	//路径出现/home
    path:'/home',
    //跳转到这个组件
    component:Home
  },
  {
    path:'/about',
    component:About
  }
]
第三步:使用路由:通过router-link和router-view
<router-view></router-view>
<router-link to="/home">首页</router-link>
<router-link to="/about">关于</router-link>
vue-router路由的默认路径
在routes中多配置一个映射。
path配置的是根路径:/
redirect是重定向,也就是我们将跟路径重定向到/home的路径下,这样就可以得到我们想要的结果了
{
    path:'',
    // 重定向:
    redirect: '/home'
  },
使用HTML5中的History模式
创建router对象时加入一个新的属性mode:
const router = new VueRouter({
  // 在routes中配置路由和组件之间的映射关系
  routes,
  // html5的history模式
  mode:'history',
  // 活跃
  linkActiveClass:'active'
})
router-link补充
to属性:点击跳转改变路径。
tag属性:可以指定<router-link>之后会被渲染成什么组件。
replace属性:replace不会留下history记录,所以指定replace的情况下,后退键返回不能返回到上一个页面中。
active-class属性:当<router-link>对应的路由匹配成功时,会自动给当前元素设置一个router-link-active的class。设置active-class可以修改默认的名称
通过代码跳转页面
  	<router-view></router-view>
    <button @click="homeClick">首页</button>
    <button @click="aboutClick">关于</button>
$router来自vue-router源码,所有组件都有这个属性
<script>
export default {
  name: 'App',
  methods: {
    homeClick() {
      // 通过代码的方式修改路由页面路径
      // $router来自vue-router源码,所有组件都有这个属性
      this.$router.push('/home')
      // this.$router.replace('/home')
      console.log('homeClick')
    },
    aboutClick() {
      this.$router.push('/about')
      console.log('aboutClick')
    }
  }
}
</script>
vue-router动态路由
在某些情况下,一个页面的path路径可能是不确定的,比如我们进入用户界面时,希望是下面这样的路径
1./user/aaaa或/user/bbb
2.除了有前面的/user之外,后面还跟着用户的ID
3.这种path和Component的匹配关系,我们称之为动态路由
配置路由的映射关系:
//导入组件
import User from '../components/user'
//配置映射关系
 {
    path:'/user/:userId',
    component:User
  },
全局组件中动态添加id作法:
export default {
  name: 'App',
  // data 是一个函数包裹数据防止变量污染
  data() {
    return {
      userId : 'lisi',
    }
  },
<router-link v-bind:to="'/user/'+userId">用户</router-link>
如果希望在user.vue界面中得到传入进来的userId.要使用**$route**属性。
export default {
        name:'',
        props:[''],
        data () {
            return {

            };
        },
        components: {},
        computed: {
          userId() {
            // 当前哪一个路由处于活跃状态就得到哪一个
            return this.$route.params.id
          }
    }
<template>
    <div>
        <h2>我是用户界面</h2>
        <p>我是用户的相关信息</p>
        <!-- <h2>{{userId}}</h2> -->
        <h2>{{$route.params.userid}}</h2>
    </div>
</template>
$route是当前那一个路由处于活跃状态,得到的就是那个活跃的路由。
vue-router打包文件的解析

vue-router路由懒加载
什么是路由懒加载?
1.在路由中通常会定义很多不同的页面。
2.一般情况下,这些不同的页面最后是放在一个js文件中
3.但是这样会导致这个页面非常大,这样的后果是用户一次性从服务器请求下来这个页面,要花费一定时间,甚至导致用户的电脑出现了短暂的空白。
4.为了避免这种情况,就可以使用路由懒加载,就可以实现一个路由打包一个JS文件
如何使用路由懒加载?

将原先的导入代码import Home from '../components/Home'替换为下方的代码,使用路由懒加载。
// 路由懒加载组件
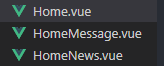
const Home = () => import('../components/Home')
const HomeNews = () => import('../components/HomeNews')
const HomeMessage = () => import('../components/HomeMessage')
const About = () => import('../components/About')
const User = () => import('../components/User')
const Profile = () => import('../components/Profile')
vue-router路由嵌套
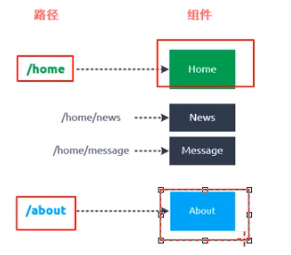
比如在home页面中,我们希望通过/home/news和/home/message访问一些内容,这样的话路径和组件的关系就如下:
想实现路由的嵌套有两个步骤:
1.创建对应的子组件,并在路由映射中配置对应的子路由
const HomeNews = () => import('../components/HomeNews')
const HomeMessage = () => import('../components/HomeMessage')

{
    path:'/home',
    component:Home,
    // 页面里跳转的子页面
    children: [
      {
        path:'',
        // 重定向:
        redirect: 'news'
      },
      {
        path:'news',
        component:HomeNews
      },
      {
        path:'message',
        component:HomeMessage
      }
    ]
  },
2.在组件内部使用<router-view>标签‘

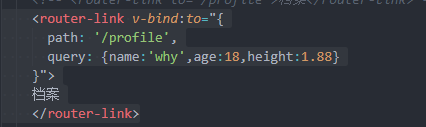
vue-router参数传递

创建profile组件:

路由懒加载
const Profile = () => import('../components/Profile')
配置映射关系
 {
    path:'/profile',
    component:Profile
  }
使用路由:
vue-router全局导航守卫
监听页面跳转过程,可以使用函数对页面做出改变:
需求:


// 前置守卫(guard)
// 全局导航守卫
router.beforeEach((to, from, next) => {
  // 从from跳转到to
  document.title = to.matched[0].meta.title
  console.log(to);
  next()
})
meta:元数据,从routes里面添加:
{
    path:'/about',
    component:About,
    meta: {
      title:'关于'
    },
  },
matched:匹配

vue-router全局导航守卫的补充
// 后置钩子(hook)
router.afterEach((to,from) => {
  console.log('----')
})
上述的两个导航守卫,都被称之为全局守卫
其余的还有路由独享守卫:

vue-router-keep-alive
keep-alive是Vue内置的一个组件,可以使被包含的组件保留状态,或避免重新渲染。
它有两个非常重要的属性:
include-字符串或正则表达式,只有匹配的组件会被缓存
exclude-字符串或正则表达式,任何匹配的组件都不会被缓存
<keep-alive exclude="Profile">
  <router-view></router-view>
</keep-alive>
data () {
            return {
              message: '你好啊',
              path:'',
            };
        },

activated() {
  this.$router.push(this.path)
},
// 组件内导航守卫,记录上一次离开状态
    beforeRoutLeave (to, from, next) {
      console.log(this.$route.path);
      this.path = this.$route.path;
      next()
    },


 4375
4375


 被折叠的 条评论
为什么被折叠?
被折叠的 条评论
为什么被折叠?
 到【灌水乐园】发言


