


pom依赖
Java 操作 zookeeper 的主要工具是 Curator。
        <dependencies>
        <!-- https://mvnrepository.com/artifact/junit/junit -->
        <dependency>
            <groupId>junit</groupId>
            <artifactId>junit</artifactId>
            <version>4.13.2</version>
            <scope>test</scope>
        </dependency>
        <!-- https://mvnrepository.com/artifact/org.apache.curator/curator-framework -->
        <dependency>
            <groupId>org.apache.curator</groupId>
            <artifactId>curator-framework</artifactId>
            <version>5.1.0</version>
        </dependency>
        <!-- https://mvnrepository.com/artifact/org.apache.curator/curator-recipes -->
        <dependency>
            <groupId>org.apache.curator</groupId>
            <artifactId>curator-recipes</artifactId>
            <version>5.1.0</version>
        </dependency>
        <!-- https://mvnrepository.com/artifact/org.slf4j/slf4j-api -->
        <dependency>
            <groupId>org.slf4j</groupId>
            <artifactId>slf4j-api</artifactId>
            <version>1.7.25</version>
        </dependency>
        <!-- https://mvnrepository.com/artifact/org.slf4j/slf4j-log4j12 -->
        <dependency>
            <groupId>org.slf4j</groupId>
            <artifactId>slf4j-log4j12</artifactId>
            <version>1.7.25</version>
            <scope>test</scope>
        </dependency>
        <!-- https://mvnrepository.com/artifact/org.springframework.boot/spring-boot-starter -->
        <dependency>
            <groupId>org.springframework.boot</groupId>
            <artifactId>spring-boot-starter</artifactId>
            <version>2.7.6</version>
        </dependency>

    </dependencies>
log4j.properties
### set log levels - for more verbose logging change 'info' to 'debug' ###
log4j.rootLogger=off, stdout
### direct log messages to stdout ###
log4j.appender.stdout=org.apache.log4j.ConsoleAppender
log4j.appender.stdout.Target=System.out
log4j.appender.stdout.layout=org.apache.log4j.PatternLayout
log4j.appender.stdout.layout.ConversionPattern=[%d{yyyy-MM-dd HH/:mm/:ss}]-%5p %c(line/:%L) %x-%m%n
连接服务端
方式一
    // 服务端ip
    public static final String ZOOKEEPER_SERVER_IP = "192.168.59.128:2181";

    /**
     * 建立连接-第一种方式
     */
    @Test
    public void testConnection1(){
        /**
         * @param baseSleepTimeMs 隔多少毫秒重试一次
         * @param maxRetries 最多重试次数
         */
        // 创建重试策略
        RetryPolicy retryPolicy = new ExponentialBackoffRetry(3000, 10);
        /**
         * @param connectString       连接字符串,服务端的ip & port,多个服务端用逗号分隔
         * @param sessionTimeoutMs    会话超时时间,单位毫秒
         * @param connectionTimeoutMs 连接超时时间,单位毫秒
         * @param retryPolicy         重试策略
         */
        // 创建客户端
        client = CuratorFrameworkFactory.newClient(ZOOKEEPER_SERVER_IP, 60 * 1000, 15 * 1000, retryPolicy);
        // 启动客户端
        client.start();
    }
方式二
/**
     * 建立连接-第二种方式,其实就是使用工厂模式
     */
    @Test
    public void testConnection2(){
        /**
         * @param baseSleepTimeMs 隔多少毫秒重试一次
         * @param maxRetries 最多重试次数
         */
        RetryPolicy retryPolicy = new ExponentialBackoffRetry(3000, 10);


        // namespace: 之后的节点操作,都是在test节点下操作,如果该节点无子节点,将会被服务端清理
        CuratorFramework client = CuratorFrameworkFactory.builder()
                                            .connectString(ZOOKEEPER_SERVER_IP)
                                            .sessionTimeoutMs(60 * 1000)
                                            .connectionTimeoutMs(15 * 1000)
                                            .retryPolicy(retryPolicy)
                                            .namespace("test")
                                            .build();
        // 启动客户端
        client.start();
    }
之后的节点操作都需要用到客户端,并开启。因此可以把这些重复的代码提出来。
    // 服务端ip
    public static final String ZOOKEEPER_SERVER_IP = "192.168.59.128:2181";

    private CuratorFramework client;

    /**
     * 建立连接-第一种方式
     */
    @Before // @before的作用就是在一个类中最先执行的方法
    public void clientInit(){
        /**
         * @param baseSleepTimeMs 隔多少毫秒重试一次
         * @param maxRetries 最多重试次数
         */
        // 创建重试策略
        RetryPolicy retryPolicy = new ExponentialBackoffRetry(3000, 10);
        /**
         * @param connectString       连接字符串,服务端的ip & port,多个服务端用逗号分隔
         * @param sessionTimeoutMs    会话超时时间,单位毫秒
         * @param connectionTimeoutMs 连接超时时间,单位毫秒
         * @param retryPolicy         重试策略
         */
        // 创建客户端
        client = CuratorFrameworkFactory.newClient(ZOOKEEPER_SERVER_IP, 60 * 1000, 15 * 1000, retryPolicy);
        // 启动客户端
        client.start();
    }

    @After // @after的作用就是在一个类中最后执行的方法
    public void closeClient(){
        if(null != client){
            client.close();
        }
    }
节点操作
创建节点
1. 基本创建
    @Test
    public void testCreateZkNode() throws Exception {
        // create [节点路径]
        String path = client.create().forPath("/app1");
        System.out.println("基本创建 path = " + path);
    }
path返回
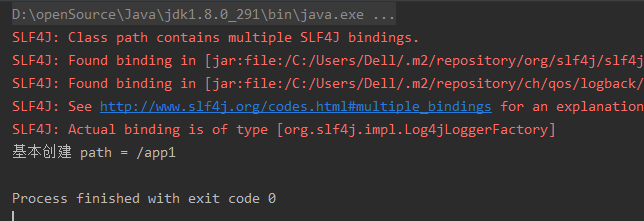
app1节点创建成功

创建的节点会有个默认的数据,就是客户端的ip
![]()
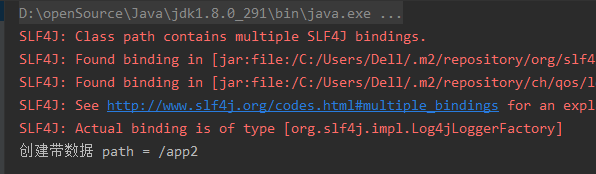
2. 创建节点 带数据
    @Test
    public void testCreateZkNode2() throws Exception {
        // 2. 创建带数据 create [节点路径] [数据]
        String path = client.create().forPath("/app2", "123".getBytes());
        System.out.println("创建带数据 path = " + path);
} 

3. 设置节点类型
节点的类型,就是持久化,临时,顺序。
创建节点的时候,再调用一个withMode(),就可以设置节点类型。
createMode的类型。
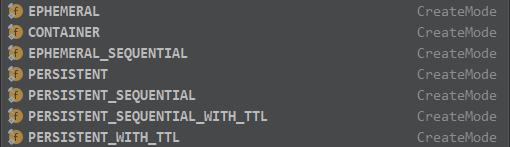
下面创建一个临时节点为例。
    @Test
    public void testCreateZkNode3() throws Exception {
        // 3. 设置节点类型:持久 临时 顺序

        // 创建临时节点
        String path = client.create().withMode(CreateMode.EPHEMERAL).forPath("/app3");
        System.out.println("创建临时节点 path = " + path);
} 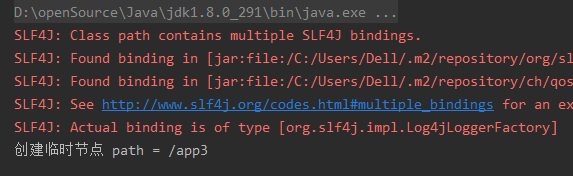
服务端看不到app3,是因为java程序结束,就意味着客户端也关闭了,节点也随之消失了。
![]()
如果想看到app3节点,可以先让程序不要这么快结束。先睡个10s。
    @Test
    public void testCreateZkNode3() throws Exception {
        // 3. 设置节点类型:持久 临时 顺序

        // 创建临时节点
        String path = client.create().withMode(CreateMode.EPHEMERAL).forPath("/app3");
        System.out.println("创建临时节点 path = " + path);

        Thread.sleep(10 * 1000);
    }
此时程序还在运行,客户端会话还没结束,能看到app3节点。
![]()
程序结束之后,客户端会话结束,app3节点消失。
![]()
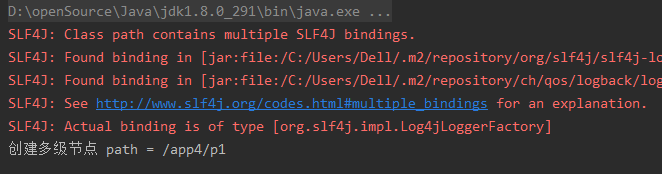
4. 创建多级节点
创建节点时,调用creatingParentsIfNeeded()即可。
    @Test
    public void testCreateZkNode4() throws Exception {
        // 4. 创建多级节点
        String path = client.create().creatingParentsIfNeeded().forPath("/app4/p1");
        System.out.println("创建多级节点 path = " + path);
} 

查询节点
1. 查询节点数据
    @Test
    public void testGet1() throws Exception {
        // 1. 查询数据 get
        byte[] bytes = client.getData().forPath("/app1");
        System.out.println("查询数据 get = " + new String(bytes));
    }
![]()
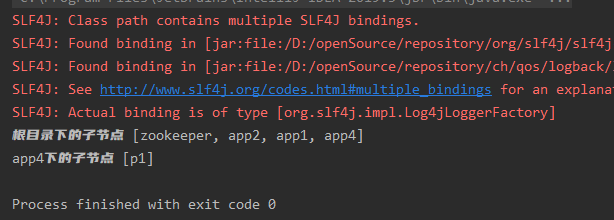
2. 查询子节点
    @Test
    public void testGet2() throws Exception {
        // 2. 查询子节点 ls
        List<String> nodes = client.getChildren().forPath("/");
        System.out.println("根目录下的子节点 " + nodes);

        List<String> nodes2 = client.getChildren().forPath("/app4");
        System.out.println("app4下的子节点 " + nodes);
    }

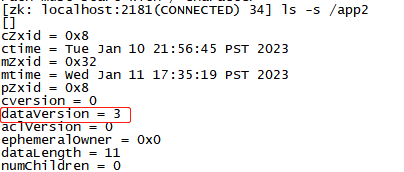
3. 查询节点状态信息
查看节点信息需要一个创建Stat对象,直接new即可。
@Test
public void testGet3() throws Exception {
// 3. 查询节点状态信息 ls -s
Stat stat = new Stat();
System.out.println("query before status = " + stat);
client.getData().storingStatIn(stat).forPath("/app1");
System.out.println("query before status = " + stat);
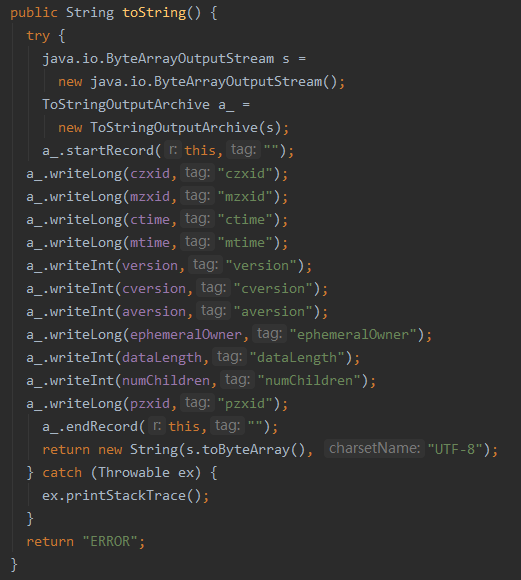
}Stat对象的toString()代码写的很low,不知道打印出来的参数是对应什么信息。
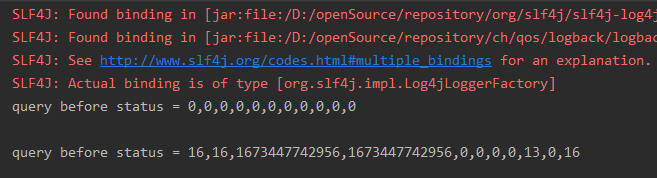
需要看一下Stat类的toString才能知道,可读性非常低。
通过linux查看app1节点的信息。

修改节点
1. 修改节点数据
    @Test
    public void testSet() throws Exception {
        // 1. 修改节点数据
        Stat stat = client.setData().forPath("/app2", "hello zookeeper".getBytes());
        System.out.println(stat);
    }

2. 根据版本修改节点数据
既然要根据版本修改,那么就需要先获取到版本号,然后再去修改。
    @Test
    public void testSetForVersion() throws Exception {
        // 2. 根据版本修改节点数据

        // 先查询版本号
        Stat stat = new Stat();
        client.getData().storingStatIn(stat).forPath("/app2");

        int version = stat.getVersion();
        System.out.println("set before version = " + version);

        // 根据版本修改数据
        Stat stat1 = client.setData().withVersion(version).forPath("/app2", "my cute fat".getBytes());
        System.out.println("set after version = " + stat1.getVersion());
    }
删除节点
1. 删除单个节点
    @Test
    public void testDelete() throws Exception {
        // 1. 删除单个节点
        client.delete().forPath("/app1");
    }
app1已被删除。
![]()
2. 删除多级节点
app4节点下有个p1节点,以它来做示范。

类似之前的添加多级节点,调用一个 deletingChildrenIfNeeded() 即可。
    @Test
    public void testDeleteAll() throws Exception {
        // 2. 删除多级节点
        client.delete().deletingChildrenIfNeeded().forPath("/app4");
    }
删除成功。
![]()
3. 必须删除成功
如果服务端或者客户端不够稳定,可能会出现删除节点不成功的问题。
因此,提供了保证删除成功的api,删除时调用 guaranteed() 即可保证删除成功。
    @Test
    public void testDeleteMustSuccess() throws Exception {
        // 3. 必须成功的删除
        client.delete().guaranteed().forPath("/app2");
    }
app2节点被删除。

4. 删除后回调
回调是指删除成功后,需要做的操作。
删除的时候,调用一个inBackground(),然后再写一个BackgroundCallback的匿名内部类,实现里面的processResult(),processResult()里写删除后的操作。
    @Test
    public void testDeleteCallback() throws Exception {
        // 4. 回调
        client.delete()
                .inBackground(new BackgroundCallback() {
                    @Override
                    public void processResult(CuratorFramework client, CuratorEvent event) throws Exception {
                        System.out.println("deleted ..");
                        System.out.println("event");
                    }
                })
                .forPath("/app6");
    }
但是执行代码成功之后,并没有打印任何东西。回调方法没被调用,原因未知。

app6节点也没有被删除成功。
![]()


 1280
1280


 被折叠的 条评论
为什么被折叠?
被折叠的 条评论
为什么被折叠?
 到【灌水乐园】发言


