


设置单元格背景色
很简单一行代码搞定,直接上代码如下:
		//创建工作薄
        Workbook wb = new XSSFWorkbook();
        //设置样式
        CellStyle titleStyle = wb.createCellStyle();
        //设置背景色
        titleStyle.setFillForegroundColor(IndexedColors.AQUA.getIndex());
        //必须设置 否则背景色不生效
        titleStyle.setFillPattern(FillPatternType.SOLID_FOREGROUND);
注意
1、 使用 setFillForegroundColor() 方法而不是 setFillBackgroundColor() 。
2、设置背景色时必须添加 titleStyle.setFillPattern(FillPatternType.SOLID_FOREGROUND) 设置,否则背景色无效。
效果

背景色对应参数
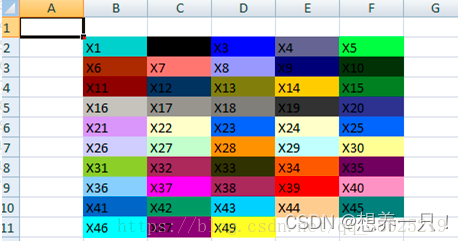
上面的单元格颜色对应下面的英语颜色表示,从X1-X49 按顺序对应;
将下面对应的code填入 setFillForegroundColor() 即可。
IndexedColors.AQUA.getIndex();

IndexedColors.AUTOMATIC.getIndex();

IndexedColors.BLUE.getIndex();

IndexedColors.BLUE_GREY.getIndex();

IndexedColors.BRIGHT_GREEN.getIndex();

IndexedColors.BROWN.getIndex();

IndexedColors.CORAL.getIndex();

IndexedColors.CORNFLOWER_BLUE.getIndex();

IndexedColors.DARK_BLUE.getIndex();

IndexedColors.DARK_GREEN.getIndex();

IndexedColors.DARK_RED.getIndex();

IndexedColors.DARK_TEAL.getIndex();

IndexedColors.DARK_YELLOW.getIndex();

IndexedColors.GOLD.getIndex();

IndexedColors.GREEN.getIndex();

IndexedColors.GREY_25_PERCENT.getIndex();

IndexedColors.GREY_40_PERCENT.getIndex();

IndexedColors.GREY_50_PERCENT.getIndex();

IndexedColors.GREY_80_PERCENT.getIndex();

IndexedColors.INDIGO.getIndex();

IndexedColors.LAVENDER.getIndex();

IndexedColors.LEMON_CHIFFON.getIndex();

IndexedColors.LIGHT_BLUE.getIndex();

IndexedColors.LEMON_CHIFFON.getIndex();

IndexedColors.LIGHT_BLUE.getIndex();

IndexedColors.LIGHT_CORNFLOWER_BLUE.getIndex();

IndexedColors.LIGHT_GREEN.getIndex();

IndexedColors.LIGHT_ORANGE.getIndex();

IndexedColors.LIGHT_TURQUOISE.getIndex();

IndexedColors.LIGHT_YELLOW.getIndex();

IndexedColors.LIME.getIndex();

IndexedColors.MAROON.getIndex();

IndexedColors.OLIVE_GREEN.getIndex();

IndexedColors.ORANGE.getIndex();

IndexedColors.ORCHID.getIndex();

IndexedColors.PALE_BLUE.getIndex();

IndexedColors.PINK.getIndex();

IndexedColors.PLUM.getIndex();

IndexedColors.RED.getIndex();

IndexedColors.ROSE.getIndex();

IndexedColors.ROYAL_BLUE.getIndex();

IndexedColors.SEA_GREEN.getIndex();

IndexedColors.SKY_BLUE.getIndex();

IndexedColors.TAN.getIndex();

IndexedColors.TEAL.getIndex();

IndexedColors.TURQUOISE.getIndex();

IndexedColors.VIOLET.getIndex();

IndexedColors.WHITE.getIndex();

IndexedColors.YELLOW.getIndex();
单元格其他样式设置
//array 表头数据
//list 具体数据
public Workbook writeToExcelByList(String[] array, List<List> list) {
 		//1 创建工作薄
        Workbook wb = new XSSFWorkbook();

        //2 设置标题样式
        CellStyle titleStyle = wb.createCellStyle();
        titleStyle.setAlignment(HorizontalAlignment.CENTER);//左右居中
        titleStyle.setVerticalAlignment(VerticalAlignment.CENTER);//上下居中
        titleStyle.setFillForegroundColor(IndexedColors.AQUA.getIndex());//设置背景色
        titleStyle.setFillPattern(FillPatternType.SOLID_FOREGROUND);//必须设置 否则无效
        Font titleFont = wb.createFont();
        titleFont.setFontHeightInPoints((short) 15);//字体大小
        titleFont.setFontName("黑体");//字体样式
        titleStyle.setFont(titleFont);

        //3 设置表头样式
        CellStyle headerStyle = wb.createCellStyle();
        headerStyle.setAlignment(HorizontalAlignment.CENTER);
        Font headerFont = wb.createFont();
        headerFont.setFontHeightInPoints((short) 12);
        headerFont.setFontName("黑体");
        headerStyle.setFont(headerFont);

        //4 创建sheet
        Sheet sheet = wb.createSheet("排版统计");

        //5 设置单元格宽度  参数1表示列 参数2表示宽度
        sheet.setColumnWidth(0,15*256);
        sheet.setColumnWidth(2,15*256);
        sheet.setColumnWidth(3,15*256);

        //6 指定合并开始行、合并结束行 合并开始列、合并结束列
        CellRangeAddress rangeAddress = new CellRangeAddress(0, 0, 0, array.length-1);
        //添加要合并地址到表格
        sheet.addMergedRegion(rangeAddress);

        //7 添加标题和标题样式
        Row row0 = sheet.createRow((int) 0);
        row0.setHeightInPoints(40);
        Cell cell0 = row0.createCell(0);
        cell0.setCellValue("这里是标题");
        cell0.setCellStyle(titleStyle);

        //8 在sheet中添加表头   因为第0行是标题 所以表头行数从1开始
        Row row = sheet.createRow((int) 1);
        for (int i = 0; i < array.length; i++) {
            Cell cell = row.createCell(i);
            cell.setCellValue(array[i]);
            cell.setCellStyle(headerStyle);
        }

        //9 数据样式 因为标题和数据样式不同 需要分开设置 不然会覆盖
        CellStyle dataStyle = wb.createCellStyle();
        //设置居中样式,水平居中
        dataStyle.setAlignment(HorizontalAlignment.CENTER);

        //10 数据从序号2开始
        try {
            int index = 2;
            for (List value : list) {
                // 默认的行数从0开始,为了统一格式设置从2开始,就是从excel的第三行开始
                row = sheet.createRow(index);
                index++;
                List data = value;
                for (int j = 0; j < data.size(); j++) {
                    Cell cell = row.createCell(j);
                    // 为当前列赋值
                    cell.setCellValue(data.get(j).toString());
                    //设置数据的样式
                    cell.setCellStyle(dataStyle);
                }
            }
        } catch (Exception e) {
            e.printStackTrace();
        }
        return wb;
    }
效果


 9528
9528


 被折叠的 条评论
为什么被折叠?
被折叠的 条评论
为什么被折叠?
 到【灌水乐园】发言


