


Vue3 探索组件的理念
1. 组件的定义及复用性,局部组件和全局组件
用树来表达一个网页的结构,将一个网页拆成小组件,会更容易维护。
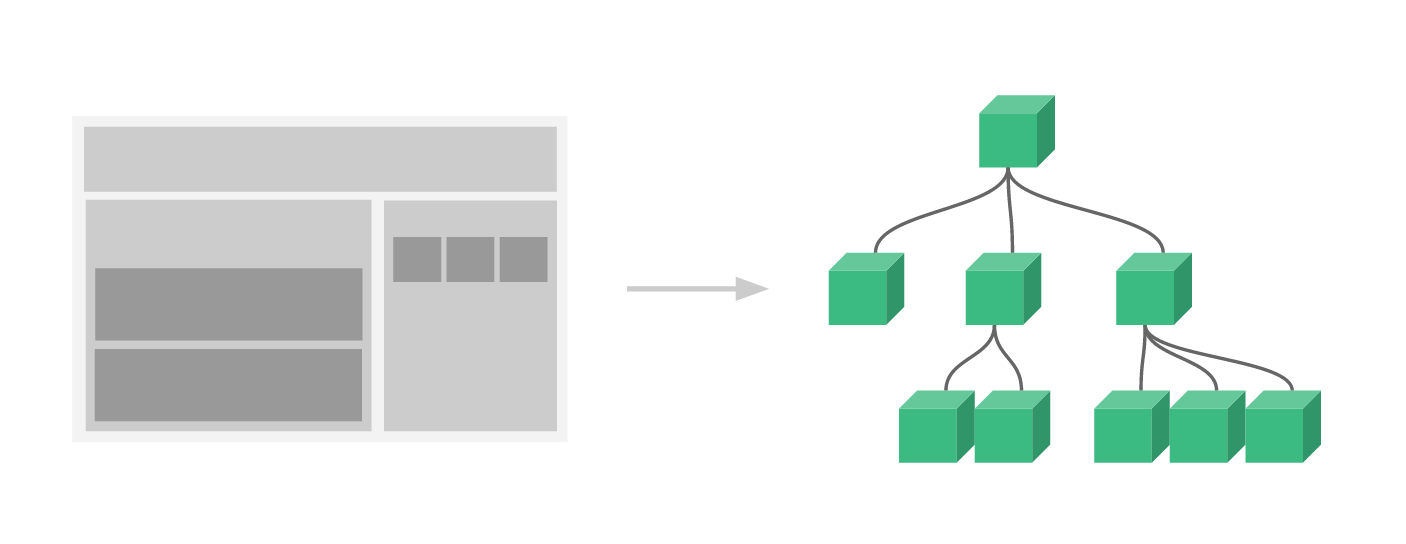
例如,你可能会有页头、侧边栏、内容区等组件,每个组件又包含了其它的像导航链接、博文之类的组件。
全局组件
简单实现组件化:
<script>
  const app = Vue.createApp({
    template: `
      <div>
        <Hello />
        <World />
      </div>
    `
  })
  app.component("hello", {
    template: `<div>hello</div>`
  })
  app.component("world", {
    template: `<div>world</div>`
  })
  const vm = app.mount("#root");
</script>
这里都通过了 app.createApp 来创建组件,这就是全局注册组件。但是这有缺陷,在于一直占用内存,app 不销毁就不会释放,性能较低。
全局组件命名建议:小写字母单词,中间用横线间隔
局部组件
用对象形式创建一个组件,然后用 components 属性进行注册。
<script>
  const Counter = {
    data() {
      return {
        count: 1,
      }
    },
    template: `<div @click="count += 1">{{ count }}</div>`
  }

  const app = Vue.createApp({
    components: {
      Counter
    },
    template: `
      <div>
        <Counter />
      </div>
    `
  })

  const vm = app.mount("#root");
</script>
注意:Counter 需要先声明才能使用
局部组件性能较高,但是使用起来比较麻烦
局部组件命名建议:写类名的形式命名:即首字母大写开头驼峰命名。
2. 组件间传值及传值校验
2.1 父传子组件传值
const Test = {
  props: [ "content" ],
  template: `<div>{{ content }}</div>`
}

const app = Vue.createApp({
  data() {
    return {
      num: 123,
    }
  },
  components: {
    Test
  },
  template: `
    <div>
      <Test :content="num" />
    </div>
  `
})
父组件传子组件值,父组件通过标签名和标签值传递,然后子组件使用 props 来接收对应的属性值。标签值同样可以动态传参,即不是写死的,用 v-bind 里边写 js 表达式。
2.2 传值校验
如果接收的 props 规定了属性,即只接受 String 类型,props 可以写成对象类型来进行校验。
这里的要求是,类型为 String 类型。
const Test = {
  props: {
    content: String,
  },
  template: `<div>{{ content }}</div>`
}

const app = Vue.createApp({
  data() {
    return {
      num: 123,
    }
  },
  components: {
    Test
  },
  template: `
  <div>
    <Test :content="num" />
  </div>
`
})
写完后仍然会正常渲染,但是控制台里会有相关的警告信息,警告类型不匹配。

props 全部用法
app.component('my-component', {
  props: {
    // 基础的类型检查 (`null` 和 `undefined` 值会通过任何类型验证)
    propA: Number,
    // 多个可能的类型
    propB: [String, Number],
    // 必填的字符串
    propC: {
      type: String,
      required: true
    },
    // 带有默认值的数字
    propD: {
      type: Number,
      default: 100
    },
    // 带有默认值的对象
    propE: {
      type: Object,
      // 对象或数组的默认值必须从一个工厂函数返回
      default() {
        return { message: 'hello' }
      }
    },
    // 自定义验证函数
    propF: {
      validator(value) {
        // 这个值必须与下列字符串中的其中一个相匹配
        return ['success', 'warning', 'danger'].includes(value)
      }
    },
    // 具有默认值的函数
    propG: {
      type: Function,
      // 与对象或数组的默认值不同,这不是一个工厂函数——这是一个用作默认值的函数
      default() {
        return 'Default function'
      }
    }
  }
})
当 prop 验证失败的时候,(开发环境构建版本的) Vue 将会产生一个控制台的警告。
2.3 批量 attrs 精简
如果有一堆的 attr 需要写,正常情况下是这样搞的:
const Test = {
  props: ["num", "a", "b", "c"],
  template: `<div>{{ num }} - {{ a }} - {{ b }} - {{ c }}</div>`
}

const app = Vue.createApp({
  data() {
    return {
      num: 123,
      a: 456,
      b: 78,
      c: 90
    }
  },
  components: {
    Test
  },
  template: `
  <div>
    <Test :num="num" :a="a" :b="b" :c="c" />
  </div>
`
})

const vm = app.mount("#root");
挨个赋值,但是有点麻烦。
有更简单的写法,就是将 attrs 一股脑放在一个对象里。写法就变成这样:
const Test = {
  props: ["num", "a", "b", "c"],
  template: `<div>{{ num }} - {{ a }} - {{ b }} - {{ c }}</div>`
}

const app = Vue.createApp({
  data() {
    return {
      params: {
        num: 123,
        a: 456,
        b: 78,
        c: 90
      }
    }
  },
  components: {
    Test
  },
  template: `
    <div>
      <Test v-bind="params" />
    </div>
  `
})

const vm = app.mount("#root");
且效果是一样的。
2.4 props 大小写问题
当传较长有两个及以上单词的属性的时候,使用 kebab-case (短横线分隔)命名法,而接收的时候使用 camelCase (驼峰)命名法。
<!-- 在 HTML 中使用 kebab-case -->
<blog-post post-title="hello!"></blog-post>
const app = Vue.createApp({})

app.component('blog-post', {
  // 在 JavaScript 中使用 camelCase
  props: ['postTitle'],
  template: '<h3>{{ postTitle }}</h3>'
})
原因在于,浏览器会把 html 的 attribute 的所有大写字母全部改为小写字母,因此 vue 使用上面的策略来解决可能发生的冲突。
2.5 单向数据流
数据只能够从父组件流向子组件,而不会反向流向父组件。子组件只能用父组件的数据,但是绝对不能修改传递过来的数据。
单向数据流存在的原因在于,如果子组件数据流向父组件,可能会污染其他使用这个数据的组件,导致强耦合。
3. Non-Props 属性
父组件给子组件传递 attribute 的时候,子组件不使用 props 接收数据。
使用 props 时
const Counter = {
  props: ["msg"],
  template: `<div>{{ msg }}</div>`
}

const app = Vue.createApp({
  components: {
    Counter
  },
  template: `
    <div>
      <Counter msg="hello" />
    </div>
  `
})

const vm = app.mount("#root");
编译后的 DOM 结构:

attr 并不在标签上,而是作为数据被接收。
不使用 props 时
不使用的时候,首先父组件那边给子组件赋予的属性将会继承给子组件的根节点,因此在 DOM 结构上可以展现 attr。
const Counter = {
  template: `<div>hello world</div>`
}

const app = Vue.createApp({
  components: {
    Counter
  },
  template: `
    <div>
      <Counter msg="hello" />
    </div>
  `
})

const vm = app.mount("#root");
编译后的 DOM 结构:

拓展:
如果不想要继承父组件传递过来的 non-props 属性,使用配置:
inheritAttrs: false即可。const Counter = { inheritAttrs: false, template: `<div>hello world</div>` }
如果要获取 non-props 属性的值,使用 $attrs 获取即可。在 template 外边使用的话,用 this.$attrs
const Counter = {
  inheritAttrs: false,
  template: `<div>{{ $attrs.msg }}</div>`
}

const app = Vue.createApp({
  components: {
    Counter
  },
  template: `
    <div>
      <Counter msg="hello" />
    </div>
  `
})

const vm = app.mount("#root");
这个 $attrs 另外一个应用是,子组件根节点继承问题。如果有多个根节点,并只想让特定的根节点拿到 attrs,就需要用 v-bind="$attrs":
const Counter = {
  inheritAttrs: false,
  template: `
    <div>Counter</div>
    <div v-bind="$attrs">Counter</div>
    <div>Counter</div>
  `
}

const app = Vue.createApp({
  components: {
    Counter
  },
  template: `
    <div>
      <Counter msg="hello" />
    </div>
  `
})

const vm = app.mount("#root");
编译后的 DOM 结构:

4. 父子组件间通过事件进行通信
自定义事件通知父组件修改值
实现功能:子组件点击按钮来通知父组件去修改值。因为单向数据流的特点,因此只能通知的形式,让父组件自己修改。
子组件通知父组件,使用 $emit 方法。第一个参数为触发的事件名称。父组件监听到事件触发后,执行事件触发时执行的相关方法。
const Counter = {
  props: [ "count" ],
  methods: {
    handleBtnClick() {
      this.$emit('addCount', this.count + 1);
    }
  },
  template: `
    <div>
      <div>{{ count }}</div>
      <button @click="handleBtnClick">点击</button>
    </div>
  `
}

const app = Vue.createApp({
  components: {
    Counter
  },
  data() {
    return {
      count: 1,
    }
  },
  methods: {
    handleAddCount(count) {
      this.count = count
    }
  },
  template: `
    <div>
      <Counter :count="count" @add-Count="handleAddCount" />
    </div>
  `
})

const vm = app.mount("#root");
上面的例子就是,通过子组件按钮点击触发 addOne 自定义事件并传递 count + 1 后的值,addCount 事件被父组件监听到后,用新的 count 值来覆盖旧的 count,成功修改了 count。
注意
在触发事件的时候用 camelCase,在监听事件的时候用 kebab-case
同样的,$emit 可以传多个参数:
const Counter = {
  props: [ "count" ],
  methods: {
    handleBtnClick() {
      this.$emit('addCount', 2, 3);
    }
  },
  template: `
    <div>
      <div>{{ count }}</div>
      <button @click="handleBtnClick">点击</button>
    </div>
  `
}

const app = Vue.createApp({
  components: {
    Counter
  },
  data() {
    return {
      count: 1,
    }
  },
  methods: {
    handleAddCount(param1, param2) {
      this.count += param;
      console.log(param2);
    }
  },
  template: `
    <div>
      <Counter :count="count" @add-one="handleAddCount" />
    </div>
  `
})

const vm = app.mount("#root");
用剩余参数接收多个参数也行。
拓展:emits 属性和自定义校验
如果在方法里挨个看有哪些自定义事件会被触发,那是比较麻烦的,因此有 emits 属性来罗列该组件会向外触发哪些自定义事件,这会更好地记录组件应该如何工作。如果 emits 定义了原生事件,将使用组件中的事件替代原生事件侦听器。
app.component('custom-form', {
  emits: ['inFocus', 'submit']
  ......
})
触发事件前,可以进行检验,如果返回值为 false,就不触发自定义事件。
app.component('custom-form', {
  emits: {
    // 验证 submit 事件
    submit: ({ email, password }) => {
      if (email && password) {
        return true
      } else {
        console.warn('Invalid submit event payload!')
        return false
      }
    }
  },
  methods: {
    submitForm(email, password) {
      this.$emit('submit', { email, password })
    }
  }
})
高级:通过 v-model 进行代码优化
const Counter = {
  props: [ "modelValue" ],
  methods: {
    handleBtnClick() {
      this.$emit('update:modelValue', this.modelValue + 1);
    }
  },
  template: `
    <div>
      <div>{{ modelValue }}</div>
      <button @click="handleBtnClick">点击</button>
    </div>
  `
}

const app = Vue.createApp({
  components: {
    Counter
  },
  data() {
    return {
      count: 1,
    }
  },
  methods: {
    handleAddCount(count) {
      this.count = count
    }
  },
  template: `
    <div>
      <Counter v-model="count" />
    </div>
  `
})

const vm = app.mount("#root");
实现的效果是一样的。
父组件通过 v-model 将数据传递给子组件。子组件能通过 v-model 获取数据(例如上边的 count),需要满足以下几点:
- 接收的参数名必须为 modelValue
- 触发的事件名必须为 update:modelValue
如果觉得 modelValue 不符合使用场景,父组件在 v-model 后面指定名称即可:
const app = Vue.createApp({
  ......
  template: `
    <div>
      <Counter v-model:app="count" />
    </div>
  `
})
v-model 标签名指定为 app 后,子组件的 modelValue 替换成 app 即可。
5. 组件间双向绑定 v-modal
父组件传递多个 v-model
父组件传递多个 v-model 的情况,v-model 是必须要自定义命名的。
<div>
    <Counter v-model:count="count" v-model:time="time" />
</div>
子组件挨个用 props 接收即可。
v-model 自定义修饰符
用 props 里的 modelModifiers 可以接收 v-model 自定义的修饰符。
比如要判断,如果 v-model 带有 uppercase 修饰符,那么点击按钮后,拼接出的结果要大写。
const Counter = {
  props: {
    modelValue: String,
    modelModifiers: {
      default: () => ({})
    }
  },
  methods: {
    handleBtnClick() {
      let newValue = this.modelValue + "b"
      // 如果存在 uppercase 修饰符,就将
      if (this.modelModifiers.uppercase) {
        newValue = newValue.toUpperCase()
      }
      this.$emit('update:modelValue', newValue)
    }
  },
  template: `
    <div>
      <div>{{ modelValue }}</div>
      <button @click="handleBtnClick">点击</button>
    </div>
  `
}

const app = Vue.createApp({
  components: {
    Counter
  },
  data() {
    return {
      count: "a",
    }
  },
  methods: {
    handleAddCount(count) {
      this.count = count
    }
  },
  template: `
    <div>
      <Counter v-model.uppercase="count" />
    </div>
  `
})

const vm = app.mount("#root");
这里的 modelModifier 默认返回空对象,如果存在修饰符,里边会有 修饰符: true 的键值对。上面的逻辑就是,判断的时候检测到了 uppercase 修饰符,就会进行相应的处理。
6. vue slot 插槽
6.1 默认插槽
一个例子,提交表单写法:
const app = Vue.createApp({
  template: `
    <myform />
  `
})

app.component("myform", {
  methods: {
    handleClick() {
      alert(123)
    }
  },
  template: `
    <div>
      <input type="text" />
      <button @click="handleClick">提交</button>
    </div>
  `
})

app.mount("#root")
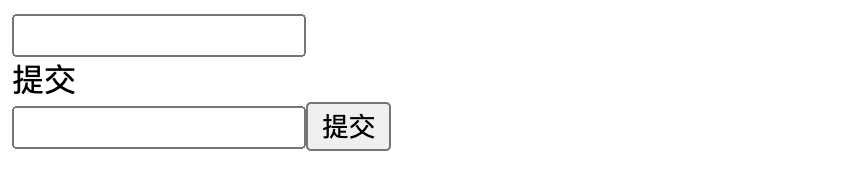
如果有一个奇葩的要求,即父组件使用两个 myform 子组件,其中一个提交用的 div,另外一个提交用 button 提交,现在就需要插槽了。
插槽的格式是夹在子组件标签中间,然后子组件通过 slot 标签来获取插槽的值。
const app = Vue.createApp({
  template: `
    <myform>
      <div>提交</div>
    </myform>
    <myform>
      <button>提交</button>
    </myform>
  `
})

app.component("myform", {
  methods: {
    handleClick() {
      alert(123)
    }
  },
  template: `
    <div>
      <input type="text" />
      <span @click="handleClick">
        <slot />
      </span>
    </div>
  `
})

app.mount("#root")
显示效果:
需要注意的是,slot 作用域。插槽内容是在父组件里拿的,因此要拿 data 的话是在父组件里拿数据。
插槽默认值
如果父组件插槽没有传任何的值过来,在 slot 里可以写默认值。
<slot>default value</slot>
6.2 具名插槽
现在有一个需求,有个 layout 子组件,里边的内容是自己控制的,但是 header 和 footer 由父组件通过插槽。这样的话,会有多个插槽内容。如果使用默认插槽会让 vue 困惑,这个插槽内容应该放在哪,因此就需要具名插槽了。
const app = Vue.createApp({
  template: `
    <layout>
      <template v-slot:header>
        <div>header</div>
      </template>
      <template v-slot:footer>
        <div>footer</div>
      </template>
    </layout>
  `
})

app.component("layout", {
  template: `
    <div>
      <header>
        <slot name="header"></slot>
      </header>
      <main>content</main>
      <footer>
        <slot name="footer"></slot>
      </footer>
    </div>
  `
})

app.mount("#root")
有几个点需要注意的,首先,v-slot 要和 template 搭配使用,其次,v-slot 后面跟冒号而不是等号。
因为插槽上面给了名字用于区分,因此称为具名插槽。
vslot: 简写形式为 #。
6.3 作用域插槽
正常循环逻辑如下代码所示:
const app = Vue.createApp({
  template: `
    <list />
  `
})

app.component("list", {
  data() {
    return {
      list: [1, 2, 3]
    }
  },
  template: `
    <div>
      <div v-for="item in list">
        {{ item }}
      </div>
    </div>
  `
})

app.mount("#root")
有个需求,由父组件决定子组件循环方式,比如用 span 来循环内容,但是循环的数据在子组件里,
父组件调用 list 子组件,传递插槽过去,子组件接收到插槽后,通过插槽的形式去展示内容并进行循环。然后,在调用的时候,把数据传给 slot,然后父组件使用 v-slot 获取传过来的数据对象,这个时候就能用子组件传过来的值了。
const app = Vue.createApp({
  template: `
    <list v-slot="slotProps">
      <span>{{ slotProps.item }}</span>
    </list>
  `
})

app.component("list", {
  data() {
    return {
      list: [1, 2, 3]
    }
  },
  template: `
    <div>
      <slot v-for="item in list" :item="item" />
    </div>
  `
})

app.mount("#root")
作用域插槽解决了,当子组件渲染的内容需要父组件决定的时候,让父组件接收子组件传过来的数据。

注意,作用域插槽获取 slot 的属性,v-slot 用的等号。完全使用的方式:
<template v-slot:slot-name="slotProps">
  {{ slotProps.item }}
</template>
slotProps 是对象,用对象结构的形式简写也是完全可以的。
7. 动态组件和异步组件
7.1 动态组件
现在展示一个通过按钮进行切换的代码:
const app = Vue.createApp({
  data() {
    return {
      currentItem: "input-item"
    }
  },
  methods: {
    handleClick() {
      if (this.currentItem === "input-item") {
        this.currentItem = "common-item"
      } else {
        this.currentItem = "input-item"
      }
    }
  },
  template: `
    <input-item v-show="currentItem === 'input-item'" />
    <common-item v-show="currentItem === 'common-item'" />
    <button @click="handleClick">切换</button>
  `
})

app.component("input-item", {
  template: `<input type="text" />`
})

app.component("common-item", {
  template: `<div>hello world</div>`
})

app.mount("#root")
虽然可以实现功能,但是代码量是比较大的,使用动态组件的语法将简化大量 template 代码:
const app = Vue.createApp({
  data() {
    return {
      currentItem: "input-item"
    }
  },
  methods: {
    handleClick() {
      if (this.currentItem === "input-item") {
        this.currentItem = "common-item"
      } else {
        this.currentItem = "input-item"
      }
    }
  },
  template: `
    <component :is="currentItem" />
    <button @click="handleClick">切换</button>
  `
})

app.component("input-item", {
  template: `<input type="text" />`
})

app.component("common-item", {
  template: `<div>hello world</div>`
})

app.mount("#root")
动态组件的用法就是,通过 :is 内容改变组件,内容是啥,该加载的组件名称就是啥。说的正式一点就是,根据数据的变化,结合 component 标签,来随时动态切换组件的显示。
但是这里有个小问题,使用动态组件后,输入框里的输入切换回来会丢失。用 keep-alive 标签包裹即可,keep-alive 表明被包裹的组件实例在第一次被创建的时候会被缓存下来,而不是重新创建。
  template: `
    <keep-alive>
      <component :is="currentItem" />
    </keep-alive>
    <button @click="handleClick">切换</button>
  `
7.2 异步组件
异步组件是用来懒加载用的。如果一个网页进了主页,其他的组件一股脑都加载出来,首页加载的效率是低下的。
现在写一个延迟 4 秒钟才加载的异步组件:
const app = Vue.createApp({
  data() {
    return {
      currentItem: "input-item"
    }
  },
  methods: {
    handleClick() {
      if (this.currentItem === "input-item") {
        this.currentItem = "common-item"
      } else {
        this.currentItem = "input-item"
      }
    }
  },
  template: `
  <div>
    <common-item />
    <async-common-item />
  </div>
`
})

app.component("common-item", {
  template: `<div>this is a component</div>`
})

app.component("async-common-item", Vue.defineAsyncComponent(() => {
  return new Promise((resolve, reject) => {
    setTimeout(() => {
      resolve({
        template: `<div>this is an async component</div>`
      })
    }, 4000)
  })
}))

app.mount("#root")
更常规的懒加载做法来优化性能:
全局注册组件
import { defineAsyncComponent } from 'vue'

const AsyncComp = defineAsyncComponent(() =>
  import('./components/AsyncComponent.vue')
)

app.component('async-component', AsyncComp)
局部注册组件
import { createApp, defineAsyncComponent } from 'vue'

createApp({
  // ...
  components: {
    AsyncComponent: defineAsyncComponent(() =>
      import('./components/AsyncComponent.vue')
    )
  }
})
8. ref
如果有时候要拿到该标签的真实 DOM 节点,就需要用 ref 属性来获取。
<!-- vm.$refs.p 会是 DOM 节点 -->
<p ref="p">hello</p>

<!-- vm.$refs.child 会是子组件实例 -->
<child-component ref="child"></child-component>

<!-- 当动态绑定时,我们可以将 ref 定义为回调函数,显式地传递元素或组件实例 -->
<child-component :ref="(el) => child = el"></child-component>
同时 ref 可以获取到子组件的引用并且调用子组件的方法。
const app = Vue.createApp({
  mounted() {
    console.log(this.$refs.childrenRef.sayHello())
  },
  template: `<children ref="childrenRef" />`
})

app.component("children", {
  methods: {
    sayHello() {
      alert("hello")
    }
  },
  template: `<div>hello world</div>`
})

app.mount("#root")
上面的代码是,父组件在 mounted 的时候通过 ref 来调用子组件的 sayHello 方法。
在无可奈何的时候才操作 DOM。
9. provide 和 inject
上面的值传递都是父子间的传递,如果有多层传递的话,还是父子间的传递就会十分的冗余。provide 和 inject 可以跨层级进行传值。
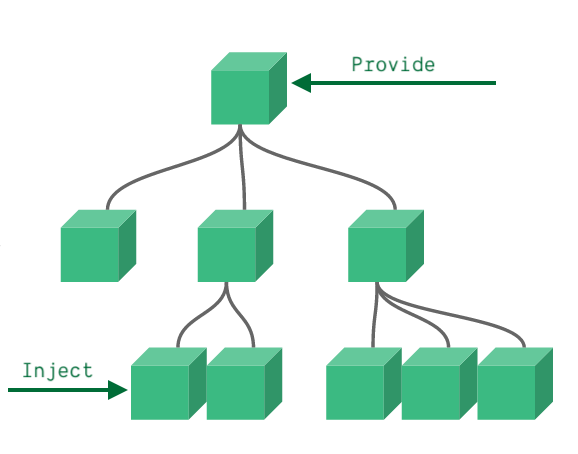
父组件 provide,子组件 inject 即可。
const app = Vue.createApp({
  data() {
    return {
      count: 1
    }
  },
  provide() {
    return {
      count: this.count
    }
  },
  template: `<children />`
})

app.component("children", {
  template: `<baby />`
})

app.component("baby", {
  inject: ["count"],
  template: `<div>hello {{ count }}</div>`
})

app.mount("#root")
注意:这种方法提供的数据是一次性的,因此子组件从 provide 获取到数据后,便不会响应式地进行更改。


 3582
3582


 被折叠的 条评论
为什么被折叠?
被折叠的 条评论
为什么被折叠?
 到【灌水乐园】发言


