


所有配套资料已上传到QQ群:167356412 需要的话群文件自取
十五、SpringCloud Alibaba入门简介
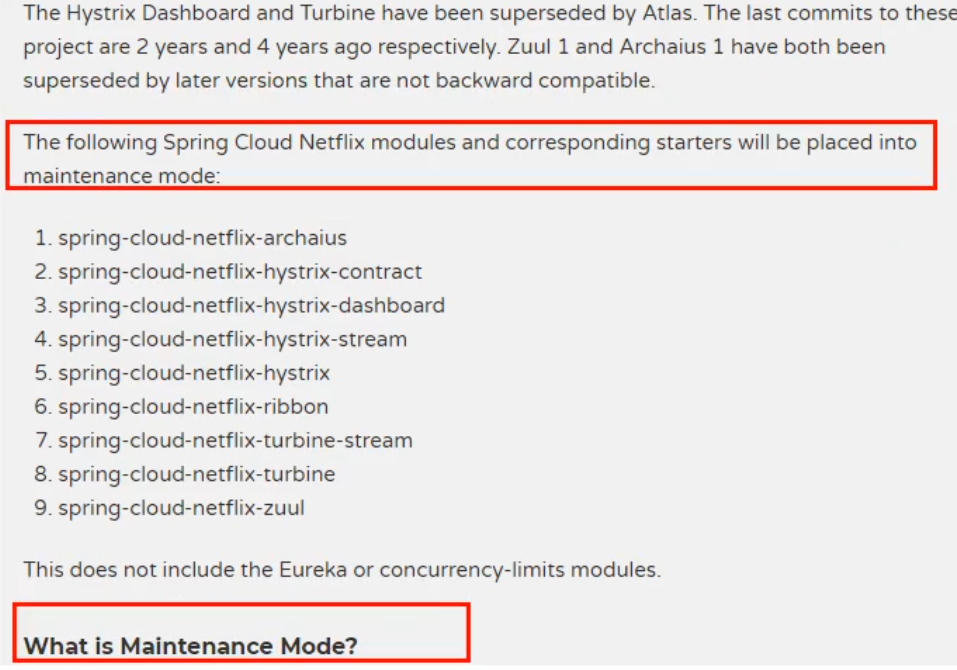
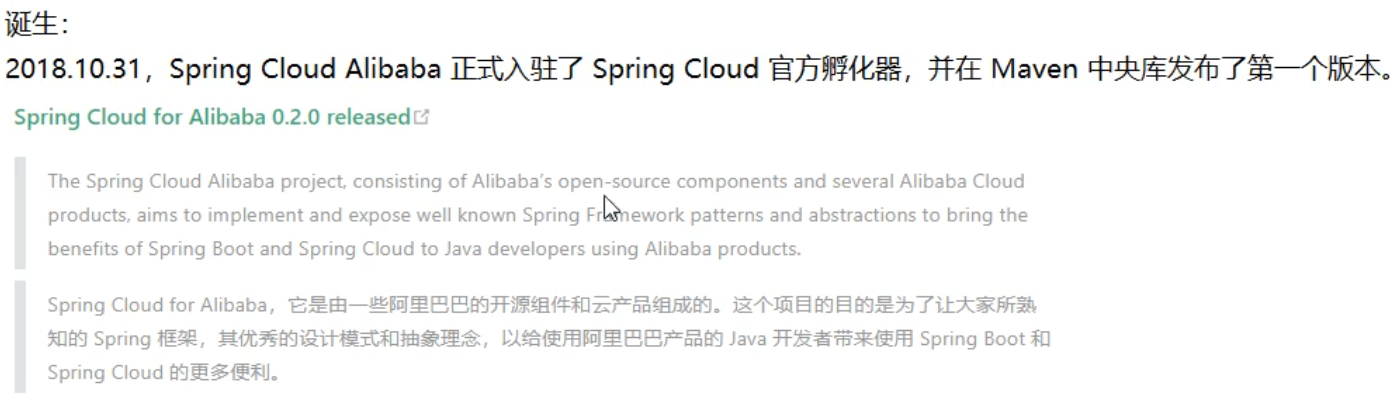
1、为什么会出现SpringCloud alibabaSpringCloud alibaba?


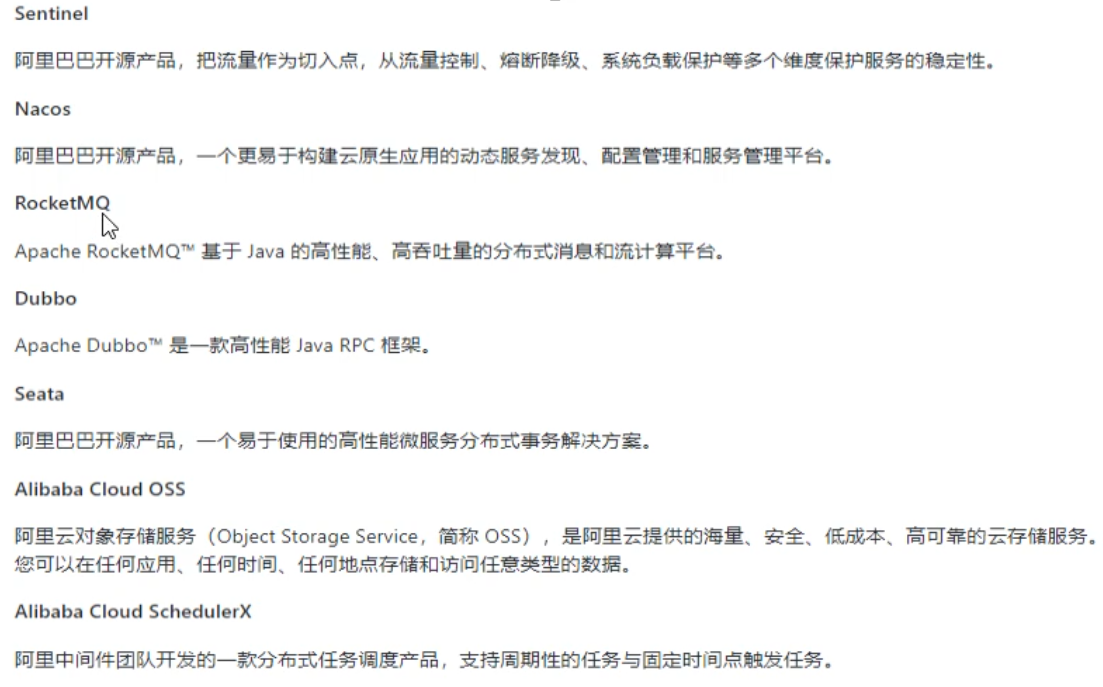
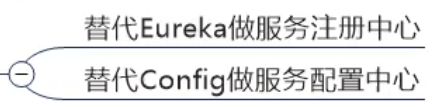
2、能干嘛

十六、SpringCloud Alibaba Nacos服务注册和配置中心
1、Nacos简介
(1)、为什么叫Nacos?
前四个字母分别为Naming和Configuration的前两个字母,最后的s为Service。
(2)、是什么

Nacos=Eureka+Config+Bus
(3)、能干嘛
(4)、下载地址

2、Nacos作为服务注册中心
(1)、基于Nacos的服务提供者
1)、pom
        <!--SpringCloud ailibaba nacos -->
        <dependency>
            <groupId>com.alibaba.cloud</groupId>
            <artifactId>spring-cloud-starter-alibaba-nacos-discovery</artifactId>
        </dependency>
2)、yml
server:
  port: 9002

spring:
  application:
    name: nacos-payment-provider
  cloud:
    nacos:
      discovery:
        server-addr: localhost:8848 #配置Nacos地址

management:
  endpoints:
    web:
      exposure:
        include: '*'
3)、主启动类
@SpringBootApplication
@EnableDiscoveryClient
public class PaymentMain9011 {
    public static void main(String[] args) {
        SpringApplication.run(PaymentMain9011.class,args);
    }
}
4)、业务类
@RestController
public class PaymentController
{
    @Value("${server.port}")
    private String serverPort;

    @GetMapping(value = "/payment/nacos/{id}")
    public String getPayment(@PathVariable("id") Integer id)
    {
        return "nacos registry, serverPort: "+ serverPort+"\t id"+id;
    }

}
(2)、基于Nacos的服务消费者
1)、pom与生产端一致
2)、yml
server:
  port: 83

spring:
  application:
    name: nacos-order-consumer
  cloud:
    nacos:
      discovery:
        server-addr: localhost:8848

#消费者将要去访问的微服务名称(注册成功进nacos的微服务提供者)
service-url:
  nacos-user-service: http://nacos-payment-provider
3)、主启动类注解一致
4)、业务类
@RestController
@Slf4j
public class OrderNacosController {
    @Resource
    private RestTemplate restTemplate;

    @Value("${service-url.nacos-user-service}")
    private String serverURL;

    @GetMapping(value = "/consumer/payment/nacos/{id}")
    public String paymentInfo(@PathVariable("id") Long id) {
        return restTemplate.getForObject(serverURL + "/payment/nacos/" + id, String.class);
    }

}
5)、使用restTemplate需要配置
@Configuration
public class ApplicationContextConfig {

    @Bean
    @LoadBalanced
    public RestTemplate restTemplate(){
        return new RestTemplate();
    }
}
(3)、服务注册中心对比

nacos的全景图
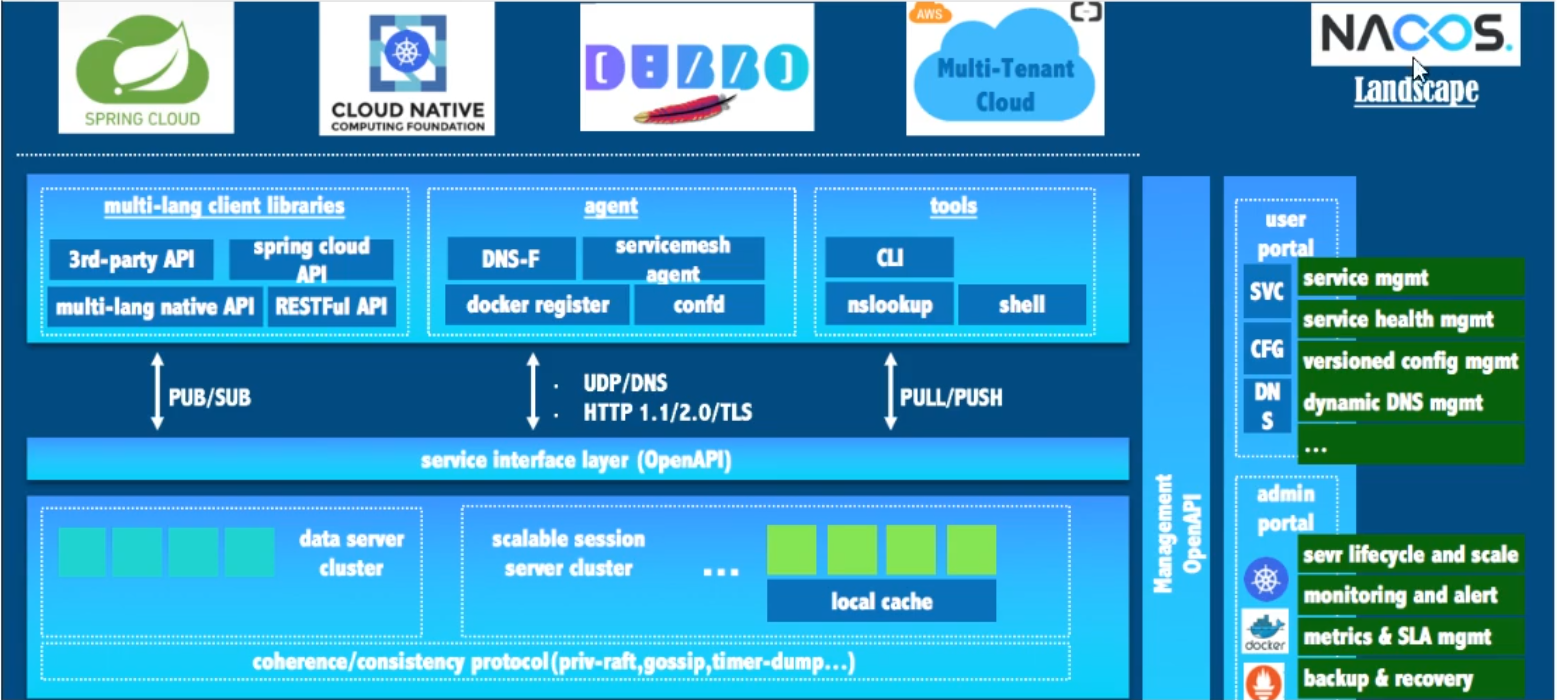


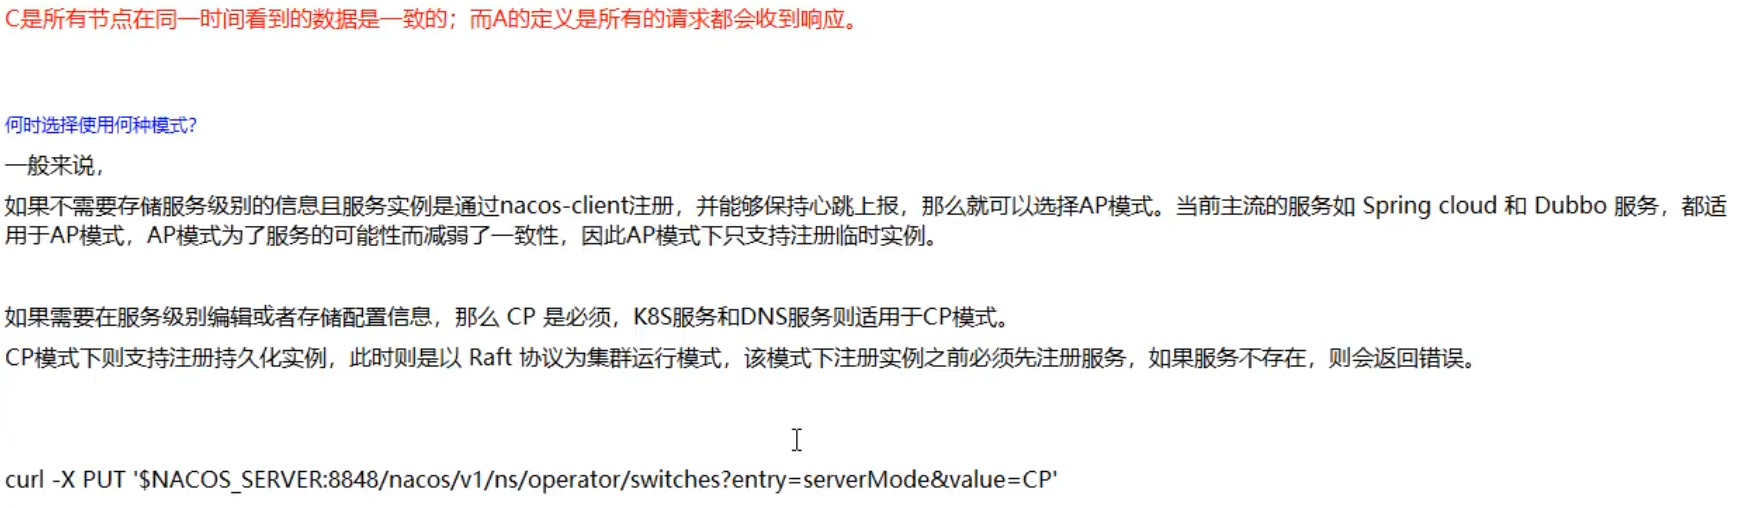
nacos支持CP和AP的切换
3、Nacos作为服务配置中心
(1)、pom
        <!--nacos-config-->
        <dependency>
            <groupId>com.alibaba.cloud</groupId>
            <artifactId>spring-cloud-starter-alibaba-nacos-config</artifactId>
        </dependency>
        <!--nacos-discovery-->
        <dependency>
            <groupId>com.alibaba.cloud</groupId>
            <artifactId>spring-cloud-starter-alibaba-nacos-discovery</artifactId>
        </dependency>
(2)、yml
为什么配置两个yml?

application.yml
spring:
  profiles:
    active: dev # 表示开发环境
    #active: test # 表示测试环境
#    active: info
bootstrap.yml
# nacos配置
server:
port: 3377
spring:
application:
name: nacos-config-client
cloud:
nacos:
discovery:
server-addr: localhost:8848 #Nacos服务注册中心地址
config:
server-addr: localhost:8848 #Nacos作为配置中心地址
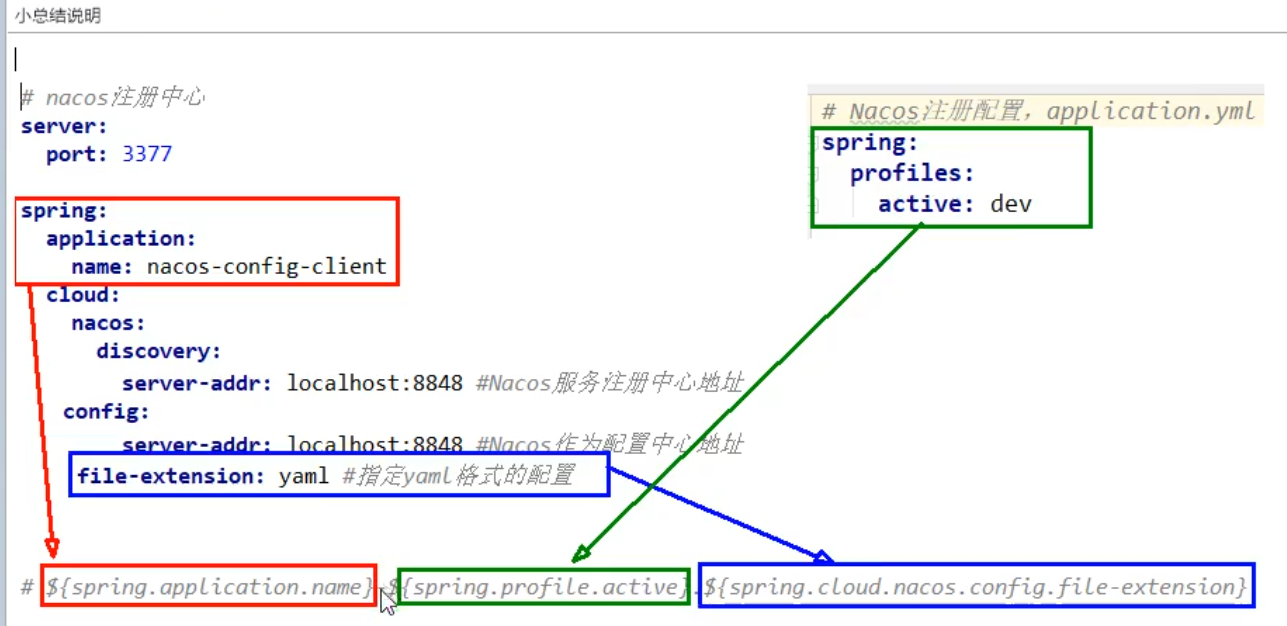
file-extension: yaml #指定yaml格式的配置
group: DEV_GROUP
namespace: eeba7661-6b5e-46c6-aa45-5df57f48091f
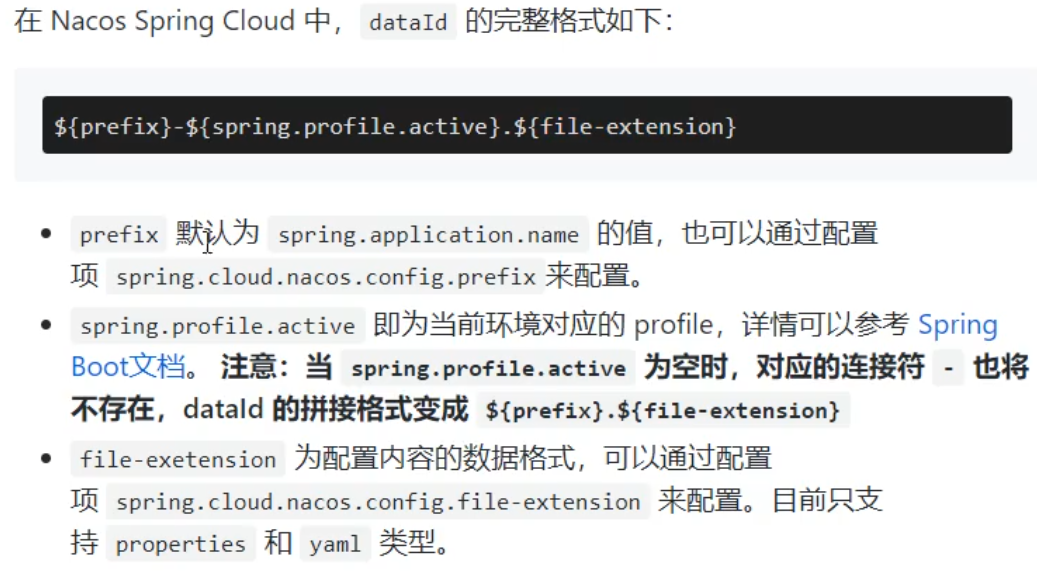
# ${spring.application.name}-${spring.profile.active}.${spring.cloud.nacos.config.file-extension}
# nacos-config-client-dev.yaml
# nacos-config-client-test.yaml ----> config.info(3)、主启动类
@SpringBootApplication
@EnableDiscoveryClient
public class NacosConfigClientApplication3377 {
    public static void main(String[] args) {
        SpringApplication.run(NacosConfigClientApplication3377.class,args);
    }
}
(4)、业务类

@RestController
@RefreshScope //支持Nacos的动态刷新功能。
public class ConfigClientController
{
    @Value("${config.info}")
    private String configInfo;

    @GetMapping("/config/info")
    public String getConfigInfo() {
        return configInfo;
    }
}
(5)、在Nacos中添加配置信息


nacos配置
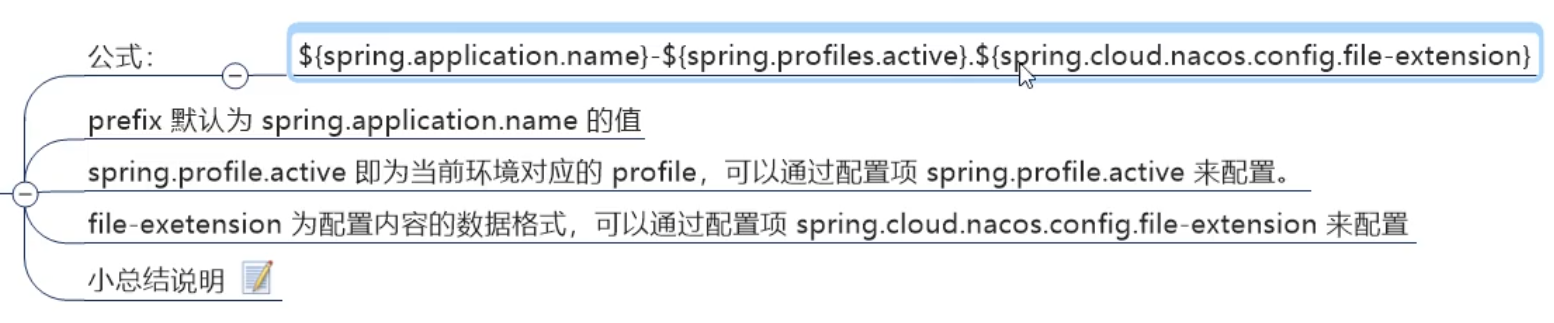
小总结说明
nacos配置中不能写yml,要写yaml
(6)、自带动态刷新
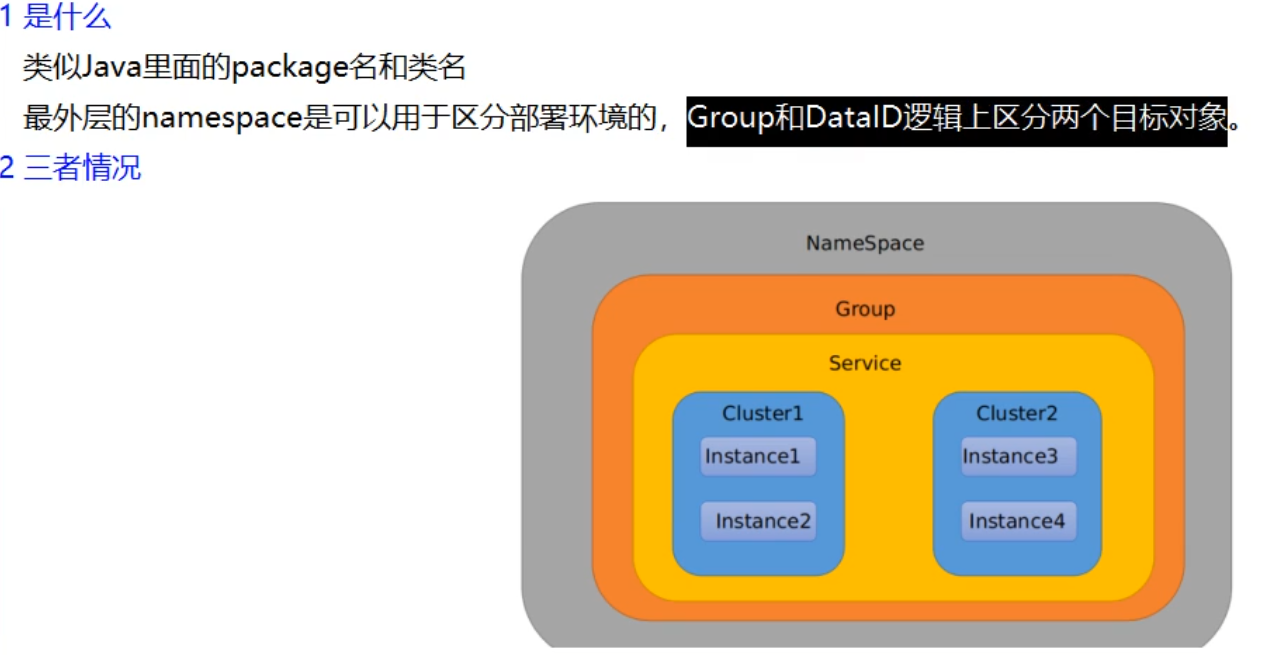
(7)、分组

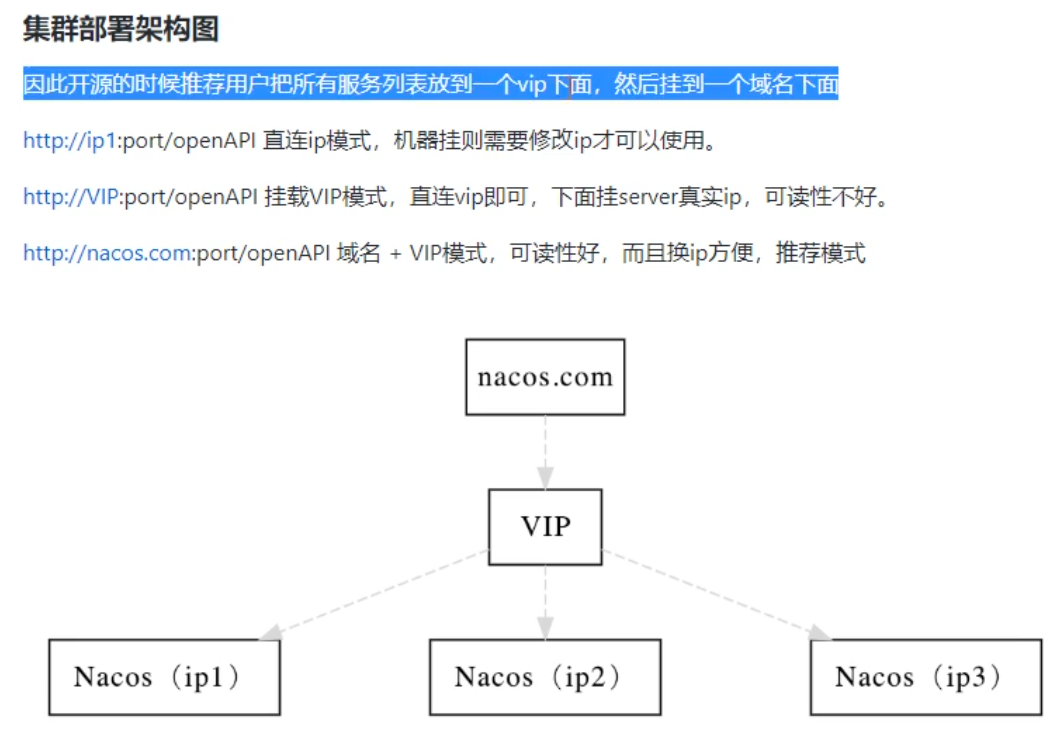
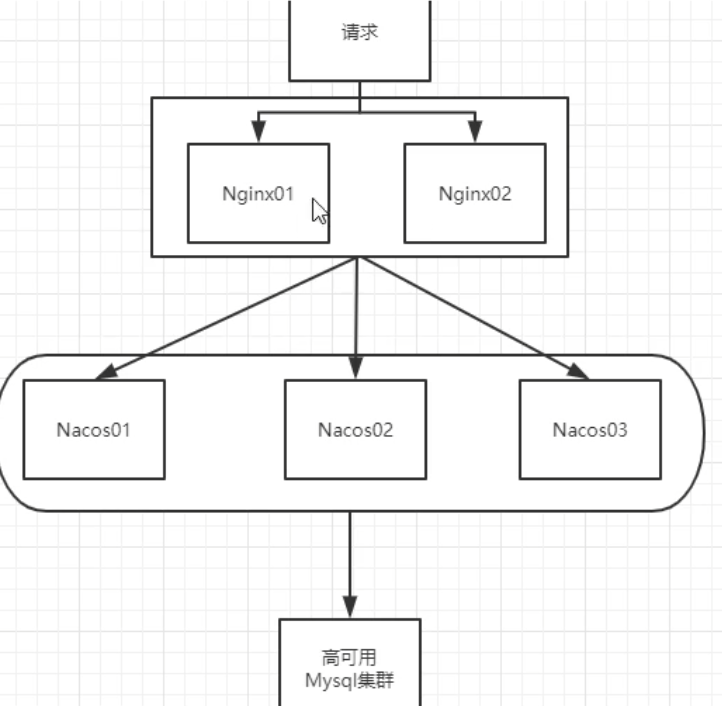
4、Nacos集群和持久化配置(重点)
(1)、官网说明
解释:
说明:
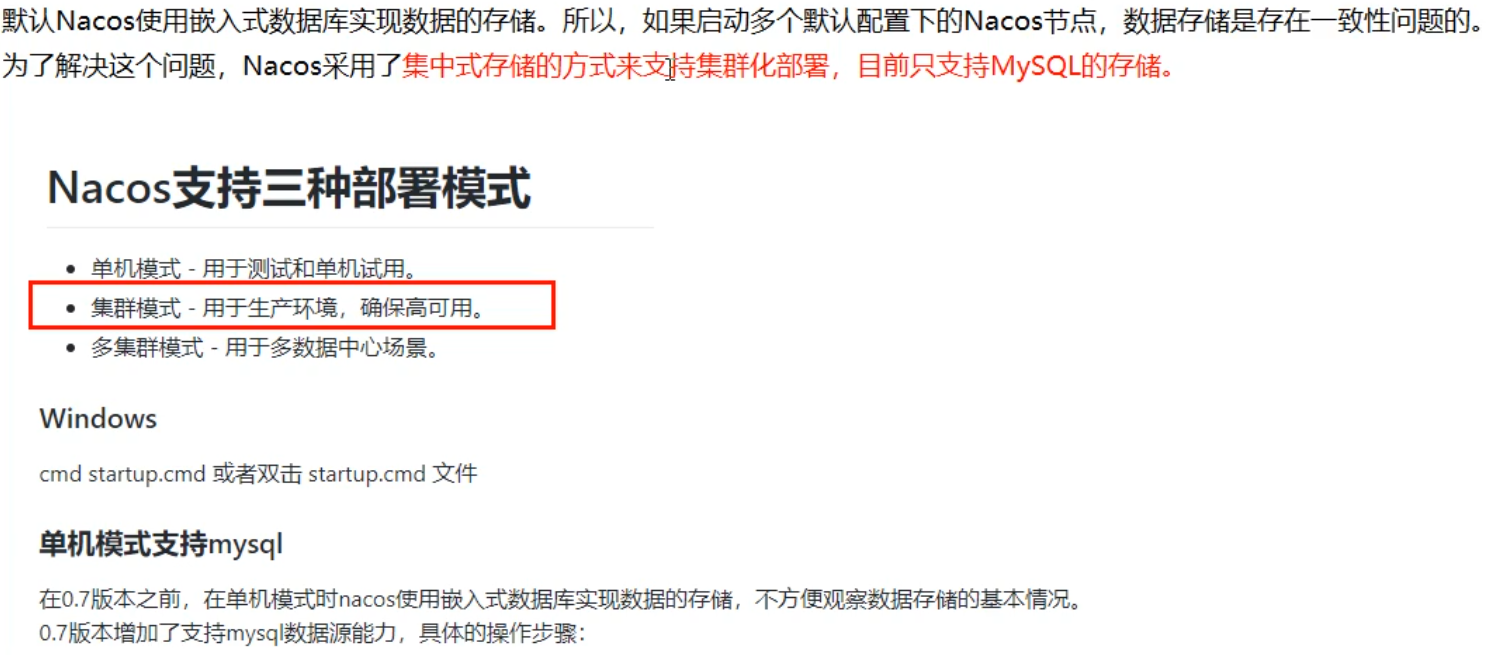


(2)、Nacos持久化配置解释


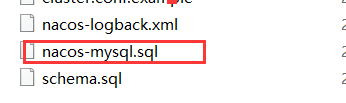
1)、建mysql数据库
执行conf目录下的sql脚本
2)、properties配置
# db mysql
spring.datasource.platform=mysql
db.num=1
db.url.0=jdbc:mysql://localhost:3306/nacos_config?characterEncoding=utf8&connectTimeout=1000&socketTimeout=3000&autoReconnect=true
db.user=root
db.password=root
(3)、Linux版Nacos+MySQL生产环境配置
1)、步骤

跳过
十七、SpringCloud Alibaba Sentinel实现熔断与限流


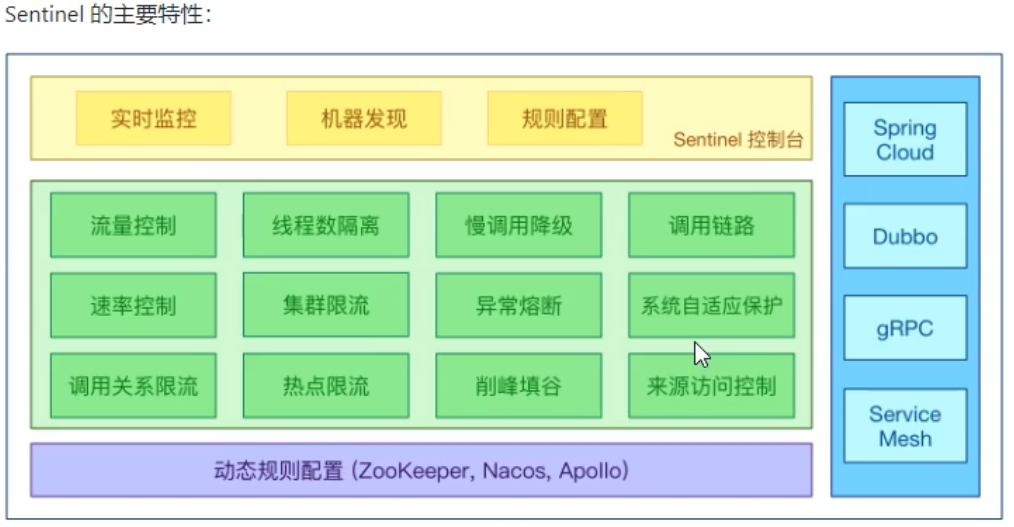
1、简介
(1)、是什么?
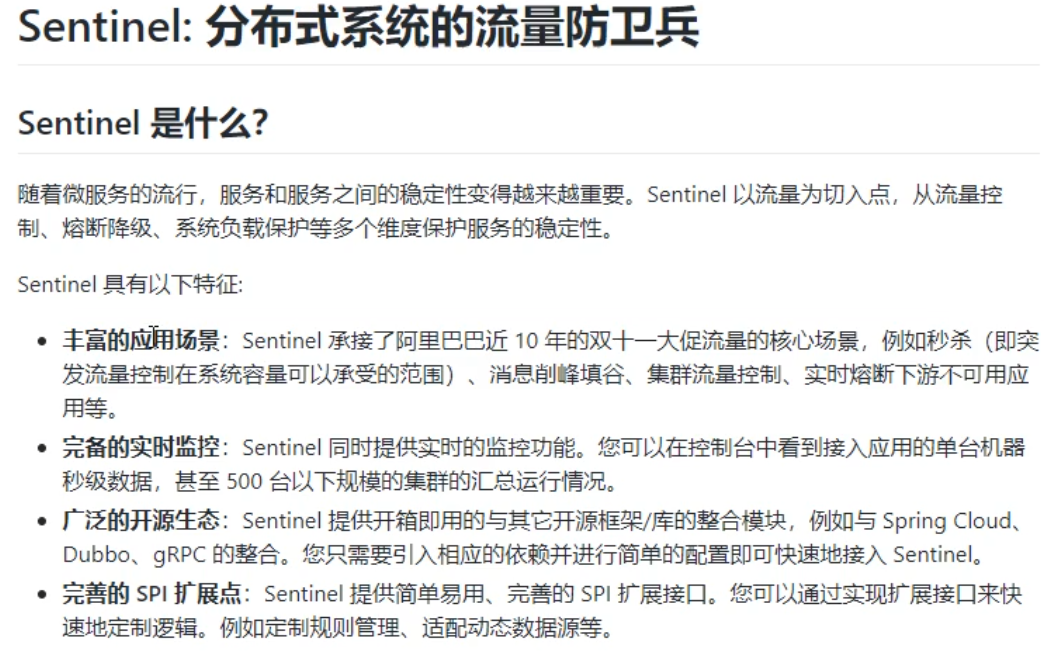
(2)、Sentinal的开源生态

(3)、能干嘛
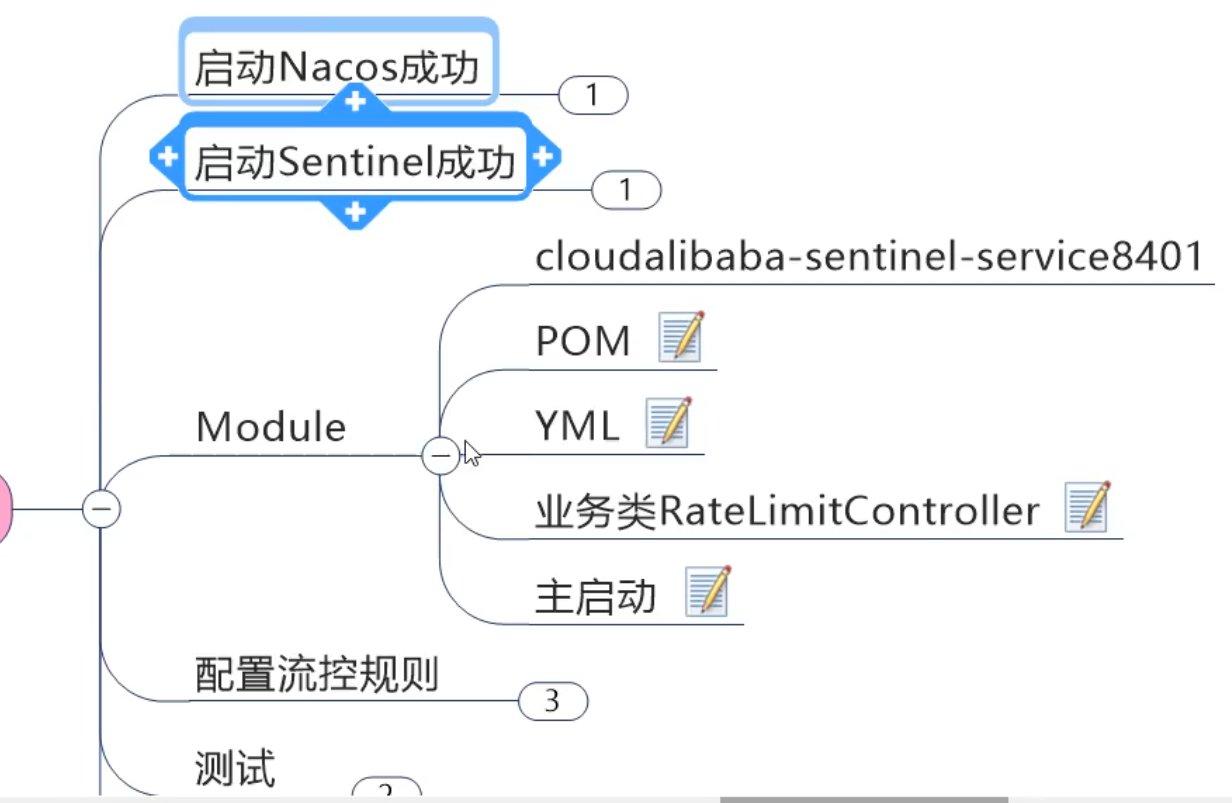
2、构建流程
(1)、pom
    <!--SpringCloud ailibaba sentinel -->
    <dependency>
        <groupId>com.alibaba.cloud</groupId>
        <artifactId>spring-cloud-starter-alibaba-sentinel</artifactId>
    </dependency>
(2)、yml
server:
  port: 8401

spring:
  application:
    name: cloudalibaba-sentinel-service
  cloud:
    nacos:
      discovery:
        server-addr: localhost:8848 #Nacos服务注册中心地址
    sentinel:
      transport:
        dashboard: localhost:8858 #配置Sentinel dashboard地址
        port: 8719
#      datasource:
#        ds1:
#          nacos:
#            server-addr: localhost:8848
#            dataId: cloudalibaba-sentinel-service
#            groupId: DEFAULT_GROUP
#            data-type: json
#            rule-type: flow

management:
  endpoints:
    web:
      exposure:
        include: '*'

feign:
  sentinel:
    enabled: true # 激活Sentinel对Feign的支持
(3)、主启动类
@EnableDiscoveryClient
@SpringBootApplication
public class SentinelMain8041 {
    public static void main(String[] args) {
        SpringApplication.run(SentinelMain8041.class,args);
    }
}
(4)、业务类
(5)、懒加载---通知
访问注册的服务的接口

3、流控规则
(1)、基本介绍


(2)、流控模式
1)、直接(默认)
2)、关联

3)、链路
(3)、流控效果
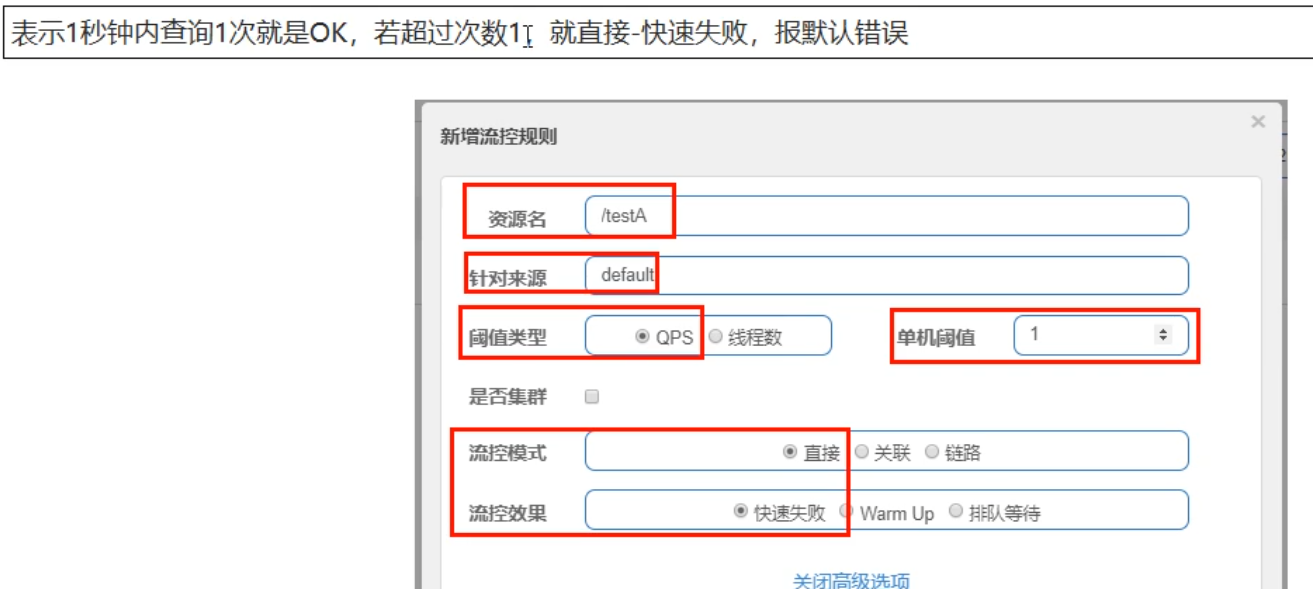
1)、直接 快速失败 默认
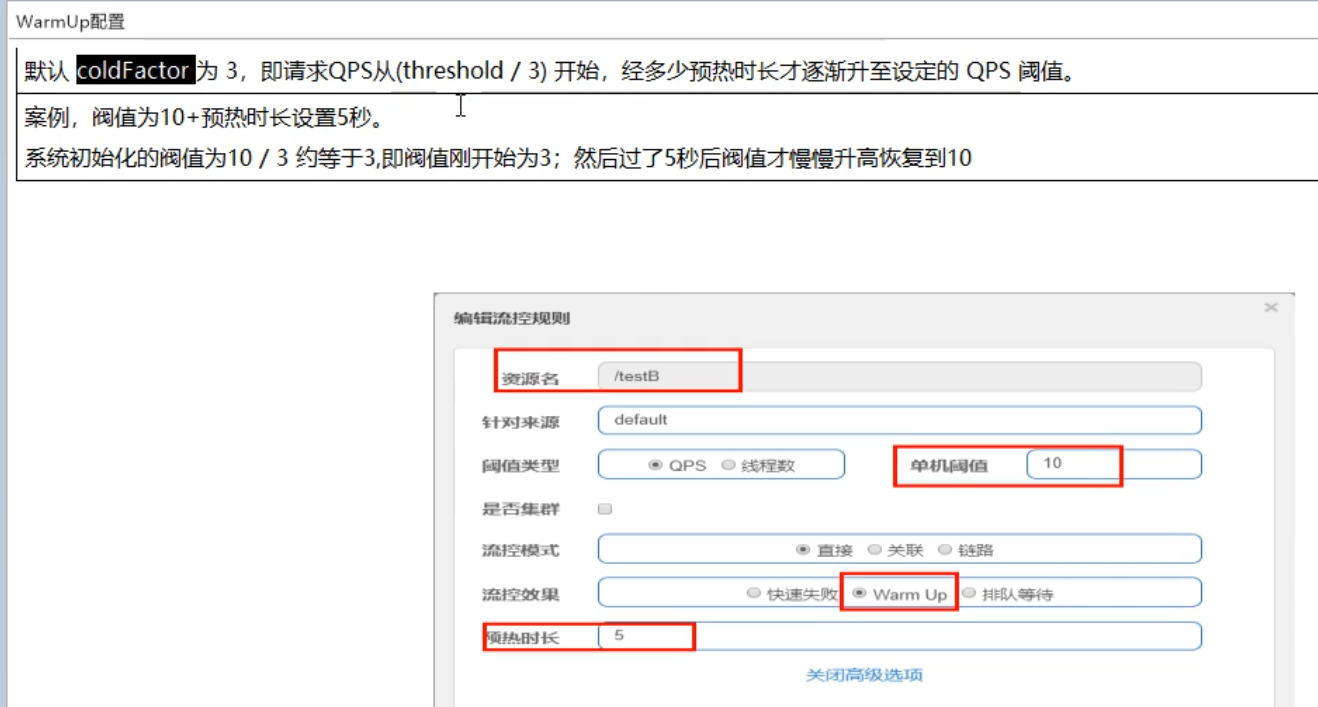
2)、预热


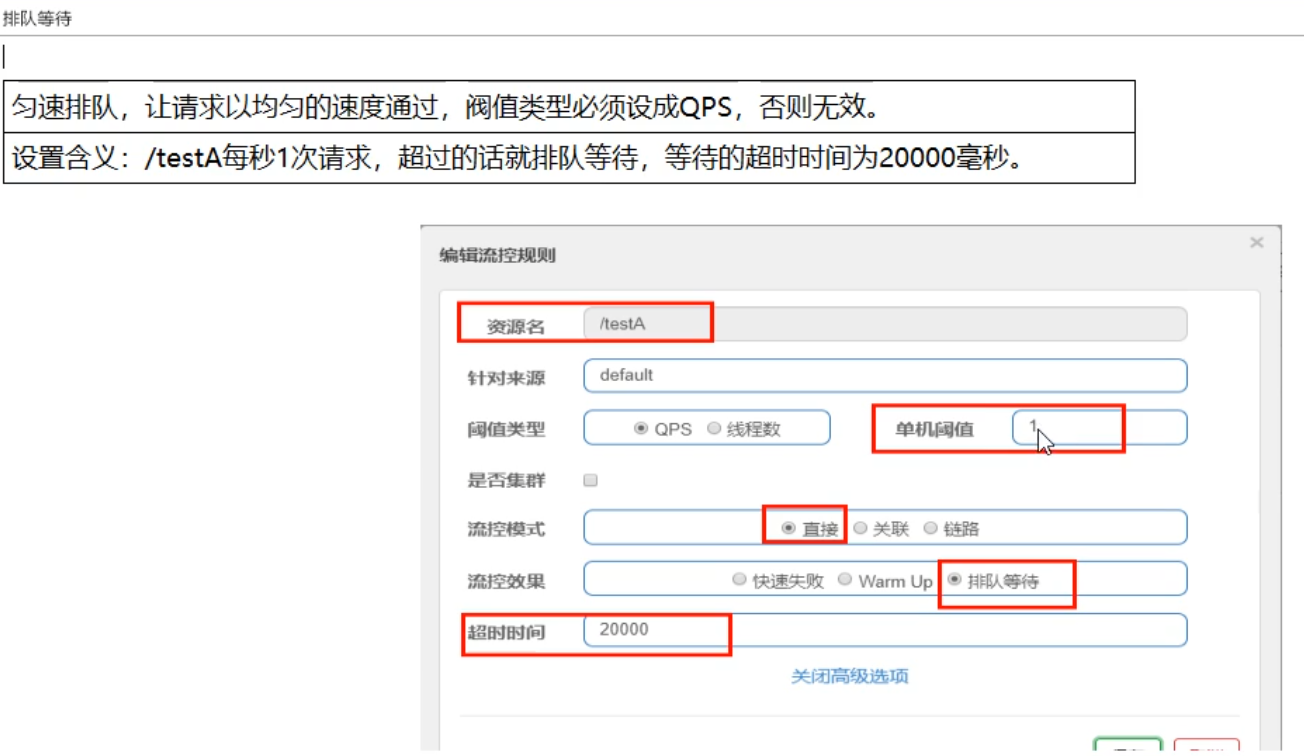
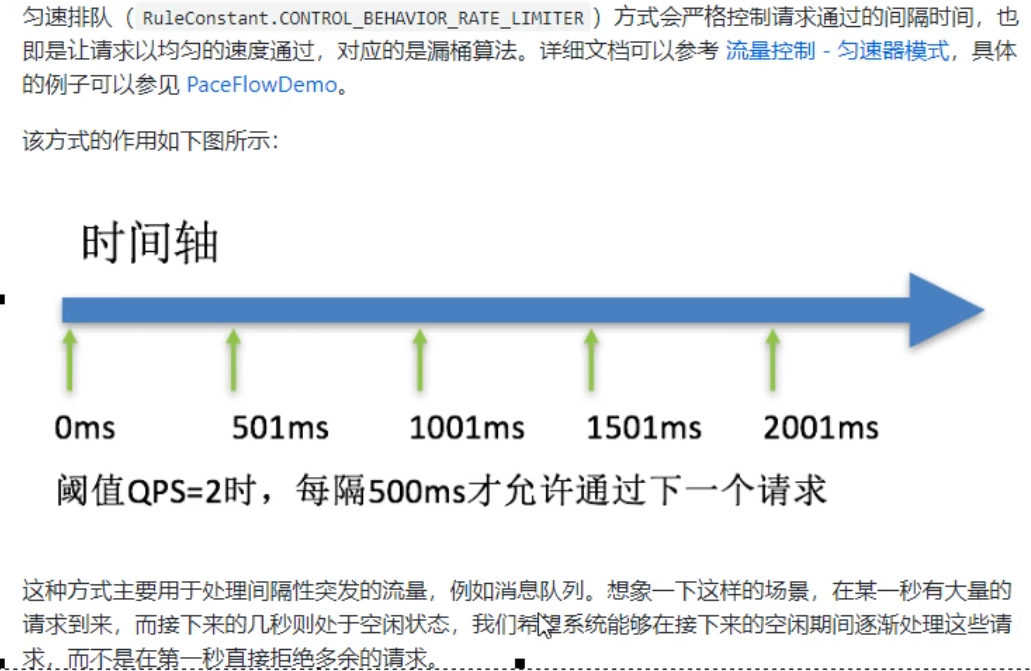
3)、排队等待
4、降级规则
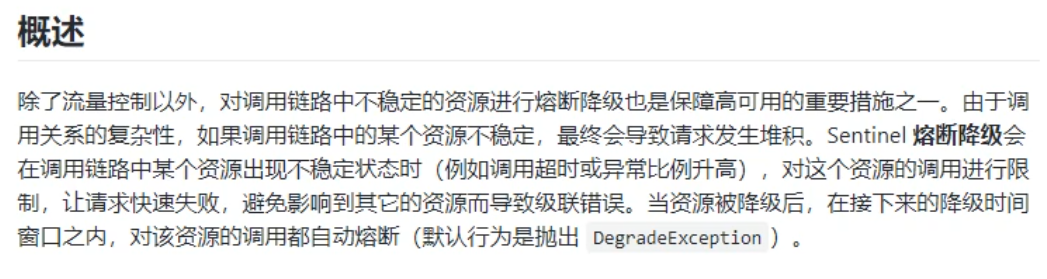
(1)、概述
(2)、降级策略
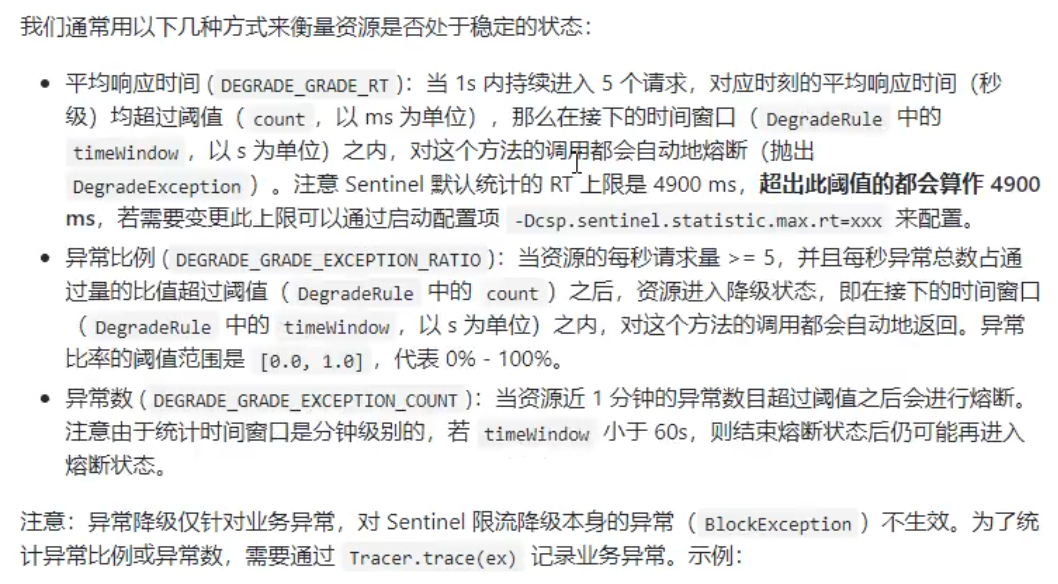
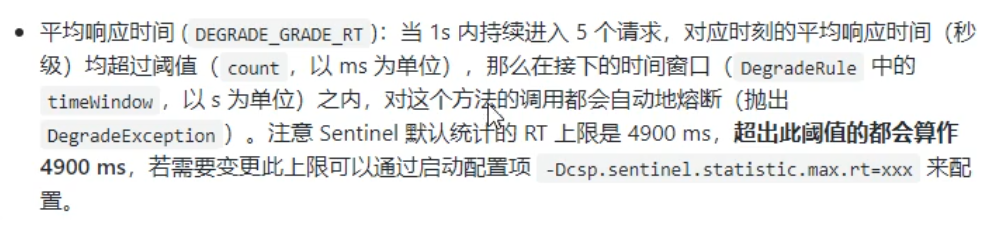
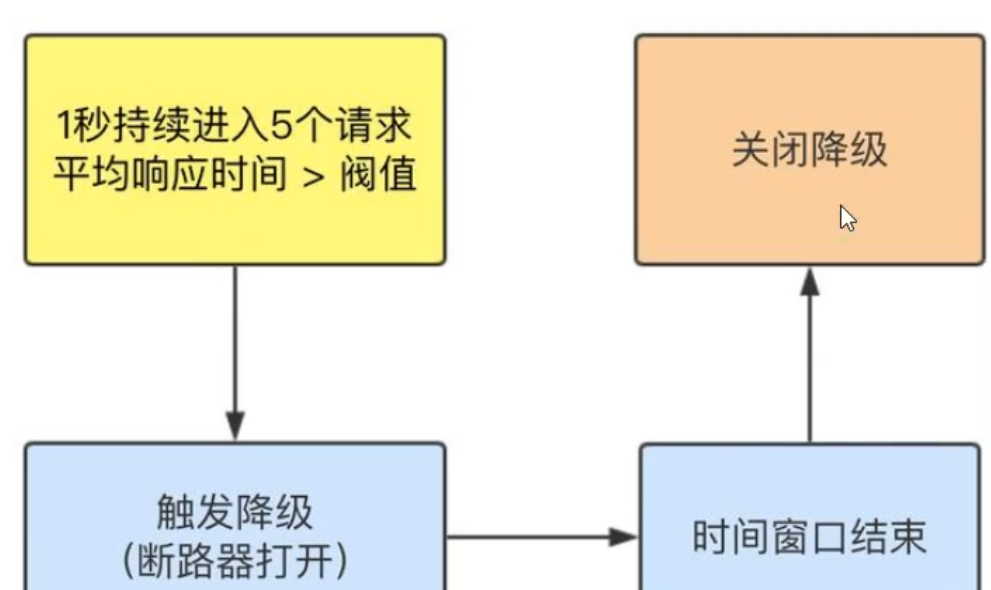
(1)、平均响应时间


进一步说明


是什么?

转存失败重新上传取消
代码
@GetMapping("/testD")
public String testD()
{
// try { TimeUnit.SECONDS.sleep(1); } catch (InterruptedException e) { e.printStackTrace(); }
// log.info("testD 测试RT");
log.info("testD 异常比例");
int age = 10/0;
return "------testD";
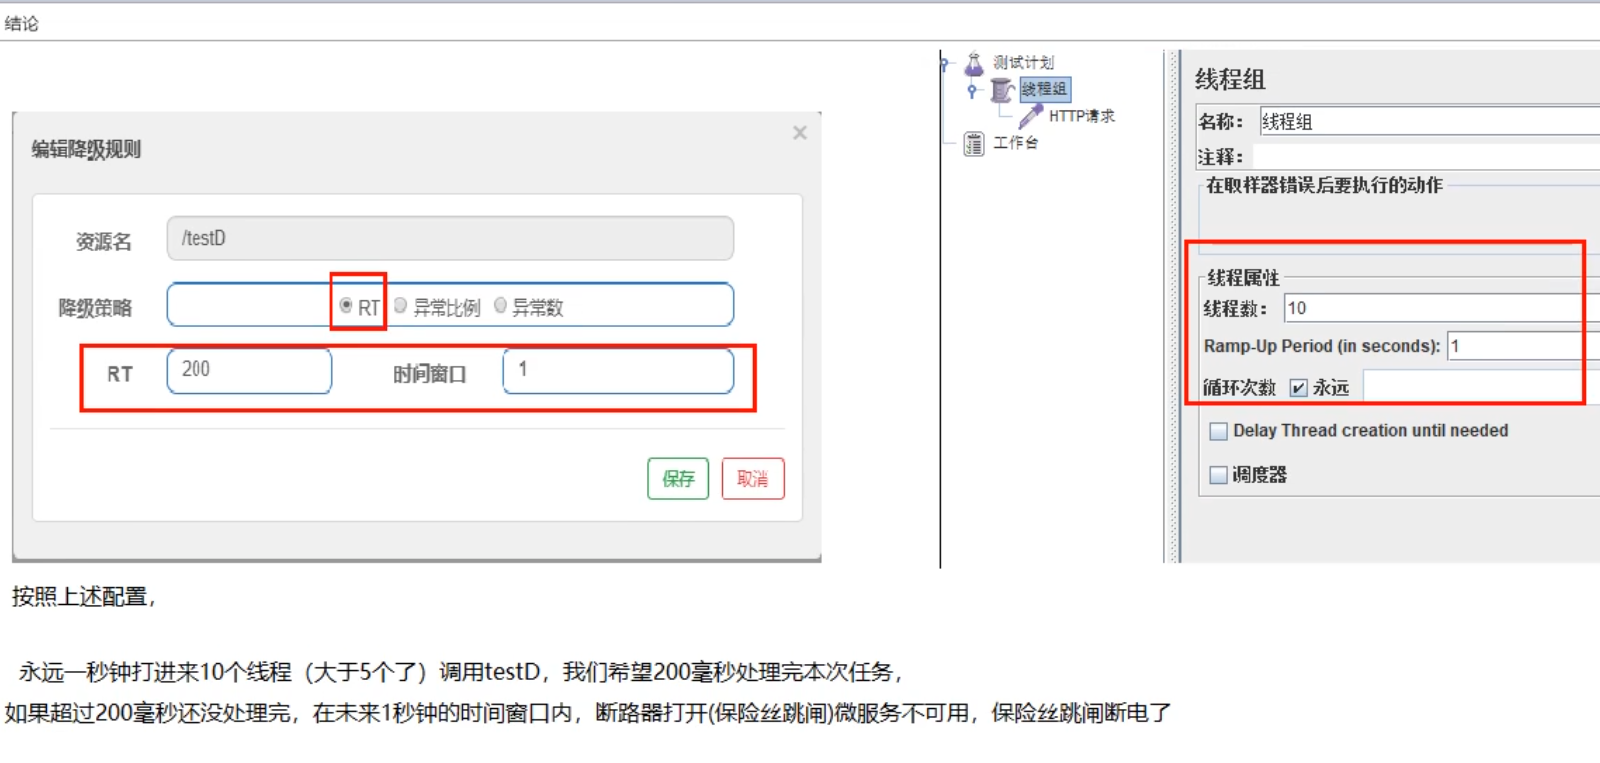
}配置
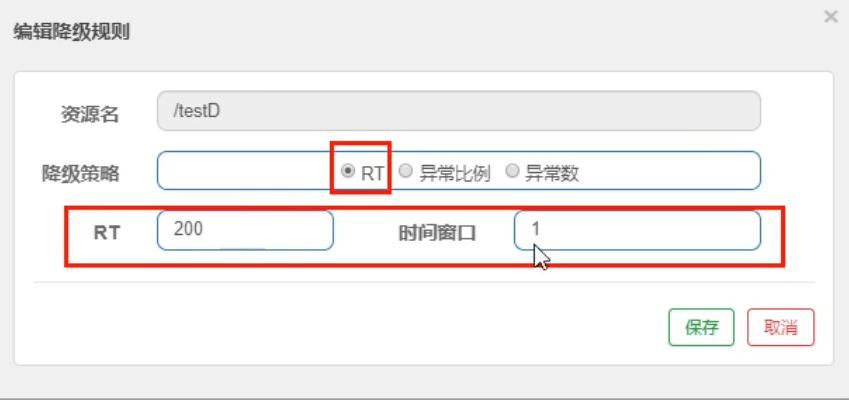
结论
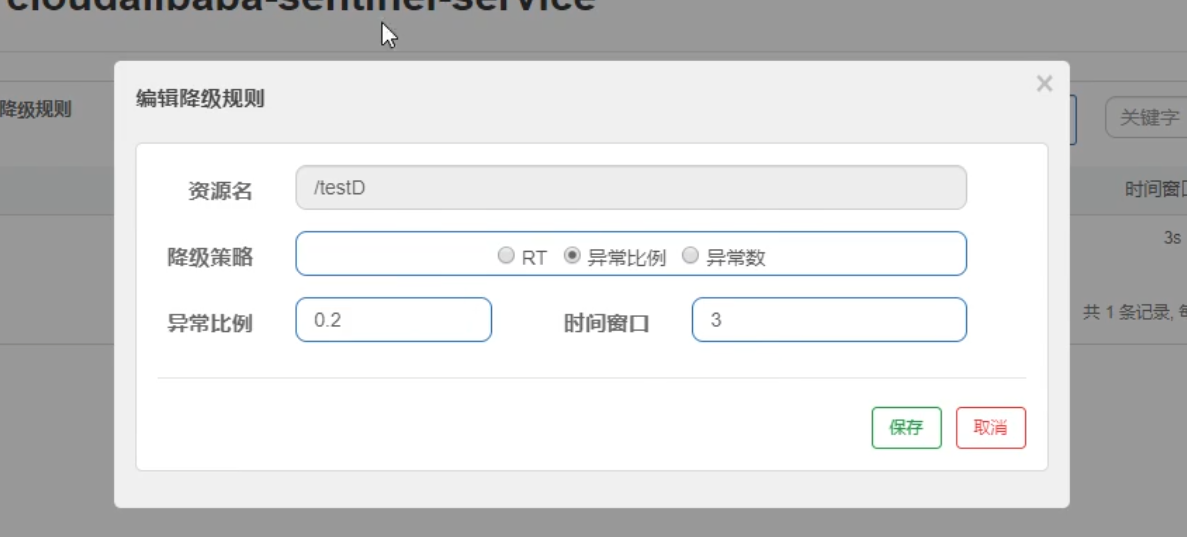
(2)、异常比例
是什么


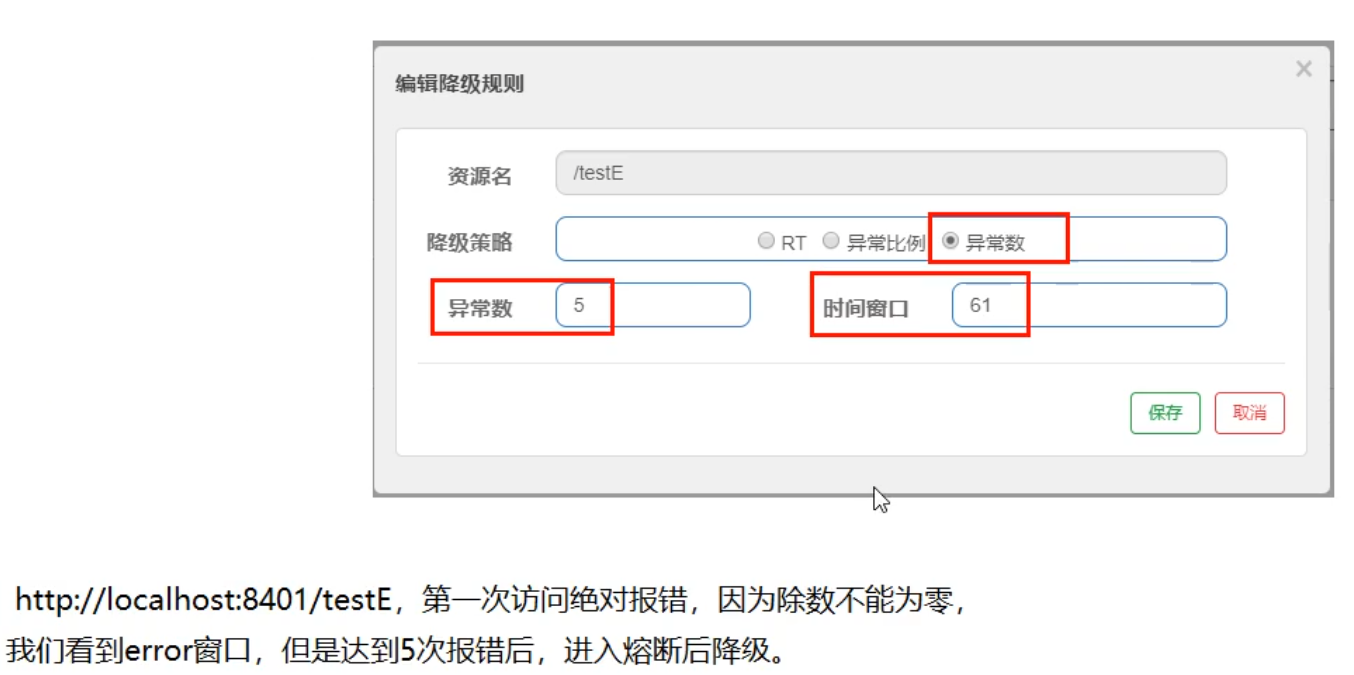
(3)、异常数
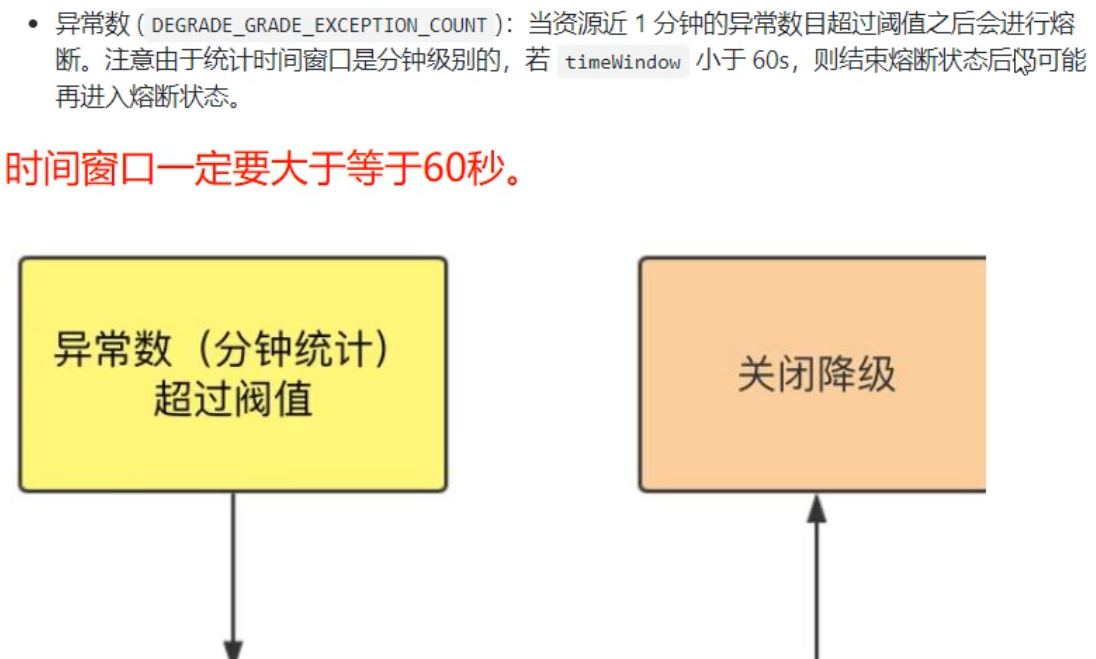

配置
5、热点key限流
(1)、是什么?

(2)、承上启下复制start

(3)、代码
@GetMapping("/testHotKey")
@SentinelResource(value = "testHotKey", blockHandler = "deal_testHotKey")
public String testHotKey(@RequestParam(value = "p1", required = false) String p1,
@RequestParam(value = "p2", required = false) String p2) {
//int age = 10/0;
return "------testHotKey";
}
public String deal_testHotKey(String p1, String p2, BlockException exception) {
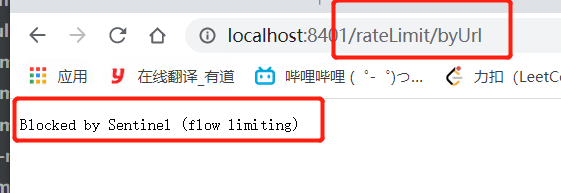
return "------deal_testHotKey,o(╥﹏╥)o"; //sentinel系统默认的提示:Blocked by Sentinel (flow limiting)
}(4)、配置

(5)、参数例外项


注意!↓↓↓
(6)、其他
添加异常不会处理
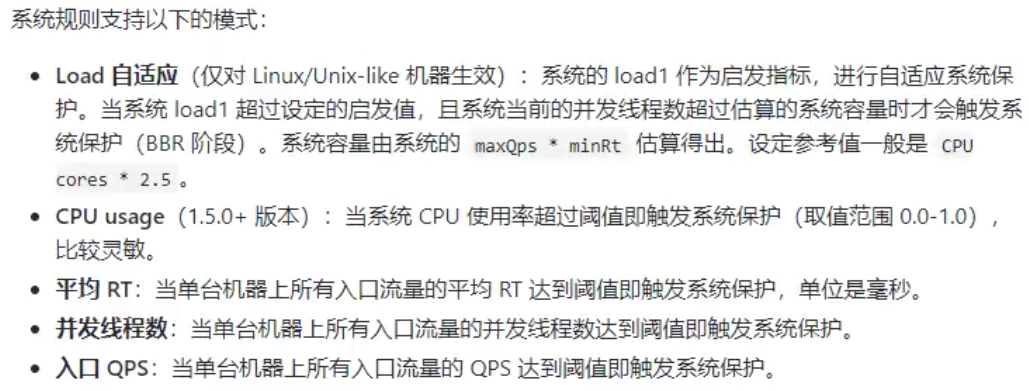
6、系统规则
(1)、简介

(2)、五种模式

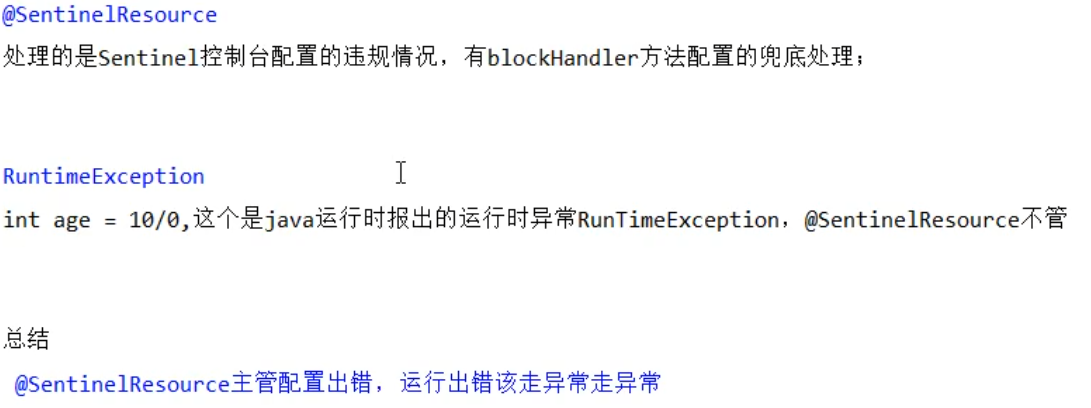
7、@SentinelResource
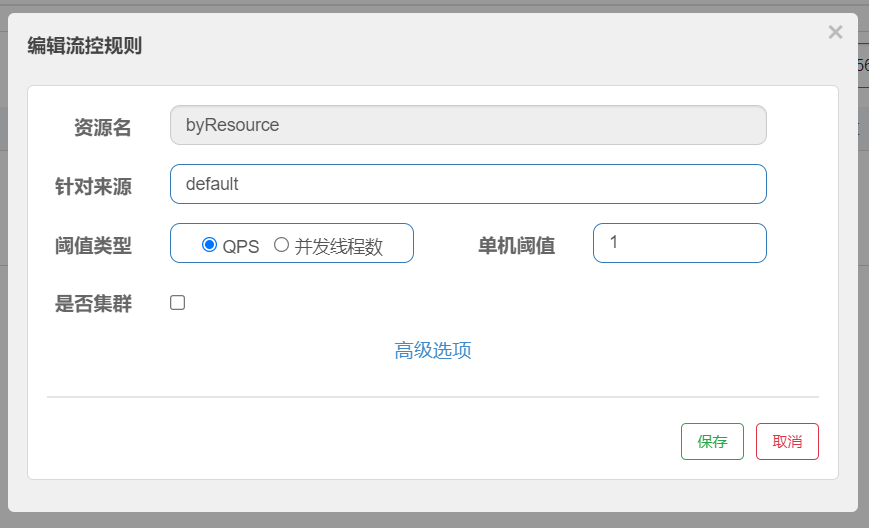
(1)、按资源名称限流+后续处理
1)、业务类
@RestController
public class RateLimitController {
@GetMapping("/byResource")
@SentinelResource(value = "byResource", blockHandler = "handleException")
public CommonResult byResource() {
return new CommonResult(200, "按资源名称限流测试OK", new Payment(2020L, "serial001"));
}
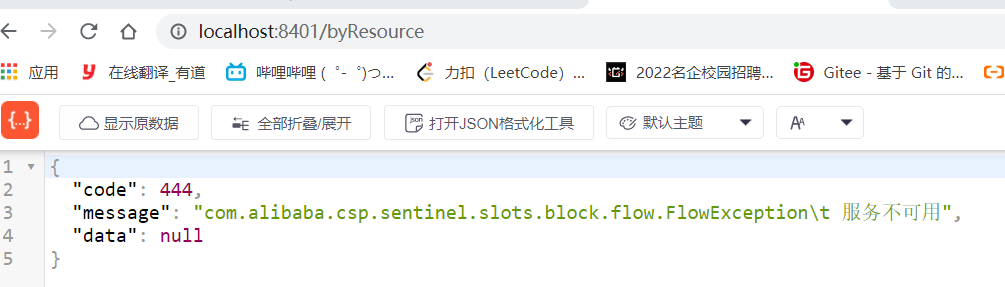
public CommonResult handleException(BlockException exception) {
return new CommonResult(444, exception.getClass().getCanonicalName() + "\t 服务不可用");
}
}2)、测试

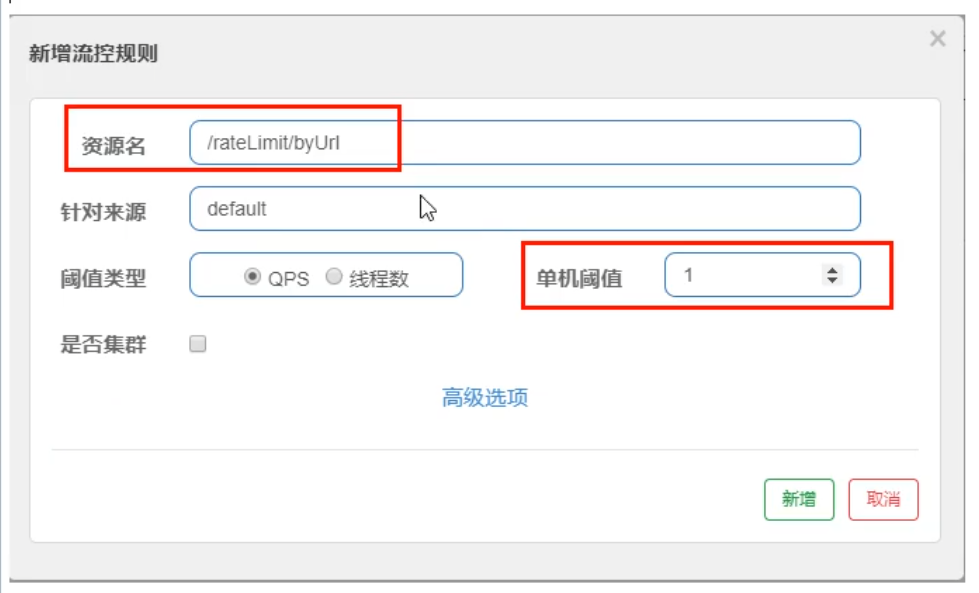
(2)、按照Url地址限流+后续处理
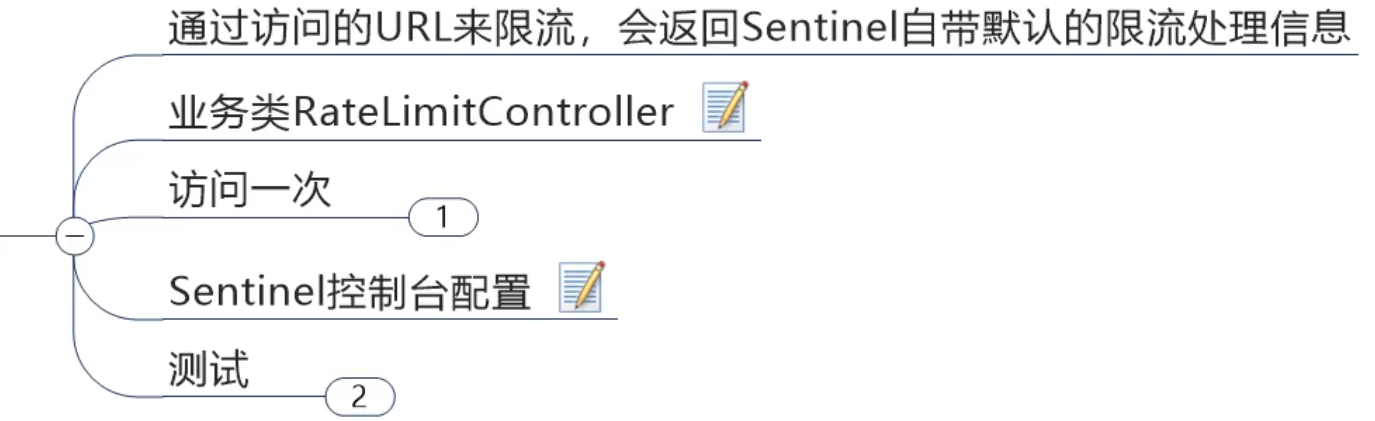
1)、控制台配置
(3)、上面兜底方案面临的问题
使用路径控制效果
使用资源名称控制效果 必须要有自定义的兜底方法


代码:
    @GetMapping("/rateLimit/customerBlockHandler")
    @SentinelResource(value = "customerBlockHandler",
            blockHandlerClass = CustomerBlockHandler.class,
            blockHandler = "handlerException2")
    public CommonResult customerBlockHandler() {
        return new CommonResult(200, "按客戶自定义", new Payment(2020L, "serial003"));
    }
public class CustomerBlockHandler
{
public static CommonResult handlerException(BlockException exception)
{
return new CommonResult(4444,"按客戶自定义,global handlerException----1");
}
public static CommonResult handlerException2(BlockException exception)
{
return new CommonResult(4444,"按客戶自定义,global handlerException----2");
}
}(4)、客户自定义限流处理逻辑
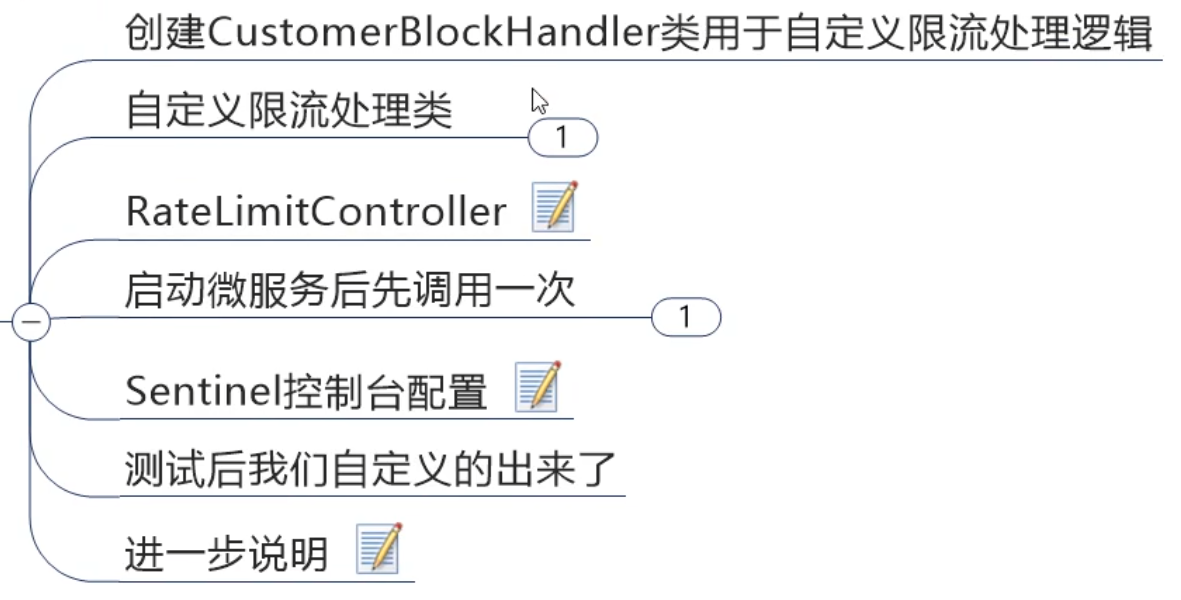
(5)、更多注解属性说明


8、服务熔断功能
Sentinel整合ribbon+openFeign+fallback
(1)、Ribbon系列
1)、pom
        <!--SpringCloud ailibaba nacos -->
        <dependency>
            <groupId>com.alibaba.cloud</groupId>
            <artifactId>spring-cloud-starter-alibaba-nacos-discovery</artifactId>
        </dependency>
2)、yml
server:
  port: 9003

spring:
  application:
    name: nacos-payment-provider
  cloud:
    nacos:
      discovery:
        server-addr: localhost:8848 #配置Nacos地址

management:
  endpoints:
    web:
      exposure:
        include: '*'
3)、主启动类
@SpringBootApplication
@EnableDiscoveryClient
public class PaymentMain9003 {
    public static void main(String[] args) {
        SpringApplication.run(PaymentMain9003.class, args);
    }
}
4)、业务类
模拟数据库
@RestController
public class PaymentController {
    @Value("${server.port}")
    private String serverPort;

    public static HashMap<Long, Payment> hashMap = new HashMap<>();

    static {
        hashMap.put(1L, new Payment(1L, "28a8c1e3bc2742d8848569891fb42181"));
        hashMap.put(2L, new Payment(2L, "bba8c1e3bc2742d8848569891ac32182"));
        hashMap.put(3L, new Payment(3L, "6ua8c1e3bc2742d8848569891xt92183"));
    }

    @GetMapping(value = "/paymentSQL/{id}")
    public CommonResult<Payment> paymentSQL(@PathVariable("id") Long id) {
        Payment payment = hashMap.get(id);
        CommonResult<Payment> result = new CommonResult(200, "from mysql,serverPort:  " + serverPort, payment);
        return result;
    }

}
5)、消费者pom
        <!--SpringCloud openfeign -->
        <dependency>
            <groupId>org.springframework.cloud</groupId>
            <artifactId>spring-cloud-starter-openfeign</artifactId>
        </dependency>
        <!--SpringCloud ailibaba nacos -->
        <dependency>
            <groupId>com.alibaba.cloud</groupId>
            <artifactId>spring-cloud-starter-alibaba-nacos-discovery</artifactId>
        </dependency>
        <!--SpringCloud ailibaba sentinel -->
        <dependency>
            <groupId>com.alibaba.cloud</groupId>
            <artifactId>spring-cloud-starter-alibaba-sentinel</artifactId>
        </dependency>
6)、消费者yml
server:
port: 84
spring:
application:
name: nacos-order-consumer
cloud:
nacos:
discovery:
server-addr: localhost:8848
sentinel:
transport:
#配置Sentinel dashboard地址
dashboard: localhost:8858
#默认8719端口,假如被占用会自动从8719开始依次+1扫描,直至找到未被占用的端口
port: 8719
#消费者将要去访问的微服务名称(注册成功进nacos的微服务提供者)
service-url:
nacos-user-service: http://nacos-payment-provider
# 激活Sentinel对Feign的支持
feign:
sentinel:
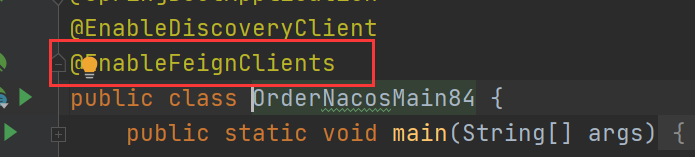
enabled: true7)、消费者主启动
@SpringBootApplication
@EnableDiscoveryClient
@EnableFeignClients
public class OrderNacosMain84 {
    public static void main(String[] args) {
        SpringApplication.run(OrderNacosMain84.class,args);
    }
}
8)、消费者业务类
public static final String SERVICE_URL = "http://nacos-payment-provider";
@Resource
private RestTemplate restTemplate;
@RequestMapping("/consumer/fallback/{id}")
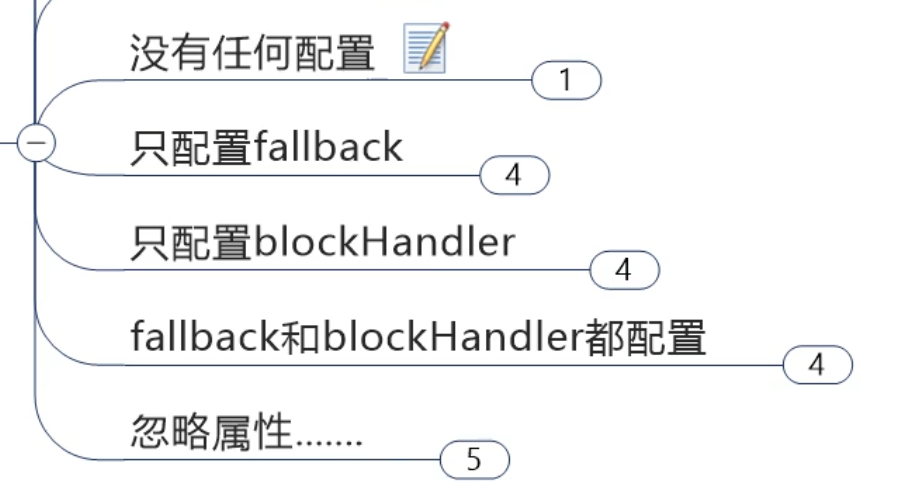
//@SentinelResource(value = "fallback") //没有配置
// @SentinelResource(value = "fallback",fallback = "handlerFallback") //fallback只负责业务异常
@SentinelResource(value = "fallback",blockHandler = "blockHandler") //blockHandler只负责sentinel控制台配置违规
// @SentinelResource(value = "fallback", fallback = "handlerFallback", blockHandler = "blockHandler",
// exceptionsToIgnore = {IllegalArgumentException.class})
public CommonResult<Payment> fallback(@PathVariable Long id) {
CommonResult<Payment> result = restTemplate.getForObject(SERVICE_URL + "/paymentSQL/" + id, CommonResult.class, id);
if (id == 4) {
throw new IllegalArgumentException("IllegalArgumentException,非法参数异常....");
} else if (result.getData() == null) {
throw new NullPointerException("NullPointerException,该ID没有对应记录,空指针异常");
}
return result;
}
//本例是fallback
public CommonResult handlerFallback(@PathVariable Long id, Throwable e) {
Payment payment = new Payment(id, "null");
return new CommonResult<>(444, "兜底异常handlerFallback,exception内容 " + e.getMessage(), payment);
}
//本例是blockHandler
public CommonResult blockHandler(@PathVariable Long id, BlockException blockException) {
Payment payment = new Payment(id, "null");
return new CommonResult<>(445, "blockHandler-sentinel限流,无此流水: blockException " + blockException.getMessage(), payment);
}
//==================OpenFeign
@Autowired
private PaymentService paymentService;
@GetMapping(value = "/consumer/paymentSQL/{id}")
public CommonResult<Payment> paymentSQL(@PathVariable("id") Long id) {
return paymentService.paymentSQL(id);
}feign接口
@FeignClient(value = "nacos-payment-provider",fallback = PaymentFallbackService.class)
//@Component
public interface PaymentService
{
    @GetMapping(value = "/paymentSQL/{id}")
    public CommonResult<Payment> paymentSQL(@PathVariable("id") Long id);
}


exceptionsToIgnore属性

(2)、Feign系列
1)、pom
        <!--SpringCloud openfeign -->
        <dependency>
            <groupId>org.springframework.cloud</groupId>
            <artifactId>spring-cloud-starter-openfeign</artifactId>
        </dependency>
2)、yml
# 激活Sentinel对Feign的支持
feign:
  sentinel:
    enabled: true
3)、业务类
@FeignClient(value = "nacos-payment-provider",fallback = PaymentFallbackService.class)
//@Component
public interface PaymentService
{
    @GetMapping(value = "/paymentSQL/{id}")
    public CommonResult<Payment> paymentSQL(@PathVariable("id") Long id);

}
4)、主启动
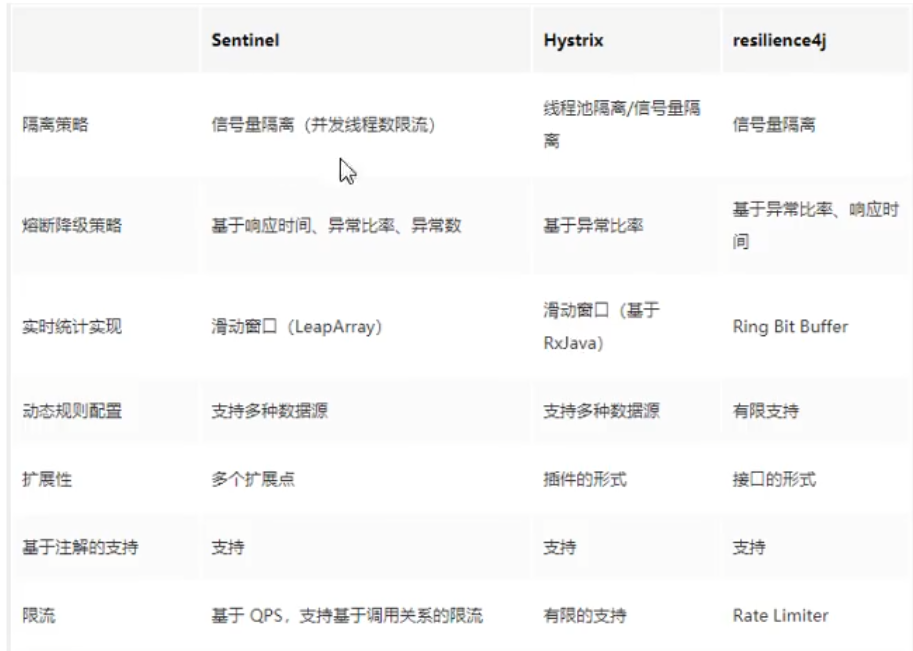
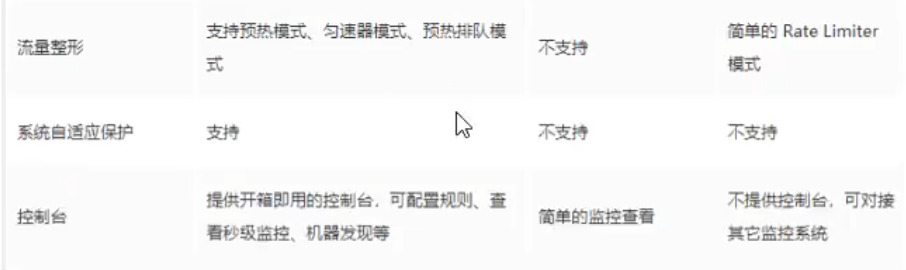
(3)、熔断框架比较
9、规则持久化
(1)、是什么

(2)、怎么玩

(3)、步骤
1)、pom
        <!--SpringCloud ailibaba sentinel-datasource-nacos 后续做持久化用到-->
        <dependency>
            <groupId>com.alibaba.csp</groupId>
            <artifactId>sentinel-datasource-nacos</artifactId>
        </dependency>
2)、yml
spring:
application:
name: cloudalibaba-sentinel-service
cloud:
nacos:
discovery:
server-addr: localhost:8848 #Nacos服务注册中心地址
sentinel:
transport:
dashboard: localhost:8858 #配置Sentinel dashboard地址
port: 8719
datasource: #持久化sentinel
ds1:
nacos:
server-addr: localhost:8848
dataId: cloudalibaba-sentinel-service
groupId: DEFAULT_GROUP
data-type: json
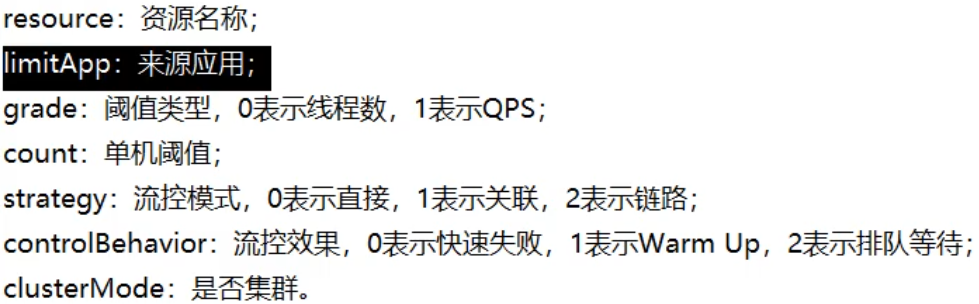
rule-type: flow3)、新建配置

[
    {
        "resource":"/rateLimit/byUrl",
        "limitApp":"default",
        "grade":1,
        "count":1,
        "strategy":0,
        "controlBehavior":0,
        "clusterMode":false
    }
]
十八、SpringCloud Alibaba Seata处理分布式事务
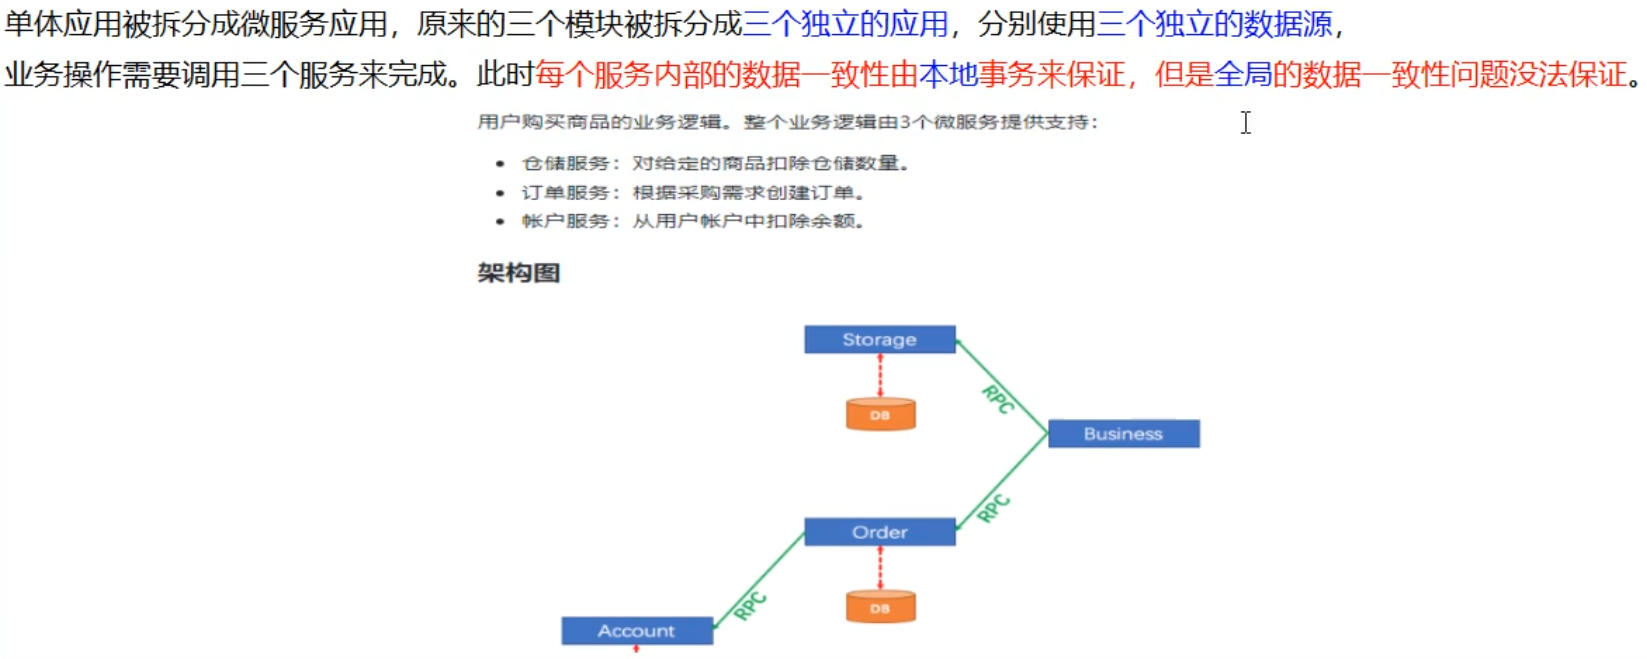
1、分布式事务问题
2、Seata简介
(1)、是什么
Seata是一款开源的分布式事务解决方案,致力于在微服务架构下提供高性能和简单易用的分布式事务服务。
(2)、能干嘛
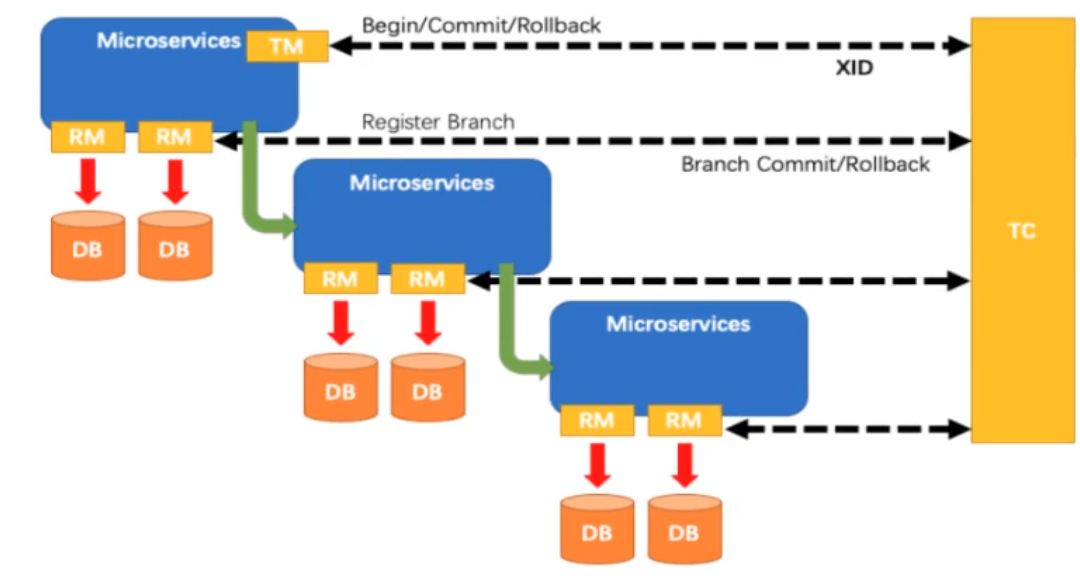
一个典型的分布式事务过程

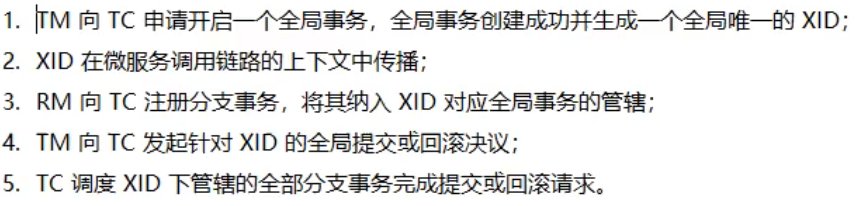
1个ID:

三组件模型:

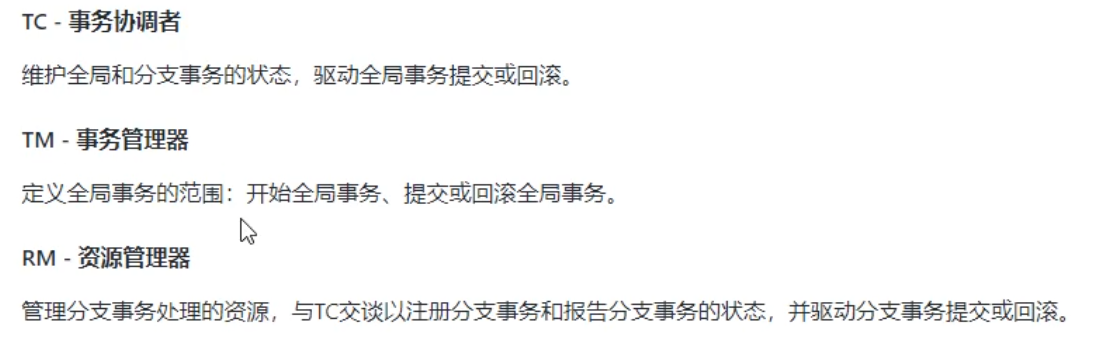
处理过程
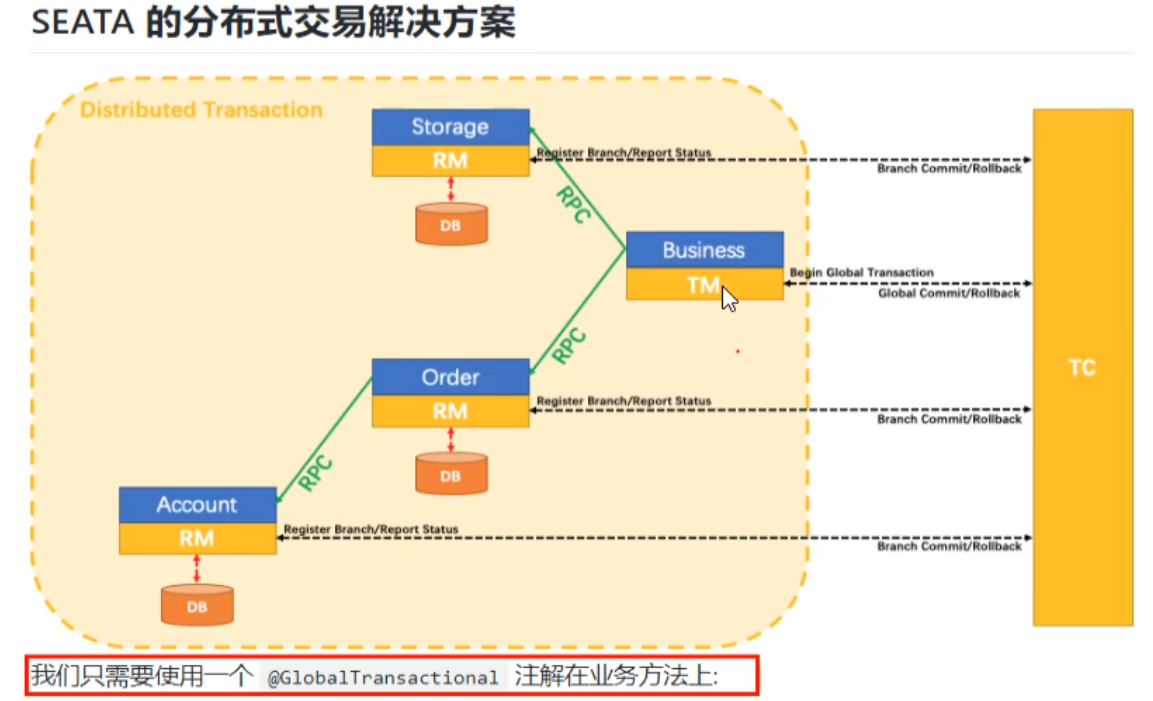
seata的分布式交易解决方案
(3)、怎么玩
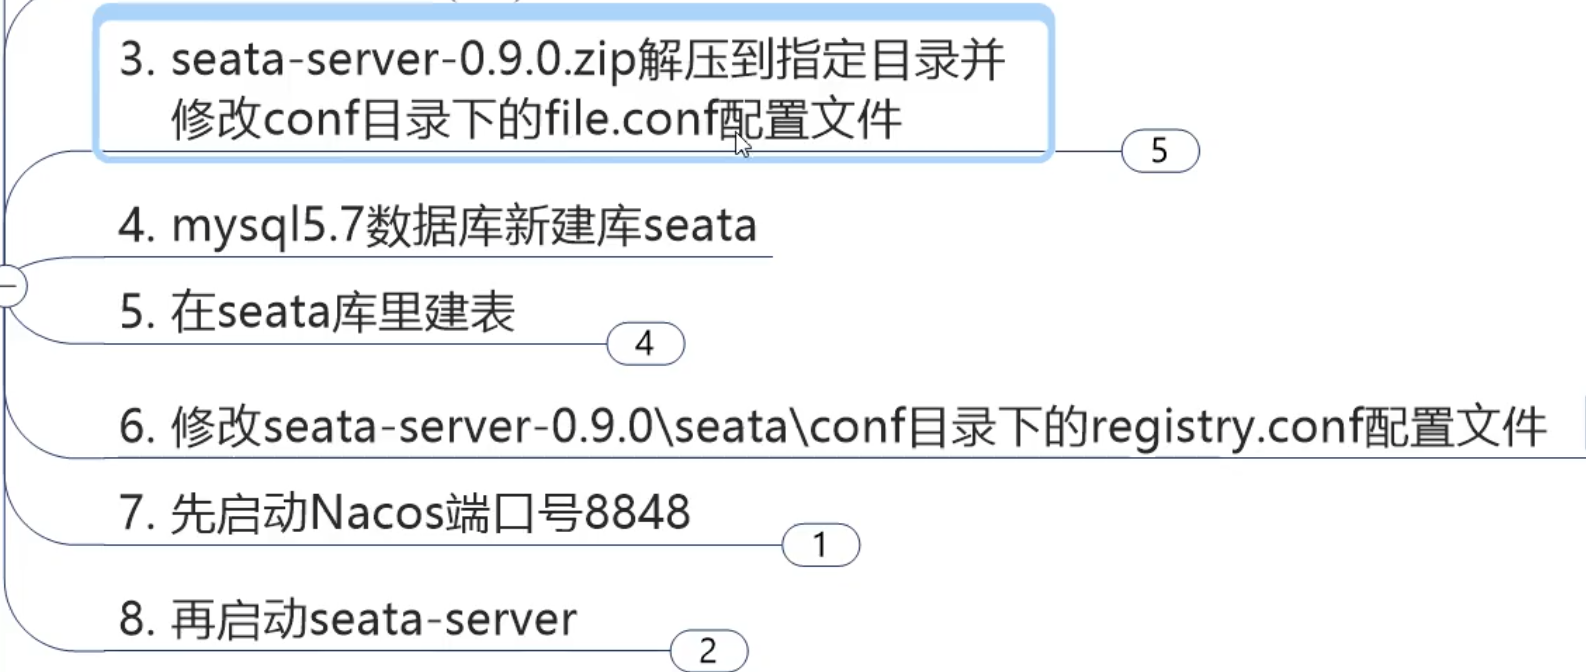
1)、修改file.conf配置文件

2)、mysql5.7数据库新建库seata
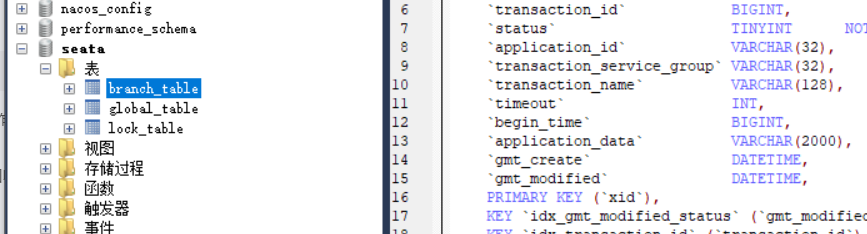
3)、在seata库里建表

4)、修改seata-server-0.9.0\seata\conf目录下的registry.conf配置文件
5)、启动Nacos端口号8848
6)、再启动seata-server
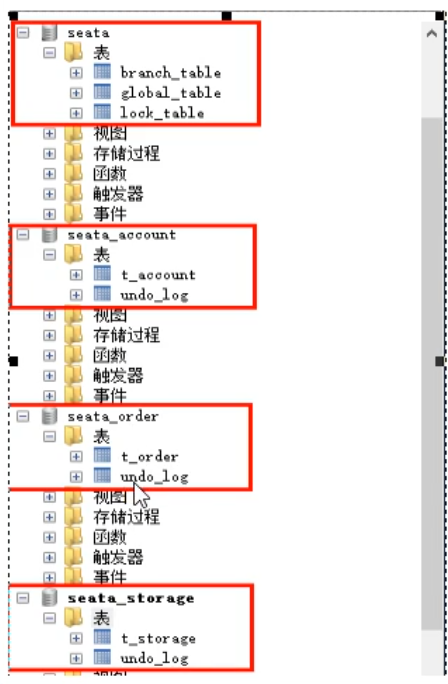
3、订单/库存/账户业务数据库准备


最终效果
4、订单/库存/账户业务微服务准备


1、官方使用步骤
步骤 1:建立数据库 (无需)
- 要求:具有InnoDB引擎的MySQL。
注意: 实际上,在示例用例中,这3个服务应该有3个数据库。 但是,为了简单起见,我们只创建一个数据库并配置3个数据源。
使用您刚创建的数据库 URL/username/password 修改Spring XML。
dubbo-account-service.xml dubbo-order-service.xml dubbo-storage-service.xml
        <property name="url" value="jdbc:mysql://x.x.x.x:3306/xxx" />
        <property name="username" value="xxx" />
        <property name="password" value="xxx" />
步骤 2:创建 UNDO_LOG 表
SEATA AT 模式需要 UNDO_LOG 表 每一个数据库都需要一个回滚日志表
-- 注意此处0.3.0+ 增加唯一索引 ux_undo_log
CREATE TABLE `undo_log` (
  `id` bigint(20) NOT NULL AUTO_INCREMENT,
  `branch_id` bigint(20) NOT NULL,
  `xid` varchar(100) NOT NULL,
  `context` varchar(128) NOT NULL,
  `rollback_info` longblob NOT NULL,
  `log_status` int(11) NOT NULL,
  `log_created` datetime NOT NULL,
  `log_modified` datetime NOT NULL,
  `ext` varchar(100) DEFAULT NULL,
  PRIMARY KEY (`id`),
  UNIQUE KEY `ux_undo_log` (`xid`,`branch_id`)
) ENGINE=InnoDB AUTO_INCREMENT=1 DEFAULT CHARSET=utf8;
步骤 3:为示例业务创建表 (无需)
DROP TABLE IF EXISTS `storage_tbl`;
CREATE TABLE `storage_tbl` (
  `id` int(11) NOT NULL AUTO_INCREMENT,
  `commodity_code` varchar(255) DEFAULT NULL,
  `count` int(11) DEFAULT 0,
  PRIMARY KEY (`id`),
  UNIQUE KEY (`commodity_code`)
) ENGINE=InnoDB DEFAULT CHARSET=utf8;


DROP TABLE IF EXISTS `order_tbl`;
CREATE TABLE `order_tbl` (
  `id` int(11) NOT NULL AUTO_INCREMENT,
  `user_id` varchar(255) DEFAULT NULL,
  `commodity_code` varchar(255) DEFAULT NULL,
  `count` int(11) DEFAULT 0,
  `money` int(11) DEFAULT 0,
  PRIMARY KEY (`id`)
) ENGINE=InnoDB DEFAULT CHARSET=utf8;


DROP TABLE IF EXISTS `account_tbl`;
CREATE TABLE `account_tbl` (
  `id` int(11) NOT NULL AUTO_INCREMENT,
  `user_id` varchar(255) DEFAULT NULL,
  `money` int(11) DEFAULT 0,
  PRIMARY KEY (`id`)
) ENGINE=InnoDB DEFAULT CHARSET=utf8;
步骤 4: 启动服务
- 从 https://github.com/seata/seata/releases,下载服务器软件包,将其解压缩。
Usage: sh seata-server.sh(for linux and mac) or cmd seata-server.bat(for windows) [options]
  Options:
    --host, -h
      The host to bind.
      Default: 0.0.0.0
    --port, -p
      The port to listen.
      Default: 8091
    --storeMode, -m
      log store mode : file、db
      Default: file
    --help

e.g.

sh seata-server.sh -p 8091 -h 127.0.0.1 -m file
步骤 5: 运行示例
示例仓库: seata-samples
- 启动 DubboAccountServiceStarter
- 启动 DubboStorageServiceStarter
- 启动 DubboOrderServiceStarter
- 运行 DubboBusinessTester for demo test
TBD: 运行演示应用程序的脚本
2、使用步骤

1、引入maven依赖
<dependency>
    <groupId>com.alibaba.cloud</groupId>
    <artifactId>spring-cloud-starter-alibaba-seata</artifactId>
</dependency>
2、启动SEATA服务器
3、大事务添加 @GlobalTransactional 注解,小事务添加@Transactional 注解。
4、将DataSourceProxy设为主数据源,否则事务无法回滚
@Configuration
public class MySeataConfig {

    @Autowired
    DataSourceProperties dataSourceProperties;

    @Bean
    public DataSource dataSource(DataSourceProperties dataSourceProperties) {

        HikariDataSource dataSource = dataSourceProperties.initializeDataSourceBuilder().type(HikariDataSource.class).build();
        if (StringUtils.hasText(dataSourceProperties.getName())) {
            dataSource.setPoolName(dataSourceProperties.getName());
        }

        return new DataSourceProxy(dataSource);
    }

}
5、配置
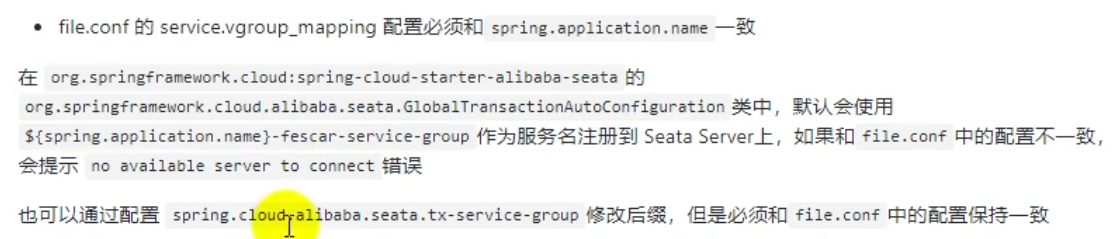

6、创建conf配置文件
file.conf
transport {
# tcp udt unix-domain-socket
type = "TCP"
#NIO NATIVE
server = "NIO"
#enable heartbeat
heartbeat = true
#thread factory for netty
thread-factory {
boss-thread-prefix = "NettyBoss"
worker-thread-prefix = "NettyServerNIOWorker"
server-executor-thread-prefix = "NettyServerBizHandler"
share-boss-worker = false
client-selector-thread-prefix = "NettyClientSelector"
client-selector-thread-size = 1
client-worker-thread-prefix = "NettyClientWorkerThread"
# netty boss thread size,will not be used for UDT
boss-thread-size = 1
#auto default pin or 8
worker-thread-size = 8
}
shutdown {
# when destroy server, wait seconds
wait = 3
}
serialization = "seata"
compressor = "none"
}
service {
#vgroup->rgroup
vgroup_mapping.gulimall-ware-fescar-service-group = "default"
#only support single node
default.grouplist = "127.0.0.1:8091"
#degrade current not support
enableDegrade = false
#disable
disable = false
#unit ms,s,m,h,d represents milliseconds, seconds, minutes, hours, days, default permanent
max.commit.retry.timeout = "-1"
max.rollback.retry.timeout = "-1"
}
client {
async.commit.buffer.limit = 10000
lock {
retry.internal = 10
retry.times = 30
}
report.retry.count = 5
}
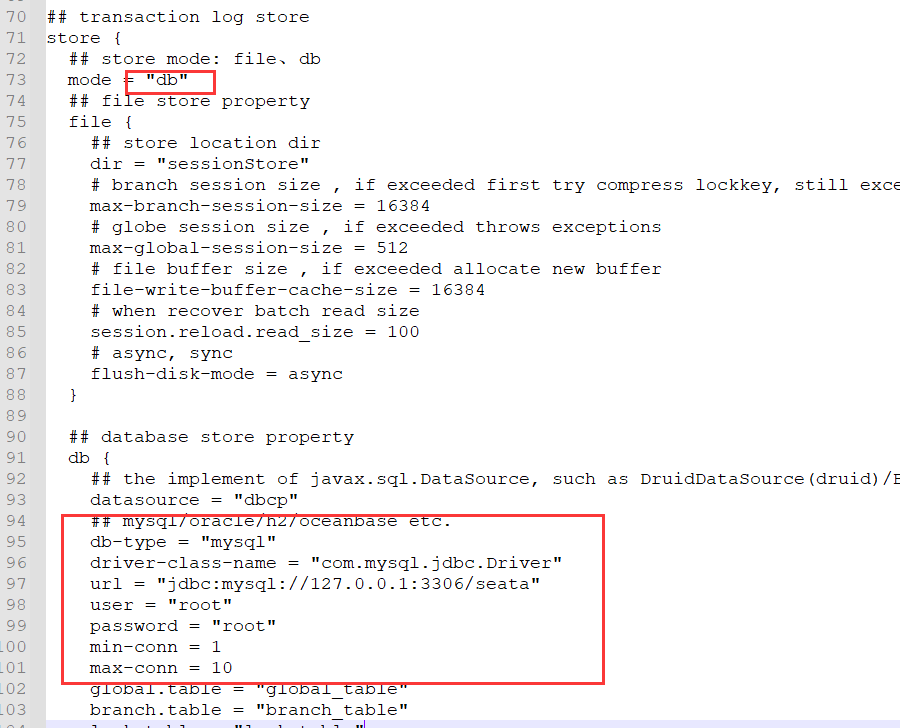
## transaction log store
store {
## store mode: file、db
mode = "file"
## file store
file {
dir = "sessionStore"
# branch session size , if exceeded first try compress lockkey, still exceeded throws exceptions
max-branch-session-size = 16384
# globe session size , if exceeded throws exceptions
max-global-session-size = 512
# file buffer size , if exceeded allocate new buffer
file-write-buffer-cache-size = 16384
# when recover batch read size
session.reload.read_size = 100
# async, sync
flush-disk-mode = async
}
## database store
db {
## the implement of javax.sql.DataSource, such as DruidDataSource(druid)/BasicDataSource(dbcp) etc.
datasource = "dbcp"
## mysql/oracle/h2/oceanbase etc.
db-type = "mysql"
url = "jdbc:mysql://127.0.0.1:3306/seata"
user = "mysql"
password = "mysql"
min-conn = 1
max-conn = 3
global.table = "global_table"
branch.table = "branch_table"
lock-table = "lock_table"
query-limit = 100
}
}
lock {
## the lock store mode: local、remote
mode = "remote"
local {
## store locks in user's database
}
remote {
## store locks in the seata's server
}
}
recovery {
committing-retry-delay = 30
asyn-committing-retry-delay = 30
rollbacking-retry-delay = 30
timeout-retry-delay = 30
}
transaction {
undo.data.validation = true
undo.log.serialization = "jackson"
}
## metrics settings
metrics {
enabled = false
registry-type = "compact"
# multi exporters use comma divided
exporter-list = "prometheus"
exporter-prometheus-port = 9898
}
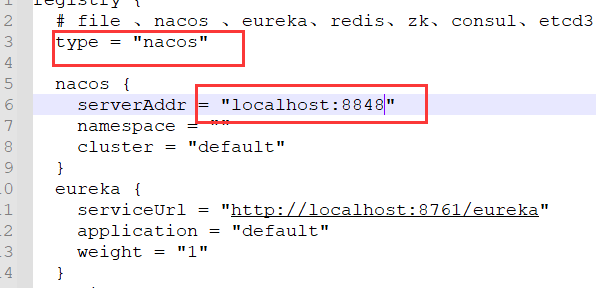
registry.conf
registry {
# file 、nacos 、eureka、redis、zk、consul、etcd3、sofa
type = "nacos"
nacos {
serverAddr = "localhost:8848"
namespace = "public"
cluster = "default"
}
eureka {
serviceUrl = "http://localhost:1001/eureka"
application = "default"
weight = "1"
}
redis {
serverAddr = "localhost:6379"
db = "0"
}
zk {
cluster = "default"
serverAddr = "127.0.0.1:2181"
session.timeout = 6000
connect.timeout = 2000
}
consul {
cluster = "default"
serverAddr = "127.0.0.1:8500"
}
etcd3 {
cluster = "default"
serverAddr = "http://localhost:2379"
}
sofa {
serverAddr = "127.0.0.1:9603"
application = "default"
region = "DEFAULT_ZONE"
datacenter = "DefaultDataCenter"
cluster = "default"
group = "SEATA_GROUP"
addressWaitTime = "3000"
}
file {
name = "file.conf"
}
}
config {
# file、nacos 、apollo、zk、consul、etcd3
type = "file"
nacos {
serverAddr = "localhost"
namespace = "public"
cluster = "default"
}
consul {
serverAddr = "127.0.0.1:8500"
}
apollo {
app.id = "seata-server"
apollo.meta = "http://192.168.1.204:8801"
}
zk {
serverAddr = "127.0.0.1:2181"
session.timeout = 6000
connect.timeout = 2000
}
etcd3 {
serverAddr = "http://localhost:2379"
}
file {
name = "file.conf"
}
}


 3075
3075


 被折叠的 条评论
为什么被折叠?
被折叠的 条评论
为什么被折叠?
 到【灌水乐园】发言


