


1.4.依赖关系
什么是依赖
我们可能在A类中,会使用到B类,这时需要在A类中对B类进行一个依赖注入,常见的注入方式有
- 声明变量,在变量上添加@Autowried注解
- 在XML文件中,对另外一个Bean的引用
依赖就是一个Bean和另一个Bean存在关系
1.4.1.依赖注入与控制反转
依赖注入(Dependency injection DI)是一个过程,对象只能通过构造函数参数,工厂方法的参数在构造或创建对象实例后,通过对象的属性中来确定它们的依赖关系,然后容器在创建那些bean时,会注入有依赖的bean,而不需要用户去通过new来获取到这个对象,所以被称为控制反转( Inversion of Control )
控制反转的好处
- 降低了代码之间的耦合度;
- 代码更简易,用户只需要提供属性,spring就可以代替注入
依赖注入的两个主要变型:构造函数依赖注入和Setter方法依赖注入
1.4.2.依赖注入模型
默认情况下,使用的注入模型的no,我们需要在Bean之间通过ref元素来对其他Bean进行一个引用
可以在Beans标签上,修改default-autowire属性来修改默认行为
如果需要对少数Bean进行单独设置,可以在Bean标签上修改autowire属性
注入模式包括以下几种
| 模型 | 解释 |
|---|---|
| no | 默认的,无自动装配;Bean之间的引用需要ref元素来定义 |
| byName | 按照属性的名称,去容器中寻找相应的bean;也就是说,如果我们设定了一个X属性,那么我们也要相应的创建一个SetX的方法,所谓的属性名称就是Set后的字符串 |
| byType | 根据这个属性的类型,去容器中寻找相应类型的Bean;也要创建一个Set方法,其中的参数类型为该属性类型,才会被自动注入如果有多个这种类型的Bean,就会报错;如果没有相匹配的Bean,那么这个属性就不会被赋值 |
| constructor | 根据属性的类型,去寻找相应的构造函数,类似于byType |
1.4.3.依赖注入例子
byName
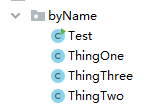
package com.jiang.official.autowire.byName;

public class ThingOne {
	private ThingTwo thingTwo;
	private ThingThree thingThree;

	public void setbyNameThingTwo(ThingTwo thingTwo) {
		this.thingTwo = thingTwo;
	}

	public void setbyNameThingThree(ThingThree thingThree) {
		this.thingThree = thingThree;
	}

	@Override
	public String toString() {
		return "ThingOne{" +
				"thingTwo=" + thingTwo +
				", thingThree=" + thingThree +
				'}';
	}
}
Two,Three类中都是空的
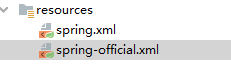
<?xml version="1.0" encoding="UTF-8"?>
<beans xmlns="http://www.springframework.org/schema/beans"
	   xmlns:xsi="http://www.w3.org/2001/XMLSchema-instance"
	   xmlns:context="http://www.springframework.org/schema/context"
	   xsi:schemaLocation="http://www.springframework.org/schema/beans http://www.springframework.org/schema/beans/spring-beans.xsd http://www.springframework.org/schema/context https://www.springframework.org/schema/context/spring-context.xsd"
	   default-autowire="byName">

	<bean id="byNameThingOne" class="com.jiang.official.autowire.byName.ThingOne"/>
	<bean id="byNameThingTwo" class="com.jiang.official.autowire.byName.ThingTwo"/>
	<bean id="byNameThingThree" class="com.jiang.official.autowire.byName.ThingThree"/>
</beans>
说明:我们减少了在XML配置中对autowireThingOne的属性进行设置,容器会根据注入方式byName进行查找,在ThingOne类中的set方法的名称,去容器中查找相应的Bean,进行赋值
byType
public class ThingOne {
   private ThingTwo thingTwo;
   private ThingThree thingThree;

   public void setThingTwo(ThingTwo thingTwo) {
      this.thingTwo = thingTwo;
   }

   public void setThingThree(ThingThree thingThree) {
      this.thingThree = thingThree;
   }

   @Override
   public String toString() {
      return "ThingOne{" +
            "thingTwo=" + thingTwo +
            ", thingThree=" + thingThree +
            '}';
   }
}
XML中的配置
<?xml version="1.0" encoding="UTF-8"?>
<beans xmlns="http://www.springframework.org/schema/beans"
	   xmlns:xsi="http://www.w3.org/2001/XMLSchema-instance"
	   xmlns:context="http://www.springframework.org/schema/context"
	   xsi:schemaLocation="http://www.springframework.org/schema/beans http://www.springframework.org/schema/beans/spring-beans.xsd http://www.springframework.org/schema/context https://www.springframework.org/schema/context/spring-context.xsd"
	   default-autowire="byType">
	<!--byType-->
	<bean id="byTypeThingOne" class="com.jiang.official.autowire.byType.ThingOne"/>
	<bean id="byTypeThingTwo" class="com.jiang.official.autowire.byType.ThingTwo"/>
	<bean id="byTypeThingThree" class="com.jiang.official.autowire.byType.ThingThree"/>
</beans>
说明:在ThingOne中使用到ThingTwo和ThingThree,如果这两个被使用到类继承了某个接口,并且该接口下有多个实现类,那么在自动注入时,就会遇到多个类型相同的选项,从而报错
constructor
public class ThingOne {
   private ThingTwo thingTwo;
   private ThingThree thingThree;

   public ThingOne(ThingTwo thingTwo, ThingThree thingThree) {
      this.thingTwo = thingTwo;
      this.thingThree = thingThree;
      thingTwo.printf();
   }

   @Override
   public String toString() {
      return "ThingOne{" +
            "thingTwo=" + thingTwo +
            ", thingThree=" + thingThree +
            '}';
   }
}
XML中的配置
<beans default-autowire="constructor">
<!--constructor-->
<bean id="constructorThingOne" class="com.jiang.official.autowire.constructor.ThingOne"/>

<bean id="constructorThingTwo" class="com.jiang.official.autowire.constructor.ThingTwo"/>
<bean id="constructorThingThree" class="com.jiang.official.autowire.constructor.ThingThree"/>
说明:构造函数中可以有多个参数,但是参数类型相同,注入的Bean将会是同一个Bean
自动注入缺点
- 不够精确
- 显示注入的property和constructor-arg会覆盖自动注入
- 无法自动注入简单的类型,例如string
排除自动注入
- 在bean中设置属性autowire-candidate为false
- 还可以在容器beans上设置全局的,包括根据bean的名称局部设置,名称以结尾的任何beanRepository,请提供值*Repository
1.4.4.以上例子的补充
在1.4.2中提到,注入主要是基于构造函数和setter方法注入,在以上的例子中,我们也可以分为两类
setter方法注入
- byName
- byType
构造函数注入
- constructor
ApplicationContext为它管理的Bean支持基于构造器和基于setter注入。在已经通过构造函数方法注入了一些依赖项之后,它还支持基于setter的依赖注入。您以BeanDefinition的形式配置依赖项,您将它与PropertyEditor实例一起使用,以将属性从一种格式转换为另一种格式。但是,大多数Spring用户并不直接使用这些类(即通过编程),而是使用XML bean定义、带注释的组件(即用@Component、@Controller等注释的类)或基于java的@Configuration类中的@Bean方法。然后在内部将这些源转换为BeanDefinition的实例,并用于加载整个Spring IoC容器实例。
如何正确使用两种方法
官方建议:因为两种方法可以混合使用,所以将构造函数用于强制性依赖项,setter方法或配置方法用于可选依赖项
注意:在setter方法上使用@Required注解,表示这个属性是必须的依赖项
最好使用带有参数的验证方法的构造函数注入
依赖性的解析过程
- ApplicationContext使用配置元数据的来创建和初始化所有的bean,配置元数据可以是XML,Java代码或注解的方式
- 对于每一个bean,它们的依赖项,都是来自于属性,构造函数参数,静态工厂方法参数(如果使用的是默认空构造函数的话),在创建bean时,会将这些依赖项提供给bean
- 每一个属性或者构造函数的参数都必须是确定的,或者是从容器中的其他bean引用的
- 属性,构造函数的参数值都可以从指定的格式转换为该属性或构造函数参数的实际类型。默认情况下,是spring能将string类型转换为所有的内置类型,如int,long,boolean等
循环依赖问题
使用构造函数注入时,所引起的问题;
A类通过构造函数注入需要B类的实例,而B类通过构造函数注入需要A类的实例,然后就会陷入死循环,抛出BeanCurrentlyInCreationException
解决方案:
- 修改某些源代码
- 使用setter注入
1.4.5.非自动注入情况下的配置
当非自动注入模式下,要实现各个Bean之间的相互依赖,主要是用属性和构造函数也就是在XML配置中使用<property/>和<constructor-arg/>标签
例如在ThingOne中引用ThingTwo和TingThree
<beans xmlns="http://www.springframework.org/schema/beans"
    xmlns:xsi="http://www.w3.org/2001/XMLSchema-instance"
    xmlns:p="http://www.springframework.org/schema/p"
    xsi:schemaLocation="http://www.springframework.org/schema/beans
    https://www.springframework.org/schema/beans/spring-beans.xsd">

    <bean id="ThingOne" class="...">
		<property name="ThingTwo">
			<ref bean="ThingTwo"/>
		<property/>
		<property name="ThingThree">
			<ref bean="ThingThree"/>
		<property/>
	<bean/>
	<bean id="ThingTwo" class="..."/>
	<bean id="ThingThree" class="..."/>
</beans>
构造函数的参数赋值
<beans xmlns="http://www.springframework.org/schema/beans"
    xmlns:xsi="http://www.w3.org/2001/XMLSchema-instance"
    xmlns:p="http://www.springframework.org/schema/p"
    xsi:schemaLocation="http://www.springframework.org/schema/beans
    https://www.springframework.org/schema/beans/spring-beans.xsd">

    <bean id="ThingOne" class="...">
		<constructor-arg ref="ThingTwo"/>
		<constructor-arg ref="ThingThree"/>
	<bean/>
	<bean id="ThingTwo" class="..."/>
	<bean id="ThingThree" class="..."/>
</beans>
拓展
在上述例子中,多次使用property标签,如果需要赋值更多的属性,那么配置就会显得十分的繁琐,我们可以利用Spring的p命名空间,其中在p:name-ref,ref表示这个是对另外一个Bean的引用,不是赋值
<beans xmlns="http://www.springframework.org/schema/beans"
    xmlns:xsi="http://www.w3.org/2001/XMLSchema-instance"
    xmlns:p="http://www.springframework.org/schema/p"
    xsi:schemaLocation="http://www.springframework.org/schema/beans
    https://www.springframework.org/schema/beans/spring-beans.xsd">

    <bean id="ThingOne" class="..."
		p:ThingTwo-ref="ThingTwo"
		p:ThingThree-ref="ThingThree"
	>
	<bean/>
	<bean id="ThingTwo" class="..."/>
	<bean id="ThingThree" class="..."/>
</beans>
在上述例子中的property标签使用ref引入,可以会导致一些重大错误,我们可以使用<idref/>标签来代替ref属性
- 第一种,会在client这个Bean实例化后才回去调用theTargetBean,如果client是原型的,那么这个错误将会在很久后才被发现
- 因为第二种,容器在部署的时候就会去判断targerBean是否存在
1.4.6.懒加载Bean
在默认情况下,bean都是在容器创建时,就被初始化出来的,这样会让用户在容器启动时,就发现配置中或环境中的错误
可以在Beans标签上修改default-lazy-init属性来修改默认行为
也可以使用Bean上设置lazy-init来修改单个Bean
depends-on
在之前,我们认定Bean A和Bean B之间存在依赖性,一般都是一个A中依赖注入B,通过xml的<ref/>标签或者属性等方法;但是有一些依赖不是那么的直接(强依赖),比如是A与B是弱依赖,他们不需要直接注入,但是A启动的初始化方法中,需要用到数据C,而C恰恰又是B产生的,那么我们就需要先实例化B,让B产生数据C后,A才可以进行实例化
可以在bean标签上,使用depends-on属性来表明该bean依赖于另一个bean,并且在该bean实例化前,将另外一个bean先实例化
该depends-on属性既可以指定初始化时间依赖性,也可以仅在单例 bean 的情况下指定相应的销毁时间依赖性。定义depends-on与给定bean 的关系的从属bean 首先被销毁,然后再销毁给定bean本身。这样,depends-on还可以控制关机顺序。


 2万+
2万+


 被折叠的 条评论
为什么被折叠?
被折叠的 条评论
为什么被折叠?
 到【灌水乐园】发言


