


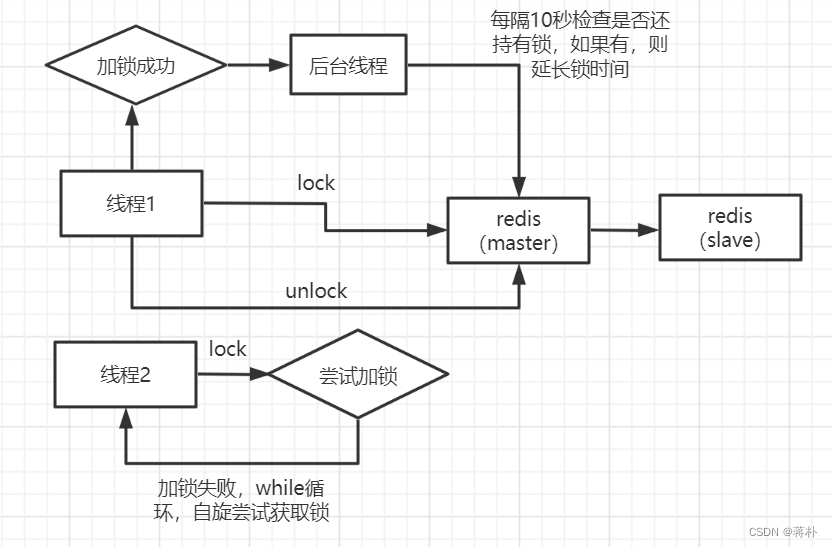
redis分布式锁简单流程
一.redis分布式锁的简单使用
@Autowired
private Redisson redisson;
// 获取锁对象
RLock rLock = redisson.getLock(productId);
// 加锁
rLock.lock();
下面的源码分析则是通过该方法lock()进入的
二.学习redis分布式锁源码
2.1 首先先看主分支:redis如何实现的分布式锁
2.1.1实现分布式锁的主要方法:
public RFuture<Boolean> tryLockAsync(long threadId) {
    return this.tryAcquireOnceAsync(-1L, -1L, (TimeUnit)null, threadId);
}
// 该方法真正实现redis分布式锁的加锁逻辑
private RFuture<Boolean> tryAcquireOnceAsync(long waitTime, long leaseTime, TimeUnit unit, long threadId) {
    if (leaseTime != -1L) {
        return this.tryLockInnerAsync(waitTime, leaseTime, unit, threadId, RedisCommands.EVAL_NULL_BOOLEAN);
    } else {
        // 实现redis分布式锁逻辑
        RFuture<Boolean> ttlRemainingFuture = this.tryLockInnerAsync(waitTime, this.internalLockLeaseTime, TimeUnit.MILLISECONDS, threadId, RedisCommands.EVAL_NULL_BOOLEAN);
        // 执行完tryLockInnerAsync()后回调该方法
        ttlRemainingFuture.onComplete((ttlRemaining, e) -> {
            if (e == null) {
                if (ttlRemaining) {
                    log.info("【续约】加锁成功 {} {}", this.getName(), threadId);
                    this.scheduleExpirationRenewal(threadId);
                }

            }
        });
        return ttlRemainingFuture;
    }
}
2.1.2上述代码块中的tryLockInnerAsync()方法通过lua脚本实现了redis的分布式锁
<T> RFuture<T> tryLockInnerAsync(long waitTime, long leaseTime, TimeUnit unit, long threadId, RedisStrictCommand<T> command) {
    return this.evalWriteAsync(this.getName(), LongCodec.INSTANCE, command,
            // 1.1第一次加锁,肯定不存在,因此设置hash:key为this.getName()
            // 1.2value为this.getLockName(threadId),同时设置锁超时时间为30s
            // 1.3最后返回null
            "if (redis.call('exists', KEYS[1]) == 0) then " +
               "redis.call('hincrby', KEYS[1], ARGV[2], 1); " +
               "redis.call('pexpire', KEYS[1], ARGV[1]); return nil; " +
            "end; " +
            // 这里的if逻辑是可重入锁的实现逻辑
            "if (redis.call('hexists', KEYS[1], ARGV[2]) == 1) then " +
               "redis.call('hincrby', KEYS[1], ARGV[2], 1); " +
               "redis.call('pexpire', KEYS[1], ARGV[1]); " +
               "return nil; " +
            "end; " +
            // 返回redis锁的时间
            "return redis.call('pttl', KEYS[1]);",
            Collections.singletonList(this.getName()), // redis的锁名,即redis中的key
            unit.toMillis(leaseTime), // 默认30s
            this.getLockName(threadId));// UUID+线程id
}
可以看出,redis分布式锁的实现就是通过一段lua脚本实现。
lua脚本的优势:(1)减少网络开销(2)保证原子操作(3)替代了redis的事务
2.2 redis分布式锁加锁成功后,是如何实现锁续命的?
2.2.1利用Future类实现在执行tryLockInnerAsync方法后回调onComplete()方法。在上述第一段代码块中,有这样一段代码:
// 执行完lua脚本
RFuture<Boolean> ttlRemainingFuture = this.tryLockInnerAsync(waitTime, this.internalLockLeaseTime, TimeUnit.MILLISECONDS, threadId, RedisCommands.EVAL_NULL_BOOLEAN);
// 该方法是在tryLockInnerAsync()执行完成后进行回调
ttlRemainingFuture.onComplete((ttlRemaining, e) -> {
    // e代表执行时异常
    if (e == null) {
        if (ttlRemaining) {
            log.info("【续约】加锁成功 {} {}", this.getName(), threadId);
            // 对该线程进行锁续命
            this.scheduleExpirationRenewal(threadId);
        }

    }
});
return ttlRemainingFuture;

// 锁续命的代码逻辑
private void scheduleExpirationRenewal(long threadId) {
    RedissonLock.ExpirationEntry entry = new RedissonLock.ExpirationEntry();
    RedissonLock.ExpirationEntry oldEntry = (RedissonLock.ExpirationEntry)EXPIRATION_RENEWAL_MAP.putIfAbsent(this.getEntryName(), entry);
    if (oldEntry != null) {
        oldEntry.addThreadId(threadId);
    } else {
        entry.addThreadId(threadId);
        // 锁续命
        this.renewExpiration();
    }
}
2.2.2 锁续命的逻辑就是通过该方法renewExpiration()方法实现的,其内部仍然是通过一段lua脚本,其对应的代码如下:
private void renewExpiration() {
    RedissonLock.ExpirationEntry ee = (RedissonLock.ExpirationEntry)EXPIRATION_RENEWAL_MAP.get(this.getEntryName());
    if (ee != null) {
        // 通过TimeTask()类调用run方法实现了锁续命逻辑,10秒之后才会执行run方法
        Timeout task = this.commandExecutor.getConnectionManager().newTimeout(new TimerTask() {
            public void run(Timeout timeout) throws Exception {
                RedissonLock.ExpirationEntry ent = (RedissonLock.ExpirationEntry)RedissonLock.EXPIRATION_RENEWAL_MAP.get(RedissonLock.this.getEntryName());
                if (ent != null) {
                    Long threadId = ent.getFirstThreadId();
                    if (threadId != null) {
                        // 如果主线程设置的键值对this.getName()和线程this.getLockName(threadId)存在,
                        // 则延长锁过期时间
                        // 同时返回结果1
                        RFuture<Boolean> future =
                        this.evalWriteAsync(this.getName(), LongCodec.INSTANCE, RedisCommands.EVAL_BOOLEAN,
                        "if (redis.call('hexists', KEYS[1], ARGV[2]) == 1) " +
                        "then redis.call('pexpire', KEYS[1], ARGV[1]); return 1; " +
                        "end; return 0;",
                        Collections.singletonList(this.getName()), this.internalLockLeaseTime, this.getLockName(threadId));
                        // 执行完lua脚本会回调该方法,其中res为lua脚本的返回值
                        // e代表程序执行异常
                        future.onComplete((res, e) -> {
                            if (e != null) {
                                RedissonLock.log.error("Can't update lock " + RedissonLock.this.getName() + " expiration", e);
                            } else {
                                // 程序无异常,并且成功返回1
                                if (res) {
                                    // 则会在10秒后再次调用上述方法
                                    RedissonLock.this.renewExpiration();
                                }
                            }
                        });
                    }
                }
            }
        }, this.internalLockLeaseTime / 3L, TimeUnit.MILLISECONDS);// run方法的延迟执行时间
        ee.setTimeout(task);
    }
}
redis续命逻辑总结:通过Future类实现对执行lua脚本的方法的回调,执行成功,则会在this.internalLockLeaseTime / 3L即10秒后再次调用renewExpiration()方法
2.3 等待加锁的线程如何自旋获取锁
2.3.1在上述实现redis分布式锁的lua脚本中,可以看出,如果加锁不成功,会返回锁的剩余时间,则tryAcquire()返回值就不等于null
private void lock(long leaseTime, TimeUnit unit, boolean interruptibly) throws InterruptedException {
    long threadId = Thread.currentThread().getId();
    // 其他线程加锁不成功,则返回锁剩余时间
    Long ttl = this.tryAcquire(leaseTime, unit, threadId);
    // 如果ttl为null,则说明加锁成功,不再执行if逻辑
    if (ttl != null) {
        RFuture<RedissonLockEntry> future = this.subscribe(threadId);
        if (interruptibly) {
            this.commandExecutor.syncSubscriptionInterrupted(future);
        } else {
            this.commandExecutor.syncSubscription(future);
        }

        try {
            // ttl不等于null,则通过while循环自旋加锁
            while(true) {
                ttl = this.tryAcquire(leaseTime, unit, threadId);
                if (ttl == null) {
                    return;
                }
                if (ttl >= 0L) {
                    try {
                        // 通过信号量的tryAcquire()方法将线程进行阻塞,让出cpu
                        // 待等待ttl时间后,再次执行while循环,尝试获取锁
                        ((RedissonLockEntry)future.getNow()).getLatch().tryAcquire(ttl, TimeUnit.MILLISECONDS);
                    } catch (InterruptedException var13) {
                        if (interruptibly) {
                            throw var13;
                        }
                        ((RedissonLockEntry)future.getNow()).getLatch().tryAcquire(ttl, TimeUnit.MILLISECONDS);
                    }
                } else if (interruptibly) {
                    ((RedissonLockEntry)future.getNow()).getLatch().acquire();
                } else {
                    ((RedissonLockEntry)future.getNow()).getLatch().acquireUninterruptibly();
                }
            }
        } finally {
            this.unsubscribe(future, threadId);
        }
    }
}
这里redis的消息订阅功能不再次赘述,重点是了解redis的分布式锁逻辑


 696
696


 被折叠的 条评论
为什么被折叠?
被折叠的 条评论
为什么被折叠?
 到【灌水乐园】发言


