


安装python3.6
简单安装python3
#Ubuntu1604 默认安装python3.5
#如下命令也是默认安装python3.5
lauf@master:~/Desktop$ sudo apt-get install python3

#安装python3.6,
#在执行该命令时,确保/usr/bin/python3 软链接到/usr/bin/python3.5
sudo add-apt-repository ppa:jonathonf/python-3.6
#参考https://www.cnblogs.com/presleyren/p/11011129.html
#cd /usr/lib/python3/dist-packages
#ls apt_pkg*
lauf@master:/usr/lib/python3/dist-packages$ ls apt_pkg*
apt_pkg.cpython-35m-x86_64-linux-gnu.so
#35m表示只支持python3.5

lauf@master:~/Desktop$ sudo apt-get install python3.6

#安装ipython3,强化的交互式python
lauf@master:/etc/alternatives$ sudo apt-get install ipython3

#卸载
lauf@master:~/Desktop$ sudo apt-get remove python3.6
多个python版本的管理
- 查看python 的版本:
#查看所有的python版本
whereis python

#查看当前默认使用的python版本
which python
which python3
- Ubuntu1604执行python3,默认进入python3.5,我想默认进入python3.6怎么办呢?
使用update-alternatives,它在linux系统中用于管理软件的多个版本。对应目录/etc/alternatives/,实际上它是通过软链接的方式对版本进行管理。
执行python命令时,它是一个软链接,指向/etc/alternatives/python,这个也是一个软连接,指向/usr/bin/python2.7可执行文件
在执行python3时,也是一样的,python3也是一个软连接。

具体使用方式:

如:sudo update-alternatives --remove python3 /usr/local/bin/python3.6
删除 命令name 到path 的链接
#如下,三个路径分别是
#/usr/bin/python3 指向/etc/alternatives/<name>的链接,这里name就是python3,可以到/etc/alternatives/查看
#python3 执行python解释器的命令
#/usr/bin/python3.6 实际执行的路径
# 2是优先级,越大优先级越高
lauf@master:/etc/alternatives$ sudo update-alternatives --install /usr/bin/python3 python3 /usr/bin/python3.6 2
update-alternatives: using /usr/bin/python3.6 to provide /usr/bin/python3 (python3) in auto mode
lauf@master:/etc/alternatives$ python3
Python 3.6.13 (default, Feb 20 2021, 21:42:50)
[GCC 5.4.0 20160609] on linux
Type "help", "copyright", "credits" or "license" for more information.
>>>
此时再进入python3,已经是python3.6.13!
使用ipython3进入的也是python3.6.13
- 查看update-alternatives 管理的python版本
lauf@master:/etc/alternatives$ sudo update-alternatives --list python
update-alternatives: error: no alternatives for python
#没有管理的python2

#以下是管理的python3
lauf@master:/etc/alternatives$ sudo update-alternatives --list python3
/usr/bin/python3.6
-
在update-alternatives中配置python版本的优先级
将版本加入到update-alternatives,并配置相应的优先级。
如图:修改python3.5的优先级为3 > python3.6的优先级2,所以再次执行python3则进入python3.5。

此时查看update-alternatives管理的python3,如下:

可以看到,python3.5在第一位,最优先(即默认) -
手动切换python版本

更细致的安装
$ sudo apt-get install zlib*  #zlib1g-dev

#源码安装openssl
#解压
cd openssl-1.1.1g
sudo ./config --prefix=/usr/local/ssl -d shared  #配置
sudo make  #编译
sudo make install #安装
sudo echo '/usr/local/ssl/lib' >> /etc/ld.so.conf
sudo ldconfig -v
使用源码安装python3.6.9
下载源码地址
这里下载 ‘Gzipped source tarball’
- 解压 Python-3.6.9.tgz,并安装
$ sudo tar -zxvf  Python-3.6.9.tgz -C /usr/local
$ cd /usr/local/Python-3.6.9
$ sudo ./configure --with-ssl  #默认安装在/usr/local/bin,也可以通过--prefix=路径 指定
$ sudo make
$ sudo make install
#1.若出错:zipimport.ZipImportError: can't decompress data; zlib not available Makefile:1079: recipe for target
#解决:sudo apt-get install zlib1g-dev
#Successfully installed pip-18.1 setuptools-40.6.2

#2.出错:使用pip3安装任何模块时的报错,
#  File "/usr/bin/python3.6/lib/python3.6/subprocess.py", line 418, in run
#    output=stdout, stderr=stderr)
#subprocess.CalledProcessError: Command '('lsb_release', '-a')' returned non-zero exit status 1.
#解决:sudo vim /usr/bin/lsb_release,在第一行指明版本号
#如#!/usr/bin/python3.6
#参考https://blog.csdn.net/u012114438/article/details/83578113

#3.使用pip3 install 时,报错:ssl无效
#在python3中导入 import ssl 出错
#./configure --with-ssl  目前没解决问题
#sudo vim ./Modules/Setup.dist
#搜索 /SSL   取消注释的四行


#等待安装完成,找到python3.6---which python3.6---使用update-alaternatives 管理
$ python3  #此时默认进入python3.6.9
#python3.5
#python3.6.13被覆盖,输入python3.5还是可以使用的
#可以使用update-alternatives统一管理
- 安装python的包
$ sudo pip3 install django==2.2.12
$ sudo pip3 install ipython
- 批量安装python包
#在配置好的主机,导出包
$ sudo pip3 freeze > r.txt
#在需要安装的主机,进行安装
$ sudo pip3 install -r r.txt
- 使用pandas时, lzma问题

- 使用pandas时,ModuleNotFoundError: No module named ‘_bz2’
Anaconda
Python数据分析、科学计算的工具
- 直接下载Anaconda3-5.2.0-Linux-x86_64.sh,可以选择不同的版本。
- 命令行执行./Anaconda3-5.2.0-Linux-x86_64.sh
- 根据提示,一步一步安装
- 输入spyder、anaconda-navigator 启动
Eclipse
此方法支持Ubuntu1804
2019-12 R版本
其他版本
- 下载eclipse: eclipse-java-2019-12-R-linux-gtk-x86_64.tar.gz
- 解压并配置
lauf@master:~/Desktop$ sudo tar -zxvf eclipse-java-2019-12-R-linux-gtk-x86_64 (1).tar.gz -C /usr/local

lauf@master:~/Desktop$ cd /usr/local
lauf@master:/usr/local$ ls
bin      etc    hadoop2.10.0  include  lib  mongo          sbin   src
eclipse  games  hbase1.4.13   jdk8     man  redis_cluster  share

#更改用户、组
lauf@master:/usr/local$ sudo chown -R lauf:lauf eclipse/

#配置JRE
lauf@master:/usr/local$ cd eclipse/
lauf@master:/usr/local/eclipse$ ls
artifacts.xml  dropins  eclipse.ini  icon.xpm  plugins
configuration  eclipse  features     p2        readme
#创建软链接,
lauf@master:/usr/local/eclipse$ sudo ln -s /usr/local/jdk8/jre ./
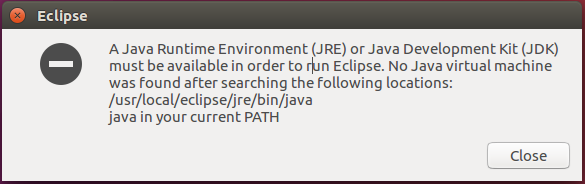
若没有配置JRE,启动eclipse时,报错:
- 创建桌面文件
lauf@master:~/Desktop$ sudo vim eclipse.desktop
#输入如下内容
[Desktop Entry]
Encoding=UTF-8
Name=Eclipse
Comment=Eclipse
Exec=/usr/local/eclipse/eclipse
Icon=/usr/local/eclipse/icon.xpm
Terminal=false
StartupNotify=true
Type=Application
Categories=Application;Development;

lauf@master:~/Desktop$ sudo chown -R lauf:lauf eclipse.desktop
lauf@master:~/Desktop$ sudo chmod u+x eclipse.desktop
- 双击执行eclipse,配置工作目录
双击执行

第一次启动,需配置工作目录:

安装成功!!
设置默认字体大小—window—preferences–general

设置自动补全—window—preferences—Java—Editor—Content Assist–

Pycharm
VScode
sudo dpkg -i xxxxxx.deb
启动: 系统搜索vs,点击启动

在左侧边栏,右键----lock to launcher----锁定到侧边栏
方便后续使用,默认启动的vscode无法修改具有超级权限的文件。
使vscode具有root权限,可以如下方式启动
sudo code --user-data-dir="~/.vscode-root"
-
设置编辑字体大小
file>preferences>settings>Text Editor>font
改变软件窗口的大小–>Ctrl + / Ctrl - -
配置python解释器
点击vscode底部的状态条,切换python解释器,如图:

-
查看vscode版本
$ code --version
-
安装python扩展,可以编辑python文件。

-
配置python 的自动补全

也可以使用:

不过不太好用 -
删除vscode
pending…


 被折叠的 条评论
为什么被折叠?
被折叠的 条评论
为什么被折叠?
 到【灌水乐园】发言


