


 本文详细介绍了如何在Kubernetes环境中使用OpenEBS部署cstor分布式存储,包括安装iscsi、应用yaml配置、下载镜像、创建CStorPoolCluster和StorageClass,以及常用命令的验证。
概述
OpenEBS 管理每个 Kubernetes 节点上可用的存储,并使用该存储为有状态工作负载提供 本地 或 分布式(也称为复制) 持久卷。
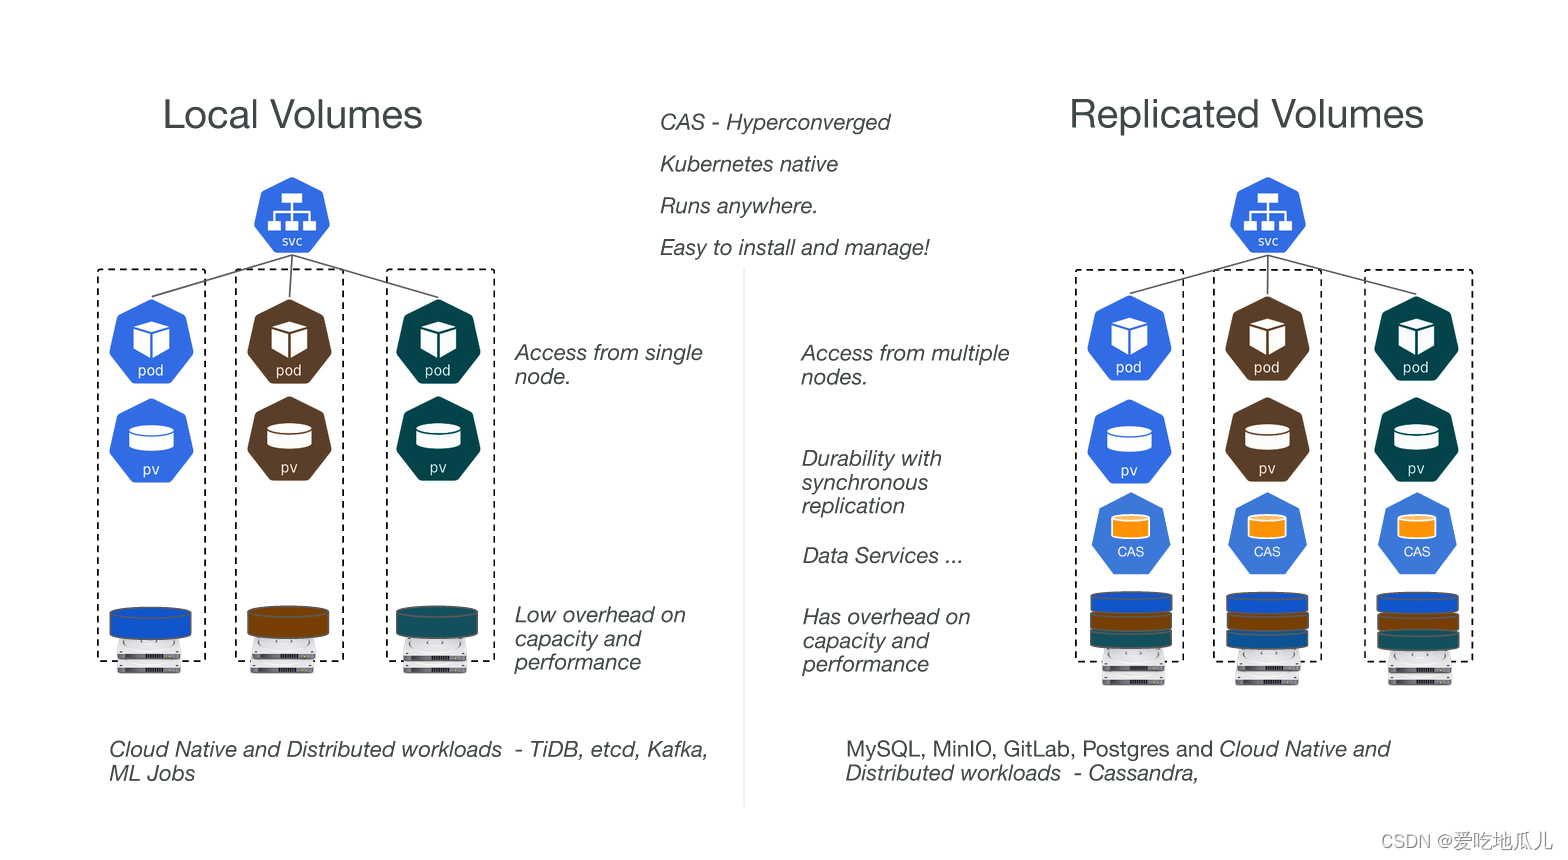 本次部署使用分布式(复制)cstor存储后端方式
–
前期准备
| 服务器 | 磁盘 |
|---|---|
| master01 | 13*1.2T |
| master02 | 13*1.2T |
| master03 | 13*1.2T |
| node01 | 13*1.2T |
Kubernetes_version:1.23.10
docker_verison:24.0.6
openebs_version:3.10.x
安装部署
1.安装iscsi
yum install iscsi-initiator-utils -y
cat /etc/iscsi/initiatorname.iscsi
sudo systemctl enable --now iscsid
systemctl status iscsid
2.下载yaml
kubectl apply -f https://openebs.github.io/charts/openebs-operator.yaml#安装openebs
kubectl apply -f https://openebs.github.io/charts/cstor-operator.yaml 安装存储后端为cstor
注意:考虑到yaml都是在国外,可以浏览器打开https://openebs.github.io/charts/openebs-operator.yaml自动下载yaml到本地,然后上传到服务器执行kubectl apply -f openebs-operator.yaml即可。
3.下载镜像及打tag
由于openebs镜像服务器在国外,部分镜像(k8s.gcr.io)需要提前下载或者更换源,我下面使用的源国内可以下载,其他的镜像国内能够拉下。
docker pull dyrnq/csi-node-driver-registrar:v2.8.0
docker tag dyrnq/csi-node-driver-registrar:v2.8.0 registry.k8s.io/sig-storage/csi-node-driver-registrar:v2.8.0
其他(k8s.gcr.io)按照 docker pull dyrnq/<镜像name> 拉取即可
4.部署cstor池
新建cspc.yaml
apiVersion: cstor.openebs.io/v1 kind: CStorPoolCluster metadata:
name: cstor-disk-pool namespace: openebs spec: pools:
nodeSelector:
kubernetes.io/hostname: “worker-node-1”#修改为hostname
dataRaidGroups:
- blockDevices:
- blockDeviceName: “blockdevice-10ad9f484c299597ed1e126d7b857967”#替换为磁盘实际ID
poolConfig:
dataRaidGroupType: “stripe”nodeSelector:
kubernetes.io/hostname: “worker-node-2”#修改为hostname
dataRaidGroups:
- blockDevices:
- blockDeviceName: “blockdevice-3ec130dc1aa932eb4c5af1db4d73ea1b”#替换为磁盘实际ID
poolConfig:
dataRaidGroupType: “stripe”nodeSelector:
kubernetes.io/hostname: “worker-node-3”#修改为hostname
dataRaidGroups:
- blockDevices:
- blockDeviceName: “blockdevice-01afcdbe3a9c9e3b281c7133b2af1b68”#替换为磁盘实际ID
poolConfig:
dataRaidGroupType: “stripe”
kubectl get node --show-labels(用于查看上面hostnmae的实际值)
例如:
修改 CSPC yaml 以使用工作节点。 使用标签中的值 kubernetes.io/hostname=< node_name
>。 在某些平台上,此标签值和节点名称可能不同。 在这种情况下,标签值和节点名称是:
kubernetes.io/hostname:“worker-node-1”, kubernetes.io/hostname:
"worker-node-2"和 kubernetes.io/hostname: “worker-node-3”.
kubectl get bd -n openebs(用于查看上面blockDeviceName)
根据主机对应的blockDevice 然后加入到cspc.yaml的blockDeviceName下
部署pool
kubectl apply -f cspc.yaml
5.部署存储类
创建 YAML 规范文件 cstor-csi-disk.yaml使用下面给出的模板。 更新池、副本计数和其他策略。 通过使用此示例配置 YAML,将使用 3 个 OpenEBS cStor 副本创建一个 StorageClass,并将在池实例上配置自身。
新建cstor-csi-disk.yaml
kind: StorageClass
apiVersion: storage.k8s.io/v1
metadata:
name: cstor-csi-disk
provisioner: cstor.csi.openebs.io
allowVolumeExpansion: true
parameters:
cas-type: cstor
cstorPoolCluster should have the name of the CSPC
cstorPoolCluster: cstor-disk-pool
replicaCount should be <= no. of CSPI created in the selected CSPC
replicaCount: “3”
kubectl apply -f cstor-csi-disk.yaml#执行yaml创建存储类
常用命令
kubectl get pod -n openebs#验证 cStor 和 NDM Pod 是否在集群中运行
kubectl get cspc -n openebs#验证创建的 CSPC 的状态
kubectl get sc #验证存储类
部署链接:https://openebs.io/docs/user-guides/cstor
排错链接:https://openebs.io/docs/user-guides/cstor/troubleshooting


 被折叠的 条评论
为什么被折叠?
被折叠的 条评论
为什么被折叠?
 到【灌水乐园】发言


