


SpringcloudGateway
特征
Spring Cloud Gateway 特点:
- 基于 Spring Framework 5、Project Reactor 和 Spring Boot 2.0 构建
- 能够匹配任何请求属性的路由。
- 谓词和过滤器特定于路由。
- 断路器集成。
- Spring Cloud Discovery客户端集成
- 易于编写谓词和过滤器
- 请求速率限制
- 路径重写
从以上的特征来说,和Zuul的特征差别不大。SpringCloud Gateway和Zuul主要的区别,还是在底层的通信框架上。
依赖
SpringCloud Gateway 使用的Webflux中的reactor-netty响应式编程组件,底层使用了Netty通讯框架。
使用时要引入spring-cloud-starter-gateway依赖,由于spring-cloud-starter-gateway依赖中包含着
spring-boot-starter-webflux依赖,如果项目中引入了spring-boot-starter-web,注意要把spring-cloud-starter-gateway中的spring-boot-starter-webflux依赖排除掉,因为 web和 webflux是有冲突的,不排除掉会出问题。
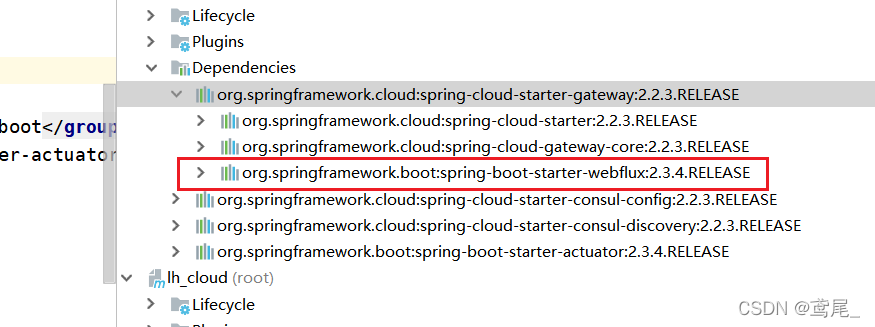
引入gateway,排除webflux依赖,若没引入web依赖,不用排除webflux
<dependency>
    <groupId>org.springframework.cloud</groupId>
    <artifactId>spring-cloud-starter-gateway</artifactId>
    <exclusions>
        <exclusion>
            <groupId>org.springframework.boot</groupId>
            <artifactId>spring-boot-starter-webflux</artifactId>
        </exclusion>
    </exclusions>
</dependency>
路由配置方式
在写路由配置的时候,一定要注意yml格式语法,否则就报错了
基础路由配置
如果请求的目标地址,是单个的URI资源路径,配置文件示例如下
server:
  port: 9999
spring:
  application:
    name: gateway
  cloud:
    gateway:
      routes:
        - id: url-proxy-1
          uri: https://blog.csdn.net
          predicates:
            - Path=/csdn
各字段含义如下:
id:我们自定义的路由 ID,保持唯一
uri:目标服务地址(跳转到此路径)
predicates:路由条件,Predicate 接受一个输入参数,返回一个布尔值结果。该接口包含多种默认方法来将 Predicate 组合成其他复杂的逻辑(比如:与,或,非)。
上文的配置,路由规则是:
当访问地址http://localhost:9999/csdn时,
会路由到上游地址https://blog.csdn.net,完整跳转路径就是 http://blog.csnd.net/csdn
基于代码实现路由配置
@Bean
public RouteLocator customRouteLocator(RouteLocatorBuilder builder) {
    return builder.routes()
            .route("my_route", r -> r.path("/csdn")
                    .uri("https://blog.csdn.net"))
            .build();
}
和上面配置文件达到同样的效果
和注册中心结合路由配置 404 问题
在uri的schema协议部分为自定义的lb:类型,表示从微服务注册中心(如Consul)订阅服务,并且进行服务的路由。
我定义了一个webflux的项目服务,并且webflux项目下有个/api/hello的接口,我想通过lb方式路由到 webflux项目上进行访问
示例如下:
server:
  port: 9999
spring:
  cloud:
    gateway:
      routes:
      - id: webflux-01
        uri: lb://webflux
        predicates:
        - Path=/api/**
我的配置中心是使用的consul,lb://webflux 中 webflux是我注册到服务中心的serviceId,其实也就是spring.application.name的值,lb://webflux它会去跳转到webflux的项目服务地址上
以上为:访问 http://localhost:9999/api/hello跳转到http://webflux服务/api/hello上
其中可能会遇到一个问题, 访问webflux时总是404
一定要注意按照上面的那种格式去写,想好你要跳转的http://服务/服务接口路径,不想麻烦就直接使用默认路由吧,感觉上面那种写法容易出错。
解决办法:
SpringCloudGateway + consul实现默认路由
创建一个gateway项目
pom.xml
<!-- 项目编译版本,防止出现 MALFORMEDINPUTEXCEPTION: INPUT LENGTH = 2 的问题 -->
<properties>
    <project.build.sourceEncoding>UTF-8</project.build.sourceEncoding>
    <project.reporting.outputEncoding>UTF-8</project.reporting.outputEncoding>
    <maven.compiler.encoding>UTF-8</maven.compiler.encoding>
</properties>

<dependencies>
    <!--网关-->
    <dependency>
        <groupId>org.springframework.cloud</groupId>
        <artifactId>spring-cloud-starter-gateway</artifactId>
    </dependency>

    <!--cloud consul-->
    <dependency>
        <groupId>org.springframework.cloud</groupId>
        <artifactId>spring-cloud-starter-consul-config</artifactId>
    </dependency>
    <!--cloud consul 注册发现-->
    <dependency>
        <groupId>org.springframework.cloud</groupId>
        <artifactId>spring-cloud-starter-consul-discovery</artifactId>
    </dependency>

    <!--actuator健康检查-->
    <dependency>
        <groupId>org.springframework.boot</groupId>
        <artifactId>spring-boot-starter-actuator</artifactId>
    </dependency>

</dependencies>

<build>
    <plugins>
	    <!-- 打包插件 -->
        <plugin>
            <groupId>org.springframework.boot</groupId>
            <artifactId>spring-boot-maven-plugin</artifactId>
        </plugin>

        <!-- mvn编译工具及版本 -->
        <plugin>
            <artifactId>maven-compiler-plugin</artifactId>
            <version>3.8.0</version>
            <configuration>
                <target>${maven.compiler.target}</target>
                <source>${maven.compiler.source}</source>
                <encoding>UTF-8</encoding>
                <skip>true</skip>
            </configuration>
        </plugin>

    </plugins>

    <!-- 设置后,可在bootstrap.xml中用@@获取pom.xml中的变量 -->
    <resources>
        <resource>
            <directory>src/main/resources</directory>
            <filtering>true</filtering>
        </resource>
    </resources>
</build>
启动类
@SpringBootApplication
@EnableDiscoveryClient
public class GatewayApplication {

    public static void main(String[] args) {
        SpringApplication.run(GatewayApplication.class, args);
    }
}
bootstrap.yml
server:
  port: 9999
spring:
  application:
    name: @artifactId@ # 引用的pom.xml的 artifactId的值
  profiles:
    active: dev
bootstrap-dev.yml
spring:
  cloud:
    consul:
      host: 192.168.1.29
      port: 8500
      config:
        prefix: lh-cloud
        enabled: true
        format: YAML
        data-key: data
        # watch选项为配置监视功能,主要监视配置的改变
        watch:
          enabled: true
          delay: 10000
          wait-time: 30
      # 服务发现配置
      discovery:
        # 启用服务发现
        enabled: true
        # 启用服务注册
        register: true
        # 服务停止时取消注册
        deregister: true
        # 表示注册时使用IP而不是hostname
        prefer-ip-address: true
        ip-address: 192.168.1.29
        # 执行监控检查的频率
        health-check-interval: 30s
        # 设置健康检查失败多长时间后,取消注册
        health-check-critical-timeout: 30s
        # 健康检查的路径
        health-check-path: /actuator/info
        # 服务注册标识,格式为:应用名称+服务器IP+端口
        instance-id: ${spring.application.name}:${spring.cloud.client.ip-address}:${server.port}
consul配置gateway路由
spring:
  cloud:        # spring cloud gateway 路由配置方式
    gateway:
      discovery:      #是否与服务发现组件进行结合,通过 serviceId(必须设置成大写) 转发到具体的服务实例。默认为false,设为true便开启通过服务中心的自动根据 serviceId 创建路由的功能。
        locator:      #路由访问方式:http://Gateway_HOST:Gateway_PORT/serviceId/**,serviceId默认是application.name
          enabled: true
使用了默认的路由规则,就不用再去设置路由规则了!!
创建一个服务项目
bootstrap.yml
server:
  port: 8001
spring:
  application:
    name: webflux
  profiles:
    active: dev
启动类
@SpringBootApplication
@EnableDiscoveryClient
public class WebfluxApplication {

    public static void main(String[] args) {
        SpringApplication.run(WebfluxApplication.class, args);
    }
}
controller
@RestController
@RequestMapping("/api")
public class HelloController {
    @RequestMapping("/hello")
    public String hello () {
        return "hello, Webflux";
    }
}
启动gateway 和 webflux项目
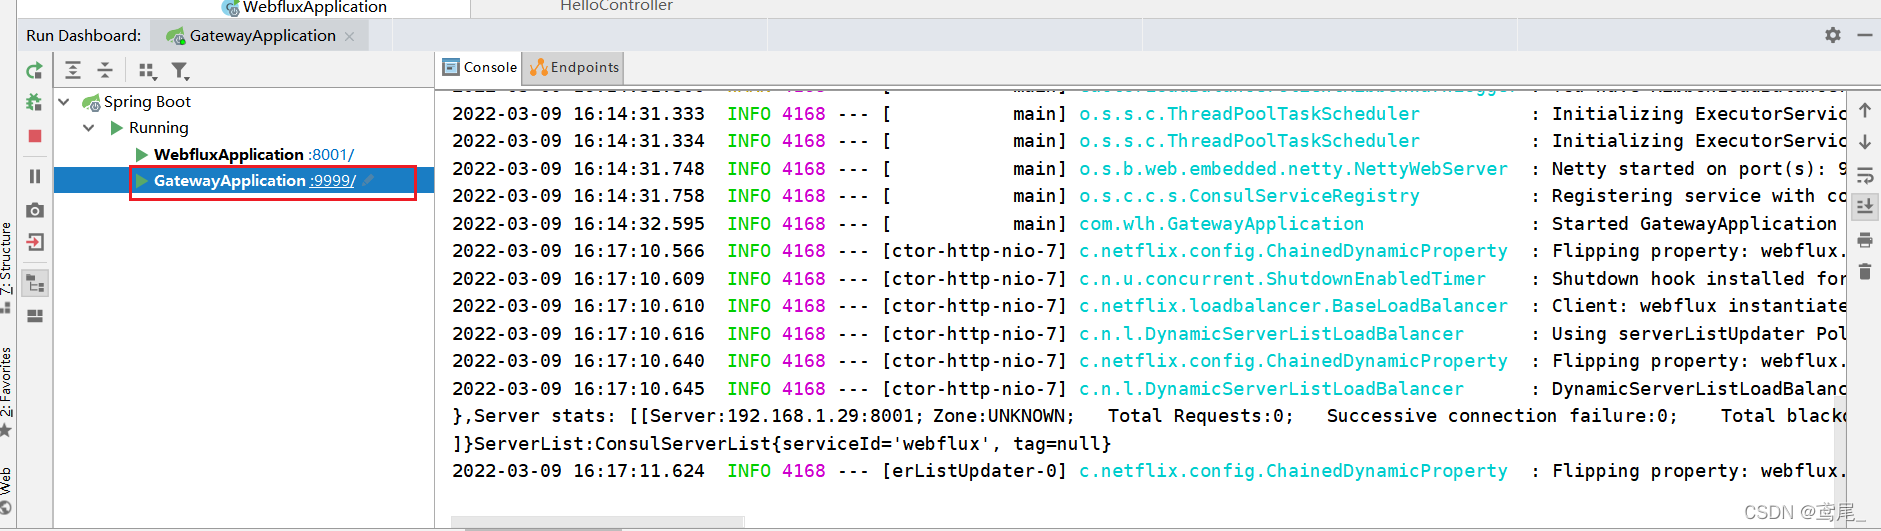
上图,gateway端口 9999
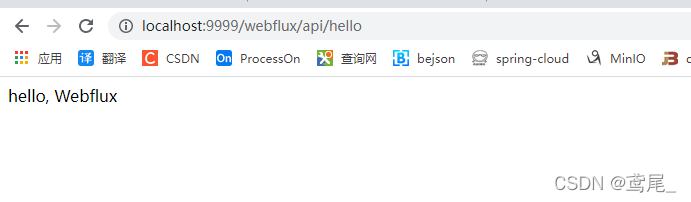
现在我们要通过 gateway访问到 webflux上的 接口
直接访问 http://localhost:9999/webflux/api/hello即可


 266
266


 被折叠的 条评论
为什么被折叠?
被折叠的 条评论
为什么被折叠?
 到【灌水乐园】发言


