web-view实现app应用与网页的数据交互

一、网页向app传递数据

1、在网页项目的index.html页面引入uniapp的js文件,引入成功之后就可以在事件里面使用uni.postMessage(网页项目是用vue框架写的)

<!-- uniapp 通信必须有的 -->
  <script type="text/javascript" src="https://unpkg.com/@dcloudio/uni-webview-js@0.0.2/index.js"></script>
  <script type="text/javascript" src="https://js.cdn.aliyun.dcloud.net.cn/dev/uni-app/uni.webview.1.5.2.js"></script>
  <script>
     document.addEventListener('UniAppJSBridgeReady', function() {  
      uni.getEnv(function(res) {  
          console.log('当前环境:' + JSON.stringify(res));  
      });  
    });
</script>

2、向app传递数据,可以直接写在点击事件里面

uni.postMessage({
   data: {
       action: 'scanCode'
   }
})

 二、app处理接收的数据并向网页传递数据

1、app项目中引入网页

 <web-view @message="handleMessage" ref="webview" :src="url"></web-view>

2、handleMessage接收网页传过来的数据

 handleMessage(event) {
     console.log("webView传递过来的消息:" + JSON.stringify(evt.detail.data))
     // #ifdef APP-PLUS
     const currentWebview = this.$parent.$scope.$getAppWebview().children()[0]
     let data = event.detail.data.length>0?event.detail.data[0]:''
     if (data&&data.action == "scanCode") {
          console.log('数据接收成功')
          // 进行处理
     }
     // #endif
 }

3、向网页中传递数据

开发的时候使用this.$scope一直Cannot read property ‘$getAppWebview‘ of undefined,后来查找了很多才找到,组件内要用this.$parent.$scope

--------------------------------------------------------------------------------------------------------------------------------

如果web-view是放在组件里面的用下面的方法去获取web-view窗口

//如果web-view就在当前页面里面,可以把$parent去掉
const currentWebview = this.$parent.$scope.$getAppWebview().children()[0]
currentWebview.evalJS(`scanCode(${JSON.stringify(_data)})`);

注意:如果页面没有初始化完成,可以加个定时等初始化完成在调用

var currentWebview = this.$scope.$getAppWebview() //此对象相当于html5plus里的plus.webview.currentWebview()。在uni-app里vue页面直接使用plus.webview.currentWebview()无效
setTimeout(function() {
   wv = currentWebview.children()[0]
}, 1000); 

三、快速起服务测试

如果你想快速上手的话,可以直接建一个html页面起本地服务

1、把index.html放到文件夹下

2、打开文件夹 shift+鼠标右键,打开命令行

3、下载http-server: npm install http-server -g

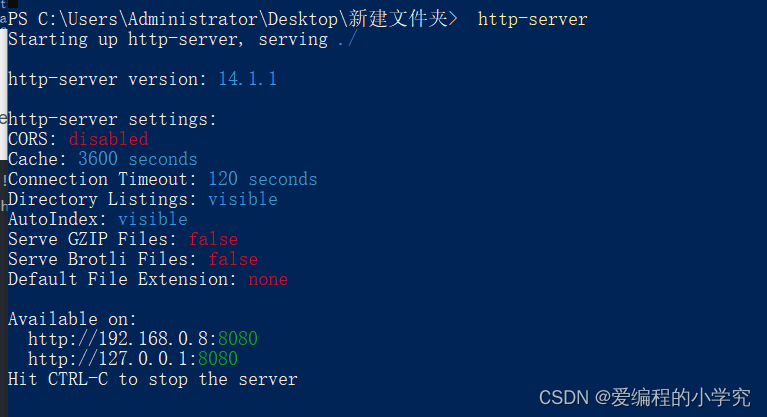
4、开启本地服务器,输入 http-server 就可以了

4、关闭本地服务器,按快捷键 CTRL-C,当显示 ^Chttp-server stopped 的时候,就是关闭成功了
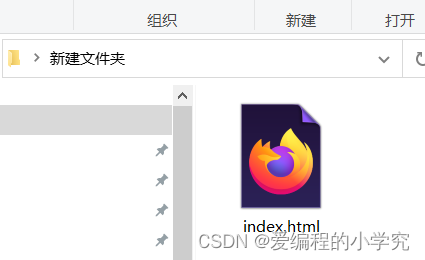
  

http://192.168.0.8:8080 作为url引入到web-view里面

<web-view @message="handleMessage" ref="webview" src="http://192.168.0.8:8080 "></web-view>

index.html 

<!DOCTYPE html>
<html>
  <head>
    <meta charset="utf-8" />
    <meta name="viewport" content="width=device-width,initial-scale=1,minimum-scale=1,maximum-scale=1,user-scalable=no" />
    <title>网络网页</title>
    <style type="text/css">
      .btn {
        display: block;
        margin: 20px auto;
        padding: 5px;
        background-color: #007aff;
        border: 0;
        color: #ffffff;
        height: 40px;
        width: 200px;
      }
      .btn-red {
        background-color: #dd524d;
      }
      .post-message-section {
        visibility: hidden;
      }
    </style>
  </head>
  <body>
    <div class="post-message-section">
      <div class="btn-list">
        <button class="btn btn-red" type="button" id="postMessage">postMessage</button>
      </div>
    </div>
    <!-- uni 的 SDK -->
    <!-- uni.webview.1.5.4.js-->
    <script type="text/javascript" src="https://unpkg.com/@dcloudio/uni-webview-js@0.0.3/index.js"></script>
    <script type="text/javascript">
      // 待触发 `UniAppJSBridgeReady` 事件后,即可调用 uni 的 API。
      document.addEventListener('UniAppJSBridgeReady', function() {
        uni.postMessage({
            data: {
                action: 'message'
            }
        });
        uni.getEnv(function(res) {
            console.log('当前环境:' + JSON.stringify(res));
        });
        document.getElementById('postMessage').addEventListener('click', function() {
          uni.postMessage({
            data: {
              action: 'message'
            }
          });
        });
      });
    </script>
  </body>
</html>

四、参考链接

web-view | uni-app官网

uniapp app内this.$scope.$getAppWebview() 报错Cannot read property ‘$getAppWebview‘ of undefined_gaoqiang1112的博客-CSDN博客

完整的代码整理中....

  • 2
    点赞
  • 6
    收藏
    觉得还不错? 一键收藏
  • 打赏
    打赏
  • 1
    评论
好的,以下是一个简单的前端web3应用程序,用于与上面编写的ERC20智能合约交互: ```html <!DOCTYPE html> <html lang="en"> <head> <meta charset="UTF-8"> <title>Web3 App</title> <script src="https://cdn.jsdelivr.net/npm/web3@1.3.5/dist/web3.min.js"></script> </head> <body> <h1>Web3 App</h1> <p>Account: <span id="account"></span></p> <p>Balance: <span id="balance"></span> ERC20 tokens</p> <input id="to" type="text" placeholder="Recipient address"> <input id="value" type="text" placeholder="Amount"> <button onclick="transfer()">Transfer</button> <script> window.addEventListener('load', async () => { if (typeof window.ethereum !== 'undefined') { await window.ethereum.enable(); const web3 = new Web3(window.ethereum); const contractAddress = 'CONTRACT_ADDRESS'; const contractAbi = [{ 'constant': true, 'inputs': [{'name': '', 'type': 'address'}], 'name': 'balanceOf', 'outputs': [{'name': '', 'type': 'uint256'}], 'payable': false, 'stateMutability': 'view', 'type': 'function' }, { 'constant': true, 'inputs': [], 'name': 'name', 'outputs': [{'name': '', 'type': 'string'}], 'payable': false, 'stateMutability': 'view', 'type': 'function' }, { 'constant': false, 'inputs': [{'name': '_to', 'type': 'address'}, {'name': '_value', 'type': 'uint256'}], 'name': 'transfer', 'outputs': [{'name': 'success', 'type': 'bool'}], 'payable': false, 'stateMutability': 'nonpayable', 'type': 'function' }, { 'constant': true, 'inputs': [], 'name': 'symbol', 'outputs': [{'name': '', 'type': 'string'}], 'payable': false, 'stateMutability': 'view', 'type': 'function' }, { 'constant': false, 'inputs': [{'name': '_spender', 'type': 'address'}, {'name': '_value', 'type': 'uint256'}], 'name': 'approve', 'outputs': [{'name': 'success', 'type': 'bool'}], 'payable': false, 'stateMutability': 'nonpayable', 'type': 'function' }, { 'constant': true, 'inputs': [{'name': '', 'type': 'address'}, {'name': '', 'type': 'address'}], 'name': 'allowance', 'outputs': [{'name': '', 'type': 'uint256'}], 'payable': false, 'stateMutability': 'view', 'type': 'function' }, { 'constant': false, 'inputs': [{'name': '_from', 'type': 'address'}, {'name': '_to', 'type': 'address'}, { 'name': '_value', 'type': 'uint256' }], 'name': 'transferFrom', 'outputs': [{'name': 'success', 'type': 'bool'}], 'payable': false, 'stateMutability': 'nonpayable', 'type': 'function' }, { 'inputs': [{'name': '_name', 'type': 'string'}, {'name': '_symbol', 'type': 'string'}, { 'name': '_totalSupply', 'type': 'uint256' }], 'payable': false, 'stateMutability': 'nonpayable', 'type': 'constructor' }, { 'anonymous': false, 'inputs': [{'indexed': true, 'name': '_from', 'type': 'address'}, { 'indexed': true, 'name': '_to', 'type': 'address' }, {'indexed': false, 'name': '_value', 'type': 'uint256'}], 'name': 'Transfer', 'type': 'event' }, { 'anonymous': false, 'inputs': [{'indexed': true, 'name': '_owner', 'type': 'address'}, { 'indexed': true, 'name': '_spender', 'type': 'address' }, {'indexed': false, 'name': '_value', 'type': 'uint256'}], 'name': 'Approval', 'type': 'event' }]; const contract = new web3.eth.Contract(contractAbi, contractAddress); const accounts = await web3.eth.getAccounts(); const account = accounts[0]; document.getElementById('account').textContent = account; const balance = await contract.methods.balanceOf(account).call(); document.getElementById('balance').textContent = balance; transfer = async () => { const to = document.getElementById('to').value; const value = document.getElementById('value').value; await contract.methods.transfer(to, value).send({from: account}); location.reload(); }; } else { alert('Please install MetaMask to use this dApp!'); } }); </script> </body> </html> ``` 在这个应用程序中,我们使用了web3.js库来与以太坊网络交互,首先需要检查MetaMask是否已安装并启用。然后,我们使用智能合约地址和ABI创建了一个智能合约实例,以便可以与合约交互。我们还获取了当前用户的帐户和智能合约中该帐户的余额,并将其显示在页面上。最后,我们定义了一个转移函数,该函数在用户输入收件人地址和金额后,调用智能合约的“transfer”函数来发送代币,并重新加载页面以更新余额。 请注意,在这个示例中,你需要将“CONTRACT_ADDRESS”替换为你部署的ERC20智能合约的地址。
评论 1
添加红包

请填写红包祝福语或标题

红包个数最小为10个

红包金额最低5元

当前余额3.43前往充值 >
需支付:10.00
成就一亿技术人!
领取后你会自动成为博主和红包主的粉丝 规则
hope_wisdom
发出的红包

打赏作者

爱编程的小学究

愿你有所收获

¥1 ¥2 ¥4 ¥6 ¥10 ¥20
扫码支付:¥1
获取中
扫码支付

您的余额不足,请更换扫码支付或充值

打赏作者

实付
使用余额支付
点击重新获取
扫码支付
钱包余额 0

抵扣说明:

1.余额是钱包充值的虚拟货币,按照1:1的比例进行支付金额的抵扣。
2.余额无法直接购买下载,可以购买VIP、付费专栏及课程。

余额充值