


xxl-job使用笔记
文章目录
前言
本文记录xxljob从配置调度中心和整合微服务和测试一个demo的学习笔记。
一、调度中心使用
1.下载xxl-job调度中心项目,如果已有可以跳过
GitHub地址: https://github.com/xuxueli/xxl-job
Gitee地址: https://gitee.com/xuxueli0323/xxl-job
2.配置yml
#XXL-job配置
xxl:
  job:
    login:
      username: admin
      password: 123456
    accessToken:
    i18n: zh_CN
    #触发池
    triggerpool:
      fast:
        max: 200
      slow:
        max: 100
    logretentiondays: 30
3.导入xxl-job数据脚本配置数据源
#数据库配置
spring:
  datasource:
    url: jdbc:mysql://localhost:3306/xxl_job?Unicode=true&characterEncoding=UTF-8&serverTimezone=Asia/Shanghai
    username: ${MYSQL-USER:root}
    password: ${MYSQL-PWD:root}
    driver-class-name: com.mysql.jdbc.Driver
    type: com.zaxxer.hikari.HikariDataSource
4.启动服务打开调度中心管理平台
访问地址:http://localhost:9080/xxl-job-admin
默认登录账号 :admin/123456

二、整合微服务
1.引入依赖
    <dependency>
        <groupId>com.xuxueli</groupId>
        <artifactId>xxl-job-core</artifactId>
        <version>2.3.0</version>
    </dependency>
2.开启 xxljob
修改yml配置,开启 xxljob,使客户端连上xxljob服务端
3. 编写Xxl-Job分布式定时任务调度中心配置文件
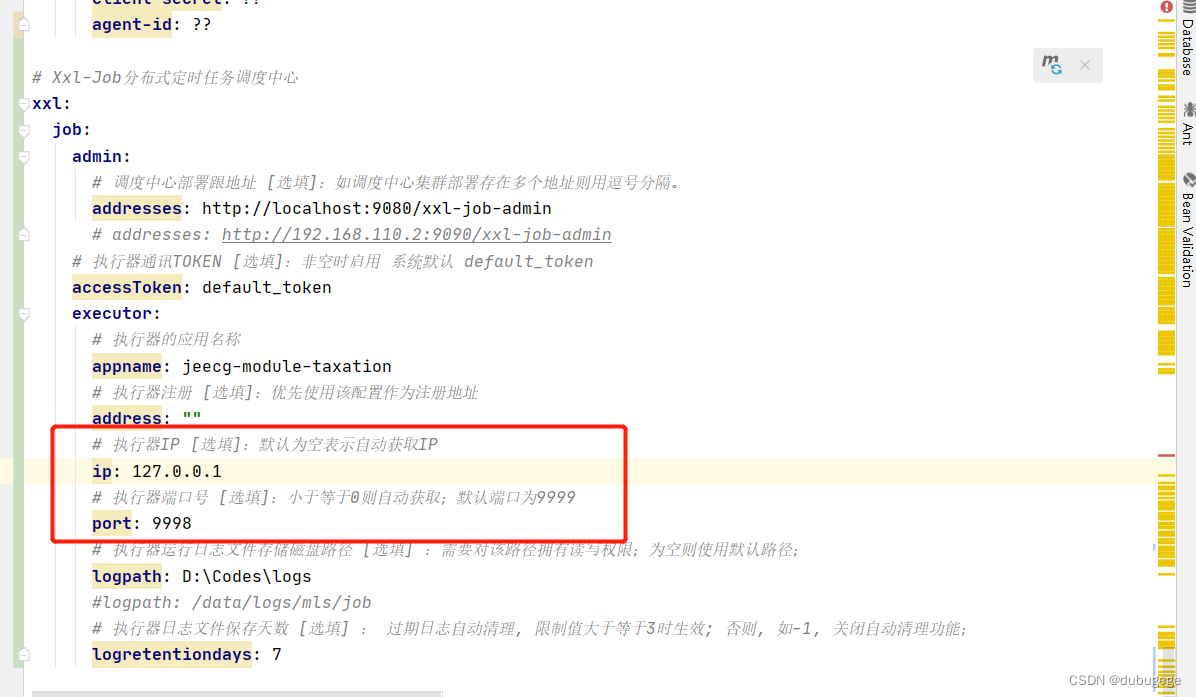
# Xxl-Job分布式定时任务调度中心
xxl:
  job:
    admin:
      # 调度中心部署跟地址 [选填]:如调度中心集群部署存在多个地址则用逗号分隔。
      addresses: http://localhost:9080/xxl-job-admin
      # addresses: http://192.168.110.2:9090/xxl-job-admin
    # 执行器通讯TOKEN [选填]:非空时启用 系统默认 default_token
    accessToken: default_token
    executor:
      # 执行器的应用名称
      appname: jeecg-module-taxation
      # 执行器注册 [选填]:优先使用该配置作为注册地址
      address: ""
      # 执行器IP [选填]:默认为空表示自动获取IP
      ip: ""
      # 执行器端口号 [选填]:小于等于0则自动获取;默认端口为9999
      port: 9998
      # 执行器运行日志文件存储磁盘路径 [选填] :需要对该路径拥有读写权限;为空则使用默认路径;
      logpath: D:\Codes\logs
      #logpath: /data/logs/mls/job
      # 执行器日志文件保存天数 [选填] : 过期日志自动清理, 限制值大于等于3时生效; 否则, 如-1, 关闭自动清理功能;
      logretentiondays: 7
4.创建配置类
/**
 * @ClassName: XxlJobConfig
 * @Description: xxl-job依赖配置
 * @author:
 * @date: 2022年12月07日 08:37
 * @version: 1.0
 */
@Configuration  //是否开启xxl-job定时任务,注释掉 //@Configuration 则不开启定时任务
@Data
@Slf4j
public class XxlJobConfig {

    @Value("${xxl.job.admin.addresses}")
    private String adminAddresses;

    @Value("${xxl.job.accessToken}")
    private String accessToken;

    @Value("${xxl.job.executor.appname}")
    private String appname;

    @Value("${xxl.job.executor.address}")
    private String address;

    @Value("${xxl.job.executor.ip}")
    private String ip;

    @Value("${xxl.job.executor.port}")
    private int port;

    @Value("${xxl.job.executor.logpath}")
    private String logPath;

    @Value("${xxl.job.executor.logretentiondays}")
    private int logRetentionDays;


    @Bean
    public XxlJobSpringExecutor xxlJobExecutor() {
        XxlJobHelper.log(">>>>>>>>>>> xxl-job config init.>>>>>>>>>>>");
        System.out.println("=============== xxl-job config init.===============");

        XxlJobSpringExecutor xxlJobSpringExecutor = new XxlJobSpringExecutor();
        xxlJobSpringExecutor.setAdminAddresses(adminAddresses);
        xxlJobSpringExecutor.setAppname(appname);
        xxlJobSpringExecutor.setAddress(address);
        xxlJobSpringExecutor.setIp(ip);
        xxlJobSpringExecutor.setPort(port);
        xxlJobSpringExecutor.setAccessToken(accessToken);
        xxlJobSpringExecutor.setLogPath(logPath);
        xxlJobSpringExecutor.setLogRetentionDays(logRetentionDays);

        return xxlJobSpringExecutor;
    }
}
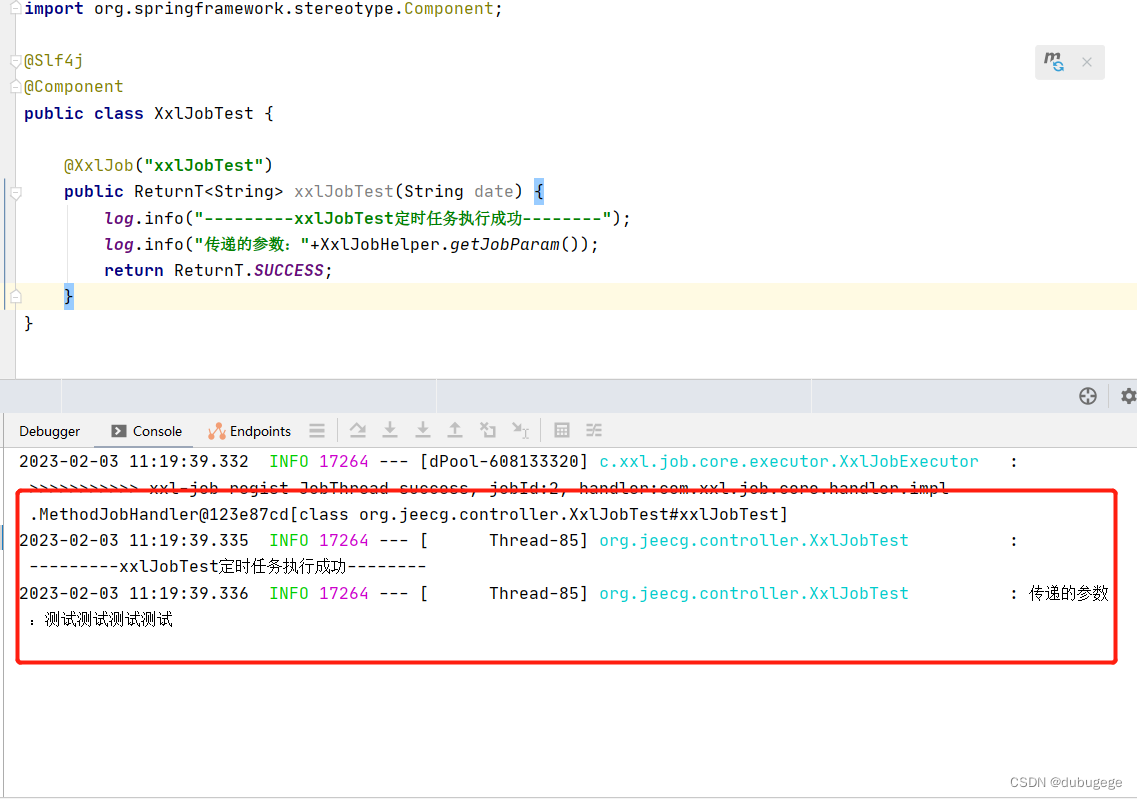
5.编写测试类
import com.xxl.job.core.biz.model.ReturnT;
import com.xxl.job.core.context.XxlJobHelper;
import com.xxl.job.core.handler.annotation.XxlJob;
import lombok.extern.slf4j.Slf4j;
import org.springframework.stereotype.Component;

@Slf4j
@Component
public class XxlJobTest {

    @XxlJob("xxlJobTest")
    public ReturnT<String> xxlJobTest(String date) {
        log.info("---------xxlJobTest定时任务执行成功--------");
        log.info("传递的参数:"+XxlJobHelper.getJobParam());
        return ReturnT.SUCCESS;
    }
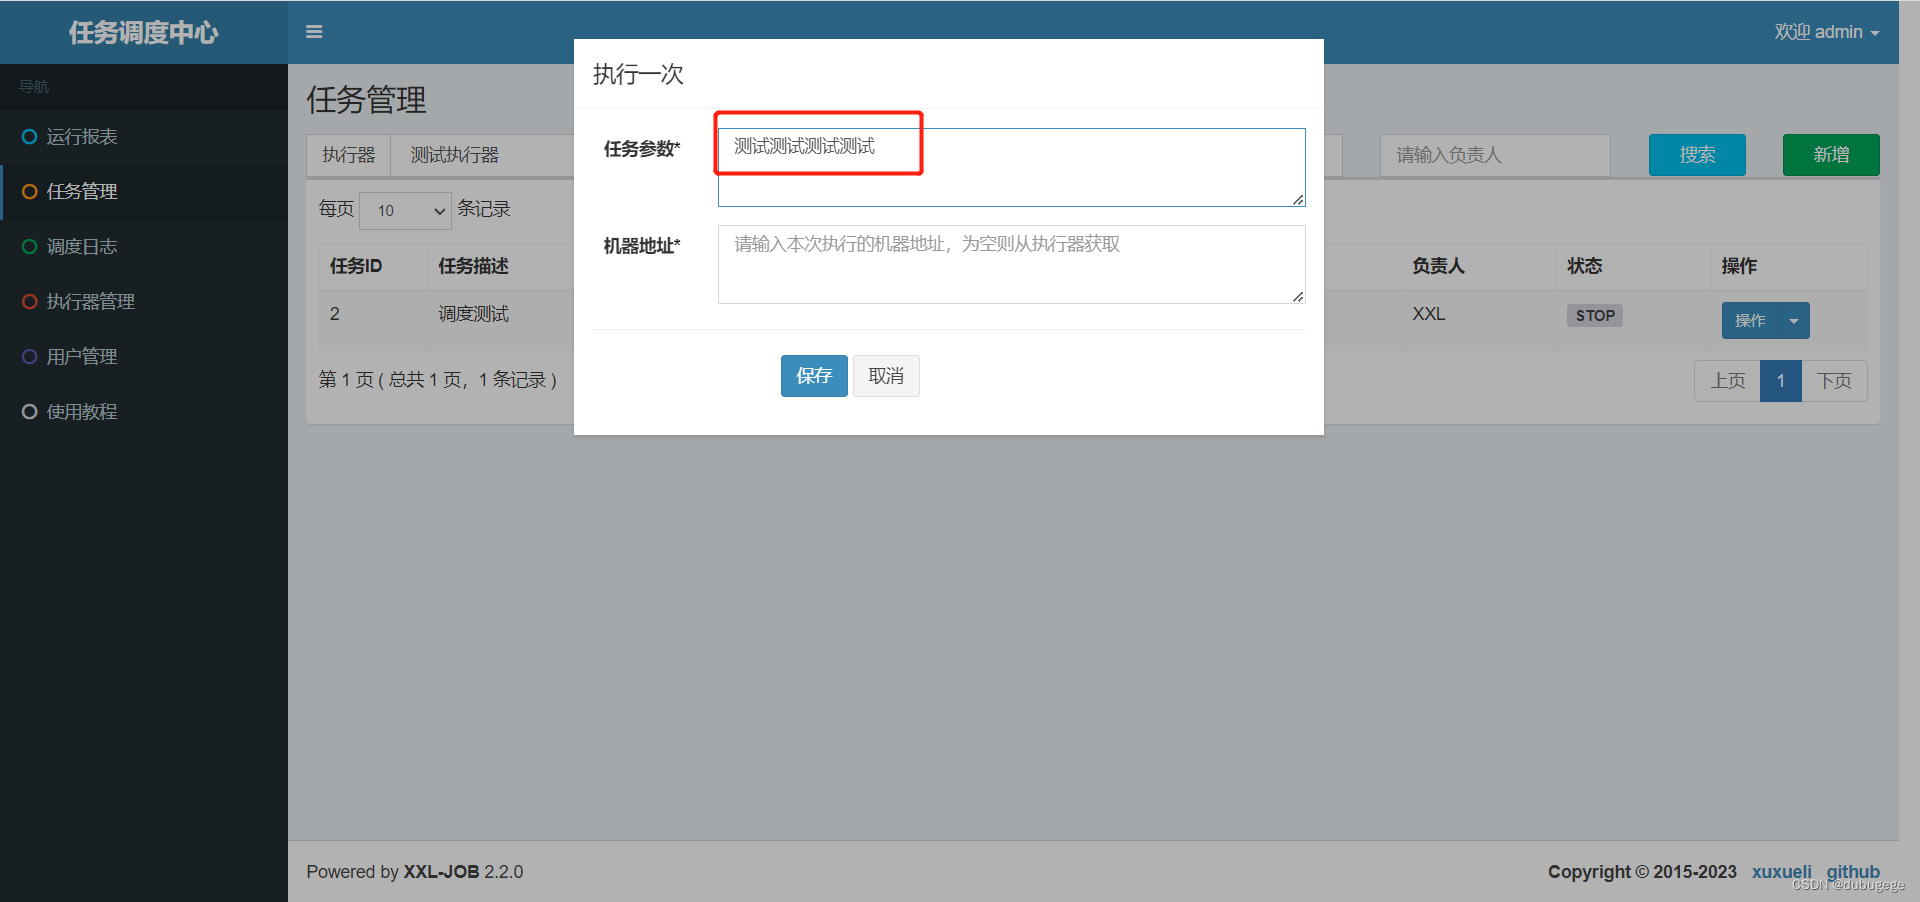
三、测试
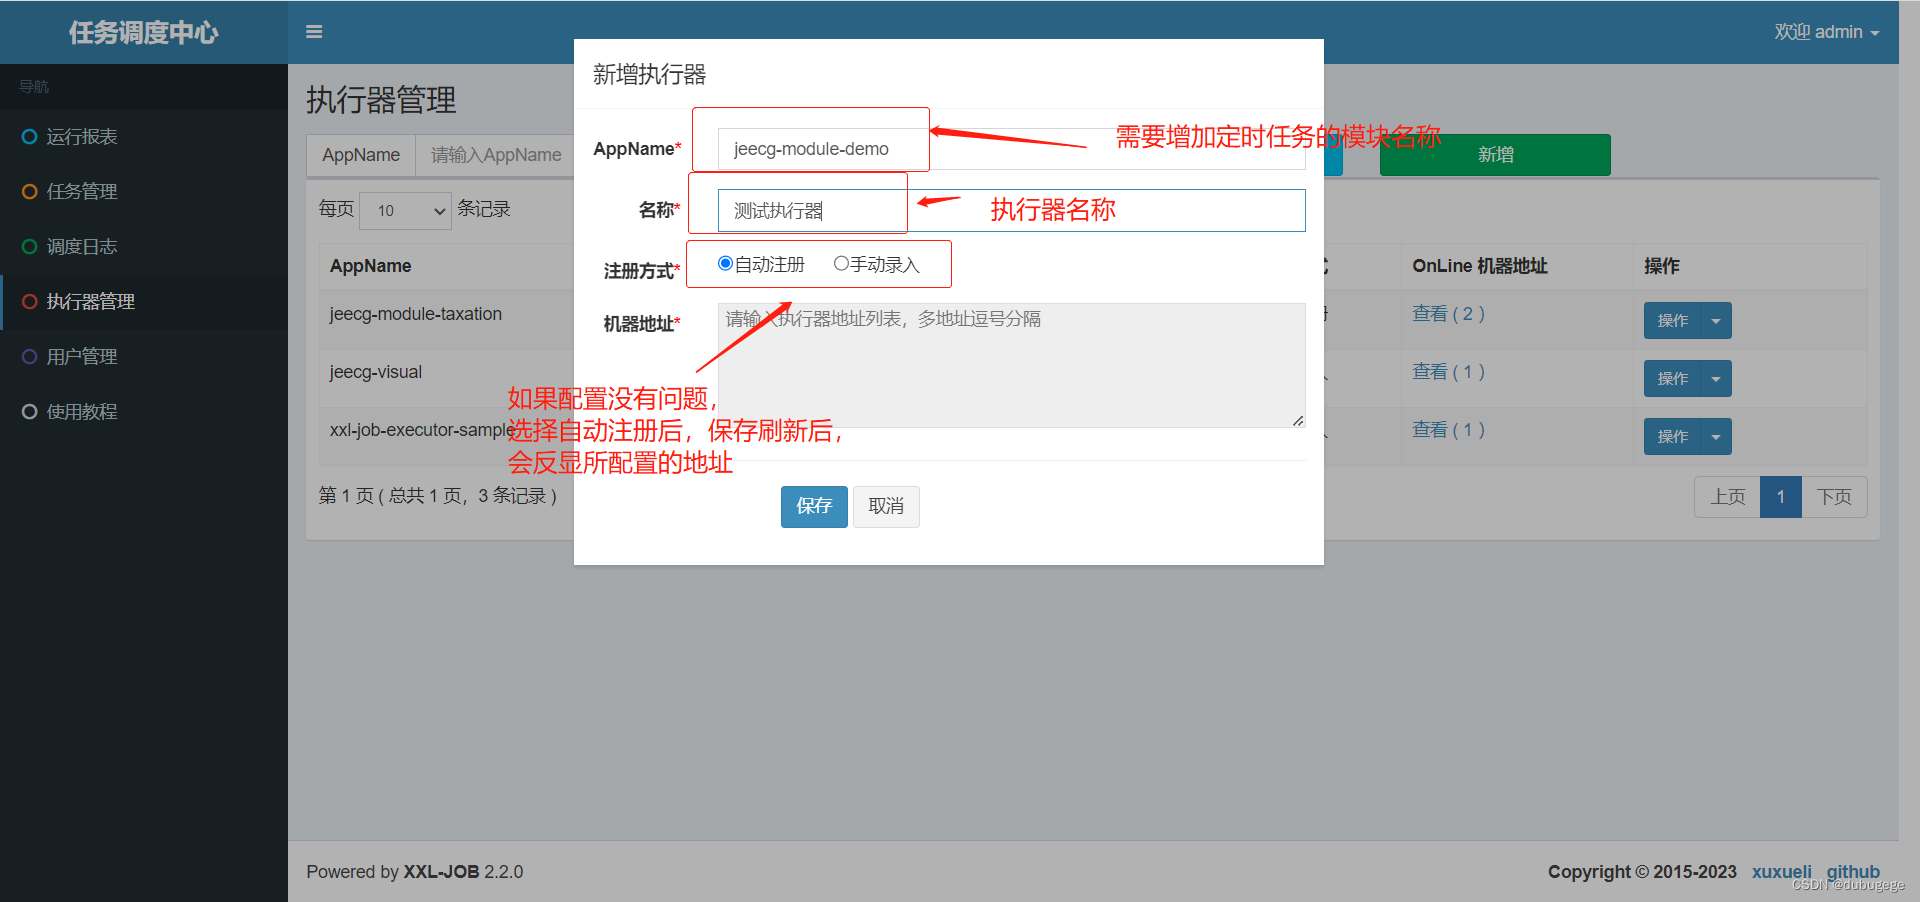
1.新增执行器
2.创建定时任务

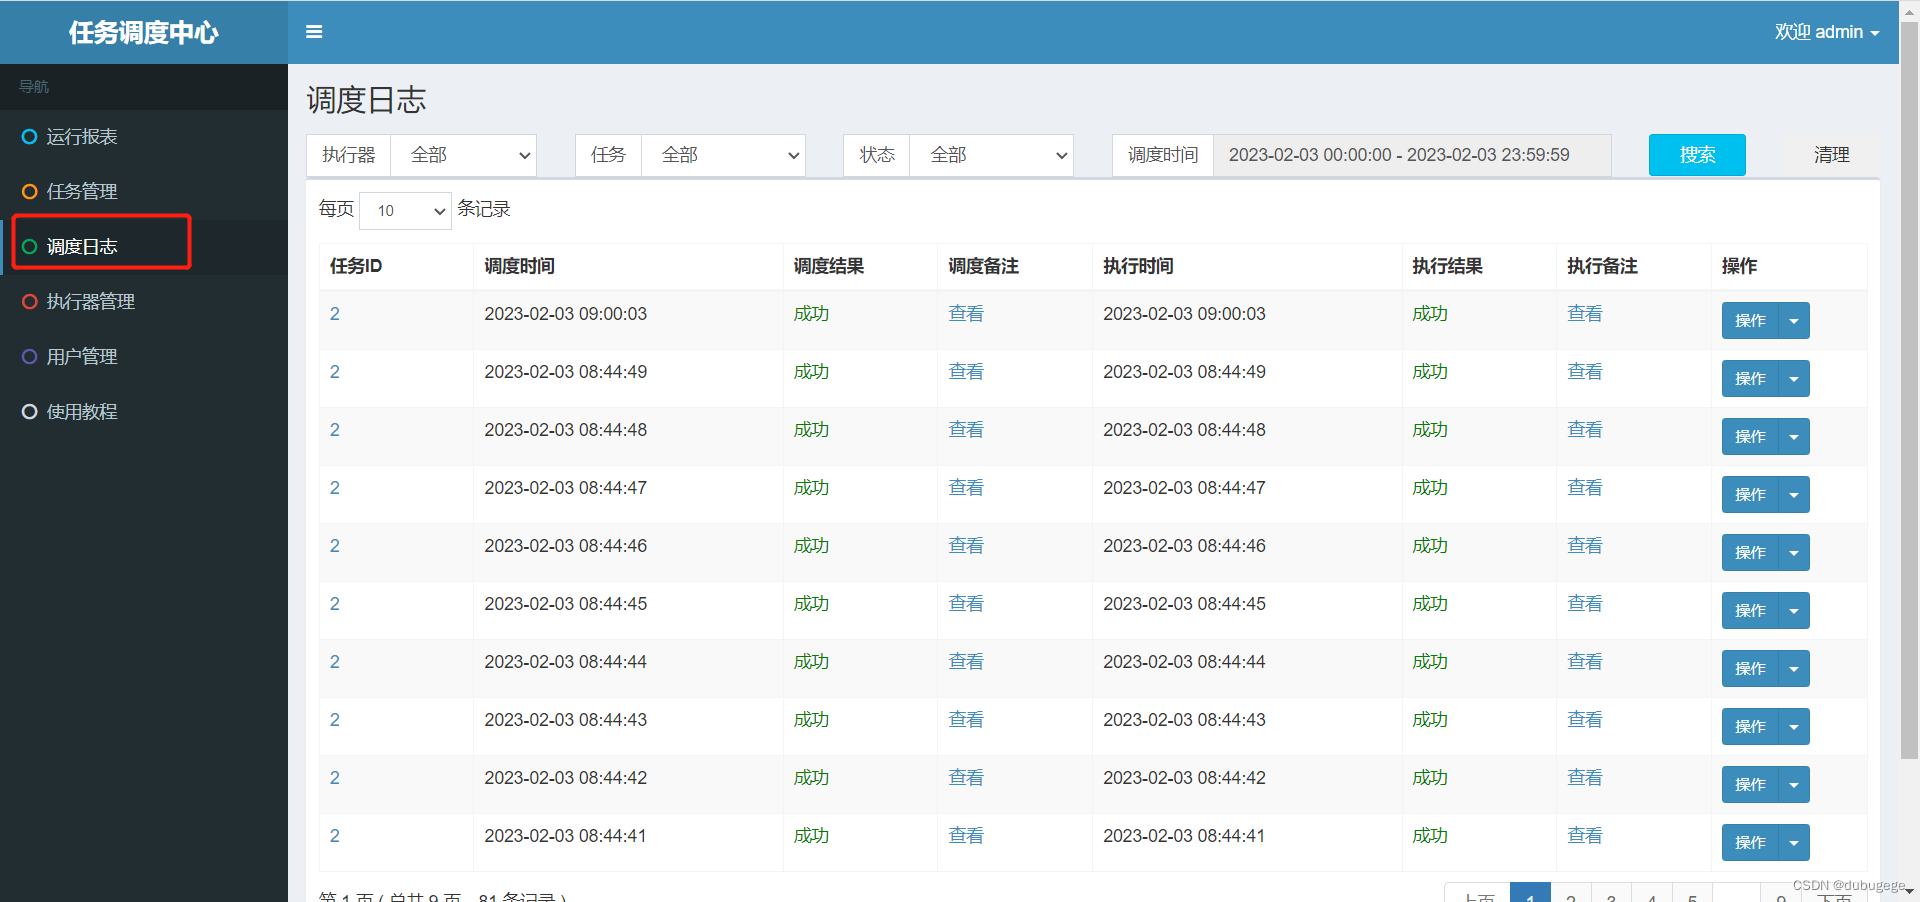
3.测试定时任务
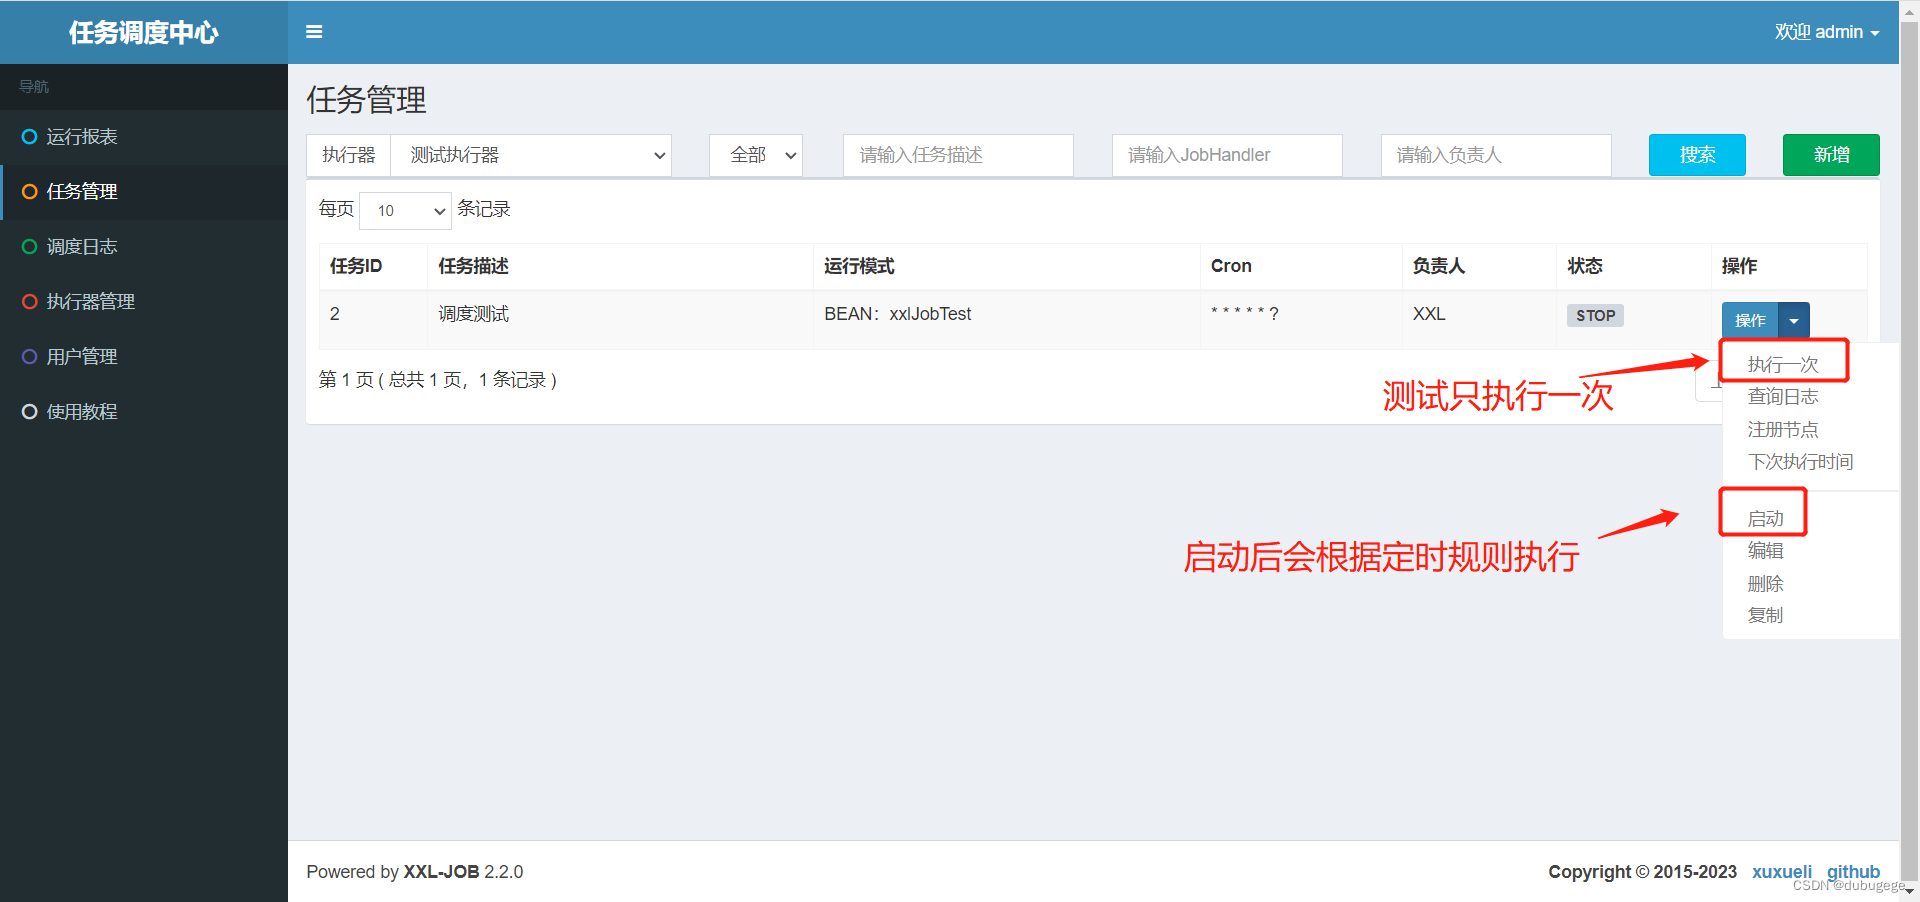
4.查看执行结果


 428
428


 被折叠的 条评论
为什么被折叠?
被折叠的 条评论
为什么被折叠?
 到【灌水乐园】发言


