


参考链接
1. window下根据openssl生成数字证书使用https
https://www.jianshu.com/p/241719c53922
2. window下根据openssl生成数字证书使用https
https://www.jianshu.com/p/ecb5876beacf
3. window下根据openssl生成数字证书使用https
https://blog.csdn.net/xiaozeiqwe/article/details/122810564
windows下根据openssl生成数字证书使用https
HTTPS网站所用的证书可向可信CA机构申请,不过这一类基本上都是商业机构,申请证书需要缴费,一般是按年缴费,费用因为CA机构的不同而不同。如果只是APP与后台服务器进行HTTPS通信,可以使用openssl工具生成自签发的数字证书,可以节约费用,不过得妥善保护好证书私钥,不能泄露或者丢失。HTTPS通信所用的数字证书格式为X.509。
1.1 Openssl的安装
1.1.1 下载安装
https://slproweb.com/products/Win32OpenSSL.html
下载后根据提示安装,并配置环境变量。

1.2 证书生成
打开cmd,输入openssl查看是否安装完成。

1.2.1 创建文件夹,作为证书的目录,例如:D:\certificate

1.2.2 补齐目录文件
参考网上大部分教程来做会报找不到文件的错,这时候我们需要补齐以下文件:
-
先创建CA文件夹和openssl.conf配置文件

- CA文件夹下包含:
- index.txt OpenSSL在创建自签证书时会向该文件里写下索引
- database.txt OpenSSL会模拟数据库将一些敏感信息写在该文件里
- serial 创建该文件后,请编辑在第一行写下 01 (注意,没有后缀)
- newcerts 文件夹

- openssl.conf配置文件
- CA文件夹下包含:
########################
# OpenSSL 配置文件示范 #
########################
# [注意]这个示范文件并不是默认设置。

########
# 语法 #
########
#
# 变量 = 值
#
# 语法很简单,一看就懂,但是有几点需要说明:
# 1. 字符串值最好使用双引号界定,并且其中可以使用"\n","\r","\t"这些转义序列("\"怎么表示?)。
# 2. 可以使用 ${变量名} 的形式引用同一字段中的变量,使用 ${字段名::变量名} 的形式引用其它字段中的变量。
# 3. 可以使用 ${EVP::环境变量} 的形式引用操作系统中定义的环境变量,若变量不存在则会导致错误。
# 4. 可以在默认字段定义与操作系统环境变量同名的变量作为默认值来避免环境变量不存在导致的错误。
# 5. 如果在同一字段内有多个相同名称的变量,那么后面的值将覆盖前面的值。
#

############
# 默认字段 #
############
# 此部分是默认字段[配置段],必须放在所有字段之前。
# 读取配置文件数据时,会首先根据字段名称去寻找相应的配置段,如果没有找到则会使用这里的默认字段。

# 定义 HOME 的默认值,防止操作系统中不存在 HOME 环境变量。
HOME = .

# 默认的随机数种子文件,建议设置为 /dev/random 或 /dev/urandom
RANDFILE = $ENV::HOME/.rnd

# 扩展对象定义
# 比如,OpenSSL中并未定义X.509证书的扩展项,在使用到的时候就会从下面对扩展对象的定义中获取。
# 定义的方法有两种,第一种(反对使用)是存储在外部文件中,也就是这里"oid_file"变量定义的文件。
#oid_file = $ENV::HOME/.oid
# 第二种是存储在配置文件的一个字段中,也就是这里"oid_section"变量值所指定的字段。
oid_section = new_oids

[ new_oids ]
# 可以在这里添加扩展对象的定义,例如可以被'ca'和'req'使用。
# 格式如下:
# 对象简称 = 对象数字ID

############################################################################################################
####################
##  证书请求配置  ##
####################
# 在申请证书之前通常需要首先生成符合 PKCS#10 标准的证书请求封装格式。
# openssl 的 req 指令实现了产生证书请求的功能,其相关选项的默认值就来自于这里的设置。
# 证书请求的配置分成几个字段,包括一个基本字段和几个附属字段。

##### 证书请求配置的"基本字段",其它附属字段都以它为入口 #####
[ req ]

# 生成的证书中RSA密钥对的默认长度,取值是2的整数次方。建议使用4096以上。
default_bits = 1024

# 保存生成的私钥文件的默认文件名
default_keyfile = privkey.pem

# 生成的私钥文件是否采用口令加密保护,可以设为yes或no。
encrypt_key = yes

# 读取输入私钥文件时的口令,如果未设置那么将会提示输入。
# input_password = secret
# 保存输出私钥文件时的口令,如果未设置那么将会提示输入。
# output_password = secret

# 签名默认使用的信息摘要算法,可以使用:md5,sha1,mdc2,md2
default_md = md5

# 为一些字段设置默认的字符串类型,比如证书请求中的城市和组织名称。可能的取值和解释如下:
# default: 包含了 PrintableString, T61String, BMPString 三种类型
# pkix  : 包含了 PrintableString, BMPString 两种类型
# utf8only: 只使用 UTF8 字符串。推荐使用这个,这样可以完美的包含任意字符。
# nombstr : 包含了 PrintableString, T61String 两种类型(不使用 BMPStrings 或 UTF8String 两种多字节字符类型)
string_mask = utf8only

# 如果设为yes,那么不管是命令行还是配置文件中的字符串都将按照UTF-8编码看待。默认值no表示仅使用ASCII编码。
utf8 = yes

# 如果设为no,那么 req 指令将直接从配置文件中读取证书字段的信息,而不提示用户输入。
prompt = yes

# 定义输入用户信息选项的"特征名称"字段名,该扩展字段定义了多项用户信息。
distinguished_name = req_distinguished_name

# 定义证书请求属性的字段名,该扩展字段定义了证书请求的一些属性,但openssl的证书签发工具并不使用它们。
attributes = req_attributes

# 证书请求扩展的字段名,该扩展字段定义了要加入到证书请求中的一系列扩展项。
# req_extensions = v3_req

# 生成自签名证书时要使用的证书扩展项字段名,该扩展字段定义了要加入到证书中的一系列扩展项。
x509_extensions = v3_ca

##### "特征名称"字段包含了用户的标识信息 #####
[ req_distinguished_name ]
#countryName = CN  #只能使用2字母的国家代码
#stateOrProvinceName = 省份或直辖市名称
#organizationName = 组织名
#commonName = 网站的全限定域名
countryName= Country Name (2 letter code)
countryName_min= 2
countryName_max = 2
stateOrProvinceName= State or Province Name (full name)
localityName = Locality Name (eg, city)
organizationName = Organization Name (eg, company)
organizationalUnitName  = Organizational Unit Name (eg, section)
commonName = Common Name (eg. YOUR name)
commonName_max = 64
emailAddress = Email Address
emailAddress_max = 40

##### 证书请求属性字段定义了证书请求的一些属性(都不是必须的) #####
[ req_attributes ]

##### 要加入到证书请求中的一系列扩展项 #####
[ v3_req ]
basicConstraints = CA:FALSE
keyUsage = nonRepudiation, digitalSignature, keyEncipherment

#### 生成自签名证书时使用的证书扩展项 #####
### 因为这部分是非必须的,所以不翻译了,事实上你完全可以删除这部分内容
[ v3_ca ]
# PKIX recommendation.
subjectKeyIdentifier = hash
authorityKeyIdentifier = keyid:always,issuer:always

# This is what PKIX recommends but some broken software chokes on critical
# extensions.
#basicConstraints = critical,CA:true
# So we do this instead.
basicConstraints = CA:true

# Key usage: this is typical for a CA certificate. However since it will
# prevent it being used as an test self-signed certificate it is best
# left out by default.
# keyUsage = cRLSign, keyCertSign

# Some might want this also
# nsCertType = sslCA, emailCA

# Include email address in subject alt name: another PKIX recommendation
# subjectAltName = email:copy
# Copy issuer details
# issuerAltName = issuer:copy

# DER hex encoding of an extension: beware experts only!
# obj=DER:02:03
# Where 'obj' is a standard or added object
# You can even override a supported extension:
# basicConstraints = critical, DER:30:03:01:01:FF

############################################################################################################
####################
##  证书签发配置  ##
####################
# openssl 的 ca 指令实现了证书签发的功能,其相关选项的默认值就来自于这里的设置。

# 这个字段只是通过唯一的default_ca变量来指定默认的CA主配置字段的入口(-name 命令行选项的默认值)
[ ca ]
default_ca = CA_default

##### 默认的CA主配置字段 #####
[ CA_default ]

# 保存所有信息的文件夹,这个变量只是为了给后面的变量使用
dir = ./

# 存放CA本身根证书的文件名
certificate = $dir/cacert.pem

# 存放CA自身私钥的文件名
private_key = $dir/private/cakey.pem

# 签发证书时使用的序列号文本文件,里面必须包含下一个可用的16进制数字。
serial = $dir/serial

# 存放新签发证书的默认目录,证书名就是该证书的系列号,后缀是.pem
new_certs_dir = $dir/newcerts

# 已生成的证书的默认保存目录
certs = $dir/certs

# 保存已签发证书的文本数据库文件,初始时为空。
database = $dir/index.txt

# 存放当前CRL编号的文件,对于v1版本的CRL则必须注释掉该行
crlnumber = $dir/crlnumber

# 当前CRL文件
crl = $dir/crl.pem

# 生成的证书撤销列表(CRL)的默认保存目录
crl_dir = $dir/crl

# 同一个subject是否只能创建一个证书,设为no表示可以创建多个
unique_subject = yes

# 签发新证书以及CRL时默认的摘要算法,可以使用:md5,md2,mdc2,sha1
default_md = sha1

# 通常,证书签发的特种名称(DN)域的各个参数顺序与证书策略的参数顺序一致。
# 但是,如果这里设为yes则保持与证书请求中的参数顺序一致。
preserve = no

# 当用户需要确认签发证书时显示可读证书DN域的方式。可用值与 x509 指令的 -nameopt 选项相同。
name_opt = ca_default
# 当用户需要确认签发证书时显示证书域的方式。
# 可用值与 x509 指令的 -certopt 选项相同,不过 no_signame 和 no_sigdump 总被默认设置。
cert_opt  = ca_default

# 新证书默认的生效日期,如果未设置则使用签发时的时间,格式为:YYMMDDHHNNSSZ(年月日时分秒Z)
# default_startdate = 080303223344Z
# 新证书默认的失效日期,格式为:YYMMDDHHNNSSZ(年月日时分秒Z)
# default_enddate = 090303223344Z
# 新签发的证书默认有效期,以天为单位
default_days = 365

# 从当前CRL(证书撤销列表)到下次CRL发布的间隔天数
default_crl_days = 30

# 是否将证书请求中的扩展项信息加入到证书扩展项中去。取值范围以及解释:
# none: 忽略所有证书请求中的扩展项
# copy: 将证书扩展项中没有的项目复制到证书中
# copyall: 将所有证书请求中的扩展项都复制过去,并且覆盖证书扩展项中原来已经存在的值。
copy_extensions = none

# 定义用于证书请求DN域匹配策略的字段,用于决定CA要求和处理证书请求提供的DN域的各个参数值的规则。
policy  = policy_match

# 定义X.509证书扩展项的字段。如果没有提供这个字段则生成X.509v1而不是v3格式的证书。
x509_extensions = usr_cert

# 定义生成CRL时需要加入的扩展项字段。如果没有定义则生成v1而不是v2版本的CRL。
# crl_extensions = crl_ext

##### 证书请求信息的匹配策略 #####
# 变量名称是DN域对象的名称,变量值可以是:
# match: 该变量在证书请求中的值必须与CA证书相应的变量值完全相同,否则拒签。
# supplied: 该变量在证书请求中必须提供(值可以不同),否则拒签。
# optional: 该变量在证书请求中可以存在也可以不存在(相当于没有要求)。
# 除非preserve=yes或者在ca命令中使用了-preserveDN,否则在签发证书时将删除匹配策略中未提及的对象。
[ policy_match ]
countryName  = match
stateOrProvinceName = match
organizationName = match
commonName  = supplied
organizationalUnitName = optional
emailAddress  = optional

### 下面的部分由于都是非必须的部分,因此也不翻译了。
### 事实上你完全可以从配置文件中删除这些内容
[ usr_cert ]

# These extensions are added when 'ca' signs a request.

# This goes against PKIX guidelines but some CAs do it and some software
# requires this to avoid interpreting an end user certificate as a CA.

basicConstraints=CA:FALSE

# Here are some examples of the usage of nsCertType. If it is omitted
# the certificate can be used for anything *except* object signing.

# This is OK for an SSL server.
# nsCertType   = server

# For an object signing certificate this would be used.
# nsCertType = objsign

# For normal client use this is typical
# nsCertType = client, email

# and for everything including object signing:
# nsCertType = client, email, objsign

# This is typical in keyUsage for a client certificate.
# keyUsage = nonRepudiation, digitalSignature, keyEncipherment

# This will be displayed in Netscape's comment listbox.
nsComment   = "OpenSSL Generated Certificate"

# PKIX recommendations harmless if included in all certificates.
subjectKeyIdentifier=hash
authorityKeyIdentifier=keyid,issuer

# This stuff is for subjectAltName and issuerAltname.
# Import the email address.
# subjectAltName=email:copy
# An alternative to produce certificates that aren't
# deprecated according to PKIX.
# subjectAltName=email:move

# Copy subject details
# issuerAltName=issuer:copy

#nsCaRevocationUrl  = http://www.domain.dom/ca-crl.pem
#nsBaseUrl
#nsRevocationUrl
#nsRenewalUrl
#nsCaPolicyUrl
#nsSslServerName

[ crl_ext ]

# CRL extensions.
# Only issuerAltName and authorityKeyIdentifier make any sense in a CRL.

# issuerAltName=issuer:copy
authorityKeyIdentifier=keyid:always,issuer:always

[ proxy_cert_ext ]
# These extensions should be added when creating a proxy certificate

# This goes against PKIX guidelines but some CAs do it and some software
# requires this to avoid interpreting an end user certificate as a CA.

basicConstraints=CA:FALSE

# Here are some examples of the usage of nsCertType. If it is omitted
# the certificate can be used for anything *except* object signing.

# This is OK for an SSL server.
# nsCertType   = server

# For an object signing certificate this would be used.
# nsCertType = objsign

# For normal client use this is typical
# nsCertType = client, email

# and for everything including object signing:
# nsCertType = client, email, objsign

# This is typical in keyUsage for a client certificate.
# keyUsage = nonRepudiation, digitalSignature, keyEncipherment

# This will be displayed in Netscape's comment listbox.
nsComment   = "OpenSSL Generated Certificate"

# PKIX recommendations harmless if included in all certificates.
subjectKeyIdentifier=hash
authorityKeyIdentifier=keyid,issuer:always

# This stuff is for subjectAltName and issuerAltname.
# Import the email address.
# subjectAltName=email:copy
# An alternative to produce certificates that aren't
# deprecated according to PKIX.
# subjectAltName=email:move

# Copy subject details
# issuerAltName=issuer:copy

#nsCaRevocationUrl  = http://www.domain.dom/ca-crl.pem
#nsBaseUrl
#nsRevocationUrl
#nsRenewalUrl
#nsCaPolicyUrl
#nsSslServerName

# This really needs to be in place for it to be a proxy certificate.
proxyCertInfo=critical,language:id-ppl-anyLanguage,pathlen:3,policy:foo
- 注意: 这里提到的所有文件必须补齐,并且文件名不得更改 !
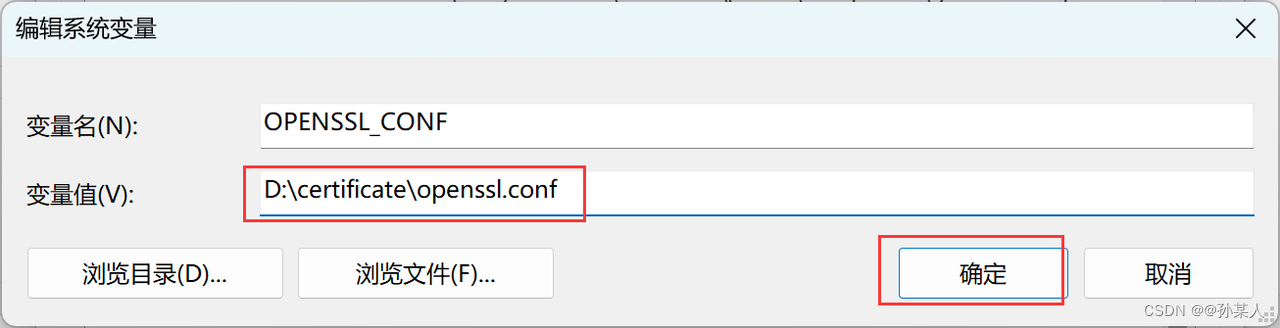
再注:在windows,没有openssl.conf默认文件夹的位置,所以需要自己配置环境变量。
1.3 生成自己的CA证书
首先,我们需要把自己先扮演成CA机构,根据非对称加密的概念,我们需要有一对密钥,对应一把公钥和一把私钥,私钥放在自己身边,公钥提供出去,这边需要注意的是不能把他看成是服务端,CA机构是在客户端和服务端两者之间的一个存在,这边理解了后,我们先来创建一把私钥,可以使用openssl来生成。
1.3.1 生成 rootca.key私钥文件
无密码:
openssl genrsa -out rootca.key 4096
有密码:
openssl genrsa -des3 -out rootca.key 4096
genrsa 表示采用RSA算法生成根证书私钥
des3 表示使用3DES给根证书私钥加密
out ****  表示生成路径
4096 表示根证书私钥的长度,建议使用4096,越长越安全

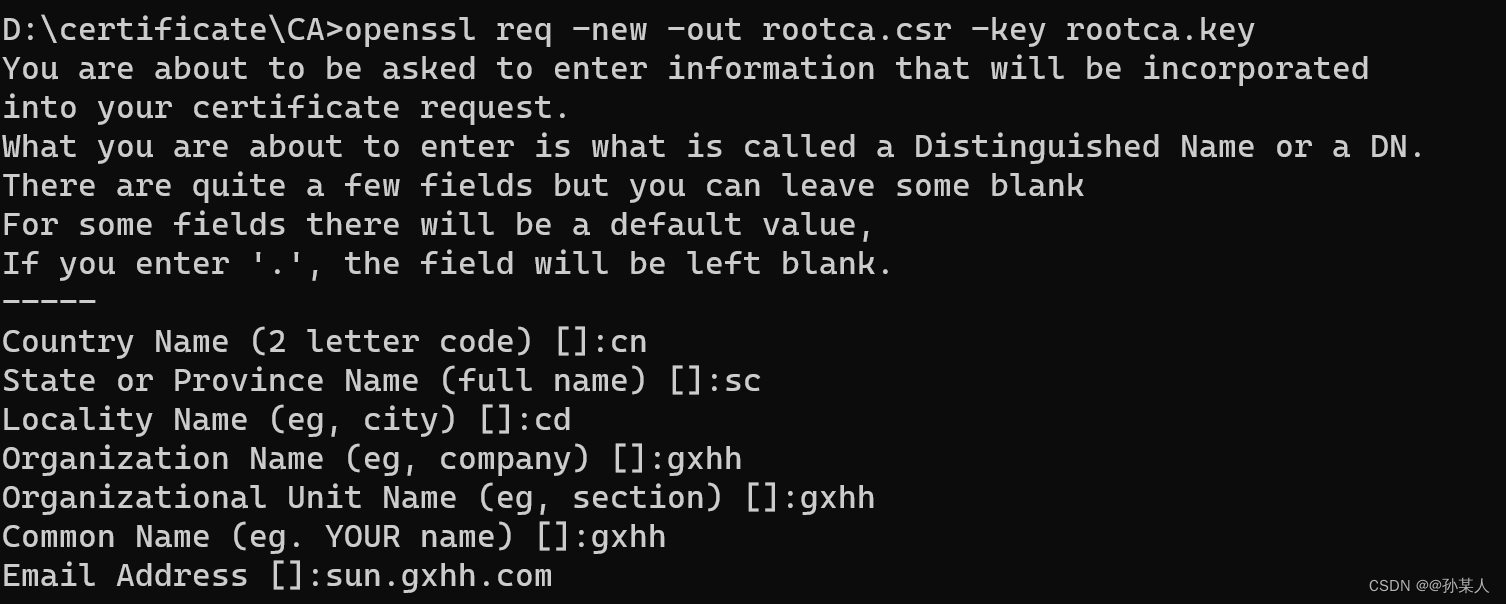
1.3.2 根据私钥文件生成req请求文件,req请求文件用来生成证书的时候使用
如果你的根证书需要别的签名机构来签名,你就拿这个签名请求文件给他,让他们帮你签名,签名完后,他们会返回你一个 .crt 的证书。
如果是自己使用,搭建着玩或者自己私人的网站,就使用openssl生成就好了。
openssl req -new -out rootca.csr -key rootca.key
需要输入一些信息:
1.3.3 生成X.509格式的CA根证书rootca.crt
openssl x509 -req -in rootca.csr -out rootca.crt -signkey rootca.key -days 36500

这个证书就是CA机构会预先在客户端中的受信任列表中埋下的根证书,其中包括了证书的所有者信息和公钥信息,有了这些信息,客户端就能通过这些信息来验证服务端返回的CA证书的合法性了。
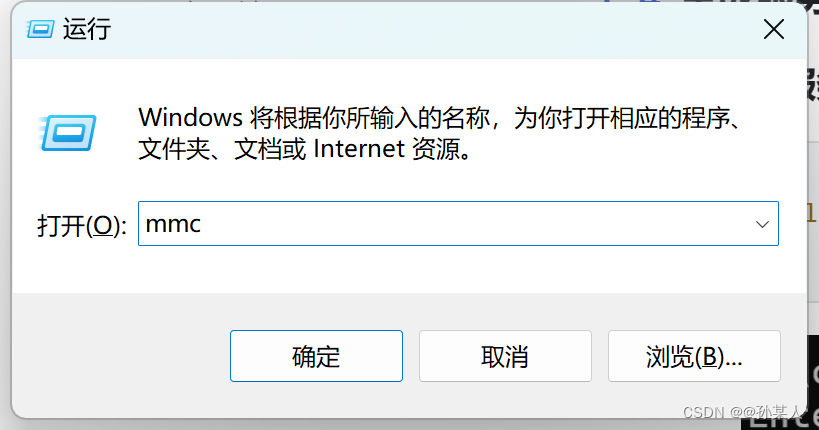
1.3.4 CA机构开张营业
-
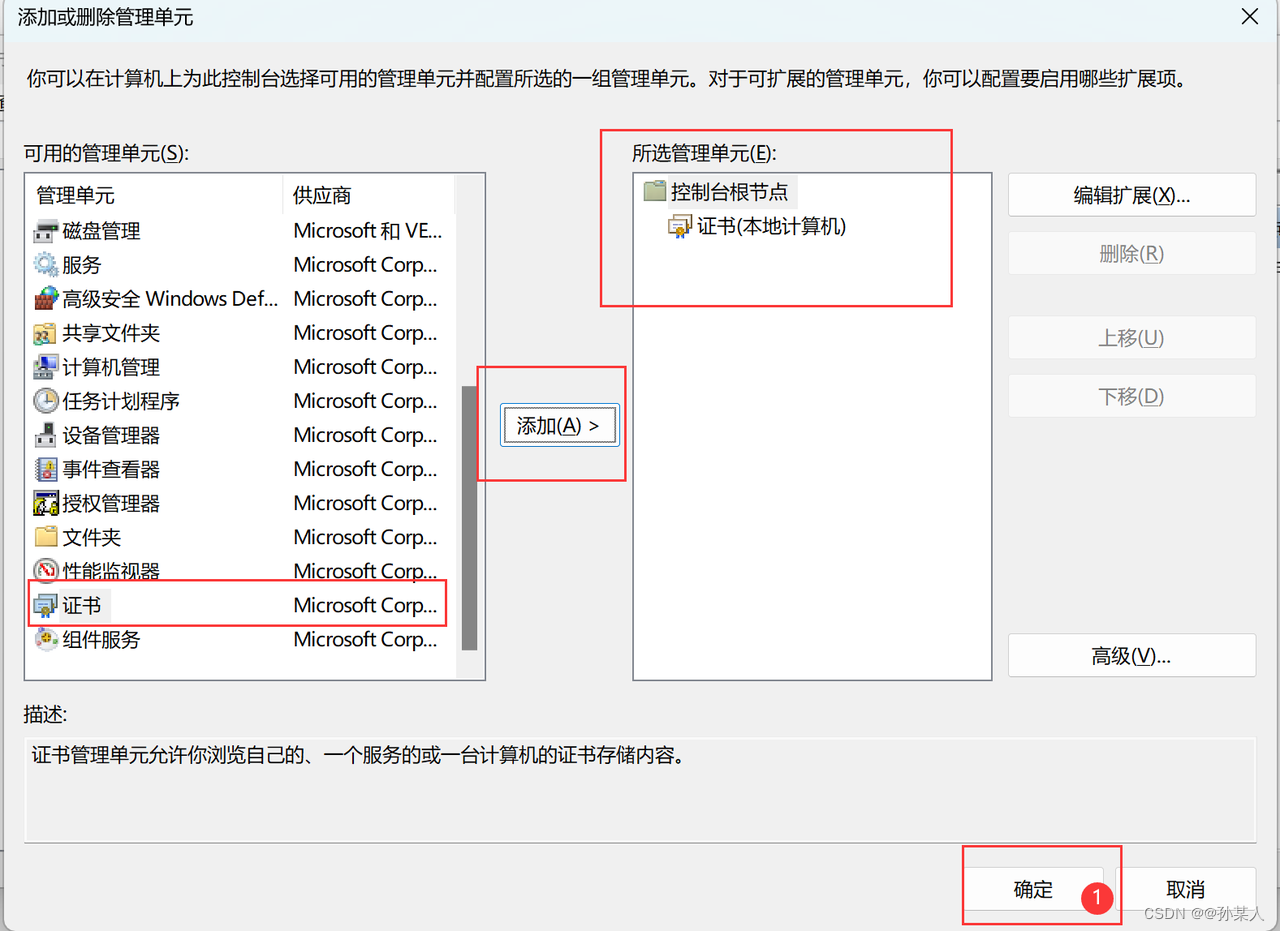
首先打开mmc。win+R→mmc
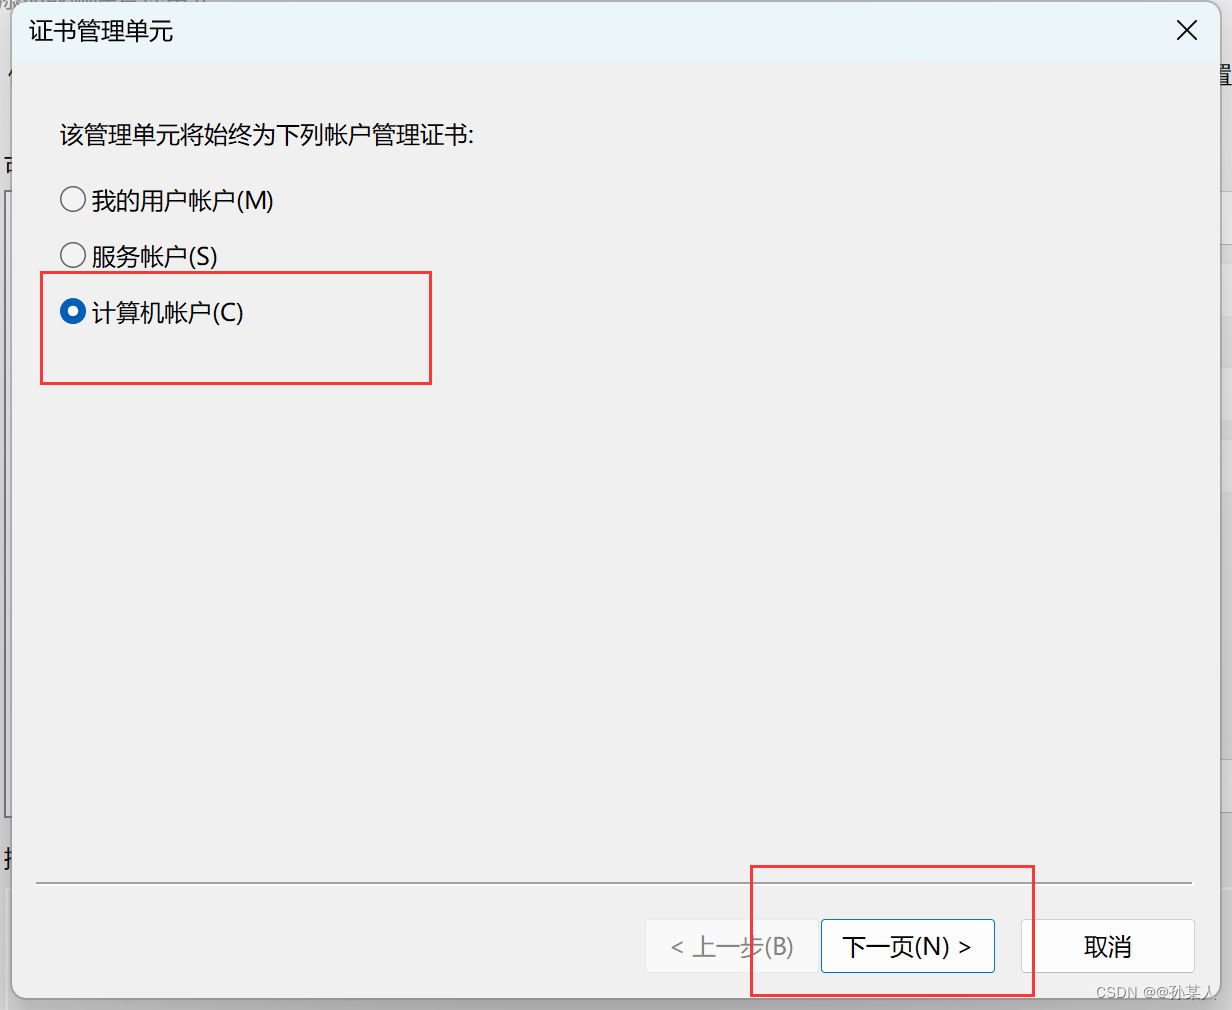
-
文件→添加/删除管理单元

-
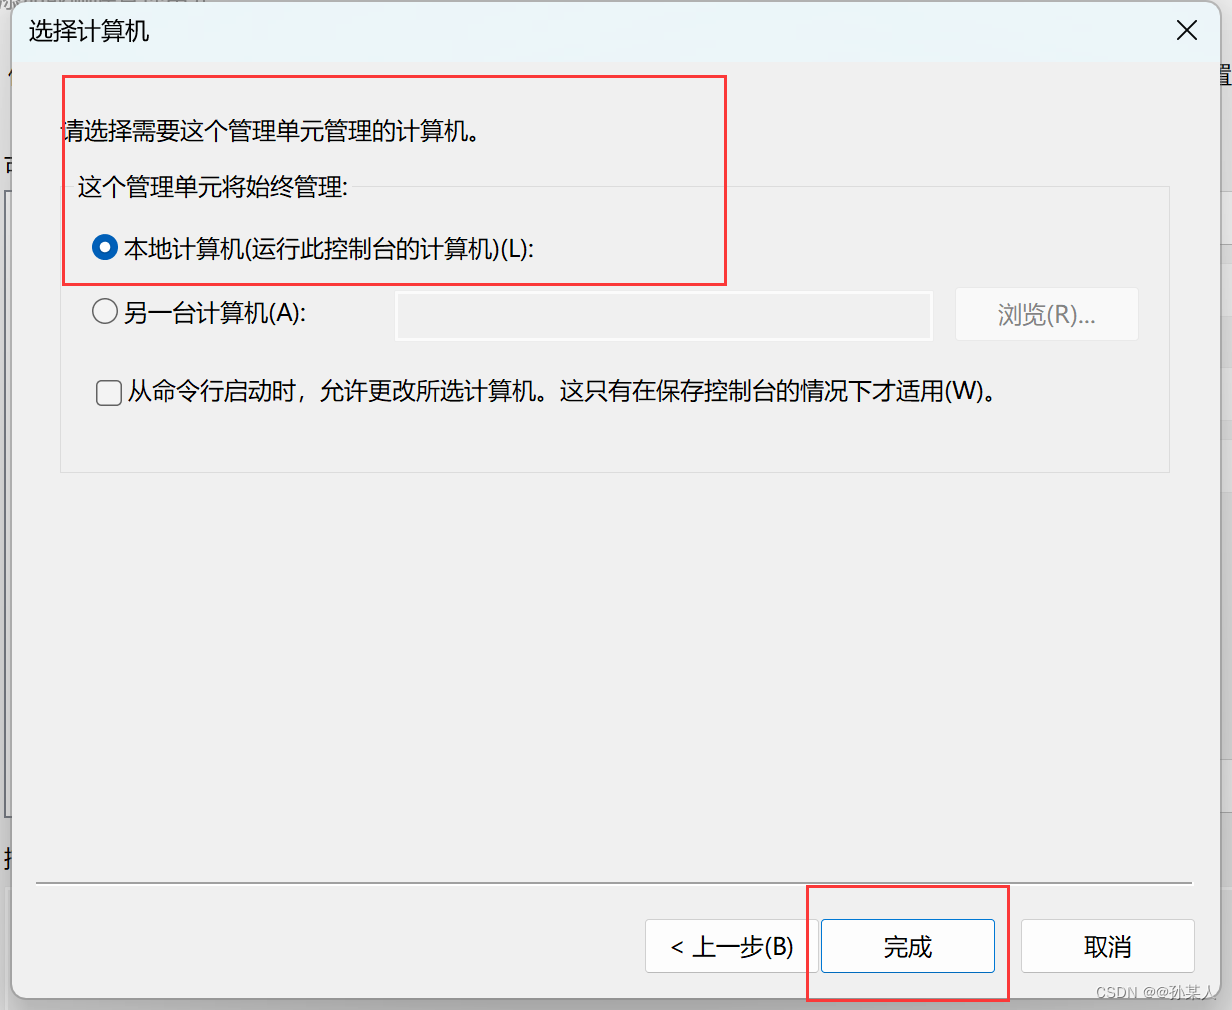
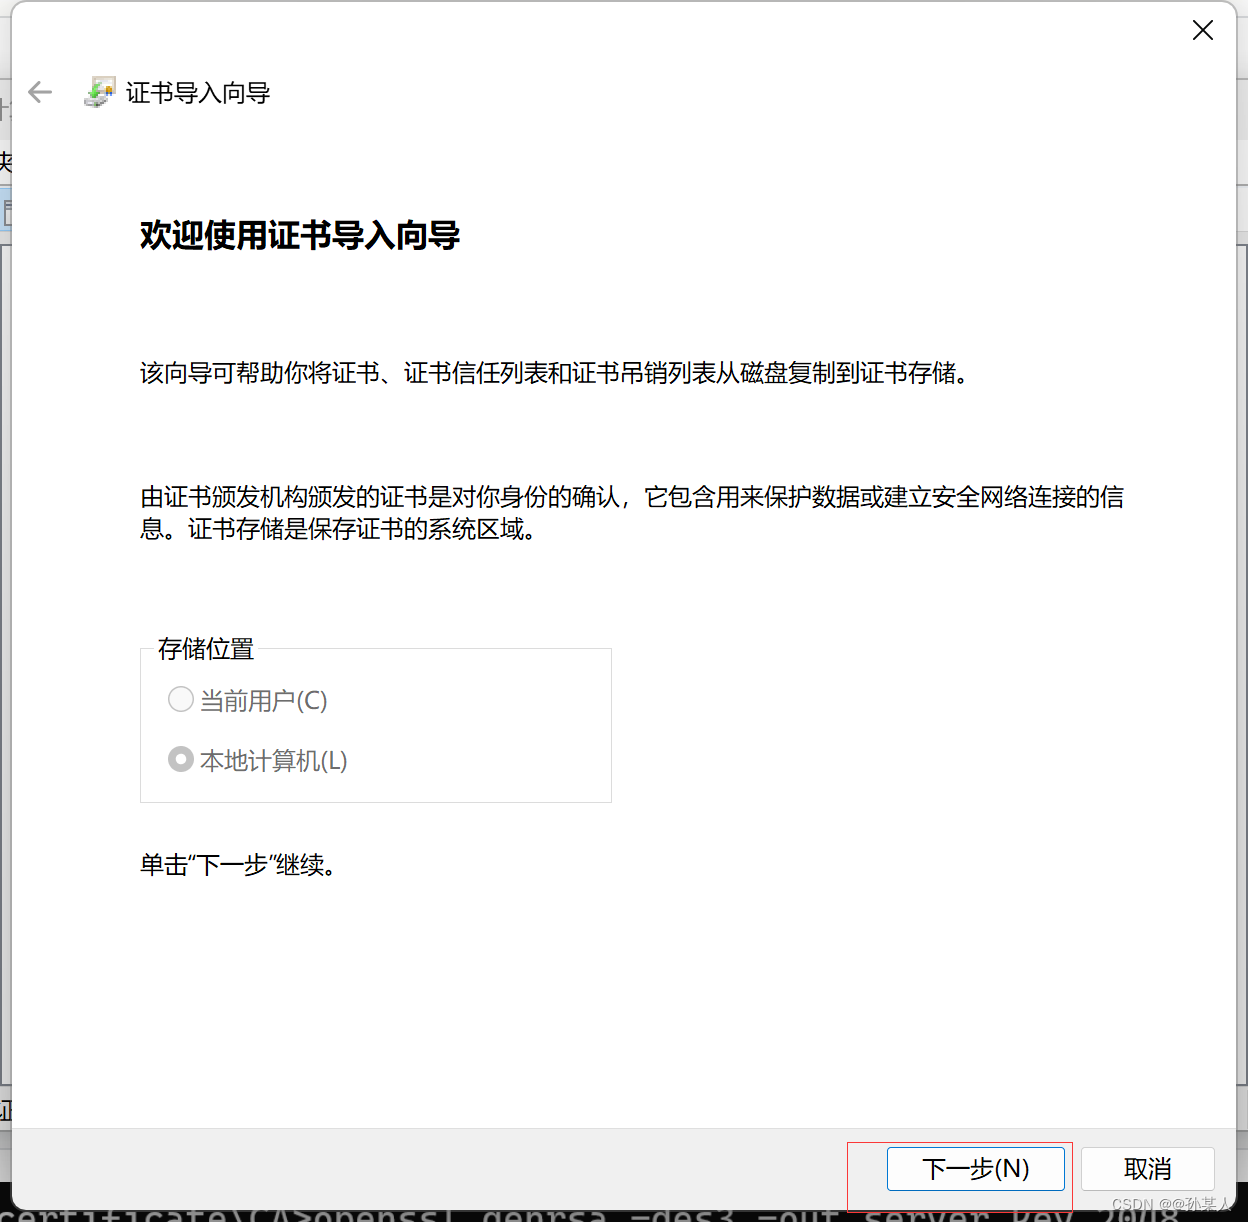
选择证书→添加→为计算机账号→本地计算机→确定

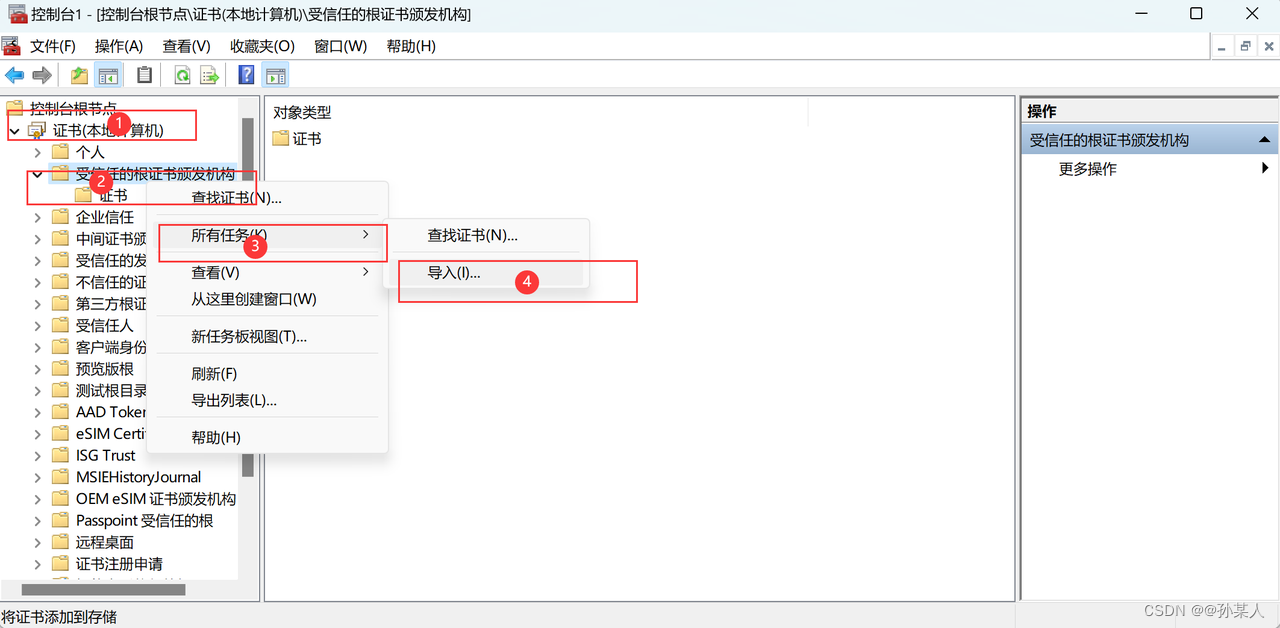
-
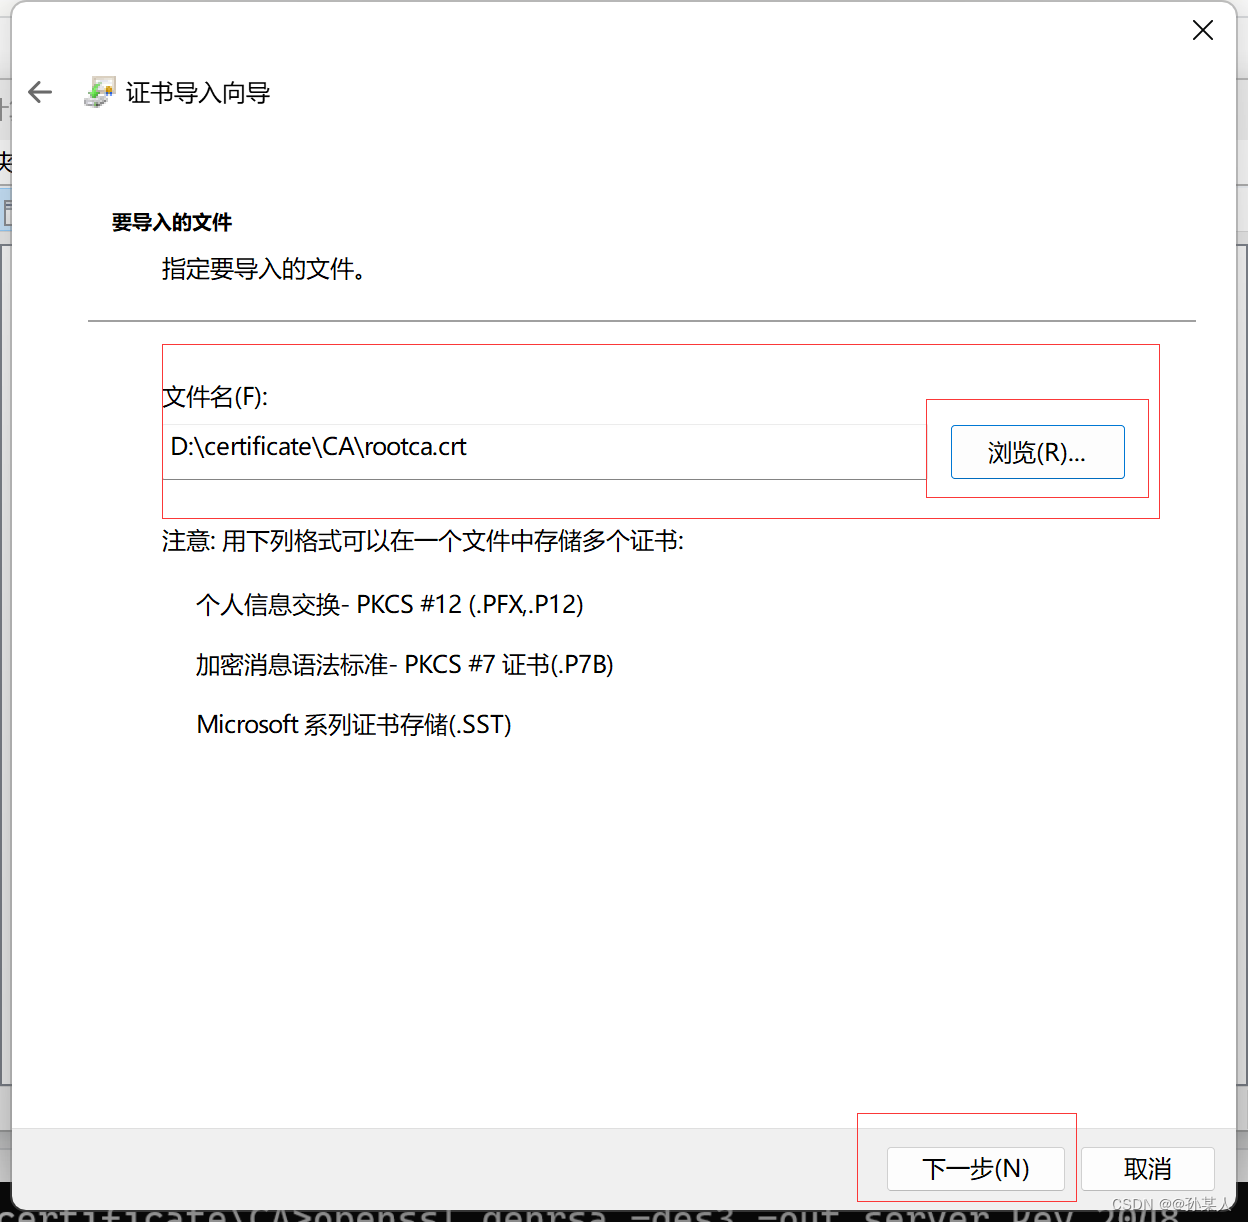
导入证书

1.4 CA机构给自己颁发证书:生成服务端证书
1.4.1 生成服务器私钥文件server1.key
openssl genrsa -des3 -out server1.key 4096

1.4.2 创建请求文件,然后输入信息。
openssl req -new -key server1.key -out server1.csr

1.4.3 使用根证书签发证书
openssl x509 -req -in server1.csr -CA rootca.crt -CAkey rootca.key -CAcreateserial -out server1.crt -days 36500

得到了一个server1.crt,这个就是我们服务器的CA证书啦,这个服务端的CA证书是通过CA机构的私钥和CA根证书进行签名得到的。
1.4.4 配置-extensions和-extfile扩展字段防止浏览器检查失败
- 创建ssl.conf配置文件
[req_ext]
subjectAltName = @alt_names

[alt_names]
IP.1    = 192.168.3.58
IP.2    = 127.0.0.1
DNS.1   = localhost
#DNS.2   = localhost
- 带上配置文件,执行签发命令
openssl x509 -req -in server1.csr -CA rootca.crt -CAkey rootca.key -CAcreateserial -out server2.crt -days 36500 -extensions req_ext -extfile ssl.conf

创建完毕!
3. spring boot配置ssl证书实现https
2.1 配置证书
在java环境中用的证书形式有p12格式的,jks格式的,所以需要做转换,以p12为例
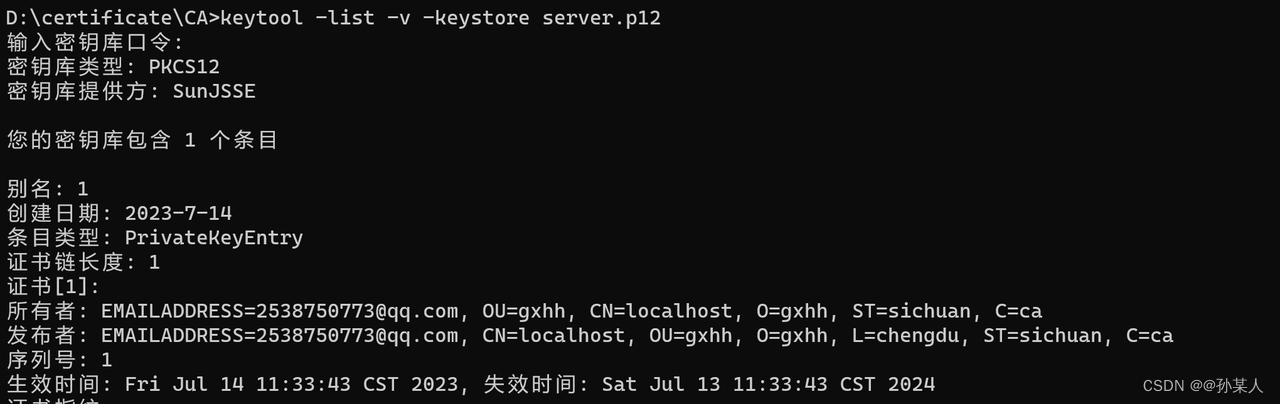
openssl pkcs12 -export -clcerts -in server1.crt -inkey server1.key -out server2.p12

首先用命令查询一下别名:
keytool -list -v -keystore server.p12
2.2 添加到springboot项目中
把server2.p12复制到spring boot的 src/main/resources/ 目录下,和application.yaml平级
2.3 配置文件
server:
  # https加密端口号 12345
  port: 12345
  ssl:
    key-store: classpath:server2.p12  # 证书路径
    key-store-password: chengdu12345  # 证书密码
    key-store-type: PKCS12 # 类型
    key-alias: 1 #别名
2.4 运行


3. spring boot配置ssl证书同时实现http、https
创建配置文件RequestConfig.java
import org.apache.catalina.Context;
import org.apache.catalina.connector.Connector;
import org.apache.tomcat.util.descriptor.web.SecurityCollection;
import org.apache.tomcat.util.descriptor.web.SecurityConstraint;
import org.springframework.boot.web.embedded.tomcat.TomcatServletWebServerFactory;
import org.springframework.context.annotation.Bean;
import org.springframework.context.annotation.Configuration;
/**
 * @description: 请求转发
 * @author: sun
 * @date: 2023-07-10 16:59
 * @version 1.0
 */
@Configuration
public class RequestConfig {
    @Bean
    TomcatServletWebServerFactory tomcatServletWebServerFactory() {
        TomcatServletWebServerFactory factory = new TomcatServletWebServerFactory() {
            @Override
            protected void postProcessContext(Context context) {
                SecurityConstraint constraint = new SecurityConstraint();
                constraint.setUserConstraint("CONFIDENTIAL");
                SecurityCollection collection = new SecurityCollection();
                collection.addPattern("/*");
                constraint.addCollection(collection);
                context.addConstraint(constraint);
            }
        };
        factory.addAdditionalTomcatConnectors(createTomcatConnector());
        return factory;
    }

    private Connector createTomcatConnector() {
        Connector connector = new
                Connector("org.apache.coyote.http11.Http11NioProtocol");
        connector.setScheme("http");
        // Http 的请求端口为 8082
        connector.setPort(8082);
        connector.setSecure(false);
        // https 的端口为 12345
        connector.setRedirectPort(12345);
        return connector;
    }
}
3.1 成功:访问8082自动跳转12345端口


 1730
1730


 被折叠的 条评论
为什么被折叠?
被折叠的 条评论
为什么被折叠?
 到【灌水乐园】发言


