


前言
数据库表
CREATE TABLE `gd_flight` (
  `id` int(11) NOT NULL AUTO_INCREMENT COMMENT 'id列',
  `flight_id` varchar(20) CHARACTER SET utf8 DEFAULT NULL COMMENT '航号',
  `company` varchar(255) CHARACTER SET utf8 DEFAULT NULL COMMENT '航空公司',
  `departure_airport` varchar(255) CHARACTER SET utf8 DEFAULT NULL COMMENT '出发机场',
  `arrive_airport` varchar(255) CHARACTER SET utf8 DEFAULT NULL COMMENT '达到机场',
  `departure_time` datetime DEFAULT NULL COMMENT '出发时间',
  `arrive_time` datetime DEFAULT NULL COMMENT '到达时间',
  `model` varchar(255) CHARACTER SET utf8 DEFAULT NULL COMMENT '机型',
  `is_delete` int(11) DEFAULT NULL COMMENT '是否隐藏0显示 1隐藏',
  PRIMARY KEY (`id`)
) ENGINE=InnoDB AUTO_INCREMENT=21 DEFAULT CHARSET=utf8mb4;
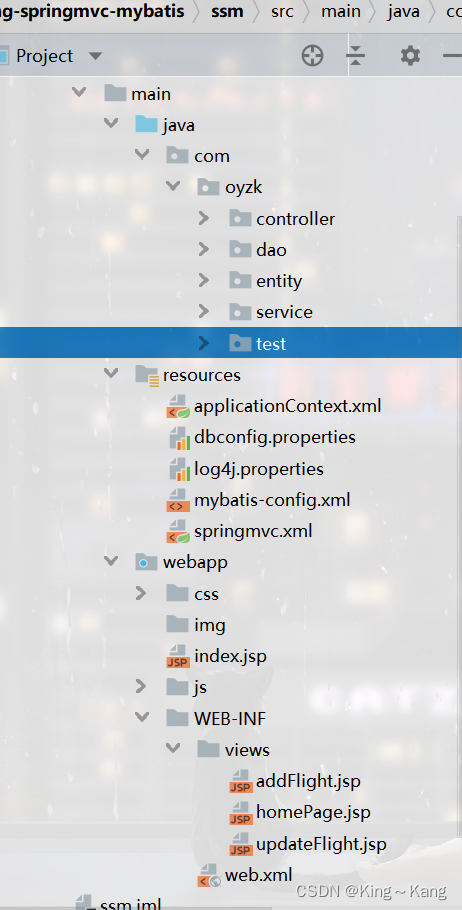
项目整体结构目录
获取源码
整合Spring
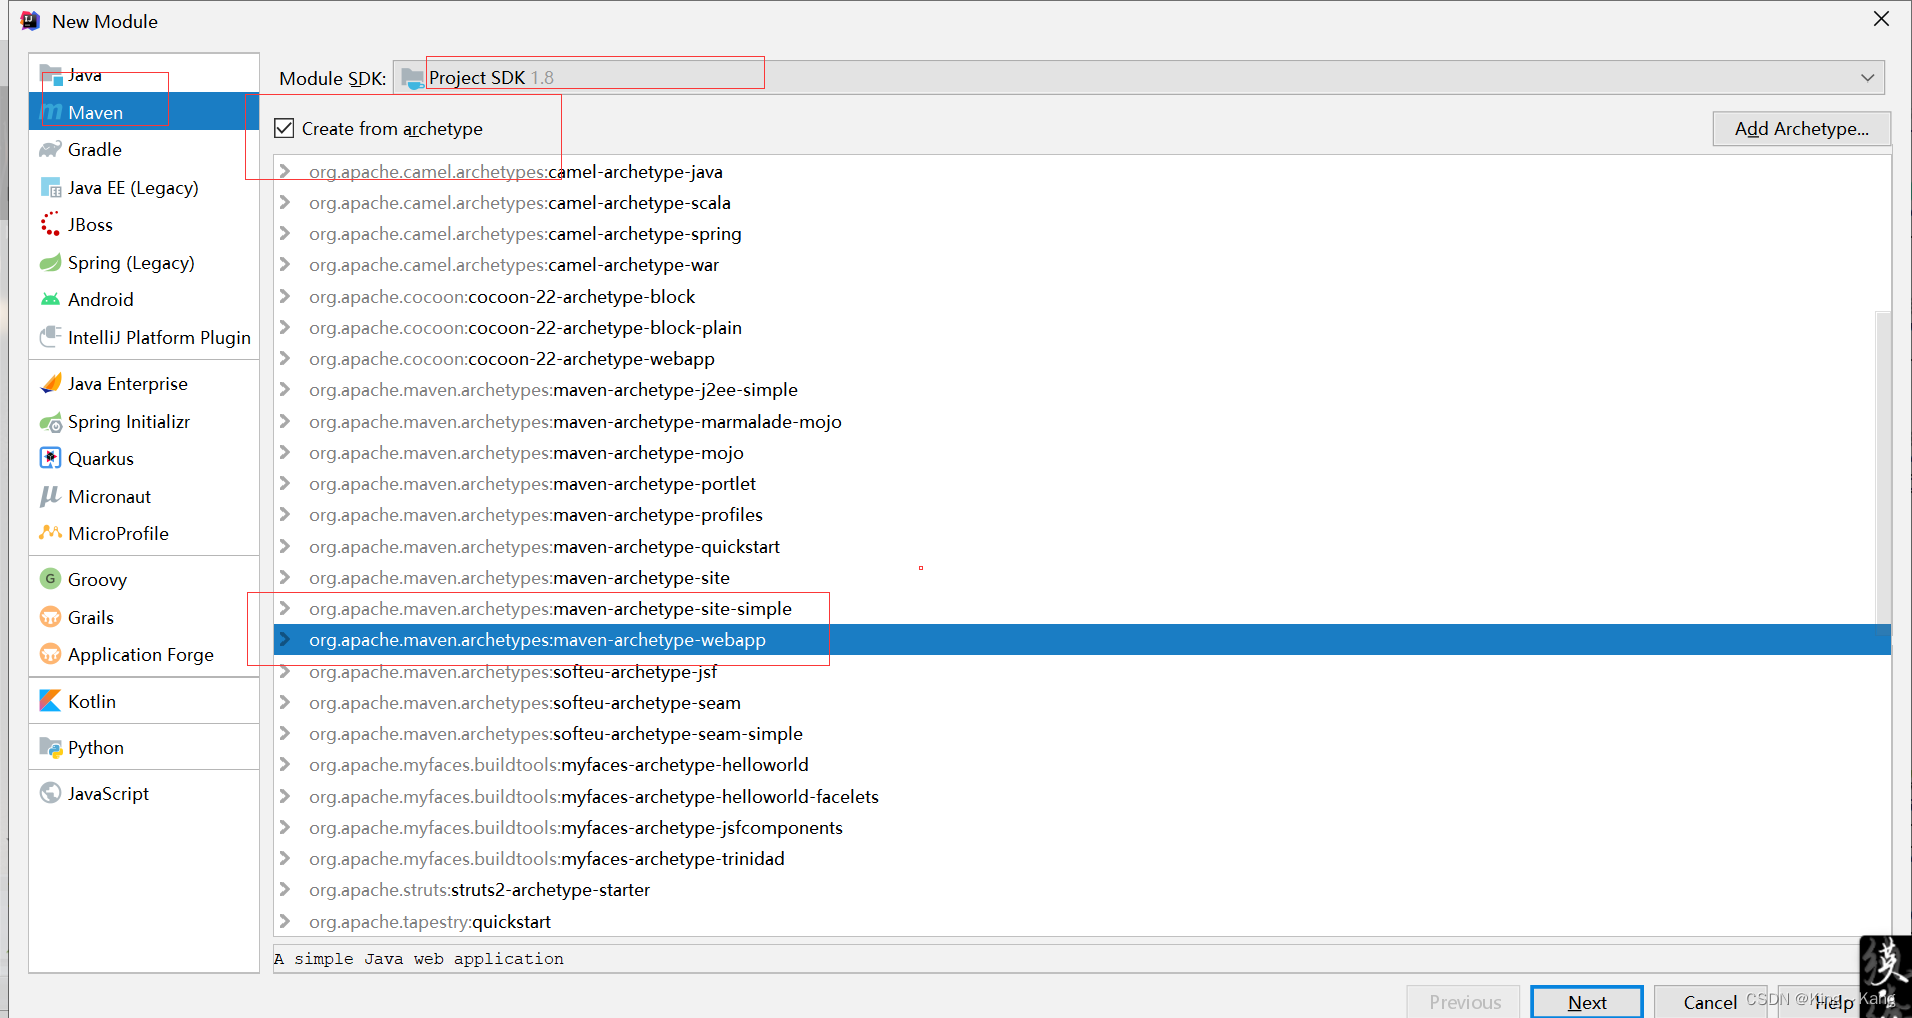
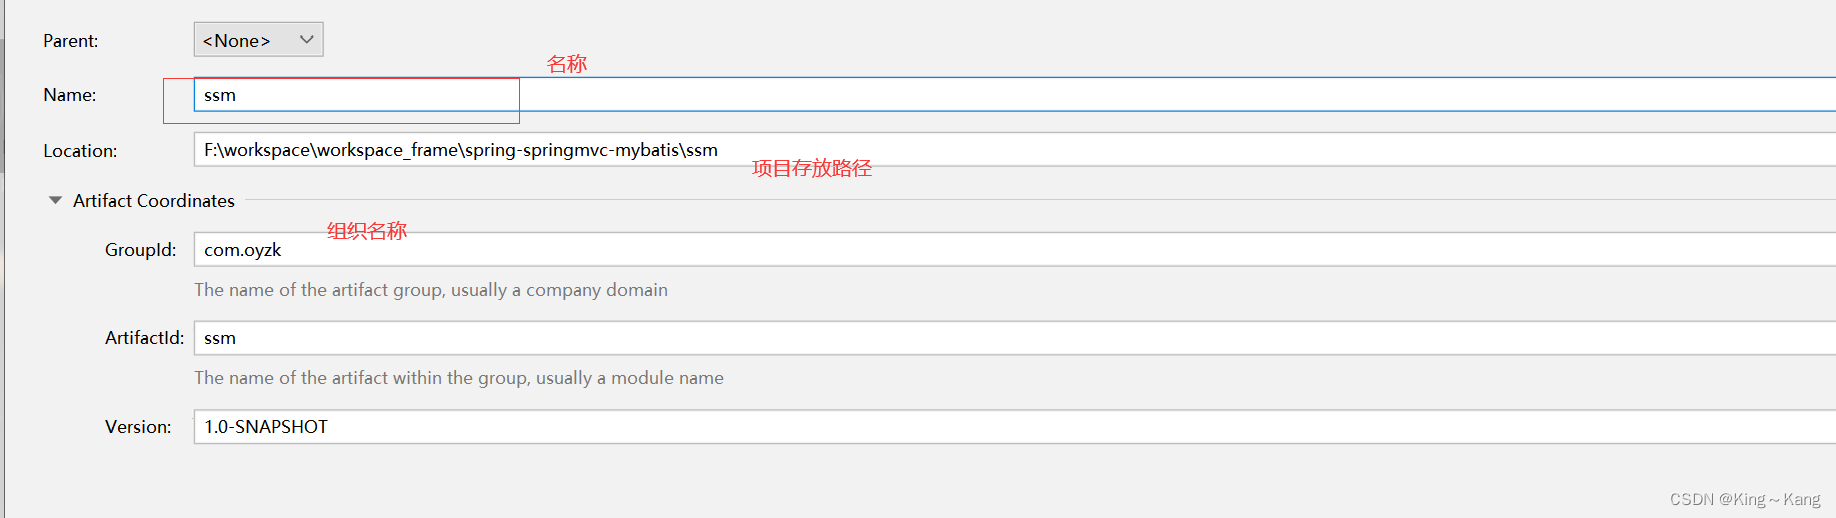
1、创建项目
2、导包
  <properties>
    <jsonVersion>1.9.13</jsonVersion>
    <jacksonVersion>2.9.0</jacksonVersion>
    <springVersion>5.0.12.RELEASE</springVersion>
    <mysqlVersion>8.0.18</mysqlVersion>
    <mybatisVersion>3.5.6</mybatisVersion>
    <mybatisSpringVersion>1.3.1</mybatisSpringVersion>
  </properties>
   <dependencies>
    <!--junit4-->
    <dependency>
      <groupId>junit</groupId>
      <artifactId>junit</artifactId>
      <version>4.12</version>
    </dependency>
    <!--日志-->
    <dependency>
      <groupId>commons-logging</groupId>
      <artifactId>commons-logging</artifactId>
      <version>1.2</version>
    </dependency>
    <dependency>
      <groupId>log4j</groupId>
      <artifactId>log4j</artifactId>
      <version>1.2.17</version>
    </dependency>
    <!-- mysql数据库驱动依赖 -->
    <dependency>
      <groupId>mysql</groupId>
      <artifactId>mysql-connector-java</artifactId>
      <version>${mysqlVersion}</version>
    </dependency>
    <!--c3p0  数据连接池 jar-->
    <dependency>
      <groupId>com.mchange</groupId>
      <artifactId>c3p0</artifactId>
      <version>0.9.5.1</version>
    </dependency>
    <!--C3P0额外依赖的一个jar包-->
    <dependency>
      <groupId>com.mchange</groupId>
      <artifactId>mchange-commons-java</artifactId>
      <version>0.2.10</version>
    </dependency>
    <!-- Mybatis框架:-->
    <dependency>
      <groupId>org.mybatis</groupId>
      <artifactId>mybatis</artifactId>
      <version>${mybatisVersion}</version>
    </dependency>
    <!-- MyBatis整合Spring的适配包 -->
    <dependency>
      <groupId>org.mybatis</groupId>
      <artifactId>mybatis-spring</artifactId>
      <version>${mybatisSpringVersion}</version>
    </dependency>


    <!--json jar包-->
    <!-- json数据 使springMVC可以返回json值 ,视情况添加-->
    <dependency>
      <groupId>org.codehaus.jackson</groupId>
      <artifactId>jackson-mapper-asl</artifactId>
      <version>${jsonVersion}</version>
    </dependency>

    <!-- Jackson可以轻松的将Java对象转换成json对象和xml文档,同样也可以将json、xml转换成Java对象-->
    <dependency>
      <groupId>com.fasterxml.jackson.core</groupId>
      <artifactId>jackson-core</artifactId>
      <version>${jacksonVersion}</version>
    </dependency>
    <dependency>
      <groupId>com.fasterxml.jackson.core</groupId>
      <artifactId>jackson-annotations</artifactId>
      <version>${jacksonVersion}</version>
    </dependency>

    <dependency>
      <groupId>com.fasterxml.jackson.core</groupId>
      <artifactId>jackson-databind</artifactId>
      <version>${jacksonVersion}</version>
    </dependency>
    <!-- Spring依赖 -->
    <!--1. Spring核心依赖,上面已经有日志了 -->
    <dependency>
      <groupId>org.springframework</groupId>
      <artifactId>spring-core</artifactId>
      <version>${springVersion}</version>
    </dependency>
    <dependency>
      <groupId>org.springframework</groupId>
      <artifactId>spring-beans</artifactId>
      <version>${springVersion}</version>
    </dependency>
    <dependency>
      <groupId>org.springframework</groupId>
      <artifactId>spring-context</artifactId>
      <version>${springVersion}</version>
    </dependency>
    <dependency>
      <groupId>org.springframework</groupId>
      <artifactId>spring-expression</artifactId>
      <version>${springVersion}</version>
    </dependency>
    <!--spring的aop jar包-->
    <dependency>
      <groupId>org.springframework</groupId>
      <artifactId>spring-aop</artifactId>
      <version>${springVersion}</version>
    </dependency>
    <dependency>
      <groupId>org.springframework</groupId>
      <artifactId>spring-aspects</artifactId>
      <version>${springVersion}</version>
    </dependency>
    <!--这两个jar包是阿帕奇的-->
    <dependency>
      <groupId>org.aspectj</groupId>
      <artifactId>aspectjrt</artifactId>
      <version>1.8.13</version>
    </dependency>
    <dependency>
      <groupId>org.aspectj</groupId>
      <artifactId>aspectjweaver</artifactId>
      <version>1.8.13</version>
    </dependency>
    <dependency>
      <groupId>aopalliance</groupId>
      <artifactId>aopalliance</artifactId>
      <version>1.0</version>
    </dependency>
    <!--2. SpringDAO层依赖 -->
    <dependency>
      <groupId>org.springframework</groupId>
      <artifactId>spring-jdbc</artifactId>
      <version>${springVersion}</version>
    </dependency>
    <dependency>
      <groupId>org.springframework</groupId>
      <artifactId>spring-tx</artifactId>
      <version>${springVersion}</version>
    </dependency>
    <!--3. Spring WEB依赖 -->
    <dependency>
      <groupId>org.springframework</groupId>
      <artifactId>spring-web</artifactId>
      <version>5.0.12.RELEASE</version>
    </dependency>
    <dependency>
      <groupId>org.springframework</groupId>
      <artifactId>spring-webmvc</artifactId>
      <version>${springVersion}</version>
    </dependency>
    <!--4.Spring-test相关依赖 -->
    <dependency>
      <groupId>org.springframework</groupId>
      <artifactId>spring-test</artifactId>
      <version>${springVersion}</version>
    </dependency>

    <!-- lombok插件导包-->
    <dependency>
      <groupId>org.projectlombok</groupId>
      <artifactId>lombok</artifactId>
      <version>1.18.10</version>
      <scope>provided</scope>
    </dependency>
    <!--EL表达式-->
    <dependency>
      <groupId>taglibs</groupId>
      <artifactId>standard</artifactId>
      <version>1.1.2</version>
      <type>jar</type>
    </dependency>
    <dependency>
      <groupId>javax.servlet</groupId>
      <artifactId>jstl</artifactId>
      <version>1.2</version>
      <type>jar</type>
    </dependency>

    <dependency>
      <groupId>javax.servlet.jsp</groupId>
      <artifactId>javax.servlet.jsp-api</artifactId>
      <version>2.3.3</version>
      <scope>provided</scope>
    </dependency>

    <dependency>
      <groupId>javax.servlet</groupId>
      <artifactId>javax.servlet-api</artifactId>
      <version>4.0.1</version>
      <scope>provided</scope>
    </dependency>
  </dependencies>
3、创建 FlightService
package com.oyzk.service;

import com.oyzk.entity.FlightEntity;

import java.util.List;

/**
 * @author Kingkang
 * @title FlightService
 * @create 2022/12/7
 **/
public interface FlightService {
      List<FlightEntity> findAll();
}
4、创建 FlightServiceImpl
package com.oyzk.service.impl;
import com.oyzk.entity.FlightEntity;
import com.oyzk.service.FlightService;
import org.springframework.stereotype.Service;
import java.util.List;
/**
* @author Kingkang
* @title FlightServiceImpl
* @create 2022/12/7
**/
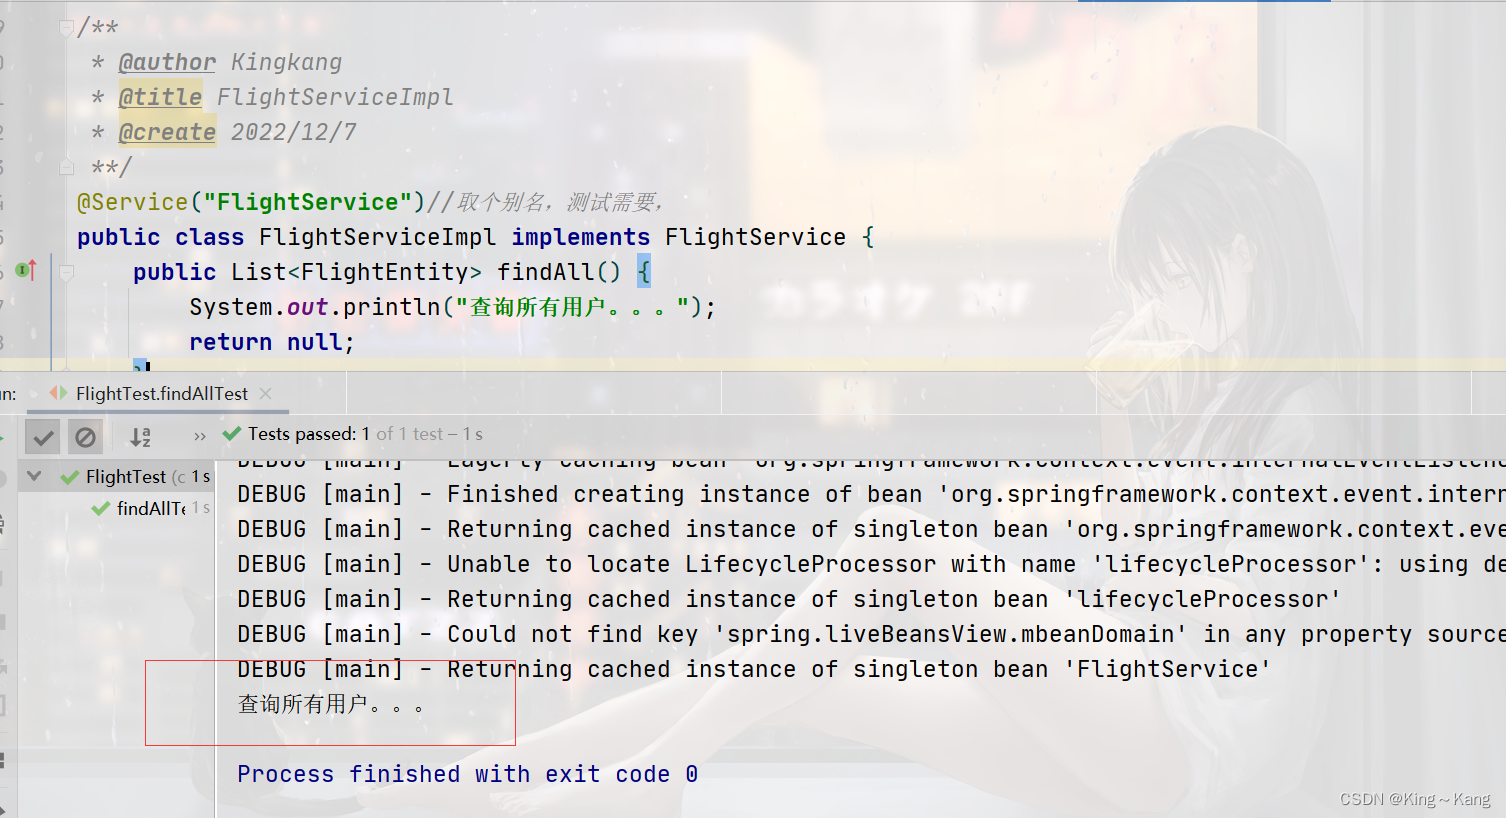
@Service("FlightService")//取个别名,测试需要,
public class FlightServiceImpl implements FlightService {
public List<FlightEntity> findAll() {
System.out.println("查询所有用户。。。");
return null;
}
}
5、创建配置文件 applicationContext.xml
<?xml version="1.0" encoding="UTF-8"?>
<beans xmlns="http://www.springframework.org/schema/beans"
       xmlns:xsi="http://www.w3.org/2001/XMLSchema-instance"
       xmlns:context="http://www.springframework.org/schema/context"
       xmlns:aop="http://www.springframework.org/schema/aop"
       xmlns:tx="http://www.springframework.org/schema/tx"
       xsi:schemaLocation="http://www.springframework.org/schema/aop http://www.springframework.org/schema/aop/spring-aop-4.3.xsd
		http://www.springframework.org/schema/beans http://www.springframework.org/schema/beans/spring-beans-3.2.xsd
		http://www.springframework.org/schema/tx http://www.springframework.org/schema/tx/spring-tx-4.3.xsd
		http://www.springframework.org/schema/context http://www.springframework.org/schema/context/spring-context-4.3.xsd">


 <!-- 自动扫描 -->
    <context:component-scan base-package="com.oyzk">
        <!-- 扫描时跳过 @Controller 注解的JAVA类(控制器) -->
        <context:exclude-filter type="annotation" expression="org.springframework.stereotype.Controller"/>
    </context:component-scan>

</beans>
6、在web.xml添加配置
<?xml version="1.0" encoding="UTF-8"?>
<web-app xmlns="http://java.sun.com/xml/ns/javaee"
         xmlns:xsi="http://www.w3.org/2001/XMLSchema-instance"
         xsi:schemaLocation="http://java.sun.com/xml/ns/javaee http://java.sun.com/xml/ns/javaee/web-app_3_0.xsd"
         version="3.0">
<!-- 地址为http://localhost:8080/  显示的默认网页-->
  <welcome-file-list>
    <welcome-file>/index.jsp</welcome-file>
  </welcome-file-list>

  <!--加载Spring的配置文件到上下文中去-->
  <context-param>
    <param-name>contextConfigLocation</param-name>
    <param-value> classpath:applicationContext.xml </param-value>
  </context-param>

  <!-- Spring监听器 -->
  <listener>
    <listener-class>org.springframework.web.context.ContextLoaderListener</listener-class>
  </listener>
  <!--  字符集过滤  -->
  <filter>
    <filter-name>encodingFilter</filter-name>
    <filter-class>org.springframework.web.filter.CharacterEncodingFilter</filter-class>
    <init-param>
      <param-name>encoding</param-name>
      <param-value>UTF-8</param-value>
    </init-param>
    <init-param>
      <param-name>forceEncoding</param-name>
      <param-value>true</param-value>
    </init-param>
  </filter>
  <filter-mapping>
    <filter-name>encodingFilter</filter-name>
    <url-pattern>/*</url-pattern>
  </filter-mapping>
</web-app>
7、测试
package com.oyzk.test;

import com.oyzk.service.FlightService;
import com.oyzk.service.impl.FlightServiceImpl;
import org.junit.Test;
import org.springframework.context.ApplicationContext;
import org.springframework.context.support.ClassPathXmlApplicationContext;

/**
 * @author Kingkang
 * @title FlightTest
 * @create 2022/12/7
 **/
public class FlightTest {
    @Test
    public void  findAllTest(){
        ApplicationContext applicationContext = new ClassPathXmlApplicationContext("classpath:applicationContext.xml");
        FlightService service = (FlightService) applicationContext.getBean("FlightService"); // 因为给service起了别名,所以通过id的方式获取class
        service.findAll();

    }
}
看到如下效果,说明spring已经没有问题
spring+springmvc整合
1、创建springmvc.xml
在resources文件夹下创建springmvc.xml文件,开启注解扫描,视图解析器以及过滤静态资源和springmvc注解支持
<?xml version="1.0" encoding="UTF-8"?>
<beans xmlns="http://www.springframework.org/schema/beans"
       xmlns:mvc="http://www.springframework.org/schema/mvc"
       xmlns:context="http://www.springframework.org/schema/context"
       xmlns:xsi="http://www.w3.org/2001/XMLSchema-instance"
       xsi:schemaLocation="
        http://www.springframework.org/schema/beans
        http://www.springframework.org/schema/beans/spring-beans.xsd
        http://www.springframework.org/schema/mvc
        http://www.springframework.org/schema/mvc/spring-mvc.xsd
        http://www.springframework.org/schema/context
        http://www.springframework.org/schema/context/spring-context.xsd">
    <!--.配置spring开启注解mvc 的支持-->
    <mvc:annotation-driven></mvc:annotation-driven>
    <!--扫描控制层-->
    <context:component-scan base-package="com.oyzk.controller"></context:component-scan>
    <!--4.视图解析器  对模型视图名称的解析,在请求时模型视图名称添加前后缀-->
    <bean class="org.springframework.web.servlet.view.InternalResourceViewResolver">
        <property name="prefix" value="/WEB-INF/views/"/>
        <!--后缀-->
        <property name="suffix" value=".jsp"/>
    </bean>
    <!--这里是对静态资源的映射-->
    <mvc:resources mapping="/js/**" location="/js/" />
    <mvc:resources mapping="/css/**" location="/css/" />
    <mvc:resources mapping="/img/**" location="/img/" />

</beans>
创建配置类里面的js、css、img文件夹
2、添加web.xml文件配置
  <!-- spring MVC config start-->
  <servlet>
    <servlet-name>dispatcherServlet</servlet-name>
    <!--通过java的反射机制加载-->
    <servlet-class>org.springframework.web.servlet.DispatcherServlet</servlet-class>
    <init-param>
      <param-name>contextConfigLocation</param-name>
      <!-- 此处指向的的是SpringMVC的配置文件 -->
      <param-value>classpath:springmvc.xml</param-value>
    </init-param>
    <!--让我们springmvc DispatcherServlet优先被加载-->
    <load-on-startup>1</load-on-startup>
  </servlet>
  <!--客户端发送所有请求 都会达到我们的 DdispatcherServlet 静态资源 控制器中,请求-->
  <servlet-mapping>
    <servlet-name>dispatcherServlet</servlet-name>
    <url-pattern>/</url-pattern>
  </servlet-mapping>
  <!-- spring MVC config end-->
3、创建controller
package com.oyzk.controller;

import com.oyzk.entity.FlightEntity;
import com.oyzk.service.FlightService;
import org.springframework.beans.factory.annotation.Autowired;
import org.springframework.stereotype.Controller;
import org.springframework.ui.Model;
import org.springframework.web.bind.annotation.RequestMapping;

import java.util.List;

/**
 * @author Kingkang
 * @title FlightController
 * @create 2022/12/7
 **/
@Controller
public class FlightController {

    @RequestMapping("/findAll")
    public String findAll(){
        System.out.println("success");
        return "homePage";
    }

}
4、创建homePage.jsp
<%--
  Created by IntelliJ IDEA.
  User: Kingkang
  Date: 2022/12/7
  Time: 17:22
  To change this template use File | Settings | File Templates.
--%>
<%@ page contentType="text/html;charset=UTF-8" language="java" %>
<html>
<head>
    <title>信息展示页面</title>
</head>
<body>
信息展示页面
</body>
</html>
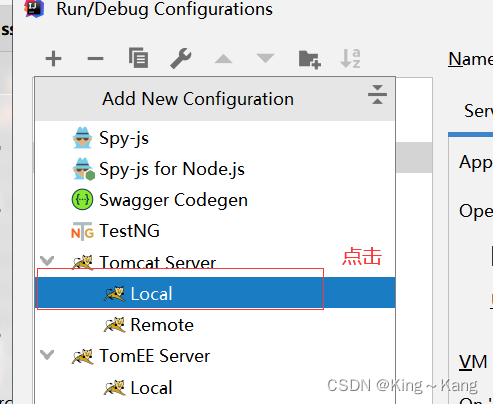
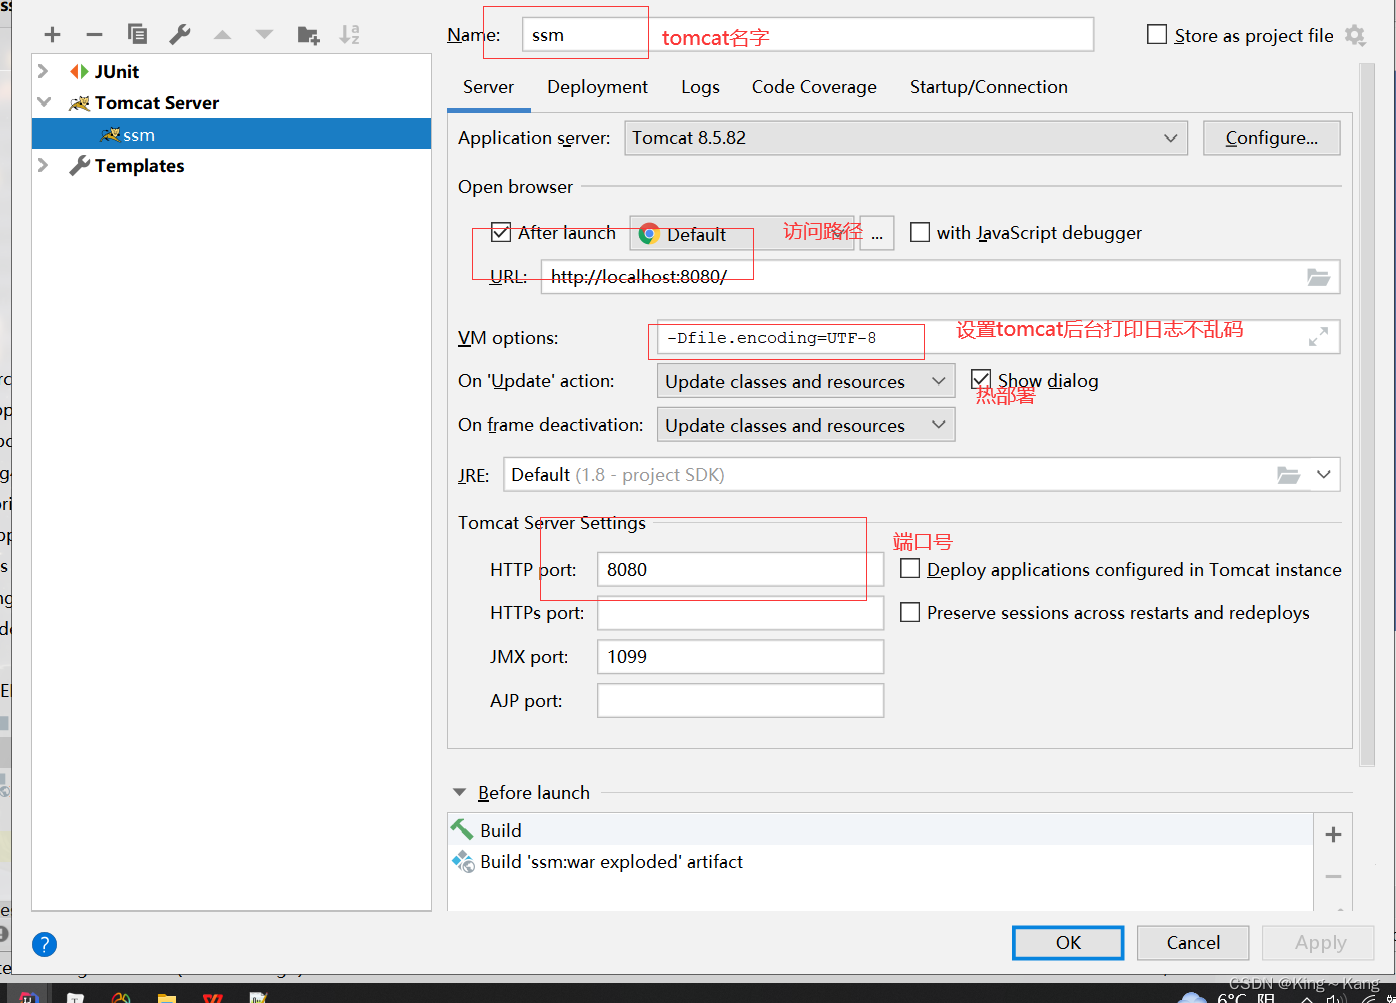
5、配置tomcat以及启动测试
http://localhost:8080/findAll
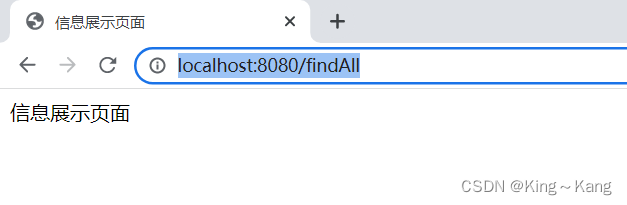
能到这个效果说明,恭喜你spring+springmvc已经整合成功
spring+springmvc+mybatis整合
1、创建FlightEntity实体类
package com.oyzk.entity;

import com.fasterxml.jackson.annotation.JsonFormat;
import lombok.Data;

import java.util.Date;

/**
 * @author Kingkang
 * @title FlightEntity
 * @create 2022/12/6
 **/
@Data
public class FlightEntity {

    private int id;
    private String flightId;
    private String company;
    private String departureAirport;
    private String arriveAirport;
    /**
     * 实例
     * 把从前端到后端的日期格式化
     * timezone="GMT+8" 东八区
     * pattern:是你需要转换的时间日期的格式
     * 		 "yyyy-MM-dd HH:mm:ss"
     * 		 "yyyy-MM-dd HH:mm"
     * 		 "yyyy-MM-dd HH"
     * 		 "yyyy-MM-dd"
     * 		 "yyyy-MM"
     * 根据需要自行选择
     */
/*    @JsonFormat(timezone="GMT+8", pattern="yyyy-MM-dd")
    private Date departureTime;
    @JsonFormat(timezone="GMT+8", pattern="yyyy-MM-dd")
    private Date arriveTime;*/

    private String departureTime;
    private String arriveTime;
    private String model;
    private int isDelete;
}
2、创建FlightDao
在dao文件夹下面创建FlightDao
package com.oyzk.dao;

import com.oyzk.entity.FlightEntity;
import org.apache.ibatis.annotations.Select;
import org.springframework.stereotype.Repository;

import java.util.List;

/**
 * @author Kingkang
 * @title FlightDao
 * @create 2022/12/7
 **/
@Repository
public interface FlightDao {
    @Select("select*from gd_flight")
    public List<FlightEntity> findAll();
}
3、创建mysqlConfig.xml
<?xml version="1.0" encoding="UTF-8" ?>
<!DOCTYPE configuration
PUBLIC "-//mybatis.org//DTD Config 3.0//EN"
"http://mybatis.org/dtd/mybatis-3-config.dtd">
<!--数据库相关的配置-->
<configuration>
<settings>
<!-- 打印sql日志 -->
<setting name="logImpl" value="STDOUT_LOGGING" />
</settings>
<environments default="mysql">
<!--配置mysql-->
<environment id="mysql">
<!--配置事务类型-->
<transactionManager type="JDBC"/>
<!--配置数据源/连接池-->
<dataSource type="POOLED">
<property name="driver" value="com.mysql.cj.jdbc.Driver"/>
<property name="url" value="jdbc:mysql://localhost:3306/frame?serverTimezone=Asia/Shanghai&useUnicode=true&characterEncoding=utf8&useSSL=false"/>
<property name="username" value="root"/>
<property name="password" value="root"/>
</dataSource>
</environment>
</environments>
<!--指定映射配置文件的位置,映射配置文件指的是每个dao独立的配置文件-->
<mappers>
<!--使用xml进行查询-->
<!-- <mapper resource="mapper/flightMapper.xml"/>-->
<!--使用注解-->
<mapper class="com.oyzk.dao.FlightDao"/>
</mappers>
</configuration>
4、测试mybatis
    @Test
    public void test() throws IOException {
        InputStream resourceAsStream = Resources.getResourceAsStream("mybatis-config.xml");
        SqlSessionFactoryBuilder builder = new SqlSessionFactoryBuilder();
        SqlSessionFactory factory = builder.build(resourceAsStream);
        SqlSession session = factory.openSession(true);
        FlightDao mapper = session.getMapper(FlightDao.class);
        List<FlightEntity> all = mapper.findAll();
        for (FlightEntity flight : all) {
            System.out.println(flight);
        }
    }
能看到如下效果,说明是mybatis没有问题了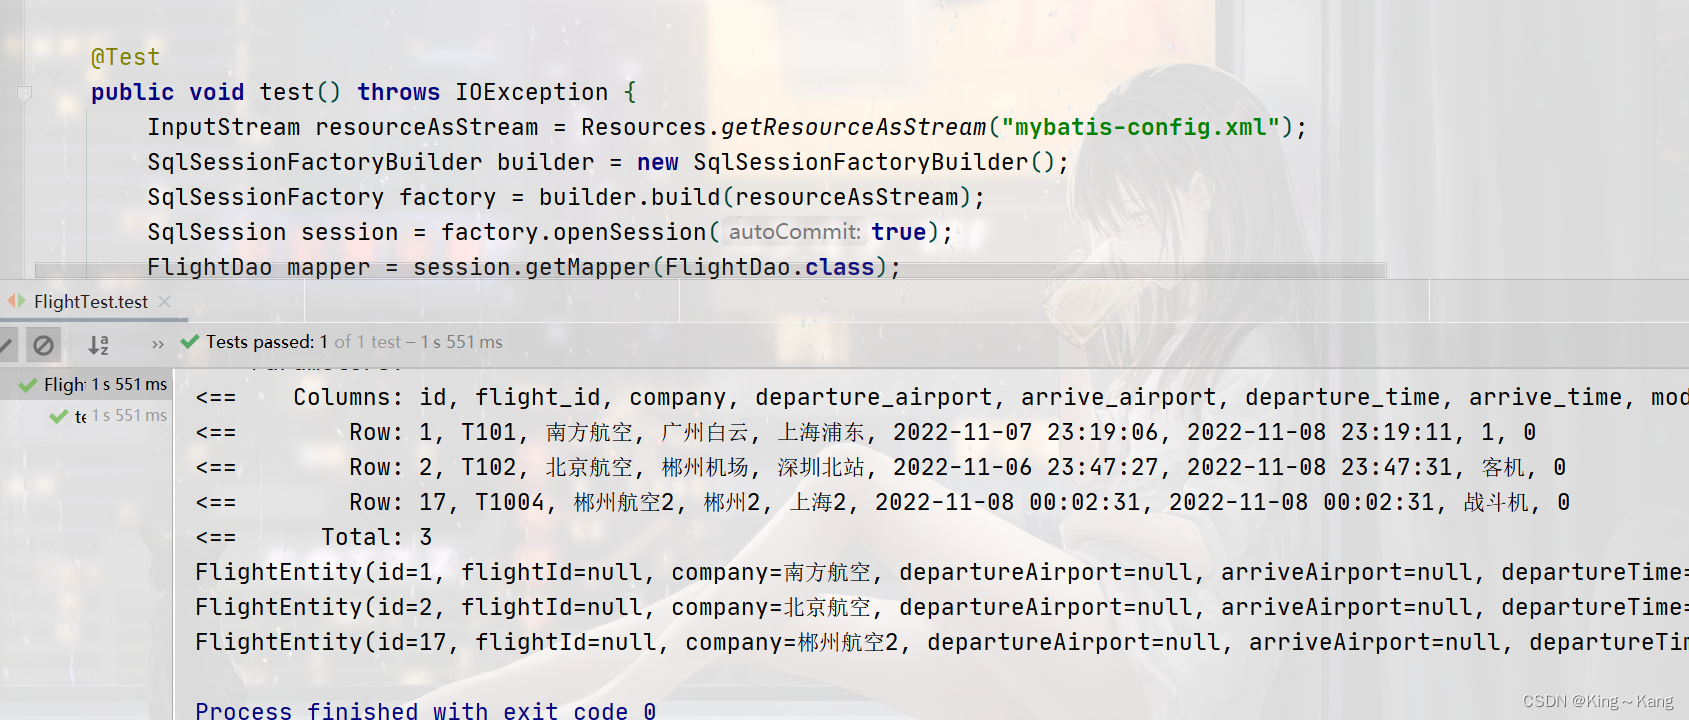
整合ssm+bootstrap(实现增删改查)
在spring的文件中整合mybatis,配置连接池,factory,dao所在的包,此时有无将mysqlConfig.xml都不重要!
1、在application配置文件里面添加mybatis的配置
  <!--引入外部文件-->
    <context:property-placeholder location="classpath:dbconfig.properties"></context:property-placeholder>

    <!--配置数据源-->
    <bean id="dataSource" class="com.mchange.v2.c3p0.ComboPooledDataSource" destroy-method="close">
        <property name="driverClass" value="${jdbc.driver}" />  <!--数据库连接驱动-->
        <property name="jdbcUrl" value="${jdbc.url}" />     <!--数据库地址-->
        <property name="user" value="${jdbc.username}" />   <!--用户名-->
        <property name="password" value="${jdbc.password}" />   <!--密码-->
        <property name="maxPoolSize" value="40" />      <!--最大连接数-->
        <property name="minPoolSize" value="1" />       <!--最小连接数-->
        <property name="initialPoolSize" value="10" />      <!--初始化连接池内的数据库连接-->
        <property name="maxIdleTime" value="20" />  <!--最大空闲时间-->
    </bean>

    <!--配置sqlSessionFactory-->
    <bean id="sqlSessionFactory" class="org.mybatis.spring.SqlSessionFactoryBean">
        <property name="dataSource" ref="dataSource"/>
    </bean>

    <!--配置dao所在的包-->
    <bean id="mapperScannerConfigurer" class="org.mybatis.spring.mapper.MapperScannerConfigurer">
        <property name="basePackage" value="com.oyzk.dao"/>
    </bean>
2、创建 dbconfig.properties
#database connection config
jdbc.driver = com.mysql.cj.jdbc.Driver
jdbc.url = jdbc:mysql://localhost:3306/frame?useUnicode=true&characterEncoding=utf-8&useSSL=false&serverTimezone = GMT
jdbc.username = root
jdbc.password = root
3、创建 log4j.properties
Global logging configuration
log4j.rootLogger=INFO, stdout
# Console output...
log4j.appender.stdout=org.apache.log4j.ConsoleAppender
log4j.appender.stdout.layout=org.apache.log4j.PatternLayout
log4j.appender.stdout.layout.ConversionPattern=%5p [%t] - %m%n
4、创建FlightDao并写出crud接口
package com.oyzk.dao;

import com.oyzk.entity.FlightEntity;
import org.apache.ibatis.annotations.*;
import org.omg.CORBA.INTERNAL;
import org.springframework.stereotype.Repository;

import java.util.List;

/**
 * @author Kingkang
 * @title FlightDao
 * @create 2022/12/7
 **/
@Repository
public interface FlightDao {
    /**
     * 查询所有信息
     * MyBatis为我们提供了注解@Results,@Result,@ResultMap
     * 用来代替mapper文件中的<resultMap>,<result>,<select id="showAll" resultMap="id">
     * @return
     */
    @Select("select*from gd_flight")
    @Results(id="floghtResultMap", value={
            @Result(column = "id",property = "id"),
            @Result(column = "flight_id",property = "flightId"),
            @Result(column = "company",property = "company"),
            @Result(column = "departure_airport",property = "departureAirport"),
            @Result(column = "arrive_airport",property = "arriveAirport"),
            @Result(column = "departure_time",property = "departureTime"),
            @Result(column = "arrive_time",property = "arriveTime"),
            @Result(column = "model",property = "model"),
            @Result(column = "is_delete",property = "isDelete")
    }
    )
    List<FlightEntity> findAll();

    @Select("select*from gd_flight where id=#{id}")
    @ResultMap("floghtResultMap")// //这里直接使用@ResultMap引入就好啦~
    FlightEntity findById(int id);

    @Insert("INSERT INTO gd_flight(`flight_id`, `company`, `departure_airport`, `arrive_airport`, `departure_time`, `arrive_time`, `model`, `is_delete`) " +
            "VALUES(#{flightId},#{company},#{departureAirport},#{arriveAirport},#{departureTime},#{arriveTime},#{model},#{isDelete});")
    int insertFlight(FlightEntity flightEntity);

    @Update("UPDATE gd_flight set " +
            " company=#{company},flight_id=#{flightId}, " +
            " departure_airport=#{departureAirport},arrive_airport=#{arriveAirport}," +
            " departure_time=#{departureTime},arrive_time=#{arriveTime}," +
            " model=#{model},is_delete=#{isDelete}"+
            " where id=#{id}")
    int updateFligth(FlightEntity flightEntity);

    @Delete("delete from gd_flight where id=#{id}")
    int deleteByIdFligth(int id);
}
5、创建FlightService文件以及接口
package com.oyzk.service;

import com.oyzk.entity.FlightEntity;
import org.apache.ibatis.annotations.Delete;
import org.apache.ibatis.annotations.Insert;
import org.apache.ibatis.annotations.Update;

import java.util.List;

/**
 * @author Kingkang
 * @title FlightService
 * @create 2022/12/7
 **/
public interface FlightService {
      List<FlightEntity> findAll();

      FlightEntity findById(int id);

      int insertFlight(FlightEntity flightEntity);

      int updateFligth(FlightEntity flightEntity);

      int deleteByIdFligth(int id);
}
6、创建FlightServiceImpl
package com.oyzk.service.impl;

import com.oyzk.dao.FlightDao;
import com.oyzk.entity.FlightEntity;
import com.oyzk.service.FlightService;
import org.springframework.beans.factory.annotation.Autowired;
import org.springframework.stereotype.Service;

import java.util.List;

/**
 * @author Kingkang
 * @title FlightServiceImpl
 * @create 2022/12/7
 **/
//@Service("FlightService")//取个别名,测试需要,
@Service
public class FlightServiceImpl implements FlightService {

    @Autowired
    private FlightDao flightDao;

    public List<FlightEntity> findAll() {
        return flightDao.findAll();
    }

    public FlightEntity findById(int id) {
        return flightDao.findById(id);
    }

    public int insertFlight(FlightEntity flightEntity) {
        return flightDao.insertFlight(flightEntity);
    }

    public int updateFligth(FlightEntity flightEntity) {
        return flightDao.updateFligth(flightEntity);
    }

    public int deleteByIdFligth(int id) {
        return flightDao.deleteByIdFligth(id);
    }
  /*  public List<FlightEntity> findAll() {
        System.out.println("查询所有用户。。。");
        return null;
    }*/
}
7、创建FlightController
package com.oyzk.controller;

import com.oyzk.entity.FlightEntity;
import com.oyzk.service.FlightService;
import org.springframework.beans.factory.annotation.Autowired;
import org.springframework.stereotype.Controller;
import org.springframework.ui.Model;
import org.springframework.web.bind.annotation.RequestBody;
import org.springframework.web.bind.annotation.RequestMapping;
import org.springframework.web.bind.annotation.RequestMethod;
import org.springframework.web.servlet.ModelAndView;

import java.util.ArrayList;
import java.util.List;

/**
 * @author Kingkang
 * @title FlightController
 * @create 2022/12/7
 **/
@Controller
@RequestMapping("/flight")
public class FlightController {

    @RequestMapping("/findAll")
    public String findAll(){
        System.out.println("success");
        return "homePage";
    }

    @Autowired
    private FlightService flightService;

    /**
     * 查询所有信息
     * @param module
     * @return
     */
    @RequestMapping(value = "/getAllFlight", method = RequestMethod.GET)
    public  String getAllFlight(Model module){
        List<FlightEntity> all = flightService.findAll();
        module.addAttribute("infoList",all);
        return "homePage";
    }

    /**
     *@description TODO
     *通过id查询
     *@return org.springframework.web.servlet.ModelAndView
     *@author Kingkang
     *@time 2022/11/27
     */
    @RequestMapping(value = "/getFlightById", method = RequestMethod.GET)
    public ModelAndView getFlightById(int id){
        ModelAndView modelAndView=new ModelAndView();
        FlightEntity flightById = flightService.findById(id);
        List<FlightEntity> flightEntities=new ArrayList<FlightEntity>();
        flightEntities.add(flightById);
        modelAndView.addObject("infoList",flightEntities);
        //跳转信息展示页面
        modelAndView.setViewName("homePage");
        return modelAndView;
    }

    /**
     * 跳转新增页面
     * @return
     */
    @RequestMapping(value = "/saveFlightPage", method = RequestMethod.GET)
    public String saveFlightPage(){
        return "addFlight";
    }
    /**
     * 新增
     * @param flightEntity
     * @return
     */
    @RequestMapping(value = "/saveFlight", method = RequestMethod.POST)
    public String saveFlight(FlightEntity flightEntity){
        flightService.insertFlight(flightEntity);
        return "redirect:/flight/getAllFlight";
    }

    /**
     * 通过id查询数据,在跳转到更新页面
     * @param id
     * @param model
     * @return
     */
    @RequestMapping(value = "/toUpdateFlightPage", method = RequestMethod.GET)
    public String toUpdateFlightPage(int id,Model model){
        FlightEntity flight = flightService.findById(id);
        model.addAttribute("flight",flight);
        return "updateFlight";
    }

    /**
     * 更新
     * @param flightEntity
     * @param model
     * @return
     */
    @RequestMapping(value = "/toUpdateFlight", method = RequestMethod.POST)
    public String toUpdateFlight(FlightEntity flightEntity,Model model){
        int i = flightService.updateFligth(flightEntity);
        if (i>0){
            model.addAttribute("flageMsg","更新成功");
        }else{
            model.addAttribute("flageMsg","更新失败");
        }
        return "redirect:/flight/getAllFlight";
    }

    /**
     * 删除
     * @param
     * @return
     */
    @RequestMapping(value = "/deleteFlight", method = RequestMethod.GET)
    public String deleteFlight(int id){
        flightService.deleteByIdFligth(id);
        return "redirect:/flight/getAllFlight";
    }


}
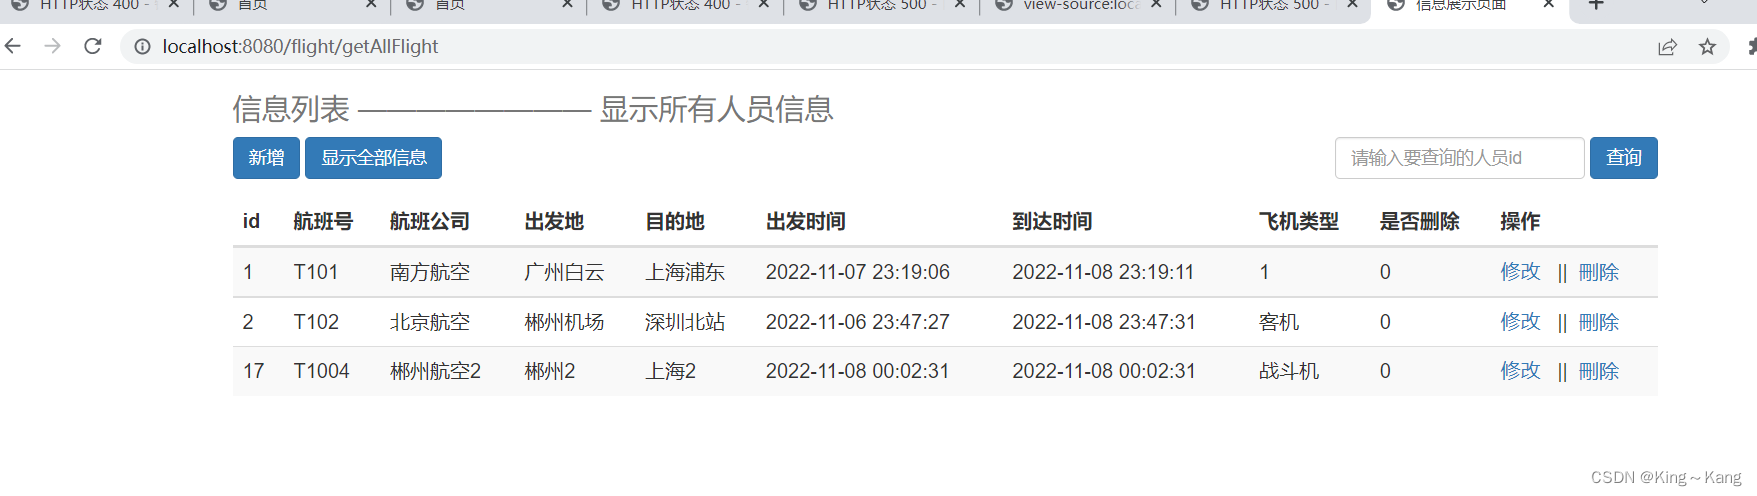
8、创建homePage.jsp
<%--
Created by IntelliJ IDEA.
User: Kingkang
Date: 2022/12/7
Time: 17:22
To change this template use File | Settings | File Templates.
--%>
<%@ page contentType="text/html;charset=UTF-8" language="java" %>
<%@ taglib prefix="c" uri="http://java.sun.com/jsp/jstl/core" %>
<html>
<head>
<title>信息展示页面</title>
<link type="text/css" rel="stylesheet" href="../../css/bootstrap.css">
<script type="text/javascript" src="../../js/jquery.min.js"></script>
<script type="text/javascript" src="../../js/bootstrap.min.js"></script>
</head>
<body>
<div class="container">
<div class="row clearfix">
<div class="col-md-12 column">
<div class="page-headr">
<h1>
<small>信息列表 ———————— 显示所有人员信息</small>
</h1>
<span style="color:#FAF520 ;font-weight: bold">${flageMsg}</span>
</div>
</div>
<div class="col-md-4 column">
<a class="btn btn-primary" href="${pageContext.request.contextPath}/flight/saveFlightPage">新增</a>
<a class="btn btn-primary" href="${pageContext.request.contextPath}/flight/getAllFlight">显示全部信息</a>
</div>
<div class="col-md-4"></div>
<div class="col-md-4">
<form class="form-inline" action="${pageContext.request.contextPath}/flight/getFlightById" method="get" style="float:right">
<span style="color:#FAF520 ;font-weight: bold">${error}</span>
<input type="text" name="id" class="form-control" placeholder="请输入要查询的人员id">
<input type="submit" value="查询" class="btn btn-primary">
</form>
</div>
</div>
<div class="row clearfix">
<div class="col-md-12 column">
<table class="table table-hover table-striped">
<thead>
<tr>
<th>id</th>
<th>航班号</th>
<th>航班公司</th>
<th>出发地</th>
<th>目的地</th>
<th>出发时间</th>
<th>到达时间</th>
<th>飞机类型</th>
<th>是否删除</th>
<th>操作</th>
</tr>
</thead>
<%-- 人员从数据库中查询出来--%>
<tbody>
<c:forEach items="${infoList}" var="flight">
<tr>
<td>${flight.id}</td>
<td>${flight.flightId}</td>
<td>${flight.company}</td>
<td>${flight.departureAirport}</td>
<td>${flight.arriveAirport}</td>
<td>${flight.departureTime}</td>
<td>${flight.arriveTime}</td>
<td>${flight.model}</td>
<td>${flight.isDelete}</td>
<td>
<a href="${pageContext.request.contextPath}/flight/toUpdateFlightPage?id=${flight.id}">修改</a>
||
<a href="${pageContext.request.contextPath}/flight/deleteFlight?id=${flight.id}">刪除</a>
</td>
</tr>
</c:forEach>
</tbody>
</table>
</div>
</div>
</div>
</body>
</html>
9、创建addFlight.jsp
<%--
  Created by IntelliJ IDEA.
  User: Kingkang
  Date: 2022/12/7
  Time: 20:09
  To change this template use File | Settings | File Templates.
--%>
<%@ page contentType="text/html;charset=UTF-8" language="java" %>
<html>
<head>
    <title>新增人员信息页面</title>
    <link type="text/css" rel="stylesheet" href="../../css/bootstrap.css">
    <script type="text/javascript" src="../../js/jquery.min.js"></script>
    <script type="text/javascript" src="../../js/bootstrap.min.js"></script>
</head>
<body>
<div class="container">
    <div class="row clearfix">
        <div class="col-md-12 column">
            <div class="page-headr">
                <h1>
                    <samll>新增人员</samll>
                </h1>
            </div>
        </div>
    </div>
    <form action="${pageContext.request.contextPath}/flight/saveFlight" method="post">
        <div class="form-group">
            <table>航班号</table>
            <input type="text" name="flightId" class="form-control"  >
        </div>
        <div class="form-group">
            <table>航班公司</table>
            <input type="text" name="company" class="form-control"  required>
        </div>
        <div class="form-group">
            <table>出发地</table>
            <input type="text" name="departureAirport" class="form-control"  required>
        </div>
        <div class="form-group">
            <table>目的地</table>
            <input type="text" name="arriveAirport" class="form-control" required>
        </div>
        <div class="form-group">
            <table>出发时间</table>
            <input type="date" name="departureTime" class="form-control" required>
        </div>
        <div class="form-group">
            <table>到达时间</table>
            <input type="date" name="arriveTime" class="form-control"  required>
        </div>
        <div class="form-group">
            <table>飞机类型</table>
            <input type="text" name="model" class="form-control" required>
        </div>
        <div class="form-group">
            <table>是否删除</table>
            <input type="text" name="isDelete" class="form-control"  required>
        </div>
        <div class="form-group">
            <input type="submit" class="form-control" value="添加">
        </div>
    </form>


</div>
</body>
</html>
10、updateFlight.jsp
<%--
  Created by IntelliJ IDEA.
  User: Kingkang
  Date: 2022/12/7
  Time: 20:03
  To change this template use File | Settings | File Templates.
--%>
<%@ page contentType="text/html;charset=UTF-8" language="java" %>
<%@ taglib prefix="c" uri="http://java.sun.com/jsp/jstl/core" %>
<html>
<head>
    <title>修改人员信息页面</title>
    <link type="text/css" rel="stylesheet" href="../../css/bootstrap.css">
    <script type="text/javascript" src="../../js/jquery.min.js"></script>
    <script type="text/javascript" src="../../js/bootstrap.min.js"></script>
</head>
<body>

<div class="container">
    <div class="row clearfix">
        <div class="col-md-12 column">
            <div class="page-headr">
                <h1>
                    <samll>修改人员</samll>
                </h1>
            </div>
        </div>
    </div>
    <form action="${pageContext.request.contextPath}/flight/toUpdateFlight" method="post">

        <input type="hidden" name="id" value="${flight.id}">
        <div class="form-group">
            <table>id</table>
            <input type="text" name="id" class="form-control" value="${flight.id}" disabled>
        </div>
        <div class="form-group">
            <table>航班号</table>
            <input type="text" name="flightId" class="form-control" value="${flight.flightId}"required>
        </div>
        <div class="form-group">
            <table>航班公司</table>
            <input type="text" name="company" class="form-control"  value="${flight.company}" required>
        </div>
        <div class="form-group">
            <table>出发地</table>
            <input type="text" name="departureAirport" class="form-control" value="${flight.departureAirport}" required>
        </div>
        <div class="form-group">
            <table>目的地</table>
            <input type="text" name="arriveAirport" class="form-control" value="${flight.arriveAirport}" required>
        </div>
        <div class="form-group">
            <table>出发时间</table>
            <input type="date" name="departureTime" class="form-control" value="${flight.departureTime}" required>
        </div>
        <div class="form-group">
            <table>到达时间</table>
            <input type="date" name="arriveTime" class="form-control" value="${flight.arriveTime}" required>
        </div>
        <div class="form-group">
            <table>飞机类型</table>
            <input type="text" name="model" class="form-control" value="${flight.model}" required>
        </div>
        <div class="form-group">
            <table>是否删除</table>
            <input type="text" name="isDelete" class="form-control" value="${flight.isDelete}" required>
        </div>
        <div class="form-group">
            <input type="submit" class="form-control" value="修改">
        </div>
    </form>

</div>
</body>
</html>
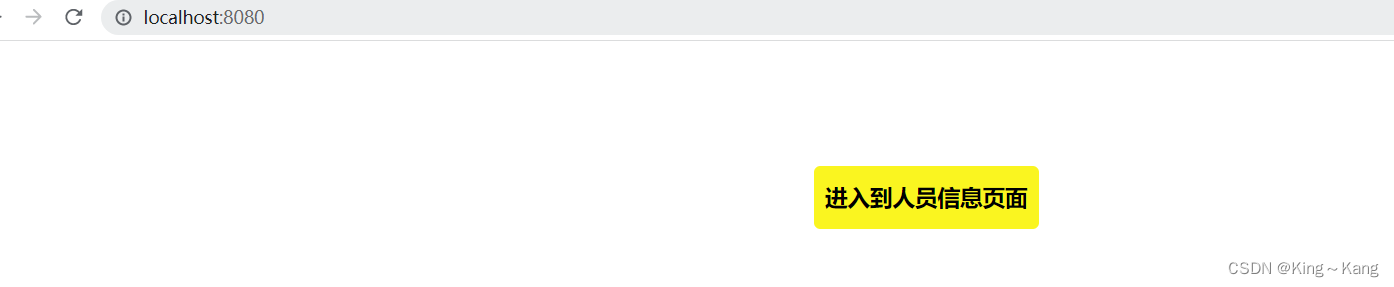
10、创建index.jsp
<%@ page contentType="text/html;charset=UTF-8" language="java" %>
<html>
<head>
    <title>首页</title>

    <style>
        a{
            text-decoration: none;
            color: black;
            font-size: 18px;
        }

        h3{
            width: 180px;
            height: 50px;
            margin: 100px auto;
            text-align: center;
            line-height:50px;
            background:#FAF520;
            border-radius: 5px;
        }
    </style>
</head>
<body>
<h3>
    <a href="${pageContext.request.contextPath}/flight/getAllFlight">进入到人员信息页面</a>
</h3>
</body>
</html>
11、启动测试


 759
759


 被折叠的 条评论
为什么被折叠?
被折叠的 条评论
为什么被折叠?
 到【灌水乐园】发言


