


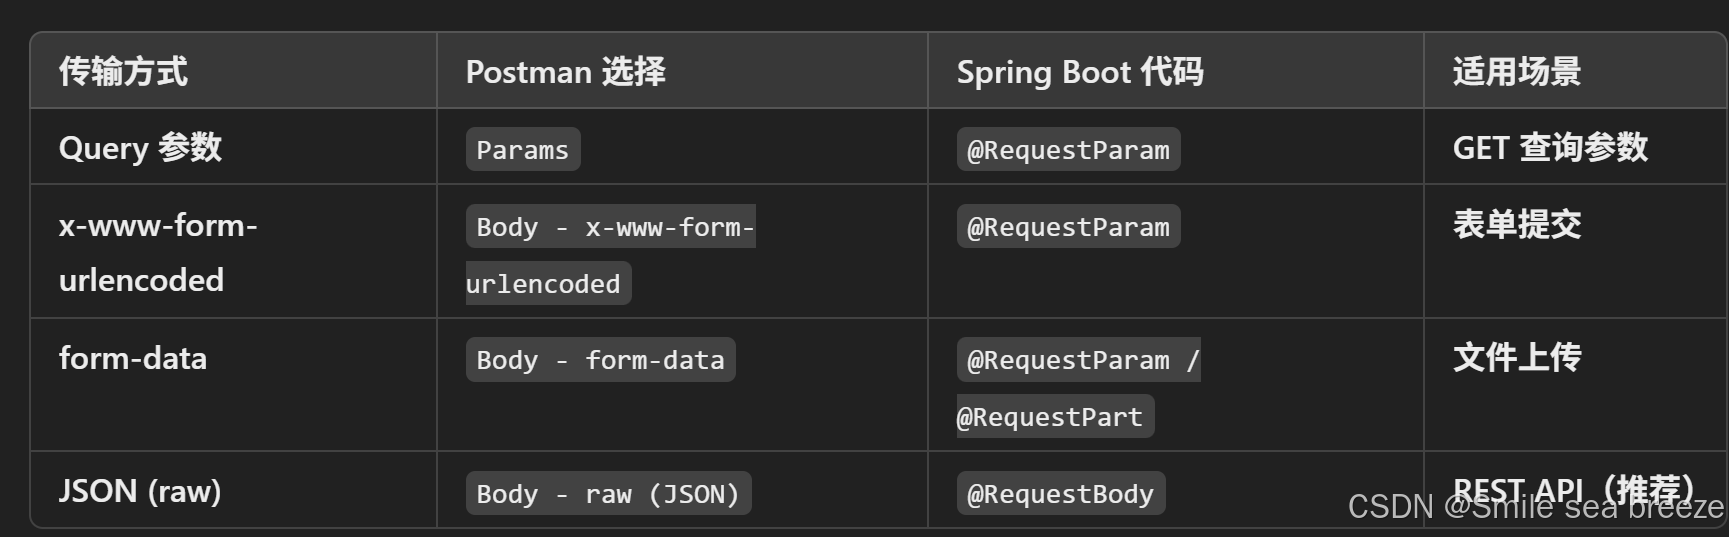
在 Postman 中,参数可以放在 Params 或 Body 里,而 Body 里又有不同的格式,比如 form-data 和 x-www-form-urlencoded。不同的参数传递方式,Spring Boot 代码写法也不同。下面是详细的区别和代码示例。
1. Params(查询参数 ?key=value)
适用场景:
-
GET 请求:一般用于传递非敏感参数,如搜索条件、分页参数等。
-
POST/PUT 请求:可用,但不常用,数据一般放 Body 里。
Postman 设置
-
方法:GET 或 POST
-
URL:http://localhost:8083/api/test?name=Tom&age=25
-
Params(键值对):

Spring Boot 代码
@RestController
@RequestMapping("/api")
public class TestController {

    @GetMapping("/test")
    public ResponseEntity<String> test(@RequestParam String name, @RequestParam int age) {
        return ResponseEntity.ok("Name: " + name + ", Age: " + age);
    }
}
2. Body - x-www-form-urlencoded
适用场景:
-
POST/PUT 请求,用于发送表单数据,Content-Type 是 application/x-www-form-urlencoded。
-
适合 表单提交、登录请求等。
Postman 设置
-
方法:POST
-
URL:http://localhost:8083/api/form
-
Body 选项:选择 x-www-form-urlencoded

Spring Boot 代码
@PostMapping("/form")
public ResponseEntity<String> formTest(@RequestParam String name, @RequestParam int age) {
    return ResponseEntity.ok("Received form data - Name: " + name + ", Age: " + age);
}
3. Body - form-data
适用场景:
上传文件,例如头像、Excel 文件等(支持 multipart/form-data)。
传输键值对(类似 x-www-form-urlencoded),但更适合含 文件 的请求。
Postman 设置
-
方法:POST
-
URL:http://localhost:8083/api/upload
-
Body 选项:选择 form-data

Spring Boot 代码
@PostMapping("/upload")
public ResponseEntity<String> uploadFile(
        @RequestParam String name,
        @RequestParam int age,
        @RequestParam("file") MultipartFile file) {

    return ResponseEntity.ok("Received: " + name + ", Age: " + age + ", File: " + file.getOriginalFilename());
}
4. Body - raw (JSON)
适用场景:
POST/PUT 请求,传递 JSON 格式数据,Content-Type 是 application/json。
适用于 REST API,推荐!
Postman 设置
-
方法:POST
-
URL:http://localhost:8083/api/json
-
Body 选项:选择 raw,格式 JSON
{
    "name": "Tom",
    "age": 25
}
Spring Boot 代码
@PostMapping("/json")
public ResponseEntity<String> jsonTest(@RequestBody Map<String, Object> data) {
    String name = data.get("name").toString();
    int age = Integer.parseInt(data.get("age").toString());
    return ResponseEntity.ok("Received JSON - Name: " + name + ", Age: " + age);
}
或者使用 DTO(推荐!):
public class Person {
    private String name;
    private int age;
    // 省略 Getter & Setter
}
@PostMapping("/json")
public ResponseEntity<String> jsonTest(@RequestBody Person person) {
    return ResponseEntity.ok("Received JSON - Name: " + person.getName() + ", Age: " + person.getAge());
}
总结


 1万+
1万+

 被折叠的 条评论
为什么被折叠?
被折叠的 条评论
为什么被折叠?
 到【灌水乐园】发言


