


ImageDraw模块
- ImageDraw模块实现了绘图功能
- 通过创建图片的方式来绘制2D图像,还可以在原有图片上进行绘图,以达到修饰图片或者对图片进行注释的目的
- 在ImageDraw模块绘图时需要首先创建一个ImageDraw.Draw对象,传入一个图片实例
- 使用Draw对象方法进行绘图
获取Draw对象
img = Image.open("文件路径")
pen = ImageDraw.Draw(img)
(1) 绘制直线
def line(self, [x1,y1,x2,y2], fill=None, width=0, joint=None)
- 以(x1,y1)为起点,以(x2,y2)为终点,画一条fill颜色的,宽为width的实线
(2) 绘制圆弧
def arc(self, [x1,y1,x2,y2], start, end, fill=None, width=1)
- 在左上角坐标为(x1,y1),右下角坐标为(x2,y2)的矩形区域内
- 满圆 O 内,以 start 为 起始角度,以 end 为终止角度,截取圆 O 的一部分圆弧并画出来
- 如果[x1,y1,x2,y2]区域不 是正方形,则在该区域内的最大椭圆中根据角度截取片段
- 参数 fill 和 width 与 line 方法相同
(3) 绘制椭圆
def ellipse(self, [x1,y1,x2,y2], fill=None, outline=None, width=1)
- 用法同 arc 类似,用于画圆(或者椭圆)
- outline 表示只规定圆的颜色。
(4) 绘制弦
def chord(self, [x1,y1,x2,y2], start, end, fill=None, outline=None, width=1)
- 用法同 arc 类似,用于画圆中从 start 到 end 的弦
- fill 表示弦与圆弧之间空间用指定颜 色填满,设置为 outline 表示只规定弦线的颜色
(5) 绘制扇形
def pieslice(self, [x1,y1,x2,y2], start, end, fill=None, outline=None, width=1)
- 用法同 elipse 类似,用于画起止角度间的扇形区域
- fill 表示将扇形区域用指定颜色填满,设置为 outline 表示只用指定颜色描出区域轮廓
(6) 绘制多边形
def polygon(self, [x1,y1,x2,y2], fill=None, outline=None)
- 根据坐标画多边形,Python 会根据第一个参量中的(x,y)坐标对,连接出整个图形
- fill 表示将多边形区域用指定颜色填满,outline 只用于设置指定颜色描出区域轮廓
(7) 绘制矩形
def rectangle(self, [x1,y1,x2,y2], fill=None, outline=None, width=1)
- 在指定的区域内画一个矩形,(x1,y1)表示矩形左上角的坐标,(x2,y2)表示矩形右下角的坐标
- fill 用于将矩形区域颜色填满,outline 用于描出区域轮廓
(8) 绘制文字
def text(
        self,
        xy,
        text,
        fill=None,
        font=None,
        anchor=None,
        spacing=4,
        align="left",
        direction=None,
        features=None,
        language=None,
    ):
- 在图像内添加文字。其中参数 position 是一个二元组,用于指定文字左上角的坐标
- text 表示要写入的文字内容
- fill 表示文本的颜色
- font 必须为 ImageFont 中指定的 font 类型
- spacing 表示行之间的像素数
- align 表示位置“left”,“center”或“right”
- direction 表示文字的方向。它可以是’rtl’(从右到左),‘ltr’(从左到右)或’ttb’(从上到下)。
(9) 绘制点
def point(self, xy, fill=None)
- 给定坐标处绘制点(单个像素)
两种绘图程序演示
【示例】创建图片的方式来绘制
from PIL import ImageDraw,Image,ImageFont
img = Image.new("RGB", (300, 300))
pen = ImageDraw.Draw(img)
pen.rectangle((10,10,250,250),fill='black',outline='red')
img_font = ImageFont.truetype('SIMLI.TTF',20)
pen.text((20,20),'这是一个测试', fill='white', font=img_font)
img.show()

【示例】在原图上绘制一个椭圆
from PIL import Image,ImageDraw
img = Image.open('picture\cup.jpg')
pen = ImageDraw.Draw(img)
pen.arc((0,0,img.width-1,img.height-1),0,360,fill='blue',width=10)
img.show()

ImageFont模块
- ImageFont莫苦熬的功能是实现对字体和字型的处理
(1)load函数
- 从
指定的文件中加载一种字体,该函数返回对应的字体对象 - 如果该函数运行失败,那么将产生 IOError 异常
def load(filename)
(2)load_path函数
- 和函数 load()一样,但是如果
没有指定当前路径,就会从文件 sys.path 开 始查找指定的字体文件
def load_path(filename)
(3)load_default函数
- 功能是加载一种
默认的字体
def load_default()
(4)getsize函数
- 返回给定文本的
宽度和高度,返回值是一个二元组
def getsize(self, text, direction=None, features=None, language=None, stroke_width=0)
(5)truetype函数
def truetype(font=None, size=10, index=0, encoding="", layout_engine=None)
- 有两种定义格式:
第 1 种格式的功能是加载一个 TrueType 或者 OpenType 字体文件,并且创建一个字体对象。在 Windows 系统中,如果指定的文件不存在,加载器 就会顺便看看 Windows 的字体目录下它是否存在
Image.truetype(file,size)
第 2 种格式的功能是,加载一个 TrueType 或者 OpenType 字体文件,并且创建一个字体 对象。
| 编码方式(encoding) | 含义 |
|---|---|
| unic | Unicode |
| symb | MicrosoftSymbol |
| ADOB | Adobe Standard |
| ADBE | Adobe Expert |
| armn | Apple Roman |
Image.truetype(file,size,encoding=value)
文字程序演示
【示例】在原图上面绘制文字
from PIL import ImageFont, ImageDraw, Image
img = Image.open('picture\cup.jpg')
pen = ImageDraw.Draw(img)
img_font = ImageFont.load_default()
pen.text((20, 10), 'ceshi', font=img_font, fill='white')
img_font = ImageFont.truetype('SIMYOU.TTF', 50)
pen.text((20, 80), '测试', font=img_font, fill='red')
img_font = ImageFont.truetype('SIMYOU.TTF',50)
pen.text((20, 150), '测试', font=img_font, fill='blue')
img.show()

程序一:绘制十字
绘制十字
from PIL import Image, ImageDraw
img = Image.open('picture\cup.jpg')
pen = ImageDraw.Draw(img)
pen.line([0, 0, img.width, img.height], fill='blue', width=5)
pen.line([0, img.height, img.width, 0], fill='red', width=5)
img.show()

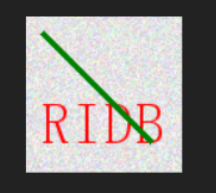
程序二:生成随机验证码
生成 随机验证码
from PIL import Image, ImageDraw, ImageFont
import random
img = Image.new("RGB", (100, 100), "white")
pen = ImageDraw.Draw(img)

# 获取一个随机颜色
def get_color():
    return (random.randint(200, 255), random.randint(200, 255), random.randint(200, 255))
# 获取一个随机大写字符
def get_char():
    return chr(random.randint(65, 90))
# 图片每个点的颜色随机
for x in range(img.width):
    for y in range(img.height):
        pen.point((x,y), fill=get_color())
# 在图片上生成4个随机字母
img_font = ImageFont.truetype('simsun.ttc', 36)
for i in range(4):
    pen.text((10 + i * 20, 50), get_char(), font=img_font, fill="red")

# 干扰线
for i in range(2):
    pen.line([10, 10, 80, 80], fill="green", width=4)

img.show()
程序三:绘制九宫格
绘制九宫格
from PIL import Image, ImageDraw
width = 300
height = 300
img = Image.new("RGB", (width, height), "blue")
pen = ImageDraw.Draw(img)

def get_color(x,y):
    a = x // 100 + y // 100
    if a == 0:
        return (255, 0, 0)
    if a == 1:
        return (0, 255, 0)
    if a == 2:
        return (0, 0, 255)
    if a == 3:
        return (0, 0, 0)
    if a == 4:
        return (255, 255, 255)

for x in range(width):
    for y in range(height):
        pen.point((x,y), fill=get_color(x,y))
img.show()

程序四:修改特定像素点颜色
将图片中所有黄色像素点修改成红色像素点
from PIL import Image, ImageDraw
img = Image.open("picture\cup.jpg")
pen = ImageDraw.Draw(img)

# 正宗的黄色(255,255,0) 正宗红色(255,0,0)
def modify_color(x,y):
    old_color = img.getpixel((x,y))
    if old_color[0] > 60 and old_color[1] > 60 and old_color[2] < 60 :
        return (255, 0, 0)
    else:
        return old_color

for x in range(img.width):
    for y in range(img.height):
        pen.point((x,y), fill=modify_color(x, y))
img.show()


 391
391


 被折叠的 条评论
为什么被折叠?
被折叠的 条评论
为什么被折叠?
 到【灌水乐园】发言


