


使用Haproxy搭建web群集
安装Nginx,配置两个Nginx网站
挂载Linux光盘
[root@centos01 ~]# mount /dev/cdrom /mnt
mount: /dev/sr0 写保护,将以只读方式挂载
将Nginx压缩包复制到第二台Nginx网站服务器
[root@centos01 ~]# scp /mnt/nginx-1.6.0.tar.gz root@192.168.100.20:/usr/src/
将Haproxy压缩包复制到Haproxy服务器
[root@centos01 ~]# scp /mnt/haproxy-1.4.24.tar.gz root@192.168.100.30:/usr/src/
解压Nginx文件到指定目录
[root@centos01 ~]# tar zxvf /mnt/nginx-1.6.0.tar.gz -C /usr/src/
挂载系统光盘,安装Nginx依赖软件
[root@centos01 ~]# mount /dev/cdrom /mnt/
mount: /dev/sr0 写保护,将以只读方式挂载
[root@centos01 ~]# yum -y install pcre-devel zlib-devel
创建Nginx用户禁止登录
[root@centos01 ~]# useradd -M -s /sbin/nologin nginx
编译安装Nginx
[root@centos01 ~]# cd /usr/src/nginx-1.6.0/
[root@centos01 nginx-1.6.0]# ./configure --prefix=/usr/local/nginx --user=nginx --group=nginx
[root@centos01 nginx-1.6.0]# make && make install
优化Nginx程序运行目录
[root@centos01 ~]# ln -s /usr/local/nginx/sbin/* /usr/local/sbin/
第二台Nginx网站服务相同配置
创建Nginx网站根目录文件
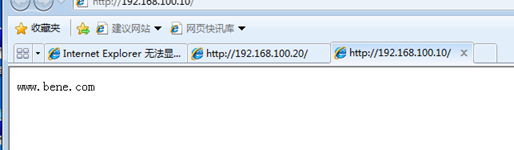
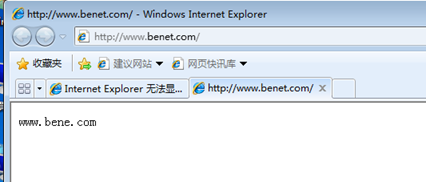
[root@centos01 ~]# echo “www.bene.com” > /usr/local/nginx/html/index.html
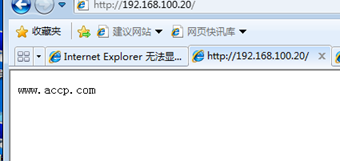
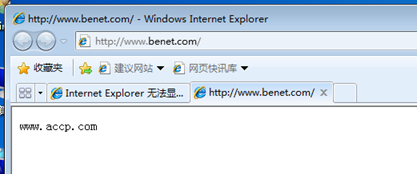
[root@centos02 ~]# echo “www.accp.com” > /usr/local/nginx/html/index.html
启动Nginx
[root@centos01 ~]# nginx
[root@centos02 ~]# nginx
验证Nginx网站服务器
编译安装Haproxy
挂载系统光盘
[root@centos03 ~]# mount /dev/cdrom /mnt
mount: /dev/sr0 写保护,将以只读方式挂载
mount: /dev/sr0 已经挂载或 /mnt 忙
/dev/sr0 已经挂载到 /mnt 上
安装Haproxy依赖软件
[root@centos03 ~]# yum -y install pcre-devel bzip2-devel
解压Haproxy软件包
[root@centos03 ~]# tar zxvf /usr/src/haproxy-1.4.24.tar.gz -C /usr/src/
编译Haproxy
[root@centos03 ~]# cd /usr/src/haproxy-1.4.24/
[root@centos03 haproxy-1.4.24]# make TARGET=linux26
[root@centos03 haproxy-1.4.24]# make install
生成Haproxy配置文件
创建保存Haproxy配置文件目录
[root@centos03 ~]# mkdir /etc/haproxy
生成主配置文件
[root@centos03 ~]# cd /usr/src/haproxy-1.4.24/
[root@centos03 haproxy-1.4.24]# cp examples/haproxy.cfg /etc/haproxy/
创建Haproxy服务控制脚本执行权限
[root@centos03 ~]# cd /usr/src/haproxy-1.4.24/
[root@centos03 haproxy-1.4.24]# cp examples/haproxy.init /etc/init.d/haproxy
[root@centos03 haproxy-1.4.24]# chmod +x /etc/init.d/haproxy
添加系统服务设置开机自动启动
[root@centos03 ~]# chkconfig --add haproxy
[root@centos03 ~]# chkconfig --level 35 haproxy on
优化程序执行命令
[root@centos03 ~]# cd /usr/src/haproxy-1.4.24/
[root@centos03 haproxy-1.4.24]# cp haproxy /usr/sbin/
创建服务运行的临时目录
[root@centos03 ~]# mkdir -p /usr/share/haproxy
修改Haproxy主配置文件
[root@centos03 ~]# vi /etc/haproxy/haproxy.cfg
#this config needs haproxy-1.1.28 or haproxy-1.2.1
global
log 127.0.0.1 local0
log 127.0.0.1 local1 notice
#log loghost local0 info
maxconn 4096
chroot /usr/share/haproxy
uid 99
gid 99
daemon
#debug
#quiet
defaults
log global
mode http
option httplog
option dontlognull
retries 3
redispatch
maxconn 2000
contimeout 10
clitimeout 10
srvtimeout 10
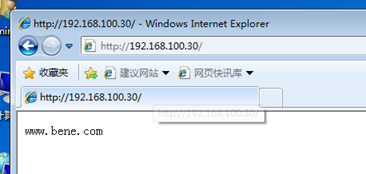
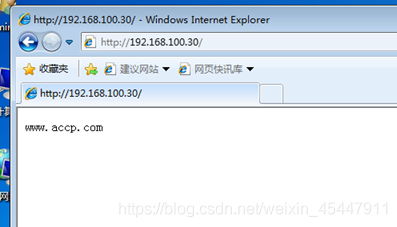
listen nginx 192.168.100.30:80
balance roundrobin
server web01 192.168.100.10:80 check inter 2000 rise 2 fall 5
server web02 192.168.100.20:80 check inter 2000 rise 2 fall 5
运行脚本文件,启动Haproxy服务
[root@centos03 ~]# /etc/init.d/haproxy start
Starting haproxy (via systemctl): [ 确定 ]
[root@centos03 ~]# netstat -anptu | grep 80
tcp 0 0 192.168.100.30:80 0.0.0.0:* LISTEN 40809/haproxy
udp 0 0 0.0.0.0:48056 0.0.0.0:* 40809/haproxy
[root@centos03 ~]# netstat -anptu | grep haproxy
tcp 0 0 192.168.100.30:80 0.0.0.0:* LISTEN 40809/haproxy
udp 0 0 0.0.0.0:48056 0.0.0.0:* 40809/haproxy
客户端验证
安装DNS
挂载系统光盘
[root@centos04 ~]# mount /dev/cdrom /mnt
mount: /dev/sr0 写保护,将以只读方式挂载
安装DNS
[root@centos04 ~]# yum -y install bind bind-chroot
启动DNS,开机自启
[root@centos04 ~]# systemctl start named
[root@centos04 ~]# systemctl enable named
备份DNS主配置文件
[root@centos04 ~]# cp /etc/named.conf /etc/named.conf.bak
配置DNS主配置文件
[root@centos04 ~]# echo “” > /etc/named.conf
[root@centos04 ~]# vi /etc/named.conf
options {
listen-on port 53 { any; };
directory “/var/named”;
};
zone “benet.com” IN {
type master;
file “benet.com.zone”;
};
编辑正向解析文件
[root@centos04 ~]# vi /var/named/benet.com.zone
$TTL 86400
@ SOA benet.com root.benet.com.(
2019120901
1H
15M
1W
1D
)
@ NS centos04.benet.com.
centos04 A 192.168.100.40
www A 192.168.100.30
[root@centos04 ~]# named-checkzone benet.com /var/named/benet.com.zone
zone benet.com/IN: loaded serial 2019120901
OK
重启DNS服务
[root@centos04 ~]# systemctl restart named
编辑网卡配置
[root@centos04 ~]# vi /etc/sysconfig/network-scripts/ifcfg-ens32
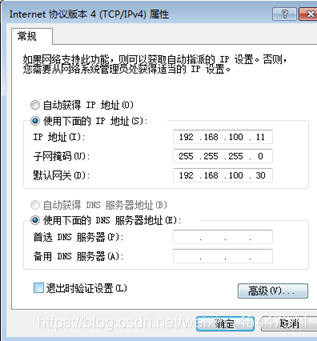
DNS1=192.168.100.40
重启网卡
[root@centos04 ~]# systemctl restart network
客户端IP配置
客户端验证
添加httpd服务
添加光盘
[root@centos05 ~]# mount /dev/cdrom /mnt
mount: /dev/sr0 写保护,将以只读方式挂载
安装httpd服务
[root@centos05 ~]# yum -y install httpd
开启httpd服务
[root@centos05 ~]# systemctl start httpd
[root@centos05 ~]# systemctl enable httpd
创建网站根目录文件
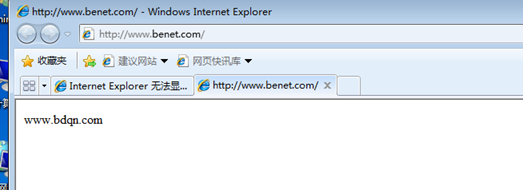
[root@centos05 ~]# echo “www.bdqn.com” > /var/www/html/index.html
编辑Haproxy主配置文件
listen nginx 192.168.100.30:80
balance roundrobin
server web01 192.168.100.10:80 check inter 2000 rise 2 fall 5
server web02 192.168.100.20:80 check inter 2000 rise 2 fall 5
server web03 192.168.100.50:80 check inter 2000 rise 2 fall 5 weight 1
重启Haproxy服务
[root@centos03 ~]# /etc/init.d/haproxy stop
Stopping haproxy (via systemctl): [ 确定 ]
[root@centos03 ~]# /etc/init.d/haproxy start
Starting haproxy (via systemctl): [ 确定 ]
客户端访问


 146
146


 被折叠的 条评论
为什么被折叠?
被折叠的 条评论
为什么被折叠?
 到【灌水乐园】发言


