


SSM项目引入sharding JDBC进行分表
- 注意点:
- 本次集成sharing-jdbc 4.1.1,由于各个版本差别比较大,配置方式差别也特别大,请根据官方文档进行配置!
官方配置路径:https://shardingsphere.apache.org/document/legacy/4.x/document/cn/manual/sharding-jdbc/configuration/config-spring-namespace/ - 本次展示的是不分库,按年进行分表,如有使用要根据自己的业务进行修改!
- 查询时候要把逻辑列带上,这样能精确定位到唯一的一张表!如果逻辑列为空会这几个表全部查一遍,然后各个表符合的数据的全部展示出来!
- 由于没有查到cat集成sharing-jdbc相关配置,dataSource专门供cat使用,导致显示sql时候还是原来的样子,但是不影响功能!
- 本次集成sharing-jdbc 4.1.1,由于各个版本差别比较大,配置方式差别也特别大,请根据官方文档进行配置!
1. 引入Maven依赖
<!-- 分库分表 -->
<dependency>
   <groupId>org.apache.shardingsphere</groupId>
   <artifactId>sharding-jdbc-spring-boot-starter</artifactId>
   <version>4.1.1</version>
</dependency>
<dependency>
   <groupId>org.apache.shardingsphere</groupId>
   <artifactId>sharding-jdbc-spring-namespace</artifactId>
   <version>4.1.1</version>
</dependency>
2. 配置文件
<?xml version="1.0" encoding="UTF-8"?>
<beans xmlns="http://www.springframework.org/schema/beans" xmlns:xsi="http://www.w3.org/2001/XMLSchema-instance" xmlns:p="http://www.springframework.org/schema/p"
   xmlns:context="http://www.springframework.org/schema/context" xmlns:cache="http://www.springframework.org/schema/cache" xmlns:aop="http://www.springframework.org/schema/aop"
   xmlns:tx="http://www.springframework.org/schema/tx" xmlns:task="http://www.springframework.org/schema/task" xmlns:util="http://www.springframework.org/schema/util"
   xmlns:sharding="http://shardingsphere.apache.org/schema/shardingsphere/sharding"
   xmlns:bean="http://www.springframework.org/schema/util"
   xsi:schemaLocation="
   http://www.springframework.org/schema/beans http://www.springframework.org/schema/beans/spring-beans.xsd
   http://www.springframework.org/schema/context http://www.springframework.org/schema/context/spring-context.xsd
   http://www.springframework.org/schema/cache  http://www.springframework.org/schema/cache/spring-cache.xsd
   http://www.springframework.org/schema/aop http://www.springframework.org/schema/aop/spring-aop.xsd
   http://www.springframework.org/schema/tx http://www.springframework.org/schema/tx/spring-tx.xsd
   http://www.springframework.org/schema/task http://www.springframework.org/schema/task/spring-task.xsd
   http://www.springframework.org/schema/util http://www.springframework.org/schema/util/spring-util.xsd
   http://www.springframework.org/schema/mvc http://www.springframework.org/schema/mvc/spring-mvc.xsd
    http://shardingsphere.apache.org/schema/shardingsphere/sharding
    http://shardingsphere.apache.org/schema/shardingsphere/sharding/sharding.xsd
    http://www.springframework.org/schema/context
    http://www.springframework.org/schema/context/spring-context.xsd
    http://www.springframework.org/schema/tx
    http://www.springframework.org/schema/tx/spring-tx.xsd"
   default-lazy-init="true">

   <bean id="ds1" class="com.alibaba.druid.pool.DruidDataSource" init-method="init" destroy-method="close">
      <property name="driverClassName" value="${jdbc.driverClass}" />
      <property name="url" value="${jdbc.url}" />
      <property name="username" value="${jdbc.user}" />
      <property name="password" value="${jdbc.password}" />
      <property name="maxActive" value="${jdbc.maxActive}" />
      <property name="initialSize" value="${jdbc.initialSize}" />
      <property name="maxWait" value="6000" />
      <property name="minIdle" value="${jdbc.initialSize}" />

      <property name="timeBetweenEvictionRunsMillis" value="60000" />
      <property name="minEvictableIdleTimeMillis" value="300000" />
      <property name="removeAbandoned" value="true" /> <!-- 打开removeAbandoned功能 -->
      <property name="removeAbandonedTimeout" value="1800" /> <!-- 1800秒,也就是30分钟 -->
      <property name="logAbandoned" value="true" /> <!-- 关闭abanded连接时输出错误日志 -->

      <property name="validationQuery" value="SELECT 'x'" />
      <property name="testWhileIdle" value="true" />
      <property name="testOnBorrow" value="false" />
      <property name="testOnReturn" value="false" />

      <property name="connectionProperties" value="druid.stat.mergeSql=true" />
      <property name="filters" value="stat,slf4j" />
   </bean>
   <!--由于cat无法集成shardingjdbc 所以此处单独cat使用-->
   <bean id="dataSource" class="com.alibaba.druid.pool.DruidDataSource" init-method="init" destroy-method="close">
      <property name="driverClassName" value="${jdbc.driverClass}" />
      <property name="url" value="${jdbc.url}" />
      <property name="username" value="${jdbc.user}" />
      <property name="password" value="${jdbc.password}" />
      <property name="maxActive" value="${jdbc.maxActive}" />
      <property name="initialSize" value="${jdbc.initialSize}" />
      <property name="maxWait" value="6000" />
      <property name="minIdle" value="${jdbc.initialSize}" />

      <property name="timeBetweenEvictionRunsMillis" value="60000" />
      <property name="minEvictableIdleTimeMillis" value="300000" />
      <property name="removeAbandoned" value="true" /> <!-- 打开removeAbandoned功能 -->
      <property name="removeAbandonedTimeout" value="1800" /> <!-- 1800秒,也就是30分钟 -->
      <property name="logAbandoned" value="true" /> <!-- 关闭abanded连接时输出错误日志 -->

      <property name="validationQuery" value="SELECT 'x'" />
      <property name="testWhileIdle" value="true" />
      <property name="testOnBorrow" value="false" />
      <property name="testOnReturn" value="false" />

      <property name="connectionProperties" value="druid.stat.mergeSql=true" />
      <property name="filters" value="stat,slf4j" />
   </bean>
   <bean:properties id="workerId">
      <prop key="worker.id">${workerId}</prop>
   </bean:properties>


   <bean id="msPushShardingAlgorithm" class="com.xxx.xxx.biz.study.manage.config.MsPushShardingAlgorithm" />
   <sharding:standard-strategy id="pushTableStrategy" sharding-column="create_date" precise-algorithm-ref="msPushShardingAlgorithm" range-algorithm-ref="msPushShardingAlgorithm"/>
   <sharding:key-generator id="idKeyGenerator" type="SNOWFLAKE" column="id" props-ref="workerId"/>

<sharding:data-source id="shardingDataSource">
		<sharding:sharding-rule data-source-names="ds1">
			<sharding:table-rules>
				<sharding:table-rule logic-table="biz_ms_push"
									 actual-data-nodes="ds1.biz_ms_push_20$->{21..25}"
									 table-strategy-ref="pushTableStrategy" key-generator-ref="idKeyGenerator"  />
				<sharding:table-rule logic-table="biz_ms_push_record"
									 actual-data-nodes="ds1.biz_ms_push_record_20$->{21..25}"
									 table-strategy-ref="pushTableStrategy" key-generator-ref="idKeyGenerator"  />
				<sharding:table-rule logic-table="biz_ms_push_record_link"
									 actual-data-nodes="ds1.biz_ms_push_record_link_20$->{21..25}"
									 table-strategy-ref="pushTableStrategy" key-generator-ref="idKeyGenerator"  />
			</sharding:table-rules>
			<sharding:binding-table-rules>
				<sharding:binding-table-rule logic-tables="biz_ms_push,biz_ms_push_record,biz_ms_push_record_link" />
			</sharding:binding-table-rules>
		</sharding:sharding-rule>
		<sharding:props>
			<prop key="sql.show">true</prop>
		</sharding:props>
	</sharding:data-source>

   <bean id="sqlSessionFactory" class="org.mybatis.spring.SqlSessionFactoryBean">
      <property name="dataSource" ref="shardingDataSource" />
      <property name="mapperLocations">
         <array>
            <value>classpath:mapper/*.xml</value>
            <value>classpath:mapper/ext/*.xml</value>
         </array>
      </property>
      <!-- 根据实际工程路径 修改 typeAliasesPackage -->
      <property name="typeAliasesPackage" value="com.xxx.xxx.biz.study.manage.po" />
      <property name="configLocation" value="classpath:mybatis/mybatis-config.xml"></property>
      <property name="plugins">
         <array>
            <bean class="com.github.pagehelper.PageHelper">
               <!-- 这里的几个配置主要演示如何使用,如果不理解,一定要去掉下面的配置 -->
               <property name="properties">
                  <value>
                     dialect=mysql
                     reasonable=false
                     supportMethodsArguments=true
                     returnPageInfo=check
                     params=count=countSql
                  </value>
               </property>
            </bean>
            <!-- 增加sql监控 -->
            <bean class="com.xxx.xxx.mybatis.interceptors.CatMybatisInterceptor">
               <!-- dataSource属性作用:获取数据库链接字符串 -->
               <property name="dataSource" ref="dataSource" />
            </bean>
         </array>
      </property>
   </bean>


   <bean class="org.mybatis.spring.mapper.MapperScannerConfigurer">
      <property name="addToConfig" value="true" />
      <property name="basePackage" value="com.xxx.xxx.biz.study.manage.mapper" />
   </bean>

   <bean id="sqlSession" class="org.mybatis.spring.SqlSessionTemplate" scope="prototype">
      <constructor-arg index="0" ref="sqlSessionFactory" />
   </bean>
</beans>
1.各个配置说明
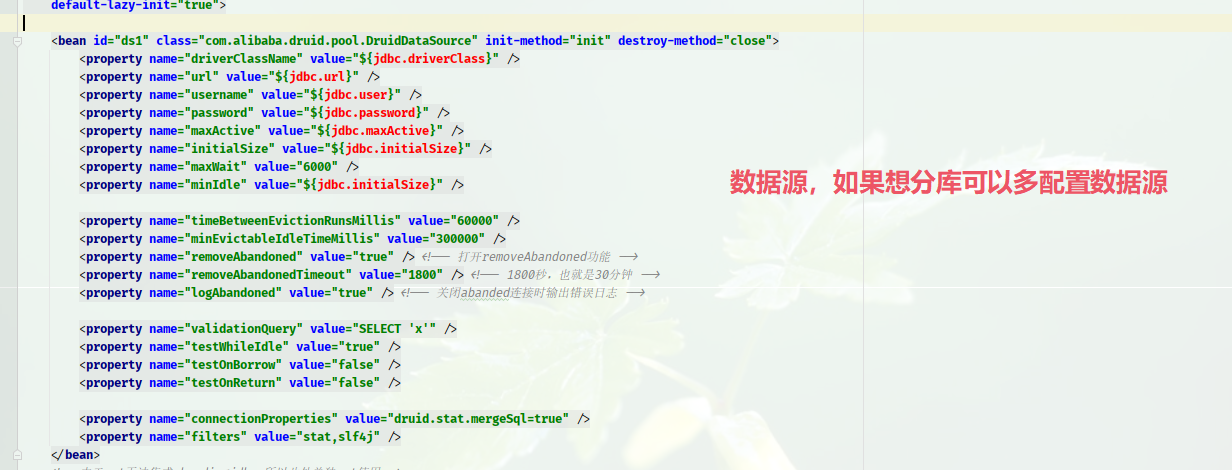
1.数据源
- 目前只是分表,如果想分库,可以配置多数据源,注意:数据源id要不同,规则要配置好)
2.加载各种配置

解释:
1. 加载分表的规制,配置如何去根据直接业务需求进行分表(配置里面是保存的逻辑以及查询的逻辑)
<bean id="msPushShardingAlgorithm" class="com.xxx.xxx.biz.study.manage.config.MsPushShardingAlgorithm" />
2. 此代码是配置具体的列,以及规制!详情见下图
<sharding:standard-strategy id="pushTableStrategy" sharding-column="create_date" precise-algorithm-ref="msPushShardingAlgorithm" range-algorithm-ref="msPushShardingAlgorithm"/>

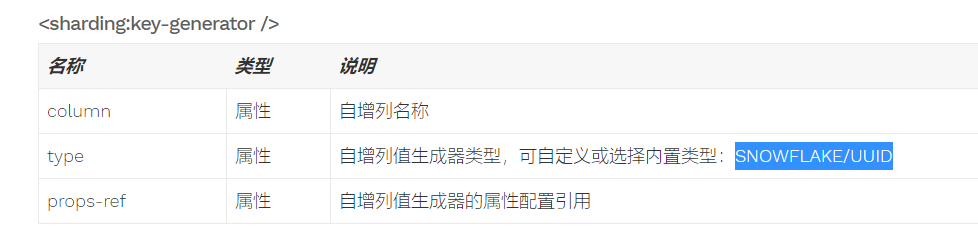
3. 这是主键的生成规则(官方默认两种SNOWFLAKE/UUID),因为已经分表原先的主键自增已经不适合现在业务,所以本次选择雪花算法!详情见下图:
<sharding:key-generator id="idKeyGenerator" type="SNOWFLAKE" column="id" props-ref="workerId"/>
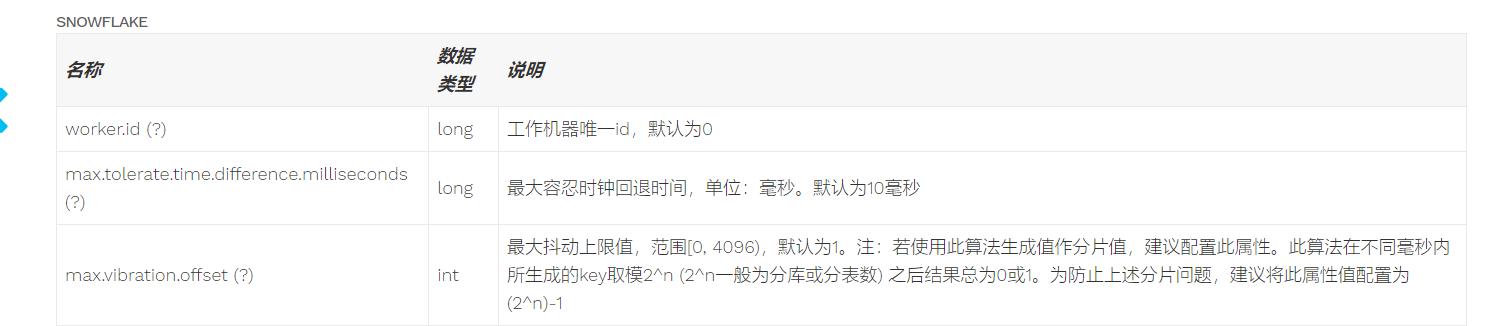
注意:1.如果你是多主机部署请为了避免生成重复请注意机器id(workerId)
2. 多主机部署如果服务器本地时间不一致请配置最大容忍时钟回退时间
3.1 主键的生成规则
3.2 雪花算法多主机配置项
3. 集成
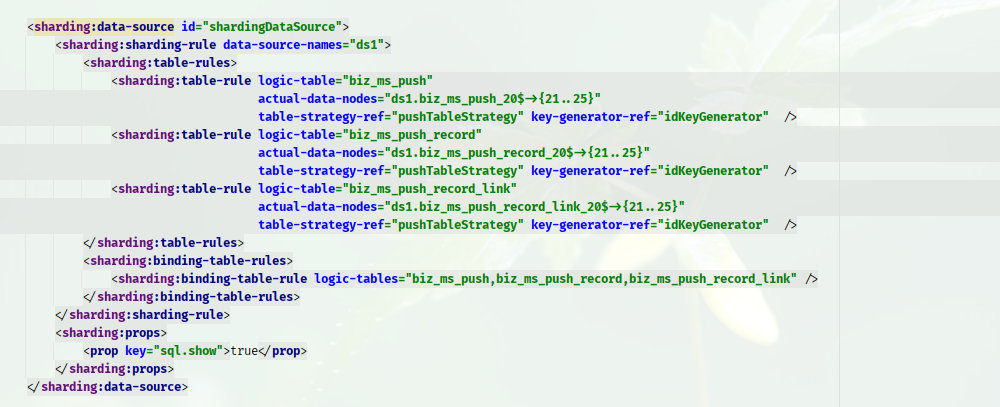
解释:
<sharding:data-source />
| 名称 | 类型 | 说明 |
|---|---|---|
| id | 属性 | Spring Bean Id |
| sharding-rule | 标签 | 数据分片配置规则 |
| props (?) | 标签 | 属性配置 |
<sharding:sharding-rule />
| 名称 | 类型 | 说明 |
|---|---|---|
| data-source-names | 属性 | 数据源Bean列表,多个Bean以逗号分隔 |
| table-rules | 标签 | 表分片规则配置对象 |
| logic-table | 标签 | 逻辑表名称 |
| actual-data-nodes (?) | 标签 | 由数据源名 + 表名组成,以小数点分隔。多个表以逗号分隔,支持inline表达式。缺省表示使用已知数据源与逻辑表名称生成数据节点,用于广播表(即每个库中都需要一个同样的表用于关联查询,多为字典表)或只分库不分表且所有库的表结构完全一致的情况 |
| table-strategy-ref (?) | 属性 | 表分片策略,对应<sharding:standard-strategy >中的策略Id,缺省表示使用<sharding:sharding-rule />配置的默认表分片策略 |
| key-generator-ref (?) | 属性 | 自增列值生成器引用,缺省表示使用默认自增列值生成器 |
| binding-table-rule (+) | 属性 | 绑定表规则 |
| sql.show (?) | 属性 | 是否开启SQL显示,默认值: false |
3. 配置类
-
保存或者查找的分片规则
@Log4j
public class MsPushShardingAlgorithm implements PreciseShardingAlgorithm, RangeShardingAlgorithm<Integer> {
    /**
     * 缓存存在的表
     */
    private List<String> msPushTables=new ArrayList<>();
    private List<String> msPushTablesList=new ArrayList<>() ;

    private Boolean isLoad = false;


    //这是保存的分片规则
    @Override
    public String doSharding(Collection availableTargetNames, PreciseShardingValue shardingValue) {
        String logicTableName = shardingValue.getLogicTableName() + "_";
        for (String tableName : msPushTablesList) {
            if (tableName.equals(logicTableName)){
                isLoad = true;
                break;
            }else {
                isLoad = false;
            }
        }
        if (!isLoad) {
            PageHelper.orderBy(null);
            msPushTables.addAll(DBUtil.getAllSystemLogTable(logicTableName));
            msPushTablesList.add(logicTableName);
            isLoad = true;
        }
        String target = shardingValue.getValue().toString();
        String year = target.substring(target.lastIndexOf("_") + 1, target.lastIndexOf("_") + 5);
        if (!msPushTables.contains(logicTableName+year)) {
        	//此处是创建表的逻辑,sql见下:
            DBUtil.createLogTable(logicTableName, year);
            msPushTables.add(year);
        }
        return shardingValue.getLogicTableName()+"_" +year;
    }
    @Override
    public Collection<String> doSharding(Collection<String> availableTargetNames, RangeShardingValue<Integer> shardingValue) {
        Collection<String> availables = new ArrayList<>();
        Range valueRange = shardingValue.getValueRange();
        for (String target : availableTargetNames) {
            Integer shardValue = Integer.parseInt(target.substring(target.lastIndexOf("_") + 1, target.lastIndexOf("_") + 5));
            if (valueRange.hasLowerBound()) {
                String lowerStr = valueRange.lowerEndpoint().toString();
                Integer start = Integer.parseInt(lowerStr.substring(0, 4));
                if (start - shardValue > 0) {
                    continue;
                }
            }
            if (valueRange.hasUpperBound()) {
                String upperStr = valueRange.upperEndpoint().toString();
                Integer end = Integer.parseInt(upperStr.substring(0, 4));
                if (end - shardValue < 0) {
                    continue;
                }
            }
            availables.add(target);
        }
        return availables;
    }


}
DBUtil:
@Component
public class DBUtil {
    @Autowired
    private  MsPushRecordPoWithBLOBsMapper msPushRecordPoWithBLOBsMapper;

    private  static MsPushRecordPoWithBLOBsMapper pushRecordPoWithBLOBsMapper;


    //解决静态方法无法注入问题
    @PostConstruct
    public void init() {
        pushRecordPoWithBLOBsMapper = msPushRecordPoWithBLOBsMapper;
    }


    public static List<String> getAllSystemLogTable(String logicTableName) {
        logicTableName=logicTableName+"2";
        List<String> allSystemLogTable = pushRecordPoWithBLOBsMapper.getAllSystemLogTable(logicTableName);
        return allSystemLogTable;
    }

    public static void createLogTable( String logicTableName,String year) {

        String tableName = logicTableName + year;
        if (logicTableName.equals("biz_ms_push_record_")){
            pushRecordPoWithBLOBsMapper.createRecordNewTable(tableName);
        }else if(logicTableName.equals("biz_ms_push_")){
            pushRecordPoWithBLOBsMapper.createPushNewTable(tableName);
        }else if(logicTableName.equals("biz_ms_push_record_link_")){
            pushRecordPoWithBLOBsMapper.createPushRecordLinkNewTable(tableName);
        }


    }
}
createPushNewTable:
CREATE TABLE ${tableName}
(
  `id` bigint(20) NOT NULL AUTO_INCREMENT COMMENT '主键',
  `ms_push_id` bigint(20) DEFAULT NULL COMMENT '推送id',
  `total_count` int(10) DEFAULT NULL COMMENT '实发送量',
  `sent_count` int(10) DEFAULT NULL COMMENT '到达量',
  `open_count` int(10) DEFAULT NULL COMMENT '打开量',
  `dismiss_count` int(10) DEFAULT NULL COMMENT '忽略量',
  `task_id` varchar(100) DEFAULT NULL COMMENT '任务id',
  `status` int(1) DEFAULT NULL COMMENT '状态(1成功,2失败)',
  `application_unique` varchar(100) DEFAULT NULL COMMENT '设备类型标识',
  `remark` varchar(2000) DEFAULT NULL COMMENT '备注',
  `task_status_remark` varchar(2000) DEFAULT NULL COMMENT '任务状态备注',
  `create_date` datetime DEFAULT NULL COMMENT '创建时间',
  `update_date` datetime DEFAULT NULL COMMENT '修改时间',
  PRIMARY KEY (`id`) USING BTREE,
  KEY                  `ms_push_id` (`ms_push_id`) USING BTREE
) ENGINE=InnoDB AUTO_INCREMENT=864 DEFAULT CHARSET=utf8 COMMENT='消息推送记录';
- 由于是分布式项目,避免生产id重复,故配置工作id,如果不配置默认为0;
<bean:properties id="workerId">
   <prop key="worker.id">${workerId}</prop>
</bean:properties>
**注意:**可以根据hostname,ip生成不重复的3位以内数字,只要各个服务器生成的不一致就行,本案例采用ip相加(请及时验证)!
public static Long getInet4Address() {
    Enumeration<NetworkInterface> nis;
    InetAddress address =null;
    try {
        nis = NetworkInterface.getNetworkInterfaces();
        for (; nis.hasMoreElements(); ) {
            NetworkInterface ni = nis.nextElement();
            Enumeration<InetAddress> ias = ni.getInetAddresses();
            for (; ias.hasMoreElements(); ) {
                InetAddress   ia  = ias.nextElement();
                //ia instanceof Inet6Address && !ia.equals("")
                if (ia instanceof Inet4Address && !ia.getHostAddress().equals("127.0.0.1")) {
                    address = ia;
                }
            }
        };
        // IP地址byte[]数组形式,这个byte数组的长度是4,数组0~3下标对应的值分别是172,16,206,54
        byte[] ipAddressByteArray = address.getAddress();
        // 由这里计算workerId源码可知,workId由两部分组成:
        int  workerId=0;
        for (byte byteNum : ipAddressByteArray) {
            workerId += byteNum & 0xFF;
        }
        logger.info("==============address是:"+address+"============================================测试workerId是:"+workerId);
        return Long.valueOf(workerId);
    } catch (SocketException e) {
        logger.error("============================================获取ip错误",e);
    }
    return  0L;
}
赋值 workerId
@Configuration
@Slf4j
public class WorkIdConfig {
    private static Logger logger = LoggerFactory.getLogger(WorkIdConfig.class);

    static {
        long workId = 0;
        try {
            workId = SnowflakeIdWorker.getInet4Address();
        } catch (Exception e) {
            logger.error("生成workId发生异常.", e);
        }
        logger.info("========最终workerID是:" + workId + "============");
        System.setProperty("workerId", String.valueOf(workId));
    }

}


 1474
1474


 被折叠的 条评论
为什么被折叠?
被折叠的 条评论
为什么被折叠?
 到【灌水乐园】发言


