


Docker 部署Django+Mysql+uWSGI+Nginx Web应用
Change logs更新记录
2022/1/4 fixed web access problem of wide area network(如下)
2021/12 draft notes released
- Docker 启动容器时,将端口 -p 80:80 改为 -p 8001:80(解决外网访问问题, 运营商限制了80端口,所以导致外网访问一直失败,内网访问ok)
- 更新了uwsgi.ini配置文件,更新了nginx配置文件
主机环境
HP workstation个人笔记本电脑
OS:ubuntu 20.04 LTS
宿主机工程目录
root@HP-ZBook-Fury-17:~# tree -d
/root/code
/root/docker
.
├── code
│ └── datacube # django项目名
│ ├── apps
│ ├── datacube
│ │ └── pycache
│ ├── extra_apps
│ ├── media
│ ├── static
│ │ └── admin
│ │ ├── css
│ │ │ └── vendor
│ │ │ └── select2
│ │ ├── fonts
│ │ ├── img
│ │ │ └── gis
│ │ └── js
│ │ ├── admin
│ │ └── vendor
│ │ ├── jquery
│ │ ├── select2
│ │ │ └── i18n
│ │ └── xregexp
│ └── templates
├── docker #
│ ├── django-uwsgi-nginx
│ └── mysql
│ ├── conf.d
│ └── data
│ ├── datacube
│ ├── mysql
│ ├── performance_schema
│ └── sys
宿主机上安装Docker
省略…网上有很多教程供参考
创建Mysql容器并启动
简单说明一下, docker run就是运行容器的命令,如果本地仓库没有mysql5.7.19镜像那么docker会自动从docker hub pull 也就是下载我们制定的mysql版本
docker run 参数大白话说明
-d : 后台运行
-v : 卷挂载 本地目录:容器目录
-e : 配置环境(这边我们配置了mysql密码 和 数据库名)
-p : 端口
我的目录
root@HP-ZBook-Fury-17:~/docker/mysql# ls
conf.d  data  start.sh

mysql
│       ├── conf.d
│       └── data
│           ├── datacube
│           ├── mysql
│           ├── performance_schema
│           └── sys
文件start.sh
#!/bin/bash
echo "create a mysql container.."
docker run -d --name mysql \
           -v /root/docker/mysql/conf.d:/etc/mysql/conf.d \
           -v /root/docker/mysql/data:/var/lib/mysql \
           -e MYSQL_ROOT_PASSWORD="my-secret-password" \
           -e MYSQL_DATABASE="datacube" \
           -p 3306:3306 mysql:5.7.19 \
           --character-set-server=utf8 --collation-server=utf8_general_ci
文件my.cnf内容
[client]
default-character-set=utf8
[mysqld]
character-set-server=utf8
performance_schema = OFF
[mysql]
no-auto-rehash
default-character-set=utf8
到这里就可以运行了
/root/docker/mysql/start.sh
然后docker查看容器已经成功运行
root@HP-ZBook-Fury-17:/# docker ps
CONTAINER ID   IMAGE       COMMAND                  CREATED      STATUS       PORTS                                                  NAMES
38baba6f3f5b   mysql:5.7   "docker-entrypoint.s…"   2 days ago   Up 2 hours   0.0.0.0:3306->3306/tcp, :::3306->3306/tcp, 33060/tcp   mysql
进入mysql容器测试一下
docker ps 查看容器id, docker exec -it 38baba6f3f5b /bin/bash进入容器,mysql -u root -p
登录mysql, 最后show databases;
root@HP-ZBook-Fury-17:/# docker ps
CONTAINER ID   IMAGE       COMMAND                  CREATED      STATUS       PORTS                                                  NAMES
38baba6f3f5b   mysql:5.7   "docker-entrypoint.s…"   2 days ago   Up 2 hours   0.0.0.0:3306->3306/tcp, :::3306->3306/tcp, 33060/tcp   mysql
root@HP-ZBook-Fury-17:/# docker exec -it 38baba6f3f5b /bin/bash
root@38baba6f3f5b:/# mysql -u root -p
Enter password:
Welcome to the MySQL monitor.  Commands end with ; or \g.
Your MySQL connection id is 2
Server version: 5.7.36 MySQL Community Server (GPL)

Copyright (c) 2000, 2021, Oracle and/or its affiliates.

Oracle is a registered trademark of Oracle Corporation and/or its
affiliates. Other names may be trademarks of their respective
owners.

Type 'help;' or '\h' for help. Type '\c' to clear the current input statement.

mysql> show databases;
+--------------------+
| Database           |
+--------------------+
| information_schema |
| datacube           |
| mysql              |
| performance_schema |
| sys                |
+--------------------+
5 rows in set (0.04 sec)
创建Python+Django+Nginx+uWSGI镜像并启动测试
该容器需要与上面创建的mysql容器互联,这里通过更新环境变量的方式来做,因此需要更新django项目下的settings.py 如下:
目录:/root/code/datacube/datacube/settings.py
DATABASES = {
    'default': {
        'ENGINE': 'django.db.backends.mysql',
        'NAME': os.environ.get('MYSQL_DATABASE_NAME'),
        'USER': 'root',
        'PASSWORD': os.environ.get('MYSQL_ENV_MYSQL_ROOT_PASSWORD'),
        'HOST': os.environ.get('MYSQL_PORT_3306_TCP_ADDR'),
        'OPTIONS': {
            "init_command": "SET foreign_key_checks=0;",
        }
    }}
配置Dockerfile, nginx, uwsgi, requirements.txt, soruces.list
目录
├── Dockerfile
├── nginx-app.conf
├── requirements.txt
├── sources.list
├── uwsgi.ini
文件Dockerfile
FROM ubuntu:18.04

MAINTAINER matt<751749090@qq.com>

# 安装git、python、nginx、.等,并清理缓存
COPY    sources.list /etc/apt/sources.list

RUN     apt-get update \
        && apt-get install gcc -y\
        && apt-get install g++ -y\
        && apt-get install gdb -y\
        && apt-get install python-software-properties -y\
        && apt-get install software-properties-common -y\
        && add-apt-repository ppa:deadsnakes/ppa -y\
        && apt-get update\
        && apt-get install python3.6 -y\
        && rm /usr/bin/python\
        && ln -s /usr/bin/python3.6 /usr/bin/python\
        && rm /usr/bin/python3\
        && ln -s /usr/bin/python3.6 /usr/bin/python3\
        && apt-get install python3-pip -y\
        && pip3 install pip -U\
        && rm /usr/bin/pip3 \
        && ln -s -f /usr/local/bin/pip3 /usr/bin/pip3\
        && ln -s -f /usr/local/bin/pip3 /usr/bin/pip\
        && pip config set global.index-url https://pypi.tuna.tsinghua.edu.cn/simple\
        && rm -rf /var/lib/apt/lists/*

# 环境变量
ENV MYSQL_DATABASE_NAME datacube
ENV EMAIL_HOST_USER user@qq.com
ENV EMAIL_HOST_PASSWORD yourpassword

# nginx配置
#RUN echo "daemon off;" >> /etc/nginx/nginx.conf
COPY nginx-app.conf /etc/nginx/sites-available/default

# 安装项目所需python第三方库
COPY requirements.txt /home/docker/code/
RUN pip install -i https://pypi.doubanio.com/simple/ \
                -r /home/docker/code/requirements.txt

COPY . /home/docker/code/

EXPOSE 80
创建docker镜像,查看结果
root@HP-ZBook-Fury-17:~/docker/django-uwsgi-nginx# docker build -t matt/datacubeimage /root/docker/django-uwsgi-nginx
root@HP-ZBook-Fury-17:/# docker images
REPOSITORY           TAG       IMAGE ID       CREATED              SIZE
matt/datacubeimage   latest    1d1f02ae30c1   About a minute ago   561MB
Docker run 启动容器 (2022/1/4更新)
docker run -itd --link mysql:mysql -v /root/code/:/home/docker/code/ --name datacubeWebapp -p 8001:80 matt/datacubeimage /bin/bash
成功启动如下:
root@HP-ZBook-Fury-17:~/code# docker run -itd --link mysql:mysql -v /root/code/:/home/docker/code/ --name datacubeWebapp -p 80:80 matt/datacubeimage bash
1ac66f1ccbbd3d08c9b9a943021efe26b4cc4b622a5ff7fe96abba9ff15c7e04

root@HP-ZBook-Fury-17:~/code# docker ps
CONTAINER ID   IMAGE                COMMAND                  CREATED         STATUS         PORTS                                                  NAMES
1ac66f1ccbbd   matt/datacubeimage   "bash"                   6 seconds ago   Up 6 seconds   0.0.0.0:80->80/tcp, :::80->80/tcp                      datacubeWebapp
38baba6f3f5b   mysql:5.7            "docker-entrypoint.s…"   2 days ago      Up 5 minutes   0.0.0.0:3306->3306/tcp, :::3306->3306/tcp, 33060/tcp   mysql
进入容器
docker exec -it 1ac66f1ccbbd /bin/bash
查看通过build image时通过编写dockerfile命令给 python安装的依赖包、库
命令:pip list
root@1ac66f1ccbbd:/# pip list
Package              Version
-------------------- ---------------
asn1crypto           0.24.0
cryptography         2.1.4
defusedxml           0.7.1
diff-match-patch     20200713
Django               2.2
django-crispy-forms  1.13.0
django-formtools     2.3
django-import-export 2.7.0
et-xmlfile           1.1.0
future               0.18.2
httplib2             0.20.2
idna                 2.6
keyring              10.6.0
keyrings.alt         3.0
MarkupPy             1.14
odfpy                1.4.1
openpyxl             3.0.9
pip                  21.3.1
pycrypto             2.6.1
PyGObject            3.26.1
pyparsing            3.0.6
python-apt           1.6.5+ubuntu0.7
pytz                 2021.3
pyxdg                0.25
PyYAML               6.0
SecretStorage        2.3.1
setuptools           39.0.1
six                  1.16.0
sqlparse             0.4.2
tablib               3.1.0
unattended-upgrades  0.1
wheel                0.30.0
xlrd                 2.0.1
xlwt                 1.3.0
到这里位置,项目用到的基础镜像,django代码,mysql配置文件以及数据均已挂载好。接下来依次安装配置Nginx, uWSGI…等
安装Nginx
1 - apt-get update
root@1ac66f1ccbbd:/# apt-get update
Get:1 http://mirrors.aliyun.com/ubuntu bionic InRelease [242 kB]
Get:2 http://ppa.launchpad.net/deadsnakes/ppa/ubuntu bionic InRelease [15.9 kB]
Get:3 http://mirrors.aliyun.com/ubuntu bionic-security InRelease [88.7 kB]
Get:4 http://mirrors.aliyun.com/ubuntu bionic-updates InRelease [88.7 kB]
Get:5 http://ppa.launchpad.net/deadsnakes/ppa/ubuntu bionic/main amd64 Packages [45.3 kB]
Get:6 http://mirrors.aliyun.com/ubuntu bionic-backports InRelease [74.6 kB]
....
Get:37 http://mirrors.aliyun.com/ubuntu bionic-proposed/universe Sources [10.9 kB]
Get:43 http://mirrors.aliyun.com/ubuntu bionic-proposed/universe amd64 Packages [22.4 kB]
Fetched 39.5 MB in 14s (2886 kB/s)
Reading package lists... Done
2 - apt install nginx
以下部分内容
root@1ac66f1ccbbd:/# apt-get install nginx
Reading package lists... Done
Building dependency tree
Reading state information... Done
The following additional packages will be installed:
  fontconfig-config fonts-dejavu-core geoip-database iproute2 libatm1 libbsd0 libfontconfig1 libfreetype6 libgd3 libgeoip1 libjbig0 libjpeg-turbo8 libjpeg8 libmnl0
  libnginx-mod-http-geoip libnginx-mod-http-image-filter libnginx-mod-http-xslt-filter libnginx-mod-mail libnginx-mod-stream libpng16-16 libtiff5 libwebp6 libx11-6
  libx11-data libxau6 libxcb1 libxdmcp6 libxpm4 libxslt1.1 libxtables12 multiarch-support nginx-common nginx-core
Suggested packages:
  iproute2-doc libgd-tools geoip-bin fcgiwrap nginx-doc ssl-cert
The following NEW packages will be installed:
  fontconfig-config fonts-dejavu-core geoip-database iproute2 libatm1 libbsd0 libfontconfig1 libfreetype6 libgd3 libgeoip1 libjbig0 libjpeg-turbo8 libjpeg8 libmnl0
  libnginx-mod-http-geoip li....
3 - 配置nginx.conf (2022/1/4更新)
我的路径:vim /etc/nginx/sites-available/default
root@1ac66f1ccbbd:/# vim /etc/nginx/sites-available/default
upstream django {
        server 172.17.0.3:8000;  # docker 容器ip
}
server {
    listen      80;
    server_name 192.168.18.116;  #宿主机ip
    charset     utf-8;
    access_log  /home/docker/code/logs/datacube.access.log;
    error_log   /home/docker/code/logs/datacube.error.log;
    client_max_body_size 75M;
    location /media {
        alias /home/docker/code/datacube/media;
    }

    location /static {
        alias /home/docker/code/datacube/static;
    }

    location / {
        include      /etc/nginx/uwsgi_params;
        uwsgi_pass   django;
        uwsgi_connect_timeout 600;
    }
}
4 - 查看nginx版本 以及 nginx重载,启动,停止命令
查看版本
root@1ac66f1ccbbd:/# nginx -v
nginx version: nginx/1.14.0 (Ubuntu)

重载配置
root@1ac66f1ccbbd:/# service nginx reload
 * Reloading nginx configuration nginx

 启动
root@1ac66f1ccbbd:/# service nginx start
 * Starting nginx nginx

 停止
 root@1ac66f1ccbbd:/# service nginx stop
 * Stopping nginx nginx

 重启
 root@1ac66f1ccbbd:/# service nginx restart
 * Restarting nginx nginx
安装uWSGI 以及常用命令
pip install uwsgi
1 - uwsgi安装使用pip install uwsgi
root@1ac66f1ccbbd:/# pip install uwsgi
Collecting uwsgi
  Downloading uwsgi-2.0.20.tar.gz (804 kB)
     |################################| 804 kB 148 kB/s
  Preparing metadata (setup.py) ... done
Building wheels for collected packages: uwsgi
  Building wheel for uwsgi (setup.py) ... done
  Created wheel for uwsgi: filename=uWSGI-2.0.20-cp36-cp36m-linux_x86_64.whl size=513838 sha256=8c25ddf9b1499c0481373fbdf20575afdba3acaaf4afde1ca0cf570b637b370a
  Stored in directory: /root/.cache/pip/wheels/4a/60/83/bd5b22ba1a9298cc00c9f6400101b3757d958e10b1b38348f8
Successfully built uwsgi
Installing collected packages: uwsgi
Successfully installed uwsgi-2.0.20
2 - uwsgi.ini 配置文件 (2022/1/4更新)
我的路径:vim /home/docker/code/django-uwsgi-nginx/uwsgi.ini
[uwsgi]
socket = 172.17.0.3:8000  # 和nginx通讯的IP端口,要和nginx保持一致
#sock path
#socket = /home/docker/code/django-uwsgi-nginx/uwsgi.sock
master = true
processes = 4
vacuum = true
buffer-size = 60000
enable-threads = true
chdir = /home/docker/code/datacube
#module = datacube.wsgi
#module = datacube.wsgi:application
chmod-socket = 666
wsgi-file = /home/docker/code/datacube/datacube/wsgi.py
#uwsgi logs path
daemonize = /home/docker/code/logs/uwsgi.log
截止目前,
Docker部署django web项目的所有环境,配置文件,依赖包/软件如:ubuntu18.04, mysql5.7, python, django, nginx, uwsgi以及django项目的的第三方依赖包库均已安装配置完成。,接下来我们开始测试django web 项目 …
进入容器,启动nginx
root@1ac66f1ccbbd:/# service nginx reload
 * Reloading nginx configuration nginx
启动uwsgi
root@1ac66f1ccbbd:/# vim /home/docker/code/django-uwsgi-nginx/uwsgi.ini
root@1ac66f1ccbbd:/# uwsgi --ini /home/docker/code/django-uwsgi-nginx/uwsgi.ini
[uWSGI] getting INI configuration from /home/docker/code/django-uwsgi-nginx/uwsgi.ini
*** Starting uWSGI 2.0.20 (64bit) on [Sat Dec 25 14:00:06 2021] ***
compiled with version: 7.5.0 on 25 December 2021 11:35:15
os: Linux-5.11.0-43-generic #47~20.04.2-Ubuntu SMP Mon Dec 13 11:06:56 UTC 2021
nodename: 1ac66f1ccbbd
machine: x86_64
clock source: unix
detected number of CPU cores: 16
current working directory: /
detected binary path: /usr/local/bin/uwsgi
!!! no internal routing support, rebuild with pcre support !!!
uWSGI running as root, you can use --uid/--gid/--chroot options
*** WARNING: you are running uWSGI as root !!! (use the --uid flag) ***
chdir() to /home/docker/code/datacube
your memory page size is 4096 bytes
detected max file descriptor number: 1048576
lock engine: pthread robust mutexes
thunder lock: disabled (you can enable it with --thunder-lock)
uwsgi socket 0 bound to TCP address 127.0.0.1:8000 fd 3
uWSGI running as root, you can use --uid/--gid/--chroot options
*** WARNING: you are running uWSGI as root !!! (use the --uid flag) ***
Python version: 3.6.9 (default, Dec  8 2021, 21:08:43)  [GCC 8.4.0]
Python main interpreter initialized at 0x55e67e2031d0
uWSGI running as root, you can use --uid/--gid/--chroot options
*** WARNING: you are running uWSGI as root !!! (use the --uid flag) ***
python threads support enabled
your server socket listen backlog is limited to 100 connections
your mercy for graceful operations on workers is 60 seconds
mapped 644040 bytes (628 KB) for 4 cores
*** Operational MODE: preforking ***
WSGI app 0 (mountpoint='') ready in 0 seconds on interpreter 0x55e67e2031d0 pid: 126 (default app)
uWSGI running as root, you can use --uid/--gid/--chroot options
*** WARNING: you are running uWSGI as root !!! (use the --uid flag) ***
*** uWSGI is running in multiple interpreter mode ***
spawned uWSGI master process (pid: 126)
spawned uWSGI worker 1 (pid: 128, cores: 1)
spawned uWSGI worker 2 (pid: 129, cores: 1)
spawned uWSGI worker 3 (pid: 130, cores: 1)
spawned uWSGI worker 4 (pid: 131, cores: 1)
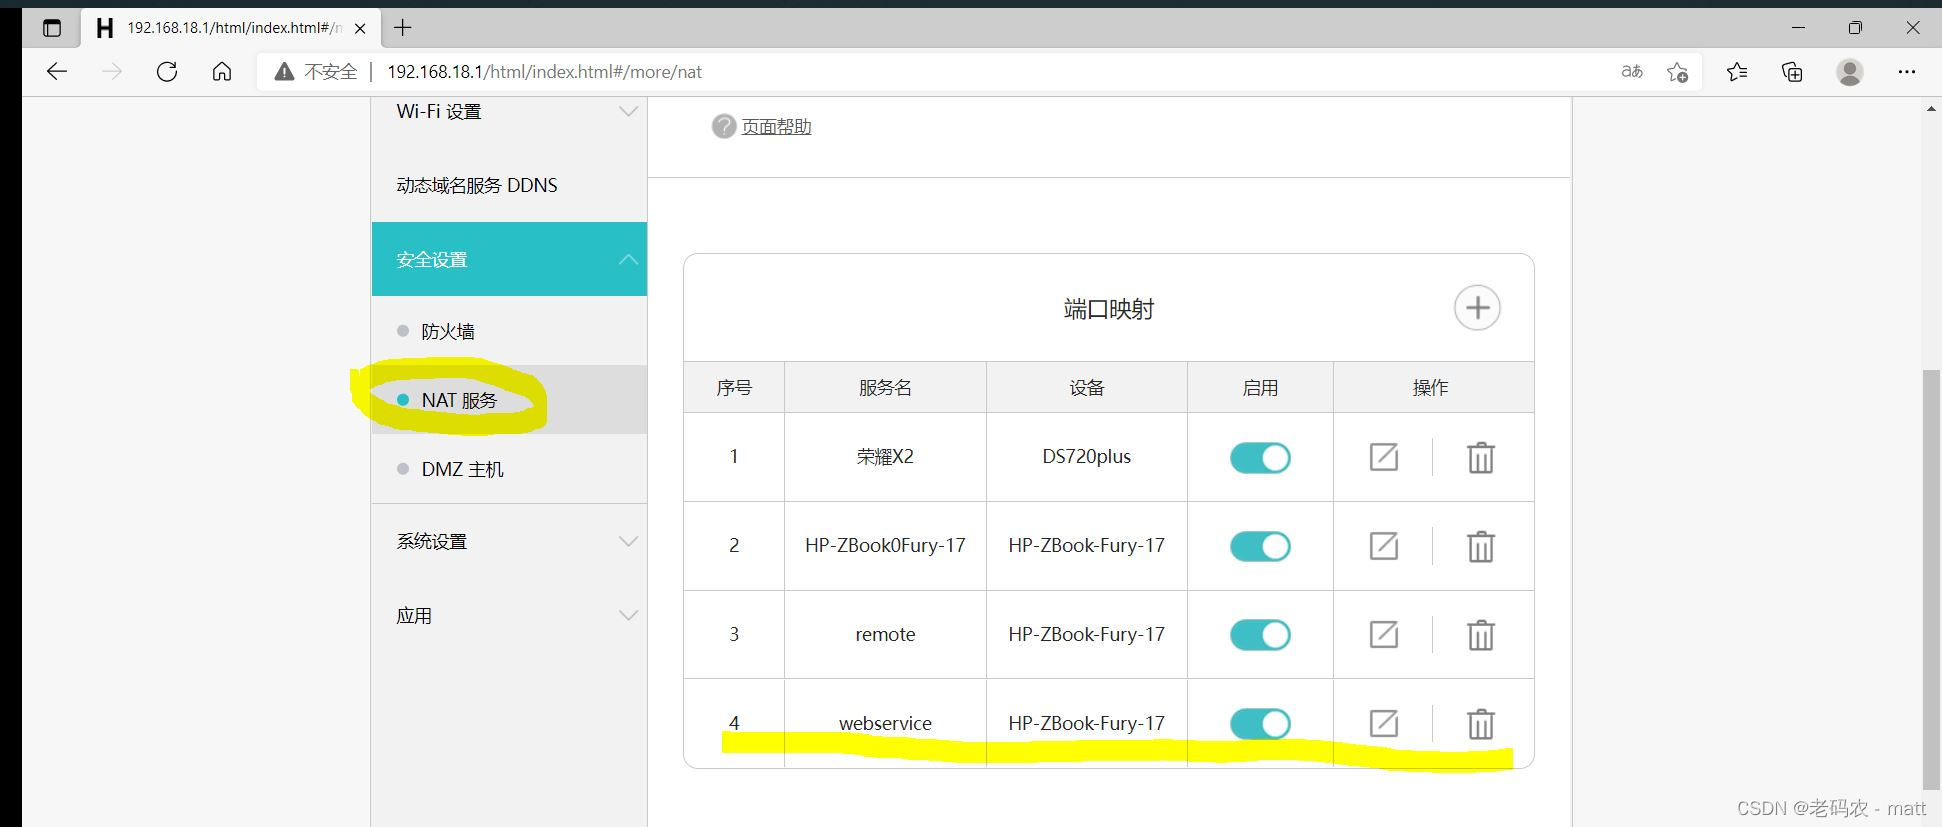
端口映射,路由器里面进行配置
我使用的华为路由器,选择 更多功能 – 安全设置 – NAT服务 --端口映射(外网IP映射到服务器IP地址端口如80:80)
游览器输入外网IP地址测试
出现django欢迎页面,恭喜你环境搭建成功,开始上传你的项目吧

以上,希望能帮到你!
附上打赏码请随意,测试一下。哈哈


 6640
6640


 被折叠的 条评论
为什么被折叠?
被折叠的 条评论
为什么被折叠?
 到【灌水乐园】发言


