


通过springsecurity实现权限控制
一、导入包
<!--spring security-->
<dependency>
     <groupId>org.springframework.boot</groupId>
     <artifactId>spring-boot-starter-security</artifactId>
</dependency>

<!-- thymeleaf springsecurity 有了它可以在thymeleaf上写springsecurity操作 -->
<dependency>
     <groupId>org.springframework.boot</groupId>
     <artifactId>spring-boot-starter-thymeleaf</artifactId>
</dependency>
二、SpringSecurity
1. 创建一个自定义类去继承WebSecurityConfigurerAdapter,开启@EnableWebSecurity注解
//启动web环境下权限控制功能
@EnableWebSecurity
public class SercurityConfig extends WebSecurityConfigurerAdapter {


}
2. 重写configure(HttpSecurity http)方法 ----设置请求授权相关配置
2.1放行首页和静态资源
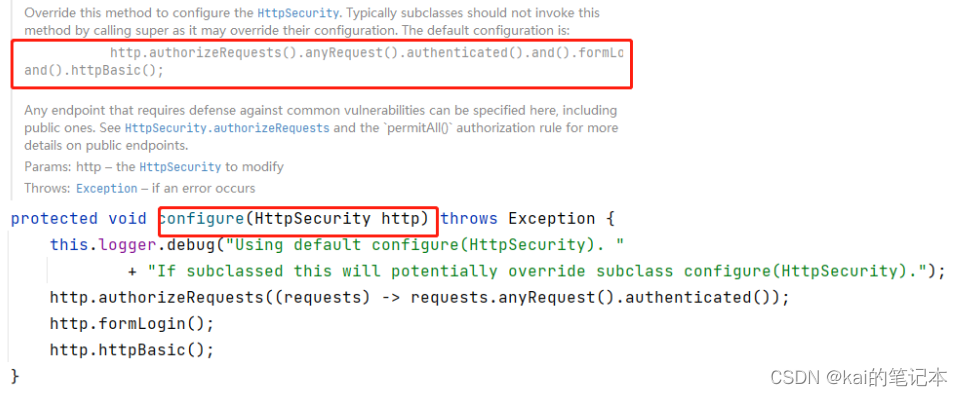
 @Override
protected void configure(HttpSecurity security) throws Exception {

    security
        .authorizeRequests().antMatchers("/","/css/**",
                                         "/fonts/**","/images/**","/js/**").permitAll()//要对请求进行授权  authorize授权
        .and()
        .authorizeRequests().anyRequest().authenticated() // .anyRequest() 任意一个请求 .anthenticated() 被认证才可以访问
        .and()
        .csrf().disable()    //防跨站请求伪造功能  禁用
        .formLogin()//以表单方式登录跳到这个表单,必须有这个才能用loginPage
        .loginPage("/login") // 到指定的页面进行登录
        .loginProcessingUrl("/login").permitAll()//上面那个是到页面,这个是登录验证的请求
        .defaultSuccessUrl("/main.html") //登录成功后前往的地址
        .and()
        .logout()
        .logoutUrl("/logout")
        .logoutSuccessUrl("/login")
        ;
}
/*
        antMatchers("/layui/**","/index.jsp") //使用 ANT 风格设置要授权的 URL 地址
        .permitAll() //允许上面使用 ANT 风格设置的全部请求
        .antMatchers("/level1/**")
        .hasRole("学徒")
        .antMatchers("/level2/**")
        .hasRole("大师")
        .antMatchers("/level3/**")
        .hasRole("宗师")
        .anyRequest() //其他未设置的全部请求
        .authenticated() //需要认证
        .and()
        .formLogin() //设置未授权请求跳转到登录页面: 开启表单登录功
        能
        .loginPage("/index.jsp") //指定登录页
        .permitAll() //为登录页设置所有人都可以访问
        .defaultSuccessUrl("/main.html") //设置登录成功后默认前往的 URL 地址
        .and()
        .logout()
        .logoutUrl("/my/logout")
        .logoutSuccessUrl("/index.jsp");


*/
2.2 注意点
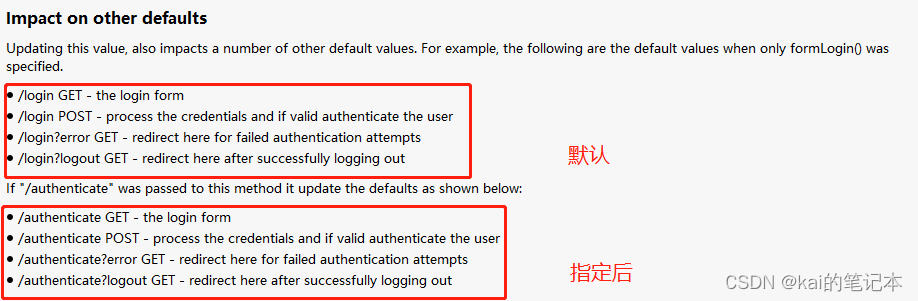
- loginPage(“/index”)
- loginPage(“/index”)要和formLogin()使用。如果只有formLogin(),那么根据系统自带的登陆页面,按照系统的默认方式/login Get、Post、错误、注销进行相应的方法。如果有使用指定的登陆页面,那么相对应的一些配置就会发生改变。
-
修改前端页面发送过来请求中的username和password参数
 最低0.47元/天 解锁文章


 528
528


 被折叠的 条评论
为什么被折叠?
被折叠的 条评论
为什么被折叠?
 到【灌水乐园】发言


