


目录
第六章 单元测试
6.1 什么是单元测试
概论:当你完成一段业务逻辑之后,想要测试这段代码运行的结果是否与自己的预期一样,但是,整个业务流程又没有写完,又不能运行服务器测试。这时候该怎么办呢?以往简单的方式就是创建一个主线程类 public static void main(String[] args) {} 来测试该逻辑是否正确。这样做虽然能达到效果,但是效率却不高。
案例:小明在写一块对数据进行增删改查的业务逻辑,刚刚写完 数据访问层(dao层)的业务代码,现在想测试这段代码能不能通过测试。那该怎么测试呢? 通过老方法虽然有效,但是却不怎么高级。所以他用了单元测试方法进行测试。现在,通过单元测试达到了预期的结果,然后开始写业务层(service层)这时候又可以在单元测试进行测试。大大的提高了效率。
6.2 案例演示
6.2.1 单元测试(Junit4)
6.2.1.1 Junit4配置(xml)
引入pom.xml 依赖。
<!--        spring容器-->
        <dependency>
            <groupId>org.springframework</groupId>
            <artifactId>spring-context</artifactId>
            <version>5.1.10.RELEASE</version>
        </dependency>
<!--      junit4  单元测试-->
        <dependency>
            <groupId>junit</groupId>
            <artifactId>junit</artifactId>
            <version>4.12</version>
            <scope>test</scope>
        </dependency>

<!--        spring 测试-->
        <dependency>
            <groupId>org.springframework</groupId>
            <artifactId>spring-test</artifactId>
            <version>5.0.2.RELEASE</version>
        </dependency>
package com.lyf.spring5.ioc.entity;

import org.springframework.context.annotation.Scope;
import org.springframework.stereotype.Component;


@Component
//@Scope("singleton")
//@Scope("prototype")


//@Repository
//@Service
//@Controller

public class Student {
    private String name;
    private Integer age;

    public Student() {
    }

    public Student(String name, Integer age) {
        this.name = name;
        this.age = age;
    }

    public Integer getAge() {
        return age;
    }

    public void setAge(Integer age) {
        this.age = age;
    }


    public String getName() {
        return name;
    }

    public void setName(String name) {
        this.name = name;
    }

    @Override
    public String toString() {
        return "User{" +
                "name='" + name + '\'' +
                ", age=" + age +
                '}';
    }
}
创建一个spring配置文件,并创建一个bean对象 student。
<?xml version="1.0" encoding="UTF-8" ?>
<beans xmlns="http://www.springframework.org/schema/beans"
       xmlns:xsi="http://www.w3.org/2001/XMLSchema-instance"
       xmlns:context="http://www.springframework.org/schema/context"
       xsi:schemaLocation="http://www.springframework.org/schema/beans
       http://www.springframework.org/schema/beans/spring-beans.xsd
       http://www.springframework.org/schema/context
       http://www.springframework.org/schema/context/spring-context.xsd">


    <bean class="com.lyf.spring5.ioc.entity.Student">
        <property name="name" value="王二明"/>
        <property name="age" value="18"/>
    </bean>
</beans>
在src目录下创建test目录,并创建一个测试类
import com.lyf.spring5.ioc.entity.Student;
import org.junit.Test;
import org.junit.runner.RunWith;
import org.springframework.beans.factory.annotation.Autowired;
import org.springframework.test.context.ContextConfiguration;
import org.springframework.test.context.junit4.SpringJUnit4ClassRunner;
/**
* @Author: lyf
* @CreateTime: 2022-10-14
* @description:
*/
@RunWith(SpringJUnit4ClassRunner.class) //创建spring容器
@ContextConfiguration("classpath:context.xml") // 加载spring配置文件
public class TestJunit4 {
// 自动注入 student对象
@Autowired
Student student;
/**
* 测试
*/
@Test //该注解标记当前方法是一个测试方法,方法旁边的三角符号表示可运行状态
public void test(){
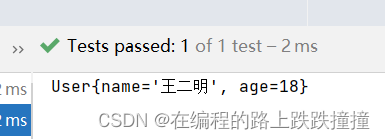
System.out.println(student);
}
}
运行结果

总结
spring使用单元测试,省略了创建容器的步骤。
使用单元测试,可以省略以下创建容器的代码
        // 第一种创建容器的方式
        new AnnotationConfigApplicationContext(JavaConfig.class);
        // 第二种 创建容器的方式
         new ClassPathXmlApplicationContext("ByNameAndByType.xml");
         // 第三种创建容器的方式
        new FileSystemXmlApplicationContext()
6.2.1.2 Junit4(注解)
依赖不变
创建bean对象
@Component
public class Student {
    private String name;
    private Integer age;

    public Student() {
    }

    public Student(String name, Integer age) {
        this.name = name;
        this.age = age;
    }

    public Integer getAge() {
        return age;
    }

    public void setAge(Integer age) {
        this.age = age;
    }


    public String getName() {
        return name;
    }

    public void setName(String name) {
        this.name = name;
    }

    @Override
    public String toString() {
        return "User{" +
                "name='" + name + '\'' +
                ", age=" + age +
                '}';
    }
}
创建配置类 ,该类相对于配置文件,等于容器。
@Configuration // 标记当前类为配置类
@ComponentScan("com.lyf.spring5.ioc")// 扫描该包下的组件
public class JavaConfig {
}
测试代码
import com.lyf.spring5.ioc.entity.JavaConfig;
import com.lyf.spring5.ioc.entity.Student;
import org.junit.Test;
import org.junit.runner.RunWith;
import org.springframework.beans.factory.annotation.Autowired;
import org.springframework.test.context.ContextConfiguration;
import org.springframework.test.context.junit4.SpringJUnit4ClassRunner;
@RunWith(SpringJUnit4ClassRunner.class) //创建spring容器
//@ContextConfiguration("classpath:context.xml") // 加载spring配置文件
@ContextConfiguration(classes = {JavaConfig.class})//加载spring配置类
public class TestJunit4 {
// 自动注入 student对象
@Autowired
Student student;
/**
* 测试
*/
@Test //该注解标记当前方法是一个测试方法,方法旁边的三角符号表示可运行状态
public void test(){
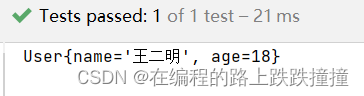
student.setName("王二明");
student.setAge(18);
System.out.println(student);
}
}
运行结果
6.2.2 单元测试(Junit5)
6.2.2.1 Junit5(xml)
导入pom依赖
<!--        spring容器-->
        <dependency>
            <groupId>org.springframework</groupId>
            <artifactId>spring-context</artifactId>
            <version>5.1.10.RELEASE</version>
        </dependency>
        <!--        spring测试模块-->
		        <dependency>
            <groupId>org.springframework</groupId>
            <artifactId>spring-test</artifactId>
            <version>5.0.2.RELEASE</version>
        </dependency>
<!--        单元测试5-->
   <dependency>
            <groupId>org.junit.jupiter</groupId>
            <artifactId>junit-jupiter-api</artifactId>
            <version>RELEASE</version>
            <scope>test</scope>
        </dependency>
package com.lyf.spring5.ioc.entity;

import org.springframework.context.annotation.Scope;
import org.springframework.stereotype.Component;

/**
 * @Author: lyf
 * @CreateTime: 2022-10-12
 * @description:
 */
@Component
//@Scope("singleton")
//@Scope("prototype")


//@Repository
//@Service
//@Controller

public class Student {
    private String name;
    private Integer age;

    public Student() {
    }

    public Student(String name, Integer age) {
        this.name = name;
        this.age = age;
    }

    public Integer getAge() {
        return age;
    }

    public void setAge(Integer age) {
        this.age = age;
    }


    public String getName() {
        return name;
    }

    public void setName(String name) {
        this.name = name;
    }

    @Override
    public String toString() {
        return "User{" +
                "name='" + name + '\'' +
                ", age=" + age +
                '}';
    }
}
<?xml version="1.0" encoding="UTF-8" ?>
<beans xmlns="http://www.springframework.org/schema/beans"
       xmlns:xsi="http://www.w3.org/2001/XMLSchema-instance"
       xmlns:context="http://www.springframework.org/schema/context"
       xsi:schemaLocation="http://www.springframework.org/schema/beans
       http://www.springframework.org/schema/beans/spring-beans.xsd
       http://www.springframework.org/schema/context
       http://www.springframework.org/schema/context/spring-context.xsd">


    <bean class="com.lyf.spring5.ioc.entity.Student">
        <property name="name" value="王二明"/>
        <property name="age" value="18"/>
    </bean>
</beans>
测试代码
import com.lyf.spring5.ioc.entity.Student;
import org.junit.jupiter.api.Test;
import org.springframework.beans.factory.annotation.Autowired;
import org.springframework.test.context.junit.jupiter.SpringJUnitConfig;

@SpringJUnitConfig(locations = "classpath:context.xml") // 加载spring配置文件
//@ContextConfiguration(classes = {JavaConfig.class})
public class TestJunit5 {

    // 自动注入 student对象
    @Autowired
    Student student;

    /**
     * 测试
     */
    @Test //该注解标记当前方法是一个测试方法,方法旁边的三角符号表示可运行状态
    public void test(){
        System.out.println(student);
    }
}
运行结果
6.2.2.2 Junit5(注解)
依赖不变
package com.lyf.spring5.ioc.entity;

import org.springframework.context.annotation.Scope;
import org.springframework.stereotype.Component;


@Component
public class Student {
    private String name;
    private Integer age;

    public Student() {
    }

    public Student(String name, Integer age) {
        this.name = name;
        this.age = age;
    }

    public Integer getAge() {
        return age;
    }

    public void setAge(Integer age) {
        this.age = age;
    }


    public String getName() {
        return name;
    }

    public void setName(String name) {
        this.name = name;
    }

    @Override
    public String toString() {
        return "User{" +
                "name='" + name + '\'' +
                ", age=" + age +
                '}';
    }
}
package com.lyf.spring5.ioc.entity;

import org.springframework.context.annotation.*;

@Configuration
@ComponentScan("com.lyf.spring5.ioc")
public class JavaConfig {
}
import com.lyf.spring5.ioc.entity.JavaConfig;
import com.lyf.spring5.ioc.entity.Student;
import org.junit.jupiter.api.Test;
import org.springframework.beans.factory.annotation.Autowired;
import org.springframework.test.context.junit.jupiter.SpringJUnitConfig;
/**
* @Author: lyf
* @CreateTime: 2022-10-14
* @description:
*/
//@SpringJUnitConfig(locations = "classpath:context.xml") // 加载spring配置文件
@SpringJUnitConfig(JavaConfig.class)
public class TestJunit5 {
// 自动注入 student对象
@Autowired
Student student;
/**
* 测试
*/
@Test //该注解标记当前方法是一个测试方法,方法旁边的三角符号表示可运行状态
public void test(){
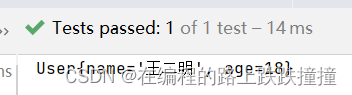
student.setName("王二明");
student.setAge(18);
System.out.println(student);
}
}
运行结果
6.3 注解扩展
• @Test :表示方法是测试方法。但是与JUnit4的@Test不同,他的职责非常单一不能声明任何属性,拓展的测试将会由Jupiter提供额外测试
• @ParameterizedTest :表示方法是参数化测试。
• @RepeatedTest :表示方法可重复执行。
• @DisplayName :为测试类或者测试方法设置展示名称
• @BeforeEach :表示在每个单元测试之前执行
• @AfterEach :表示在每个单元测试之后执行
• @BeforeAll :表示在所有单元测试之前执行
• @AfterAll :表示在所有单元测试之后执行
• @Tag :表示单元测试类别,类似于JUnit4中的@Categories
• @Disabled :表示测试类或测试方法不执行,类似于JUnit4中的@Ignore
• @Timeout :表示测试方法运行如果超过了指定时间将会返回错误
• @ExtendWith :为测试类或测试方法提供扩展类引用
import org.junit.jupiter.api.Test; //注意这里使用的是jupiter的Test注解!!


 320
320


 被折叠的 条评论
为什么被折叠?
被折叠的 条评论
为什么被折叠?
 到【灌水乐园】发言


