


1. Mysql主从同步原理:
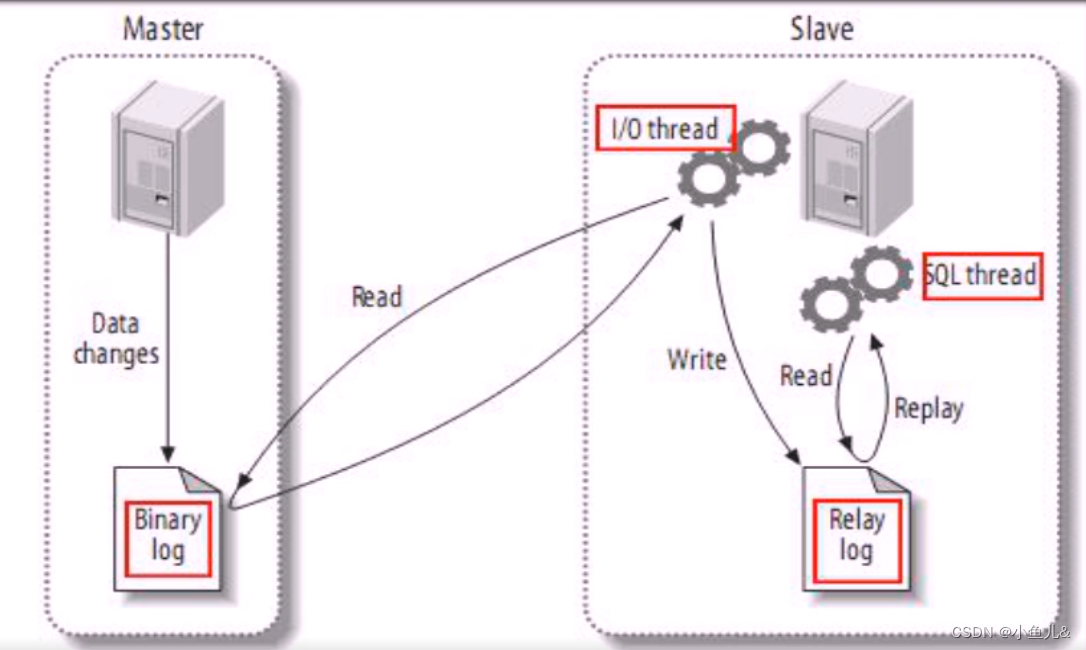
- 客户端在主库操作增删改等操作时会把这些操作的sql语句记录在binlog日志里,然后会通知从库,从库通过I/O线程拷贝这些SQL语句保存在中继日志里(Relay- log),然后从库的sql线程开始读取并执行中继日志里面的SQL语句实现与主库数据一致。
2. MySQL主从主要作用:
- 实现数据备份;
- 基于数据备份,实现故障转移;
- 基于数据备份,实现读写分离;
3. 常见mysql主从架构:

4. MySQL主从部署:
- master :192.168.2.10
- slave :192.168.2.20
4.1. master端配置:
4.1.1. 安装MySQL数据库:
[root@localhost ~]# yum -y install mysql-community-server
注意:执行这个命令首先你要有MySQLrepo源,可以参考MySQLyum安装
4.1.2. 启动binlog日志:
[root@www ~]# vim /etc/my.cnf
在mysqld指令段添加以下内容:
server_id=1
log-bin=master10
binlog_format=mixed      ---设置binlog日志格式为混合模式
4.1.3. 启动MySQL服务并设置开机自启:
[root@www ~]# systemctl restart mysqld
[root@www ~]# systemctl enable mysqld
4.1.4.验证binlog启动是否成功:
[root@www ~]# mysql -uroot -p1234
mysql> show variables like "%log_bin";   -----查看log_bin和sql_log_bin是否均为on
+---------------+-------+
| Variable_name | Value |
+---------------+-------+
| log_bin       | ON    |
| sql_log_bin   | ON    |
+---------------+-------+
2 rows in set (0.00 sec)
4.1.5. 授权用户:
mysql> grant replication slave on *.* to "ys"@"192.168.2.20" identified by "1234";
mysql> flush privileges;     ---刷新权限
Query OK, 0 rows affected (0.00 sec)
###完全备份数据传给slave保证两个服务器数据库一致。
[root@localhost ~]# mysqldump -uroot -p1234 --master-data -A > all.sql   //--master-data记录当前备份数据对应的日志信息。
###把完全备份文件传给从库
[root@localhost ~]# scp -r all.sql 192.168.2.20:/root
##模拟公司环境,备份完后有人继续让主库写数据。
mysql> create database db1 default charset=utf8;
mysql> create database db2 default charset=utf8;
4.2. slave端配置:
- 相关配置文件存放在mysql目录下
| 文件名 | 说明 |
|---|---|
| master.info | 主库信息表 |
| relay-log.info | 中继日志信息 |
| 主机名-relay-bin.xxxxxx | 中继日志 |
| 主机名-relay-bin.index | 中继日志的索引文件 |
- 前面的安装MySQL就不讲了,注意主库和从库最好版本一样。
4.2.1. 修改配置文件:
[root@localhost ~]# vim /etc/my.cnf
在[mysqld]指令块下添加如下行:
server-id=2
4.2.2. 启动服务并设置开机自启:
[root@localhost ~]# systemctl start mysqld.service
[root@localhost ~]# systemctl enable mysqld.service
4.2.3. 把主库的完全备份文件导入从库
[root@localhost ~]# mysql -uroot -p1234 < /root/all.sql
4.2.4. 查看完全备份文件中的binlog日志信息
[root@localhost ~]# grep "master10" all.sql
CHANGE MASTER TO MASTER_LOG_FILE='master10.000002', MASTER_LOG_POS=154;
4.2.5. 指定master信息:
[root@www ~]# mysql -uroot -p1234
mysql>  change master to
    -> master_host="192.168.2.10",
    -> master_user="ys",
    -> master_password="1234",
    -> master_log_file="master10.000002",   ---这个文件名和下面的pos值在上面备份文件里
    -> master_log_pos=154;
###以上的操作保存在/var/lib/mysql/master.info里面
mysql> start slave;    开启slave
4.2.6. 查看slave状态:
##必须SQL线程和I/O线程都变为yes才算配置成功。
mysql> show slave status \G;
*************************** 1. row ***************************
               Slave_IO_State: Waiting for master to send event
                  Master_Host: 192.168.2.10   --master的IP地址
                  Master_User: ys
                  Master_Port: 3306
                Connect_Retry: 60
              Master_Log_File: master10.000002
          Read_Master_Log_Pos: 331
               Relay_Log_File: localhost-relay-bin.000002
                Relay_Log_Pos: 496
        Relay_Master_Log_File: master10.000002
             Slave_IO_Running: Yes  ---slave的I/O线程已开启
            Slave_SQL_Running: Yes   ---slave的SQL线程已开启
              Replicate_Do_DB:
          Replicate_Ignore_DB:
           Replicate_Do_Table:
       Replicate_Ignore_Table:
      Replicate_Wild_Do_Table:
  Replicate_Wild_Ignore_Table:
                   Last_Errno: 0
                   Last_Error:
                 Skip_Counter: 0
          Exec_Master_Log_Pos: 331
              Relay_Log_Space: 707
              Until_Condition: None
               Until_Log_File:
                Until_Log_Pos: 0
           Master_SSL_Allowed: No
           Master_SSL_CA_File:
           Master_SSL_CA_Path:
              Master_SSL_Cert:
            Master_SSL_Cipher:
               Master_SSL_Key:
        Seconds_Behind_Master: 0
Master_SSL_Verify_Server_Cert: No
                Last_IO_Errno: 0
                Last_IO_Error:
               Last_SQL_Errno: 0
               Last_SQL_Error:
  Replicate_Ignore_Server_Ids:
             Master_Server_Id: 100
                  Master_UUID: 76db4609-a78f-11ed-b8ae-000c2937259c
             Master_Info_File: /var/lib/mysql/master.info
                    SQL_Delay: 0
          SQL_Remaining_Delay: NULL
      Slave_SQL_Running_State: Slave has read all relay log; waiting for more updates
           Master_Retry_Count: 86400
                  Master_Bind:
      Last_IO_Error_Timestamp:
     Last_SQL_Error_Timestamp:
               Master_SSL_Crl:
           Master_SSL_Crlpath:
           Retrieved_Gtid_Set:
            Executed_Gtid_Set:
                Auto_Position: 0
         Replicate_Rewrite_DB:
                 Channel_Name:
           Master_TLS_Version:
1 row in set (0.00 sec)

ERROR:
No query specified
5. 验证数据同步:
##查看主库数据库
mysql> show databases;
+--------------------+
| Database           |
+--------------------+
| information_schema |
| db1                |
| db2                |
| mysql              |
| performance_schema |
| sys                |
+--------------------+
6 rows in set (0.00 sec)
##查看从库数据库
mysql> show databases;
+--------------------+
| Database           |
+--------------------+
| information_schema |
| db1                |
| db2                |
| mysql              |
| performance_schema |
| sys                |
+--------------------+
6 rows in set (0.00 sec)
##可以看的出来db1和db2库是完全备份完后又操作的,现在主库和从库已经一致。
在主库创建一个数据库:
mysql> create database if not exists ys default charset=utf8;
Query OK, 1 row affected (0.00 sec)
mysql> show databases;
+--------------------+
| Database           |
+--------------------+
| information_schema |
| mysql              |
| performance_schema |
| sys                |
| ys                 |
+--------------------+
5 rows in set (0.00 sec
在从库查看:
mysql> show databases;
+--------------------+
| Database           |
+--------------------+
| information_schema |
| mysql              |
| performance_schema |
| sys                |
| ys                 |
+--------------------+
5 rows in set (0.00 sec)
6. 同步错误分析:
Slave_IO_Running: Connecting
- 第一种:主库宕机
- 第二种:从库指定的用户名与密码错误(与主库授权的用户名和密码不一致)
- 第三种:关闭防火墙
Slave_IO_Running: No - 从库指定的二进制文件有误
- 主库和从库版本不同导致报错
MariaDB [(none)]> show slave status\G;
*************************** 1. row ***************************
               Slave_IO_State:
                  Master_Host: 192.168.20.10
                  Master_User: ys
                  Master_Port: 3306
                Connect_Retry: 60
              Master_Log_File: ys.000002
          Read_Master_Log_Pos: 307
               Relay_Log_File: mariadb-relay-bin.000002
                Relay_Log_Pos: 404
        Relay_Master_Log_File: ys.000002
             Slave_IO_Running: No
            Slave_SQL_Running: No
              Replicate_Do_DB:
          Replicate_Ignore_DB:
           Replicate_Do_Table:
       Replicate_Ignore_Table:
      Replicate_Wild_Do_Table:
  Replicate_Wild_Ignore_Table:
                   Last_Errno: 1594
                   Last_Error: Relay log read failure: Could not parse relay log event entry. The possible reasons are: the master's binary log is corrupted (you can check this by running 'mysqlbinlog' on the binary log), the slave's relay log is corrupted (you can check this by running 'mysqlbinlog' on the relay log), a network problem, or a bug in the master's or slave's MySQL code. If you want to check the master's binary log or slave's relay log, you will be able to know their names by issuing 'SHOW SLAVE STATUS' on this slave.
                 Skip_Counter: 0
          Exec_Master_Log_Pos: 154
              Relay_Log_Space: 857
              Until_Condition: None
               Until_Log_File:
                Until_Log_Pos: 0
           Master_SSL_Allowed: No
           Master_SSL_CA_File:
           Master_SSL_CA_Path:
              Master_SSL_Cert:
            Master_SSL_Cipher:
               Master_SSL_Key:
        Seconds_Behind_Master: NULL
Master_SSL_Verify_Server_Cert: No
                Last_IO_Errno: 1236
                Last_IO_Error: Got fatal error 1236 from master when reading data from binary log: 'Could not find first log file name in binary log index file'
               Last_SQL_Errno: 1594
               Last_SQL_Error: Relay log read failure: Could not parse relay log event entry. The possible reasons are: the master's binary log is corrupted (you can check this by running 'mysqlbinlog' on the binary log), the slave's relay log is corrupted (you can check this by running 'mysqlbinlog' on the relay log), a network problem, or a bug in the master's or slave's MySQL code. If you want to check the master's binary log or slave's relay log, you will be able to know their names by issuing 'SHOW SLAVE STATUS' on this slave.
  Replicate_Ignore_Server_Ids:
             Master_Server_Id: 1
1 row in set (0.00 sec)

ERROR: No query specified
Slave_SQL_Running: No
- pos点问题
7. 主从复制延迟问题及解决方法:
7.1. 从库过多:
- 建议从库数量3-5 为宜,要复制的从节点数量过多,会导致复制延迟
7.2. 从库硬件差:
- 从库硬件比主库差,导致复制延迟,查看master和slave的系统配置,可能会因为机器配置的问题,包括磁盘IO、CPU、内存等各方面因素造成复制的延迟,一般发生在高并发大数据量写入场景。
7.3. 网络问题:
- 主从库之间的网络延迟,主库的网卡、网线、连接的交换机等网络设备都可能成为复制的瓶颈,导致复制延迟。
8. mysql主从同步复制模式
- 异步复制模式(默认)(Asynchronous replication)
- 主库执行完一次事务后,立即将结果返给客户端,并不关心从库是否已经接收并处理。
- 全同步复制模式(Full synchronous replication)
当主库执行完一次事务,且所有从库都执行了该事务后才将结果返回给客户端。
- 半同步复制模式(Semisynchronous replication)
- 介于异步复制和全同步复制之间。
- 主库在执行完一次事务之后,等待至少一个从库接收到,并写到relay log中才将结果返回给客户端。
8.1. 配置半同步复制模式:
- 命令行配置
- 优点:马上生效无需重启。
- 缺点:重启服务则无效。
##查看是否允许动态加载半同步复制模块
mysql> show variables like "have_dynamic_loading";
+----------------------+-------+
| Variable_name        | Value |
+----------------------+-------+
| have_dynamic_loading | YES   |
+----------------------+-------+
##在主服务器安装semisync_master.so模块
mysql> install plugin rpl_semi_sync_master SONAME "semisync_master.so";
##在从服务器安装semisync_slave.so模块
mysql> install plugin rpl_semi_sync_slave SONAME "semisync_slave.so";

##查看是否安装成功模块
##主库执行
mysql> select plugin_name,plugin_status from information_schema.plugins where plugin_name like '%semi%';
+----------------------+---------------+
| plugin_name          | plugin_status |
+----------------------+---------------+
| rpl_semi_sync_master | ACTIVE        |
+----------------------+---------------+
##从库执行
mysql>  select plugin_name,plugin_status from information_schema.plugins where plugin_name like '%semi%';
+---------------------+---------------+
| plugin_name         | plugin_status |
+---------------------+---------------+
| rpl_semi_sync_slave | ACTIVE        |
+---------------------+---------------+
##启动模块
mysql> set global rpl_semi_sync_master_enabled=1;        //主服务器执行

mysql> set global rpl_semi_sync_slave_enabled=1;           //从服务器执行
###查看是否启动成功。
mysql> show variables like "rpl_semi_sync_%_enabled";
- 修改配置文件配置
- 优点:永久生效
##在主库执行
vim  /etc/my.cnf
[mysqld]
....
plugin-load=rpl_semi_sync_master=semisync_master.so    ----安装模块
rpl_semi_sync_master_enabled=1    启动模块
systemctl  restart mysqld   --重启服务
###在从库执行
vim  /etc/my.cnf
[mysqld]
....
plugin-load=rpl_semi_sync_slave=semisync_slave.so
rpl_semi_sync_slave_enabled=1
systemctl  restart mysqld   --重启服务
- 假如架构是互为主从时需要同上启动rpl_semi_sync_master和rpl_semi_sync_slave两个模块。


 3920
3920


 被折叠的 条评论
为什么被折叠?
被折叠的 条评论
为什么被折叠?
 到【灌水乐园】发言


