


文章目录
编译安装 nginx
环境:
系统:Centos7
IP:192.168.11.11
安装准备
停止原有web服务器: 以免端口冲突
添加用户账号来运行nginx:
这里有多种创建用户的方法都是可以的,根据自己的实际情况选择
useradd -r nginx(创建一个名为nginx的系统用户)
下载nginx源码
官网选择合适的源或稳定的源
# wget http://nginx.org/download/nginx-1.17.10.tar.gz
如果没有安装wget使用# yum -y install wget
安装nginx依赖包
# yum -y install zlib zlib-devel openssl openssl-devel pcre pcre-devel gcc gcc-c++ make cmake
- 这条命令运行有问题的话请查看一下自己的yum源是否有上面这些包
解压下载的包
# tar -xzf nginx-1.17.10.tar.gz
# cd nginx-1.17.10/
设置nginx编译配置
# ./configure --prefix=/usr/local/nginx --user=nginx --group=nginx --with-http_stub_status_module --with-http_ssl_module
| 参数 | 描述 |
|---|---|
| –prefix=
| NGINX文件的目录,以及其他配置脚本选项(不包括库的路径)设置的所有相对路径以及nginx.conf配置文件的路径的基本位置。默认值:/ usr / local / nginx。 |
| –sbin-path=
| NGINX可执行文件的名称,仅在安装期间使用。默认值:<前缀> / sbin / nginx |
| –conf-path=
| NGINX配置文件的名称。但是,您始终可以在启动时通过使用nginx命令行上的选项指定其他文件来覆盖此值。默认值: conf / nginx.conf-c |
| –pid-path=
| nginx.pid文件的名称,用于存储nginx主进程的进程ID 。安装后,可以使用NGINX配置文件中的pid指令更改文件名的路径。默认值:<前缀> /logs/nginx.pid |
| –error-log-path=
| 错误,警告和诊断数据的主日志文件的名称。安装后,可以使用NGINX配置文件中的error_log指令更改文件名。默认值:<前缀> /logs/error.log |
| –http-log-path=
| 向HTTP服务器发出请求的主日志文件的名称。安装后,可以始终使用NGINX配置文件中的access_log伪指令更改文件名。默认值:<前缀> /logs/access.log |
| –user= | NGINX工作进程使用其凭据的非特权用户的名称。安装后,可以使用NGINX配置文件中的用户指令更改名称。默认:nobody |
| –group= | NGINX工作进程使用其凭据的组的名称。安装后,可以使用NGINX配置文件中的用户指令更改名称。默认值:该–user选项设置的值。 |
| –with-pcre=
| PCRE库的源路径,这是location指令和Rewrite模块中支持正则表达式所必需的。 |
| –with-pcre-jit | 使用“及时编译”支持(pcre_jit指令)构建PCRE库。 |
| –with-zlib=
| zlib库的源路径,这是Gzip模块所必需的。 |
| –with-http_stub_status_module | 声明启用service status页,默认不启用 |
| –with-http_ssl_module | 启用ssl模块,以支持https请求 |
| 更多的参数描述参考官网 |
编译安装
# make && make install
替换nginx主程序
# mv /usr/local/nginx/sbin/nginx /usr/local/nginx/sbin/nginx.old
# cp objs/nginx /usr/local/nginx/sbin/nginx
启动nginx
# /usr/local/nginx/sbin/nginx -c /usr/local/nginx/conf/nginx.conf
开机自启
# echo "/usr/local/nginx/sbin/nginx -c /usr/local/nginx/conf/nginx.conf" >> /etc/rc.local
(记得给予rc.local执行权限)
重启nginx服务,不影响正在访问web的人
# /usr/local/nginx/sbin/nginx -s reload
查看启动状态
# netstat -tanp |grep 80

测试主页是否能访问

关闭防火墙和selinux后可以输入ip用本机访问,

yum安装nginx
环境:
系统:Centos7
IP:192.168.11.11
安装
yum -y install nginx
# 停止服务
systemctl stop nginx

# 启动
systemctl start nginx

# 开机启动
systemctl enable nginx


# 测试配置文件
nginx -t

# 重新载入配置文件
nginx -s reload
开启https 并让 http 跳转到 https
# For more information on configuration, see:
#   * Official English Documentation: http://nginx.org/en/docs/
#   * Official Russian Documentation: http://nginx.org/ru/docs/

user nginx;
worker_processes auto;
error_log /var/log/nginx/error.log;
pid /run/nginx.pid;

# Load dynamic modules. See /usr/share/doc/nginx/README.dynamic.
include /usr/share/nginx/modules/*.conf;

events {
    worker_connections 1024;
}

http {
    log_format  main  '$remote_addr - $remote_user [$time_local] "$request" '
                      '$status $body_bytes_sent "$http_referer" '
                      '"$http_user_agent" "$http_x_forwarded_for"';

    access_log  /var/log/nginx/access.log  main;

    sendfile            on;
    tcp_nopush          on;
    tcp_nodelay         on;
    keepalive_timeout   65;
    types_hash_max_size 4096;

    include             /etc/nginx/mime.types;
    default_type        application/octet-stream;

    # Load modular configuration files from the /etc/nginx/conf.d directory.
    # See http://nginx.org/en/docs/ngx_core_module.html#include
    # for more information.
    include /etc/nginx/conf.d/*.conf;

    server {
        listen       80;
        listen       [::]:80;
        server_name  www.qq.com;
        location / {
                rewrite ^(/.*)$ https://$host$1 permanent;
        }

        # Load configuration files for the default server block.

        include /etc/nginx/default.d/*.conf;

        error_page 404 /404.html;
        location = /404.html {
        }

        error_page 500 502 503 504 /50x.html;
        location = /50x.html {
        }
    }

# Settings for a TLS enabled server.
#
    server {
        listen       443 ssl http2;
        listen       [::]:443 ssl http2;
        server_name  www.qq.com;

        ssl_certificate "/etc/nginx/certificat/wms.crt";
        ssl_certificate_key "/etc/nginx/certificat/wms.key";
        ssl_session_cache shared:SSL:1m;
        ssl_session_timeout  10m;
        ssl_ciphers HIGH:!aNULL:!MD5;
        ssl_prefer_server_ciphers on;

        location / {
                proxy_pass http://127.0.0.1:10001;
        }

        # Load configuration files for the default server block.
        include /etc/nginx/default.d/*.conf;

        error_page 404 /404.html;
            location = /40x.html {
        }

        error_page 500 502 503 504 /50x.html;
            location = /50x.html {
        }
    }

}
几个Nginx性能优化方法
均需修改nginx的配置文件
vi /nginx/conf/nginx.conf
1、worker_processes 工作进程最大连接数
worker 进程数默认为 1 ,单进程最大连接数为1024
- 每个 worker 进程都是单线程的进程,它们会调用各个模块以实现多种多样的功能
- 如果这些模块确认不会出现阻塞式的调用,那么有多少CPU内核就应该配置多少个进程
- 反之,如果有可能出现阻塞式调用,那么需要配置稍多一些的worker进程
例如:如果业务方面会致使 用户请求 大量读取 本地磁盘上的静态资源文件,而且服务器上的内存较小,以至于 大部分的请求 访问 静态资源文件 时,都必须读取磁盘(磁头的寻址是缓慢的),而不是内存中的磁盘缓存,那么磁盘 IO 调用可能会 阻塞 住 worker 进程少量时间,进而导致服务整体性能下降。

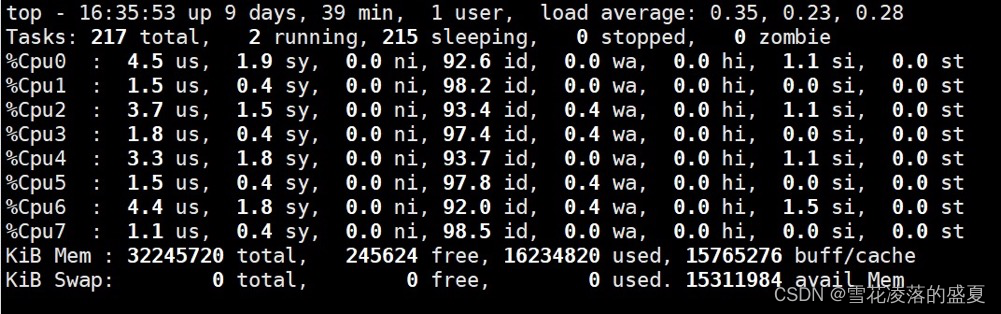
运行工作进程个数一般设置CPU的核心或者核心数x2
如果不了解CPU的核数,可以top命令后按1来看
实操
# 编辑ng的配置文件
> vi /usr/local/nginx/conf/nginx.conf
> worker_processes 4;
# 保存退出
# 重新加载ng配置文件
> /usr/local/nginx/sbin/nginx-s reload
# 查看进程情况
> ps -aux | grep nginx |grep -v grep

2、worker_cpu_affinity工作进程绑定CPU内核
假定每一个 worker 进程都是非常繁忙的,如果多个 worker 进程都在抢同一个 CPU,那么这就会出现 同步问题。
反之,如果每一个 worker 进程都独享一个 CPU,就在 内核的调度 策略上实现了完全的 并发。
注意:worker_cpu_affinity 配置仅对 Linux 操作系统有效。
# 如:如果有`2`颗`CPU`内核,就可以进行如下配置
worker_processes 2;
worker_cpu_affinity 10 01;
# 如:如果有`4`颗`CPU`内核,就可以进行如下配置
worker_processes 4;
worker_cpu_affinity 1000 0100 0010 0001;
# 如:如果有`8`颗`CPU`内核,就可以进行如下配置
worker_processes 8;
worker_cpu_affinity 00000001 00000010 00000100 0000100000010000 00100000 01000000 10000000;


 1527
1527


 被折叠的 条评论
为什么被折叠?
被折叠的 条评论
为什么被折叠?
 到【灌水乐园】发言


