


讲解之前,先说一下本文讲述的内容:
前端axios提交json数据,使用security验证登录,舍弃原本security使用cookie存储sessionId登陆的方式,改为JWT验证登录、权限控制
目录
目录
UsernamePasswordAuthenticationFilter 拦截器
一、登录过程解析
Ⅰ、登录流程(随手画的不标准哈)
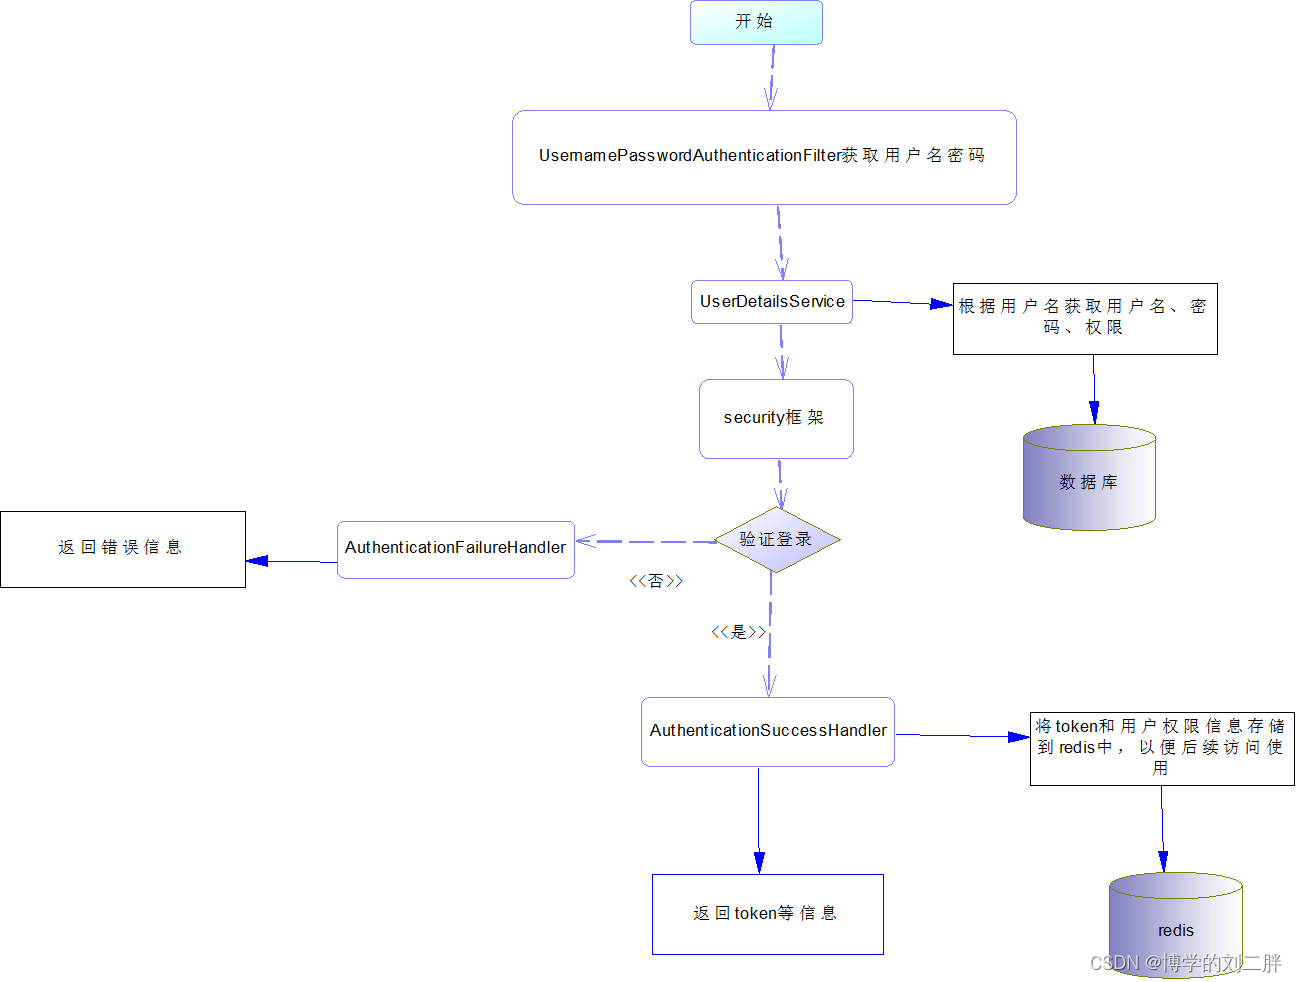
Ⅱ、登录文字描述:
1、用户输入用户名和密码点击登录
2、因为我们前端使用axios提交JSON格式数据,所以我们使用自定义验证器,编写一个类继承过滤器UsernamePasswordAuthenticationFilter在request中获取用户输入的用户名和密码,封装到UsernamePasswordAuthenticationToken中返回
3、此时传递到UserDetailsService接口,同样写一个类实现该接口,在该类实现类中获取username根据username获取用户的登录名、密码、权限信息,封装到User(security中自带的)中,传递给security处理登录
4、当验证成功,将会执行AuthenticationSuccessHandler处理器执行登录成功的逻辑,此时我们创建token,封装到response中,从Authentication获取用户的登录名和权限信息,并将信息存储到redis中,以便后续访问使用。
5、登录失败,执行AuthenticationFailureHandler处理器处理登陆失败的逻辑。
6、到此为止登录完成
二、请求过程解析
Ⅰ、请求流程图(随手画的不标准哈)

Ⅱ、请求过程文字解析
1、用户发送请求,要求header中携带token
2、此时我创建了一个继承BasicAuthenticationFilter过滤器的类jwtAuthenticationTokenFilter在request中的header获取token,从token中获取用户名,根据用户名在redis中查找当前请求的用户权限信息,封装到SecurityContextHolder的context中的authentication
3、对相应的接口表明权限——用户请求——通过
三、代码
Ⅰ、配置代码(最新版的security)
@Configuration
@EnableGlobalMethodSecurity(prePostEnabled = true)
public class SecurityConfiguration {
    //自定义登陆成功处理器
    @Autowired
    private LoginSuccessHandle loginSuccessHandle;
    //自定义登录失败处理器
    @Autowired
    private LoginFailHandle loginFailHandle;
    //自定义权限不足处理器
    @Autowired
    private AccessDeny accessDeny;
    //自定义未登录处理器
    @Autowired
    private AuthenticationEnryPoint authenticationEnryPoint;
    //redisTemplate
    @Autowired
    private RedisTemplate redisTemplate;
    @Bean
    public AuthenticationManager authenticationManager(AuthenticationConfiguration authenticationConfiguration) throws Exception {
        return authenticationConfiguration.getAuthenticationManager();
    }

    @Bean
    public PasswordEncoder passwordEncoder() {
        return new BCryptPasswordEncoder();
    }
    @Bean
    public SecurityFilterChain securityFilterChain(HttpSecurity http) throws Exception {
        http
                .cors()
                .and()
                .csrf()
                .disable()
                // 身份认证请求
                .authorizeHttpRequests()
                .anyRequest()
                //处理登录逻辑
                .authenticated()
                .and()
                .exceptionHandling()
                .accessDeniedHandler(accessDeny)    //权限不足的时候的逻辑处理
                .authenticationEntryPoint(authenticationEnryPoint);  //未登录是的逻辑处理;
        //配置自定义拦截器
        http.addFilterAt(new AdminUsernamePasswordAuthenticationFilter(authenticationManager(new AuthenticationConfiguration()),loginSuccessHandle,loginFailHandle), UsernamePasswordAuthenticationFilter.class);
        //配置自定义拦截器
        http.addFilterBefore(new jwtAuthenticationTokenFilter(authenticationManager(new AuthenticationConfiguration()),redisTemplate), BasicAuthenticationFilter.class);
        return http.build();
    }

}
Ⅱ、相关处理器
登录失败处理器
/**
* 登录失败处理器
*/
@Component
public class LoginFailHandle implements AuthenticationFailureHandler {
    //下面代码不写注释了,看不懂的话说明此文章不适合您
    @Override
    public void onAuthenticationFailure(HttpServletRequest request, HttpServletResponse response, AuthenticationException exception) throws IOException, ServletException {
        response.setContentType("application/json;charset=utf-8");
        response.setStatus(500);
        response.getWriter().write("login fail");
    }
}
未登录处理器
@Component
public class AuthenticationEnryPoint  implements AuthenticationEntryPoint {
    //下面代码不写注释了,看不懂的话说明此文章不适合您
    @Override
    public void commence(HttpServletRequest request, HttpServletResponse response, AuthenticationException authException) throws IOException, ServletException {
        response.setContentType("application/json;charset=utf-8");
        response.setStatus(401);
        response.getWriter().write("You need to log in to the system");
    }
}
权限不足处理器
@Component
public class AccessDeny implements AccessDeniedHandler {
    //下面代码不写注释了,看不懂的话说明此文章不适合您
    @Override
    public void handle(HttpServletRequest request, HttpServletResponse response, AccessDeniedException e) throws IOException {
        response.setContentType("application/json;charset=utf-8");
        response.setStatus(403);
        response.getWriter().write("Insufficient permissions require re-login");
    }
}
登陆成功处理器
@Component
public class LoginSuccessHandle implements AuthenticationSuccessHandler {
    @Autowired
    private RedisTemplate redisTemplate;

    @Override
    public void onAuthenticationSuccess(HttpServletRequest request, HttpServletResponse response, Authentication authentication) throws IOException {
        //得到用户的用户名
        String username = authentication.getName();
        //权限信息存入到redis中 username:权限
        redisTemplate.opsForValue().set(username,authentication.getAuthorities());
        //登陆成功信息
        response.getWriter().write("welcome to login this system");
    }
}
Ⅲ、自定义拦截器
UsernamePasswordAuthenticationFilter 拦截器
public class AdminUsernamePasswordAuthenticationFilter extends UsernamePasswordAuthenticationFilter {

    public AdminUsernamePasswordAuthenticationFilter(AuthenticationManager authenticationManager, LoginSuccessHandle loginSuccessHandle, LoginFailHandle loginFailHandle) {
        //只允许post请求,不是post请求也能经过filter
        this.setPostOnly(false);
        //设置登陆的路径和请求方式
        this.setAuthenticationManager(authenticationManager);
        this.setAuthenticationSuccessHandler(loginSuccessHandle);
        this.setAuthenticationFailureHandler(loginFailHandle);
        this.setRequiresAuthenticationRequestMatcher(new AntPathRequestMatcher("/loginAdmin/login"));
    }

    @Override
    public Authentication attemptAuthentication(HttpServletRequest request, HttpServletResponse response) throws AuthenticationException {
        if (!request.getMethod().equals("POST")) {
            throw new AuthenticationServiceException("Authentication method not supported: " + request.getMethod());
        } else //判断是否是JSON
if (request.getContentType().equals(MediaType.APPLICATION_JSON_UTF8_VALUE) || request.getContentType().equals(MediaType.APPLICATION_JSON_VALUE)) {
            ObjectMapper objectMapper = new ObjectMapper();
            try {
                 //获取上传的数据
                Map<String, String> map = objectMapper.readValue(request.getInputStream(), Map.class);
                //在上传数据里获取用户名密码
                String username = map.get("username");
                username = username != null ? username.trim() : "";
                String password = map.get("password");
                password = password != null ? password.trim() : "";
                //封装返回
                UsernamePasswordAuthenticationToken authRequest = UsernamePasswordAuthenticationToken.unauthenticated(username, password);
                setDetails(request, authRequest);
                return getAuthenticationManager().authenticate(authRequest);
            } catch (IOException e) {
                throw new RuntimeException(e);
            }
        }
        throw new AuthenticationServiceException("User input error");
    }


}
BasicAuthenticationFilter 过滤器
public class jwtAuthenticationTokenFilter extends BasicAuthenticationFilter {
    private RedisTemplate redisTemplate;

    public jwtAuthenticationTokenFilter(AuthenticationManager authenticationManager,RedisTemplate redisTemplate) {
        super(authenticationManager);
        this.redisTemplate=redisTemplate;
    }

    @Override
    protected void doFilterInternal(HttpServletRequest request, HttpServletResponse response, FilterChain filterChain) throws ServletException, IOException {
        //在请求头中获取token
        String tokens = request.getHeader("token");
        if(token!=null){
            //jwtUtils中获取用户名
            String username = JwtUtils.getUsernameByToken(tokens);
            //根据用户名在redis中获取权限信息
            Collection<LinkedHashMap<String,String>> authorities = (Collection<LinkedHashMap<String, String>>) redisTemplate.opsForValue().get(username);
            Collection<GrantedAuthority> authorityCollection = new ArrayList<>();
            if (!CollectionUtils.isEmpty(authorities)) {
                for (LinkedHashMap<String,String> permissionValue : authorities) {
                    SimpleGrantedAuthority authority = new SimpleGrantedAuthority(permissionValue.get("authority"));
                    authorityCollection.add(authority);
                }
            }
            SecurityContextHolder.getContext().setAuthentication(new UsernamePasswordAuthenticationToken(username, token, authorityCollection));
        }
        filterChain.doFilter(request, response);
    }
}
Ⅳ、测试api
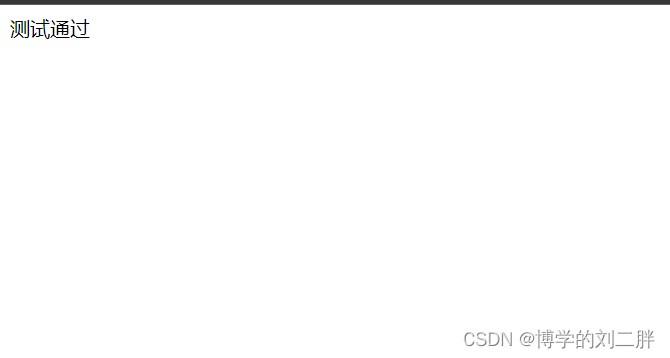
编写一个测试类,没有什么说的哈,就是一个api给出此地址的权限
     /**
     * 测试
     * @return
     */
    @ApiOperation(value = "测试")
    @PreAuthorize("hasAnyAuthority('5') or hasAnyRole('1','5')")
    @GetMapping("/test")
    public String test(){
        return "测试通过";
    }
Ⅵ、工具类
jwt工具类
@Component
public class JwtUtils {
    /*设置三十分钟后过期*/
    private static long EXPIRE_TIME;
    private static String TOKEN_SECRET;
    public static String signAdmin(String permission, String userId,String username) {
        String tokens = "";
        try {
            Date date = new Date(System.currentTimeMillis() + EXPIRE_TIME);
            //秘钥及加密算法
            Algorithm algorithm = Algorithm.HMAC256(TOKEN_SECRET);
            //设置头部信息
            Map<String, Object> header = new HashMap<>();
            header.put("typ", "JWT");
            header.put("alg", "HS256");
            //携带username,password信息,生成签名
            tokens = JWT.create().withHeader(header).withClaim("id", userId).withClaim("permission", permission).withClaim("username", username).withExpiresAt(date).sign(algorithm);
        } catch (Exception e) {
            e.printStackTrace();
            return null;
        }
        return token;
    }

    public static String getUsernameByToken(String token) {
        DecodedJWT decodeToken = JWT.decode(token);
        return decodeToken.getClaim("username").asString();
    }

    @Value(value = "${electronictariff.EXPIRE_TIME}")
    public void setExpireTime(long expireTime) {
        JwtUtils.EXPIRE_TIME = expireTime;
    }

    @Value(value = "${electronictariff.TOKEN_SECRET}")
    public void setTokenSecret(String tokenSecret) {
        JwtUtils.TOKEN_SECRET = tokenSecret;
    }
}
测试结果


 438
438


 被折叠的 条评论
为什么被折叠?
被折叠的 条评论
为什么被折叠?
 到【灌水乐园】发言


