


Spring MVC框架
Spring web MVC 框架提供了模型-视图-控制的体系结构和可以用来开发灵活、松散耦合的 web 应用程序的组件。MVC 模式导致了应用程序的不同方面(输入逻辑、业务逻辑和 UI 逻辑)的分离,同时提供了在这些元素之间的松散耦合。
模型封装了应用程序数据,并且通常它们由 POJO 组成。视图主要用于呈现模型数据,并且通常它生成客户端的浏览器可以解释的 HTML 输出。控制器主要用于处理用户请求,并且构建合适的模型并将其传递到视图呈现。
DispatcherServlet
Spring Web 模型-视图-控制(MVC)框架是围绕 DispatcherServlet 设计的,DispatcherServlet 用来处理所有的 HTTP 请求和响应。
Web MVC DispatcherServlet 的请求处理的工作流程如下图所示:

DispatcherServlet 传入 HTTP 请求的事件序列:
- 收到一个 HTTP 请求后,DispatcherServlet 根据 HandlerMapping 来选择并且调用适当的控制器。
- 控制器接受请求,并基于使用的 GET 或 POST 方法来调用适当的 service 方法。Service 方法将设置基于定义的业务逻辑的模型数据,并返回视图名称到 DispatcherServlet 中。
- DispatcherServlet 会从 ViewResolver 获取帮助,为请求检取定义视图。
- 一旦确定视图,DispatcherServlet 将把模型数据传递给视图,最后呈现在浏览器中。
上面所提到的所有组件,即 HandlerMapping、Controller 和 ViewResolver 是 WebApplicationContext 的一部分,而 WebApplicationContext 是带有一些对 web 应用程序必要的额外特性的 ApplicationContext 的扩展。
需求的配置
你需要映射你想让 DispatcherServlet 处理的请求,通过使用在 web.xml 文件中的一个 URL 映射。
web.xml文件将被保留在你的应用程序的WebContent/WEB-INF目录下。好的,在初始化HelloWeb DispatcherServlet时,该框架将尝试加载位于该应用程序的WebContent/WEB-INF目录中文件名为[servlet-name]-servlet.xml的应用程序内容。在这种情况下,我们的文件将是HelloWeb-servlet.xml。
接下来,servlet-mapping标签表明哪些 URLs 将被DispatcherServlet处理。这里所有以 .jsp 结束的 HTTP 请求将由HelloWeb DispatcherServlet处理。
关于 HelloWeb-servlet.xml 文件的一些要点:
[servlet-name]-servlet.xml文件将用于创建 bean 定义,重新定义在全局范围内具有相同名称的任何已定义的 bean。context:component-scan标签将用于激活 Spring MVC 注释扫描功能,该功能允许使用注释,如 @Controller 和 @RequestMapping 等等。InternalResourceViewResolver将使用定义的规则来解决视图名称。按照上述定义的规则,一个名称为 hello 的逻辑视图将发送给位于 /WEB-INF/jsp/hello.jsp 中实现的视图。
定义控制器
DispatcherServlet 发送请求到控制器中执行特定的功能。
@Controller 注释表明一个特定类是一个控制器的作用。@RequestMapping 注释用于映射 URL 到整个类或一个特定的处理方法。
@Controller 注释定义该类作为一个 Spring MVC 控制器。在这里,第一次使用的@RequestMapping表明在该控制器中处理的所有方法都是相对于 /hello 路径的。下一个注释@RequestMapping(method = RequestMethod.GET)用于声明 printHello() 方法作为控制器的默认 service 方法来处理 HTTP GET 请求。你可以在相同的 URL 中定义其他方法来处理任何 POST 请求。
控制器要注意的要点:
- 你将在一个 service 方法中定义需要的业务逻辑。你可以根据每次需求在这个方法中调用其他方法。
- 基于定义的业务逻辑,你将在这个方法中创建一个模型。你可以设置不同的模型属性,这些属性将被视图访问并显示最终的结果。这个示例创建了一个带有属性 “message” 的模型。
- 一个定义的 service 方法可以返回一个包含视图名称的字符串用于呈现该模型。这个示例返回 “hello” 作为逻辑视图的名称。
创建 JSP 视图
对于不同的表示技术,Spring MVC 支持许多类型的视图。这些包括 JSP、HTML、PDF、Excel 工作表、XML、Velocity 模板、XSLT、JSON、Atom 和 RSS 提要、JasperReports 等等。但我们最常使用利用 JSTL 编写的 JSP 模板。
Spring Web MVC 框架例子:
web.xml 文件配置:
<?xml version="1.0" encoding="UTF-8"?>
<web-app xmlns="http://xmlns.jcp.org/xml/ns/javaee"
         xmlns:xsi="http://www.w3.org/2001/XMLSchema-instance"
         xsi:schemaLocation="http://xmlns.jcp.org/xml/ns/javaee http://xmlns.jcp.org/xml/ns/javaee/web-app_3_1.xsd"
         version="3.1">

    <display-name>HelloController</display-name>
    <welcome-file-list>
        <welcome-file> index.jsp</welcome-file>
    </welcome-file-list>

    <context-param>
        <param-name>contextConfigLocation</param-name>
        <param-value>classpath*:springmvc.xml</param-value>
    </context-param>
    <listener>
        <listener-class>org.springframework.web.context.ContextLoaderListener</listener-class>
    </listener>
    <servlet>
        <servlet-name>dispatcher</servlet-name>
        <servlet-class>org.springframework.web.servlet.DispatcherServlet</servlet-class>
        <load-on-startup>1</load-on-startup>
    </servlet>
    <servlet-mapping>
        <servlet-name>dispatcher</servlet-name>
        <url-pattern>*.do</url-pattern>
    </servlet-mapping>

    <!--过滤器设置编码格式-->
    <filter>
        <filter-name>characterencoding</filter-name>
        <filter-class>org.springframework.web.filter.CharacterEncodingFilter</filter-class>
        <init-param>
            <param-name>Encoding</param-name>
            <param-value>UTF-8</param-value>
        </init-param>
    </filter>
    <filter-mapping>
        <filter-name>characterencoding</filter-name>
        <url-pattern>/*</url-pattern>
    </filter-mapping>
</web-app>
springmvc.xml 文件配置:
<?xml version="1.0" encoding="UTF-8"?>
<beans xmlns="http://www.springframework.org/schema/beans"
       xmlns:xsi="http://www.w3.org/2001/XMLSchema-instance"
       xmlns:tx="http://www.springframework.org/schema/tx"
       xmlns:mvc="http://www.springframework.org/schema/mvc"
       xmlns:aop="http://www.springframework.org/schema/aop"
       xmlns:context="http://www.springframework.org/schema/context"
       xsi:schemaLocation="http://www.springframework.org/schema/beans
        http://www.springframework.org/schema/beans/spring-beans.xsd
        http://www.springframework.org/schema/tx
        http://www.springframework.org/schema/tx/spring-tx.xsd
        http://www.springframework.org/schema/mvc
        http://www.springframework.org/schema/mvc/spring-mvc.xsd
        http://www.springframework.org/schema/context
        http://www.springframework.org/schema/context/spring-context.xsd
        http://www.springframework.org/schema/aop
        http://www.springframework.org/schema/aop/spring-aop.xsd

">

    <!--自动扫描上下文-->
    <context:component-scan base-package="cn.zbw.*"></context:component-scan>

    <!--视图层-->
    <mvc:annotation-driven></mvc:annotation-driven>
    <mvc:default-servlet-handler></mvc:default-servlet-handler>
    <bean id="viewResolver" class="org.springframework.web.servlet.view.InternalResourceViewResolver">
        <property name="prefix" value="/"></property>
        <property name="suffix" value=".jsp"></property>
    </bean>

</beans>
controller 控制器层的代码:
package cn.zbw.controller;

import org.springframework.stereotype.Controller;
import org.springframework.ui.Model;
import org.springframework.web.bind.annotation.RequestMapping;
import org.springframework.web.bind.annotation.RequestMethod;
import org.springframework.web.bind.annotation.RequestParam;
import javax.servlet.http.HttpServletRequest;
import org.springframework.web.servlet.ModelAndView;

import java.util.Map;

@Controller
public class HelloController {

//    @RequestMapping("/sayHello.do")
//    public String sayHello(){
//        System.out.println("hello");
//        return "index";
//    }

//    视图层往控制器传值
//    @RequestMapping("/hello.do")
//    public String hello(String name){
//        System.out.println(name);
//        return "index";
//    }

//    @RequestMapping("/hello.do")
//    public String hello(@RequestParam String name){
//        System.out.println(name);
//        return "index";
//    }

//    @RequestMapping("/hello.do")
//    public String hello(@RequestParam(value = "name",required = false) String name){
//        System.out.println(name);
//        return "index";
//    }

//    @RequestMapping(value = "/hello.do",method = RequestMethod.GET,params = "name")
//    public String hello(String name){
//        System.out.println(name);
//        return "index";
//    }


//    控制器往视图层传值
//    @RequestMapping("/hello.do")
//    public ModelAndView hello(){
//        ModelAndView modelAndView = new ModelAndView();
//    添加模型数据
//        modelAndView.addObject("name","冰冰");
//    设置图层
//        modelAndView.setViewName("index");
//        return modelAndView;
//    }

//    @RequestMapping("/hello.do")
//    public String hello(Model model){
//        model.addAttribute("username","养乐多");
//        model.addAttribute("椰果奶茶");
//        return "index";
//    }

//    @RequestMapping("/hello.do")
//    public String hello(Map<String,Object> map){
//        map.put("password","2580");
//        return "index";
//    }


//    课后作业
//    @RequestMapping("/hello.do")
//    public String hello(String username){
//        System.out.println(username);
//        return "index";
//    }
    @RequestMapping("/show.do")
    public ModelAndView login(String username){
        ModelAndView mv = new ModelAndView();
        mv.addObject("name",username);//添加模型数据
        System.out.println(username);
        mv.setViewName("success");//设置视图名称
        return mv;
    }

}
jsp 页面:
<%--
Created by IntelliJ IDEA.
User: ASUS
Date: 2021/03/17
Time: 上午 11:08
To change this template use File | Settings | File Templates.
--%>
<%@ page contentType="text/html;charset=UTF-8" language="java" %>
<html>
<head>
<title>学习SpringMvc第一天</title>
</head>
<body>
<%--我爱学习SpringMVC--%>
<%--${name}--%>
<%--${username}--%>
<%--${string}--%>
<%--${password}--%>
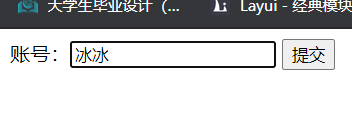
<form action="/show.do" method="post">
账号:<input name="username" type="text" id="name">
<%--密码:<input name="password" type="password">--%>
<input type="submit" value="提交" >
</form>
</body>
</html>
success 成功返回页面:
<%--
Created by IntelliJ IDEA.
User: ASUS
Date: 2021/03/17
Time: 下午 5:28
To change this template use File | Settings | File Templates.
--%>
<%@ page contentType="text/html;charset=UTF-8" language="java" %>
<html>
<head>
<title>成功</title>
</head>
<body>
<br>
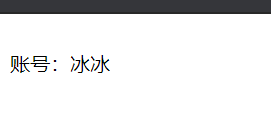
账号:${name}
<%--密码:${password}--%>
</body>
</html>
结果就是在 index.jsp 中书写的用户名会在 success.jsp 中显示:
点击提交跳转:


 198
198


 被折叠的 条评论
为什么被折叠?
被折叠的 条评论
为什么被折叠?
 到【灌水乐园】发言


