


这里写目录标题
写在之前
在一开始我是在CSDN上写博客,记录一些学习过程,由于每次写完 markdown 再发布的过程比较麻烦,又不想花大价钱租服务器,所以暂时想到了是使用 github page 来做个人博客,进行学习过程的记录
开始折腾
有一个github账号
这方面的相关博客和教程比较多,这里就不再过多赘述了,其实一步一步来就可以
放一个官网链接 github传送门
创建github仓库


上面两种方式都可以进入仓库创建界面,进入后显示如下

这里需要注意,仓库的名字必须是 XXX.github.io , 其中XXX 要和你前面的用户名相同,仓库的discription 自己想写什么就写什么,就的对仓库的一个描述,最后点击 Create repository 就可以了
安装相关软件
安装git工具

点击上方 logol 传送去git官网,选择和系统相符的git版本进行下载安装,安装过程中想改安装位置的可以改一下,其他的一直下一步就好了
如果
安装好后,我们右键可以看到 git bash 和 git gui 就已经安装好了

对于git的使用和安装可以看 廖雪峰老师的官网
安装Node.js
这里我推进使用 nvm 来管理 node 的版本,因为在我做项目过程中,可能需要维护别人的老项目,所以node版本经常不匹配,使用 nvm 进行node 版本的管理,可用方便的切换不同版本的 node 。
windows的话,可以在github上下载nvm 打开我们可以看到两个版本
-
nvm-noinstall.zip:绿色免安装版,但使用时需进行配置
-
nvm-setup.zip:安装版,推荐使用

nvm的具体安装和使用简书Do_Du有详细的步骤,可以进行参考
安装Hexo
![]()
点击上方 logo 可以去官网了解更多Hexo的内容
npm install hexo-cli -g
复制上面这句代码,在一个没有中文的路径下新建一个文件夹做为博客的目录
进入文件夹中,右键 git bash here,并粘贴代码回车运行

看到updated 1 package 就安装好了
初始化和本地博客的搭建
初始化本地博客
cd ../

hexo init blog
在刚才初始化的窗口分别键入上面两句代码,对本地博客进行初始化

当看到图中的信息后,你的本地博客就初始化完成了,可以进入刚才博客的文件夹(这里我的文件夹名字是blog),发现多了很多文件
cd blog/

npm install
使用上面第一条命令进入文件夹内,blog需要替换为自己的文件夹名称
进入后使用第二条命令进行依赖的安装

看到如上图信息就安装成功了
hexo s
在博客的根目录下(即刚才博客的文件夹下)输入上面的命令,启动博客

可以看到如图的输出信息,我们可以在 localhost:4000去看一下我们博客现在的样子,大概就是下面这样

停止运行我们只需要输入 Ctrl+C 就可以了
配置git
如果不是第一次使用git可以跳过这一步
在刚才的git bash 中输入
cd ~/.ssh
如果提示 No such file or directory 说明你是第一次使用git
先配置使用git人的身份,在git bash 中分别输入下面两个命令,用户名 用github的用户名就好 邮箱 也使用注册github的邮箱
git config --global user.name "这里换上你的用户名"
git config --global user.email "这里换上你的邮箱"
再进行git的ssh配置,同样 邮箱 使用注册github的邮箱
ssh-keygen -t rsa -C "这里换上你的邮箱"
命令执行后需要进行三次确认,按回车就完了
命令执行完成后,在用户目录(就的c盘下User里你用户名的目录)的 .ssh目录 下会生成2个名为id_rsa和id_rsa.pub的文件

打开github 点击右上角你的头像,进入settings

选择 SSH and GPG keys

点击New SSH key,并把之前生成的id_rsa.pub文件,用记事本打开,将内容复制到key下的文本框,title的话自己随便写一个自己明白的就好,最后点击 Add SSH key

回到git bash 输入下面的命令
$ ssh -T git@github.com

看到 access 就成功了,如果是第一次,可能需要确认一下,输入yes后回车,就会提示成功
安装deployer插件
npm install hexo-deployer-git --save
在博客文件夹目录下,的git bash中输入上面的命令进行安装
发布博客到 github.io
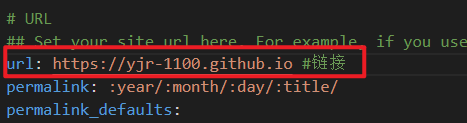
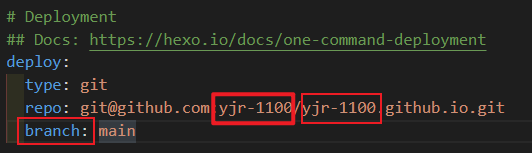
想要发布博客到XXX.github.io 首先要让hexo 知道你的github位置,进入本地博客根目录修改一些配置,在博客的文件夹下打开_config.yml 开始编辑
-
修改url:
-
修改deploy,注意红标的地方写自己的github名称,branch默认的话现在是
main,之前好多博客中写的是master这是之前的分支名称,如果没有改过,那么就是main
修改配置后,在git bash 中分别输入
hexo clean

hexo g

hexo d
等待命令执行完成,就发布成功了,可以打开你的地址进行查看https://XXX.github.io 这里XXX 就是你的用户名,比如我的 https://yjr-1100.github.io
配置好看的主题,并写博客
又到了最麻烦和最开心的时刻,配置好看的主题让你的博客变的独一无二吧
安装butterfly主题
你可以在 hexo的主题库 中找到自己喜欢的主题,这里我用的是 butterfly 主题
打开主题的主页,里面其实有很多详细的教程
git clone -b master https://github.com/jerryc127/hexo-theme-butterfly.git themes/butterfly
在你的博客根目录下执行上面的代码,下载主题
为了使这个主题可用,我们还需要安装几个插件,再博客的根目录下运行下面的命令
npm install hexo-renderer-pug hexo-renderer-stylus --save

npm install hexo-wordcount --save
配置butterfly主题
注意在进行下面配置过程中随时执行 hexo clean hexo g hexo s 来确保没有出错,并且注意: 后面都会有空格,如果报错即时检查
应用主题
我们需要继续配置 _config.yml 文件来应用我们的主题,在_config.yml 文件中找到 theme 填写我们主题的名字

并且在博客文件夹根目录下新建一个_config.butterfly.yml 的文件,将主题的配置文件复制进去,目前这个版本的主题配置文件在 /themes/butterfly/_config.yml

创建几个页面
这里我只创建了几个目前我需要的,可以根据主题官方的说明进行其他的配置
-
标签页
hexo new page tags执行上面代码并在source/tags/index.md 的头部添加
type: "tags"
title就是页面中间显示的内容,自己根据喜好写就好top_img就是页面顶部的背景图片 -
分类页
hexo new page categories执行上面代码并在source/categories/index.md 的头部添加
type: "categories"
titletop_img和上面一样 -
友情链接页
hexo new page link执行上面代码并在source/link/index.md 的头部添加
type: "link"
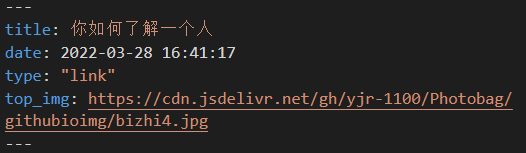
titletop_img和上面一样对于友情链接的设置我们需要在
source目录下新建一个_data文件夹,并创建一个link.yml,按照下面的内容进行修改- class_name: 友情链接 class_desc: 那些人,那些事 link_list: - name: Hexo link: https://hexo.io/zh-tw/ avatar: https://d33wubrfki0l68.cloudfront.net/6657ba50e702d84afb32fe846bed54fba1a77add/827ae/logo.svg descr: 快速、简单且强大的网誌框架 - class_name: 网站 class_desc: 没问题,就是学习 link_list: - name: jquery之家 link: http://www.htmleaf.com/ avatar: https://cdn.jsdelivr.net/gh/yjr-1100/Photobag/githubioimg/jqueryhome.jpg descr: 自由分享jQuery、html5和css3的插件库 - name: jquery插件库 link: https://www.jq22.com/ avatar: https://www.jq22.com/img/logo.png descr: jquery插件库 - name: AcWing link: https://www.acwing.com/ avatar: https://cdn.acwing.com/media/activity/surface/logo100x100.png descr: 算法刷题 -
关于我页面
hexo new page about执行上面代码并在source/about/index.md 的头部添加
type: "about"
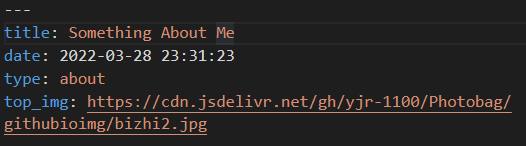
titletop_img和上面一样 -
404页面
主题内部内置了一个404,我们只需要打开就好,进入
_config.butterfly.yml找到下面的设置,把enable改为true
修改浏览器标签栏Icon
在themes/butterfly/source/img/ 文件夹下,放一个自己的icon ,在 _config.butterfly.yml 文件中,找到 favicon 进行编辑,改为自己图片的路径
# Favicon(網站圖標)
favicon: /img/favicon.ico
设置导航栏
在 _config.butterfly.yml 文件中,找到 menu 进行编辑
menu:
  主页: / || fas fa-home
  时间轴: /archives/ || fas fa-archive
  标签: /tags/ || fas fa-tags
  分类: /categories/ || fas fa-folder-open
  链接||fas fa-list:
    友情链接: /link/ || fas fa-link
    关于: /about/ || fas fa-heart
设置主页的头部图片和背景图片
在 _config.butterfly.yml 文件中,找到 index_img 和 archive_img ,在后面写上图片的url,其他的有兴趣也可以设置,找到background 在后面写上背景图片的url

# Website Background (設置網站背景)
# can set it to color or image (可設置圖片 或者 顔色)
# The formal of image: url(http://xxxxxx.com/xxx.jpg)
background: url(https://cdn.jsdelivr.net/gh/yjr-1100/Photobag/githubioimg/bizhi3.jpg)
设置页脚开启页脚背景
在 _config.butterfly.yml 文件中,找到 footer 修改 enable 为 true,找到 footer_bg 修改为 true
footer:
  owner:
    enable: true
    since: 2022
  custom_text: 这里可以加一些自己的话
  copyright: true # Copyright of theme and framework

# Footer Background
footer_bg: true
开启页面美化
在 _config.butterfly.yml 文件中,找到 beautify 修改 enable 为 true
beautify:
  enable: true
  field: post # site/post
  title-prefix-icon: # '\f0c1'
  title-prefix-icon-color: # '#F47466'
设置首页动态打字效果
在 _config.butterfly.yml 文件中,找到 subtitle 修改 enable 为 true ,并在 sub 下写自己的想打的句子
# the subtitle on homepage (主頁subtitle)
subtitle:
  enable: true
  # Typewriter Effect (打字效果)
  effect: true
  # loop (循環打字)
  loop: true
  # source 調用第三方服務
  # source: false 關閉調用
  # source: 1  調用一言網的一句話(簡體) https://hitokoto.cn/
  # source: 2  調用一句網(簡體) http://yijuzhan.com/
  # source: 3  調用今日詩詞(簡體) https://www.jinrishici.com/
  # subtitle 會先顯示 source , 再顯示 sub 的內容
  source: false
  # 如果關閉打字效果,subtitle 只會顯示 sub 的第一行文字
  sub:
    - 人生没有白走的路,弯路也算数
    - 总有一天,你会渐渐活出写满答案的人生
    - 今天不想跑,所以才去跑,这才是长距离跑者的思维方式
修改侧边栏
在 _config.butterfly.yml 文件中,找到 aside 修改 enable 为 true ,并在 card_announcement 下修改公告内容,在 card_author 下修改自己的Github链接,找到 busuanzi 打开访问人数 ,找到 runtimeshow 打开网页运行时间
aside:
  enable: true
  hide: false
  button: true
  mobile: true # display on mobile
  position: right # left or right
  card_author:
    enable: true
    description:
    button:
      enable: true
      icon: fab fa-github
      text: Follow Me
      link: https://github.com/yjr-1100
  card_announcement:
    enable: true
    content: 总要记些什么证明我来过
  card_recent_post:
    enable: true
    limit: 5 # if set 0 will show all
    sort: date # date or updated
    sort_order: # Don't modify the setting unless you know how it works
  card_categories:
    enable: true
    limit: 8 # if set 0 will show all
    expand: none # none/true/false
    sort_order: # Don't modify the setting unless you know how it works
  card_tags:
    enable: true
    limit: 40 # if set 0 will show all
    color: false
    sort_order: # Don't modify the setting unless you know how it works
  card_archives:
    enable: true
    type: monthly # yearly or monthly
    format: MMMM YYYY # eg: YYYY年MM月
    order: -1 # Sort of order. 1, asc for ascending; -1, desc for descending
    limit: 8 # if set 0 will show all
    sort_order: # Don't modify the setting unless you know how it works
  card_webinfo:
    enable: true
    post_count: true
    last_push_date: true
    # sort_order: # Don't modify the setting unless you know how it works

# busuanzi count for PV / UV in site
# 訪問人數
busuanzi:
  site_uv: true
  site_pv: true
  page_pv: true

# Time difference between publish date and now (網頁運行時間)
# Formal: Month/Day/Year Time or Year/Month/Day Time
runtimeshow:
  enable: true
  publish_date: 3/28/2022 00:00:00
设置社交账号
在 _config.butterfly.yml 文件中,找到 social 修改,冒号前面的是图标,使用的图标库是 font-awesome v6,冒号后边是网址和名称
social:
  fab fa-github: https://github.com/yjr-1100 || Github
  fas fa-envelope: mailto:jiaruiyang221@gmail.com || Email
开启繁简体切换和阅读模式
在 _config.butterfly.yml 文件中,找到 translate 修改 enable 为 true ,找到 readmode 修改为 true
# Conversion between Traditional and Simplified Chinese (簡繁轉換)
translate:
  enable: true
  # The text of a button
  default: 繁
  # the language of website (1 - Traditional Chinese/ 2 - Simplified Chinese)
  defaultEncoding: 2
  # Time delay
  translateDelay: 0
  # The text of the button when the language is Simplified Chinese
  msgToTraditionalChinese: '繁'
  # The text of the button when the language is Traditional Chinese
  msgToSimplifiedChinese: '简'

# Read Mode (阅读模式)
readmode: true
写文章和发布博客
配置好后,再运行下面三个命令,打开本地博客看一下
hexo clean

hexo g

hexo s
当我们需要写博客的时候,我们可以使用命令
hexo new post 文章名
来创建一个文件,改文件的位置就在 /source/_posts 下,我们可以打开新建好的 .md 文件进行编辑。
hexo new post 命令使用的就是post模板,可以在/scaffolds 文件夹下找到改模板,我们可以编辑模板的头部,方便以后生成。
---
title: {{ title }}
date: {{ date }}
tags:
categories:
keywords:
description:
top_img: https://cdn.jsdelivr.net/gh/yjr-1100/Photobag/githubioimg/background_4k.jpg
cover:
---
其中:
tags用来写新增文章的标签
categories指明文章的分类,这个指明后会自动在分类页面被归类
description描述本篇文章,类似摘要
top_img指定文章头部的图片
cover指定文章在首页展示时的缩略图
keywords就是页面关键字
我们写好后,就可以在本地博客看到新写的博客了,再次执行下面的命令,就可以发布到github.io 中了
hexo clean

hexo g

hexo d
一些其他的设置
绑定自己的域名
-
购买一个域名 可以去阿里云 进行域名注册
-
为域名设置解析 拿阿里云为例,进入控制台,选择域名解析

-
添加CNMA解析,我这里添加的是二级域名,

-
在xxx.github.io的仓库中新建文件名为
CNAME,写入你刚才解析的域名
-
在仓库的
settings里找到pages进行设置,下面的那个对勾需要等一会才能勾选
-
等一会就可以使用这个域名进行访问了,比如我可以通过
https://yjr1100blog.jerryfirst.top/进行博客的访问 -
使用
hexo d的时候一般会把这个CNAME文件覆盖掉,所以我们可以在本地的source文件夹下创建一个CNAME文件把刚才的内容写进去,这样在进行hexo d的时候,就也会同时进行上传
进行文件更替
我们xxxx.github.io仓库里的文件只有 hexo g hexo d后的内容,没有源文件,加入我们电脑坏了,数据丢了,我们的博客就没了,所以我们建一个私有仓库进行我们原文件的更替
-
在github 中建立一个私有仓库

-
在博客文件夹下创建
.gitignore文件,内容入下.DS_Store Thumbs.db db.json *.log node_modules/ public/ .deploy*/ .vscode/ /.idea/ .deploy_git*/ .idea themes/butterfly/.git -
在博客的文件夹下 执行
git init

git add .
如果执行
git add .提示hint: You've added another git repository inside your current repository. hint: Clones of the outer repository will not contain the contents of hint: the embedded repository and will not know how to obtain it. hint: If you meant to add a submodule, use: hint: hint: git submodule add <url> themes/butterfly hint: hint: If you added this path by mistake, you can remove it from the hint: index with: hint: hint: git rm --cached themes/butterfly hint: hint: See "git help submodule" for more information.这个意思因为
themes/butterfly/下也有一个.git文件夹 ,git 认为themes/butterfly是子仓库,但是对于子仓库还需要配置其他东西才可以进行 add 所以有了这个提示如果想要提交
themes/butterfly中的内容,那我们可以选择删了themes/butterfly下的.git文件,并执行git rm -f --cached themes/butterfly先删了add 里的这个文件,再添加一次 -
添加好后,依次执行下面的命令,完成源文件上传,其中
git@github.com:yjr-1100/blogdata.git要改成自己仓库的信息git commit -m "first commit" git branch -M main git remote add origin git@github.com:yjr-1100/blogdata.git git push -u origin main -
以后我们改完文件执行进行提交就好了
其它一些注意事项
github.io 没有更新的问题
如果git bash 中执行 hexo d 没有报错,仓库里的东西也更新了,但是你的xxx.github.io 却没有立刻得到更新,请耐心等一等,也可能github pages还在deploy


 1122
1122


 被折叠的 条评论
为什么被折叠?
被折叠的 条评论
为什么被折叠?
 到【灌水乐园】发言


