


文章目录
注意事项–介绍
自定义监控脚本如何设置
-
监控脚本:你要监控哪些值,如何取出这些值
-
配置文件中userparameter项 > 重启agent
-
测试:zabbix_get
-
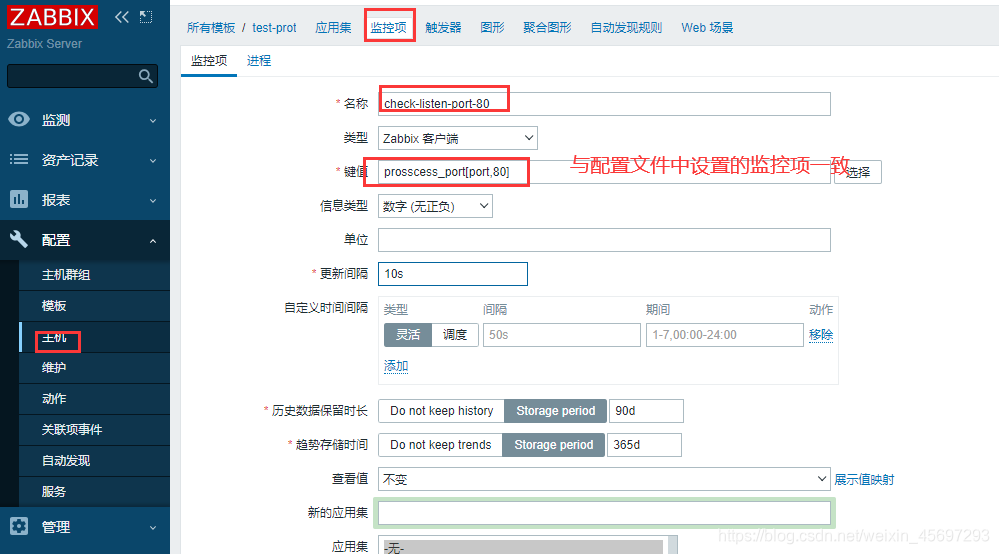
创建模板,添加监控项,键值为
<userparameter的键>[参数1,参数2] -
添加触发器,
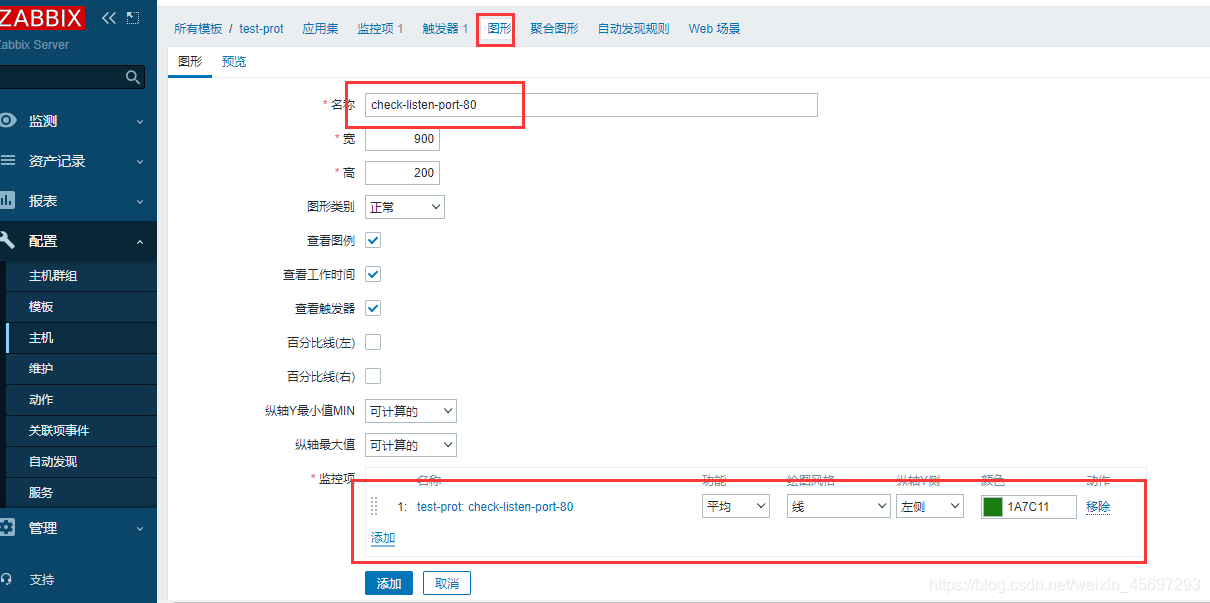
添加图形
配置agent 配置文件导入自定义配置
mkdir  /etc/zabbix/zabbix_agentd.conf.d

vim /usr/local/zabbix/etc/zabbix_agentd.conf
#自定义配置
Include=/usr/local/zabbix/etc/zabbix_agentd.conf.d/*.conf
#自定义脚本
Include=/usr/local/zabbix/etc/zabbix_agentd.conf.d/*.sh
引用的监控项也可以直接写到一个文件中去
vim /usr/local/zabbix/etc/zabbix_agentd.conf.d/status_内容.conf
这些监控脚本是写在agent
实例:自定义端口进程监控
1. 在zabbix-agent,写脚本
用于监控端口,进程
cd /etc/zabbix/zabbix_agent.d
脚本process_port_check.sh 内容:
#!/bin/bash
check_process(){
	NUM=`ps -ef | grep -v grep | grep -v bash | grep ${NAME} | wc -l`
	if [ $NUM -eq 0 ];then
		echo 100
	else
		echo 50
	fi
}
check_port(){
	ss -tnl | grep ${PORT} &> /dev/null
	if [ $? -eq 0 ];then
		echo 50
	else
		echo 100
	fi
}
 main(){
	case $1 in
	process)
		NAME=$2
		check_process;
		;;
	port)
		PORT=$2
		check_port;
		;;
	esac
}
main $1 $2
# $1为监控的端口或进程  $为具体的内容


chmod +x process_port_check.sh


bash  process_port_check.sh  port 80
	50正确结果
vim /etc/zabbix/zabbix_agent.conf
								,命令/脚本
UserParameter=prosscess_port[*],/etc/zabbix/zabbix_agentd.d/process_port_check.sh "$1" "$2"

systemctl restart zabbix-agent
2.在zabbix-server测试
yum install zabbix-get -y

 -s指定主机,或者主机名
 -p端口
 -k 测试具体的监控项

zabbix_get -s 192.168.15.204 -p 10050 -k "prosscess_port[port,80]"
	50正确结果
3. 创建模板
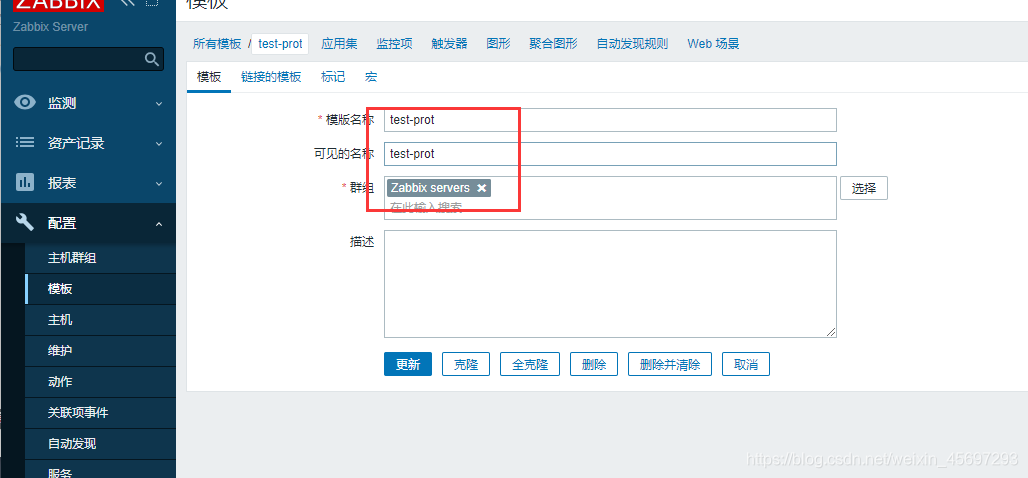
4. 创建监控项
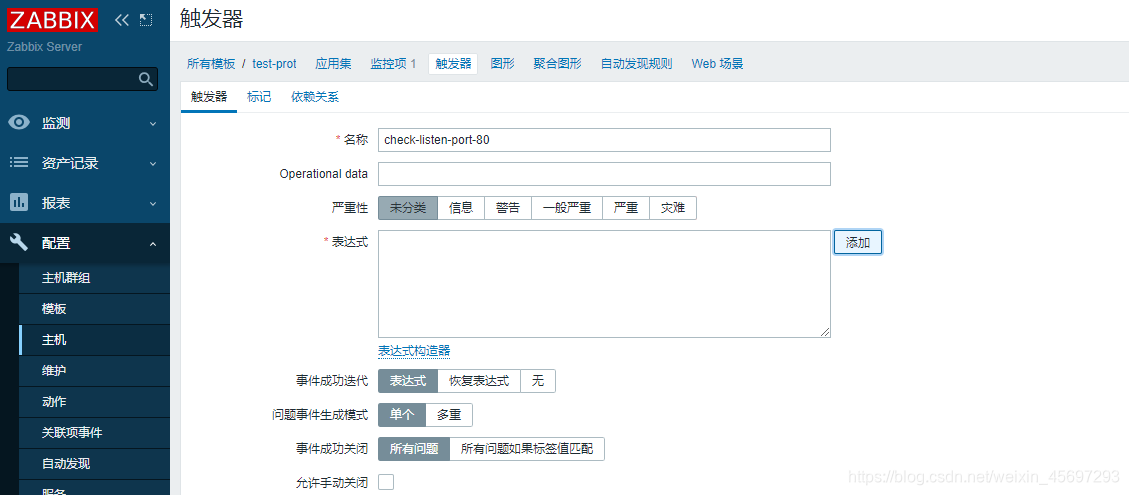
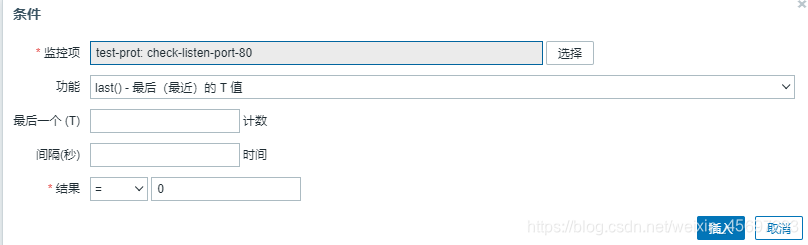
5. 创建触发器
6. 创建图形
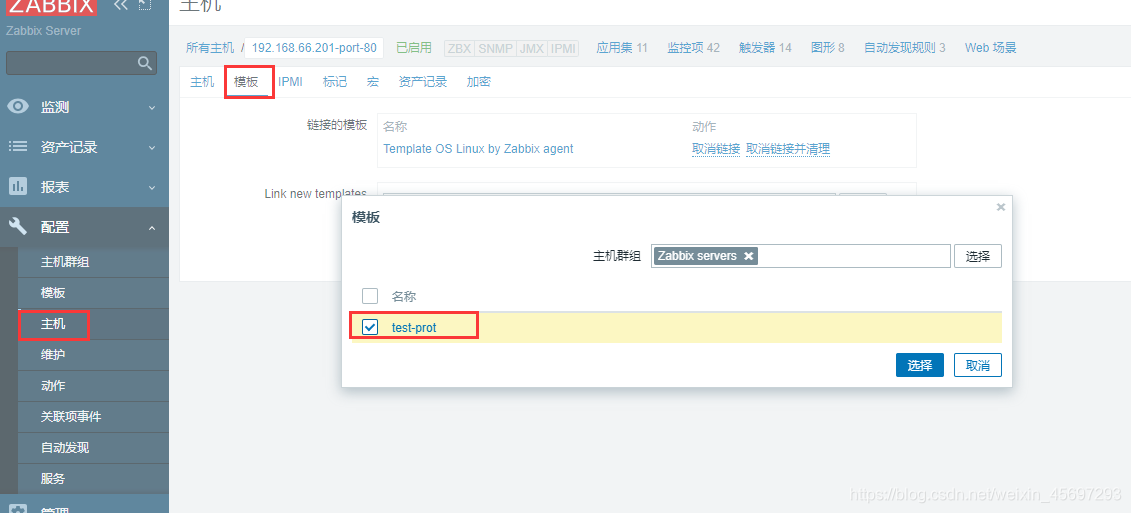
7. 关联至主机
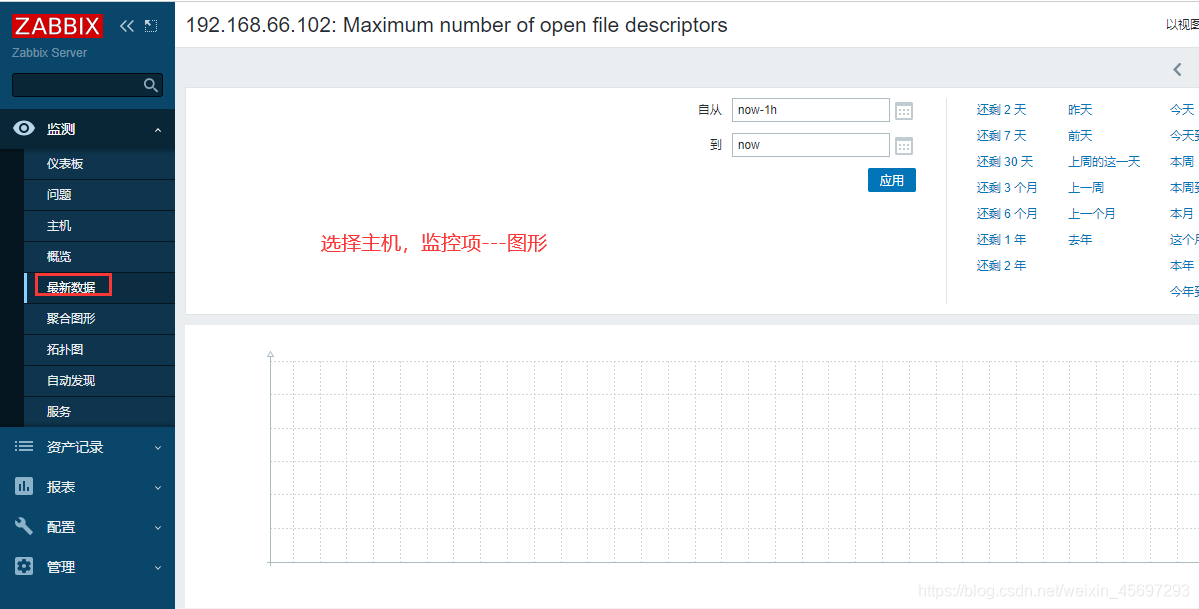
8. 查看数据

一. 监控TCP连接数
端口状态转换
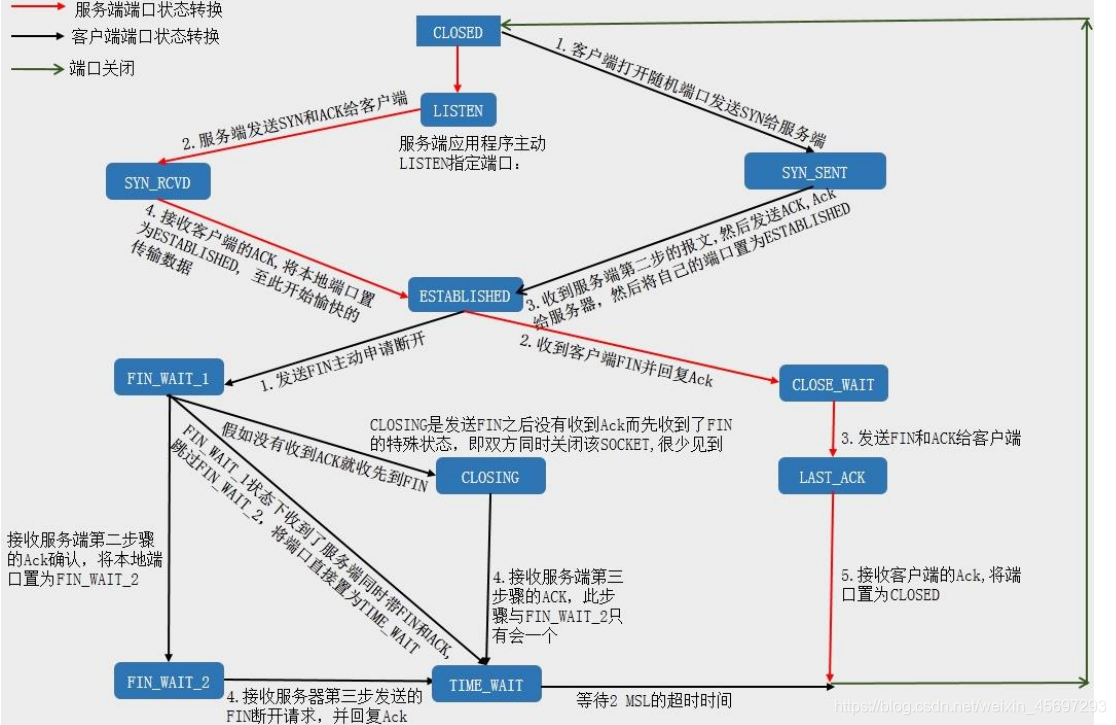
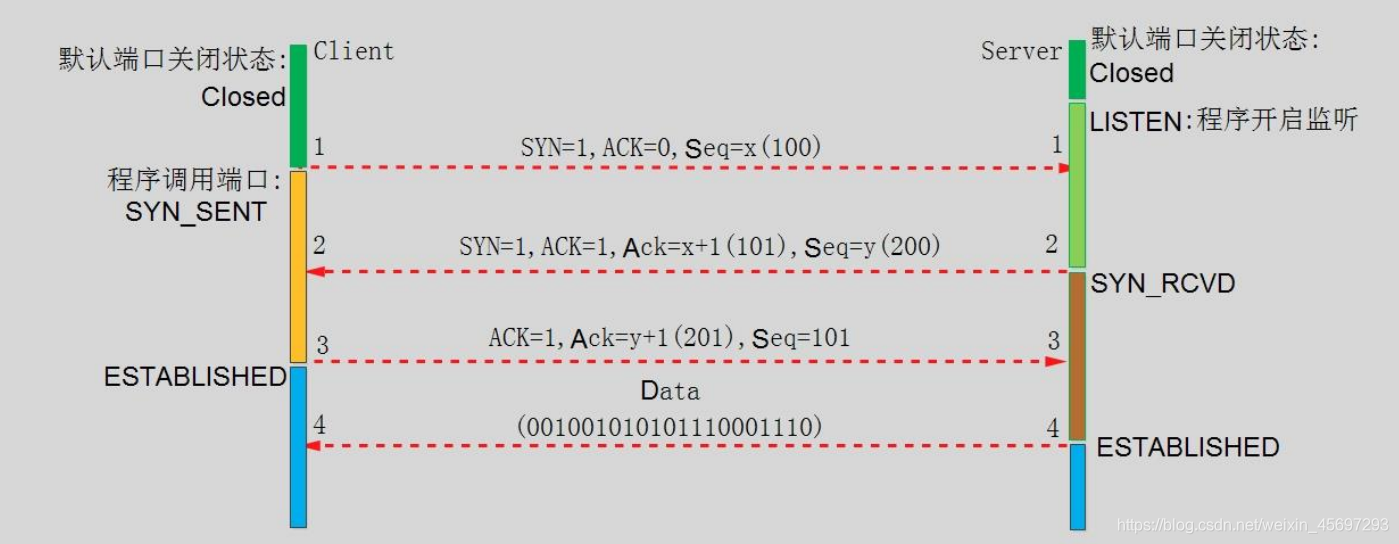
TCP 三次握手
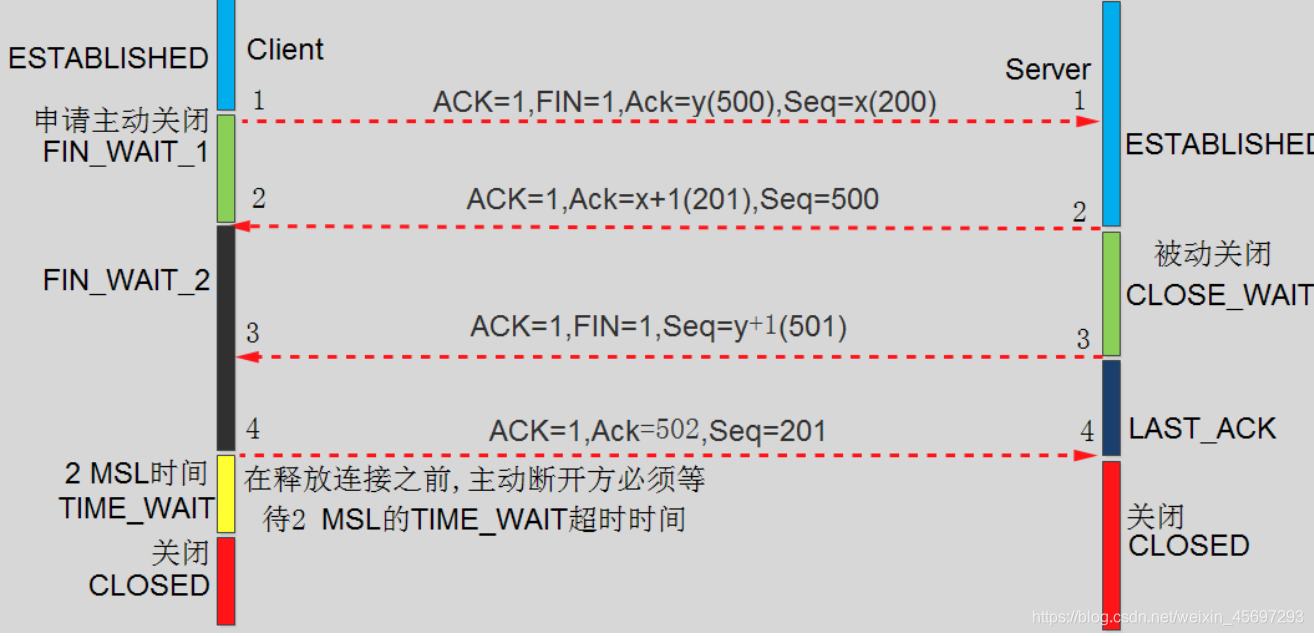
TCP 四次挥手
监控tcp脚本
在agent机器中
监控TCP 连接数
vim /usr/local/zabbix/etc/zabbix_agentd.conf.d/tcp_conn_plugin.sh

#!/bin/bash
tcp_conn_status(){
	TCP_STAT=$1
	#监控各个状态的链接数
	ss -ant | awk 'NR>1 {++s[$1]} END {for(k in s) print k,s[k]}' > /tmp/tcp_conn.txt
	TCP_NUM=$(grep "$TCP_STAT" /tmp/tcp_conn.txt | cut -d ' ' -f2)
	if [ -z $TCP_NUM ];then
		TCP_NUM=0
	fi
		echo $TCP_NUM
}
#$1主要是指定  监控模板中的项
main(){
	case $1 in
		tcp_status)
			tcp_conn_status $2;
		;;
	esac
}
main  $1 $2
# $1为tcp_status  $2为监控的项

chmod a+x tcp_conn_plugin.s

cd /usr/local/zabbix/etc/zabbix_agentd.conf.d
bash tcp_conn_plugin.sh  tcp_status  tcp的状态
bash tcp_conn_plugin.sh  tcp_status  TIME-WAIT
引用脚本
vim /etc/zabbix/zabbix_agent.conf
								,命令/脚本
UserParameter=linux_tcp_status[*],/usr/local/zabbix/etc/zabbix_agentd.conf.d/tcp_conn_plugin.sh "$1" "$2"
配置agent 配置文件导入自定义配置那文件
vim /usr/local/zabbix/etc/zabbix_agentd.conf
 Include=/usr/local/zabbix/etc/zabbix_agentd.conf.d/*.conf
在被监控服务器为zabbix 用户授权:
vim /etc/sudoers
zabbix ALL =(ALL) NOPASSWD: ALL
重启agent服务
/etc/init.d/zabbix_agentd restart
测试数据
yum install zabbix-get -y
-s指定主机,或者主机名
-p端口
-k 测试具体的监控项
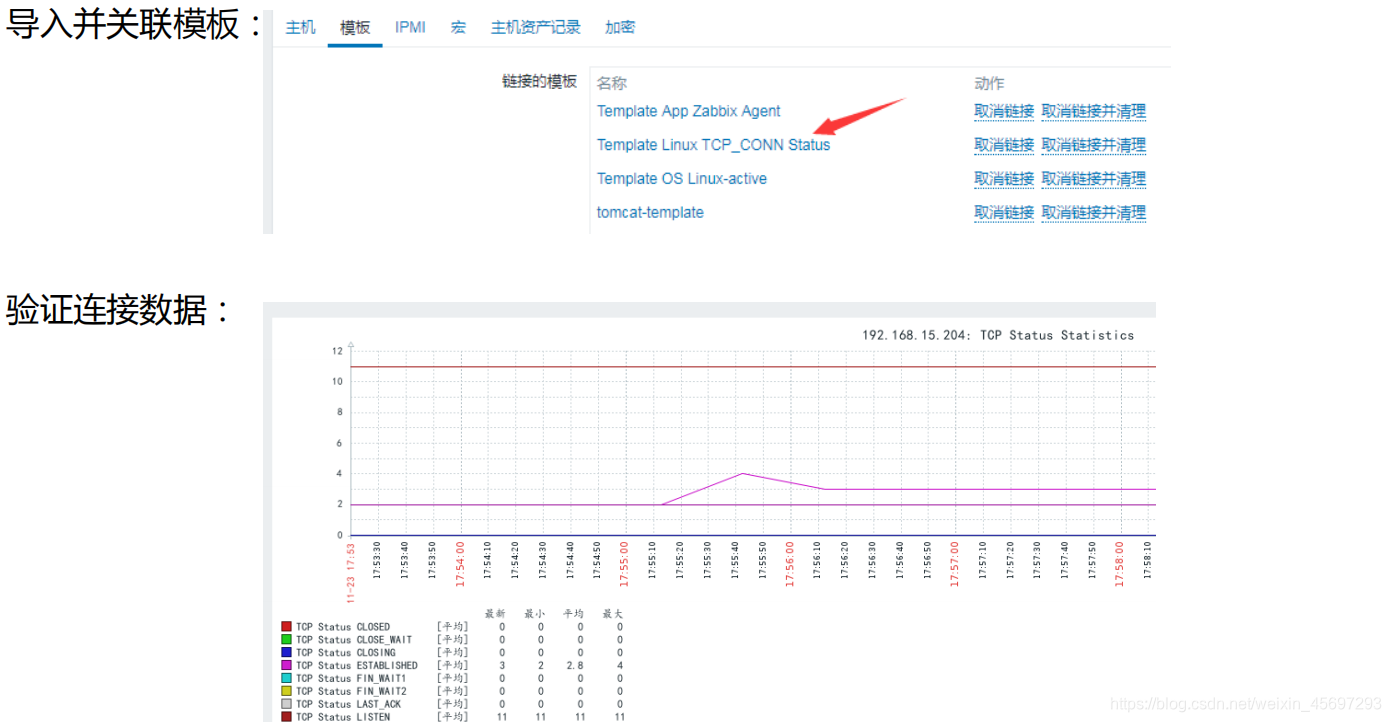
zabbix_get -s 192.168.15.204 -p 10050 -k "linux_tcp_status[tcp_status,TIME-WAIT]"
添加–模板—监控项—图形—触发器(报警) 等等
二. 监控memcache
监控的是当前链接数 ,线程数等
监控脚本
需要下载nc或者ncat命令
在agent机器中
#!/bin/bash

memcached_status(){
	M_PORT=$1
	M_COMMAND=$2
	echo -e "stats\nquit" | nc 127.0.0.1 "$M_PORT" | grep "STAT $M_COMMAND " | awk '{print $3}'
}
main(){
	case $1 in
	memcached_status)
		memcached_status $2 $3
		;;
esac
}
main $1 $2 $3
# $1为memcached_status,$2是端口,$3是取的参数  才会执行

加权限
chmod +x .sh
调用脚本:
[root@zabbix-web2 zabbix_agentd.conf.d]# cat all.conf
UserParameter=linux_status[*],/usr/local/zabbix/etc/zabbix_agentd.conf.d/tcp_conn_plugin.sh "$1" "$2" "$3"
UserParameter=memcache_status[*],/usr/local/zabbix/etc/zabbix_agentd.conf.d/memcache.sh "$1" "$2" "$3“
测试脚本:
bash memcache.sh memcached_status 11211 curr_connections


systemctl restart zabbix_agentd
测试数据
在server端
 -s指定主机,或者主机名
 -p端口
 -k 测试具体的监控项

zabbix_get -s 192.168.15.204 -p 10050 -k "memached_status[11211,curr_connections]"
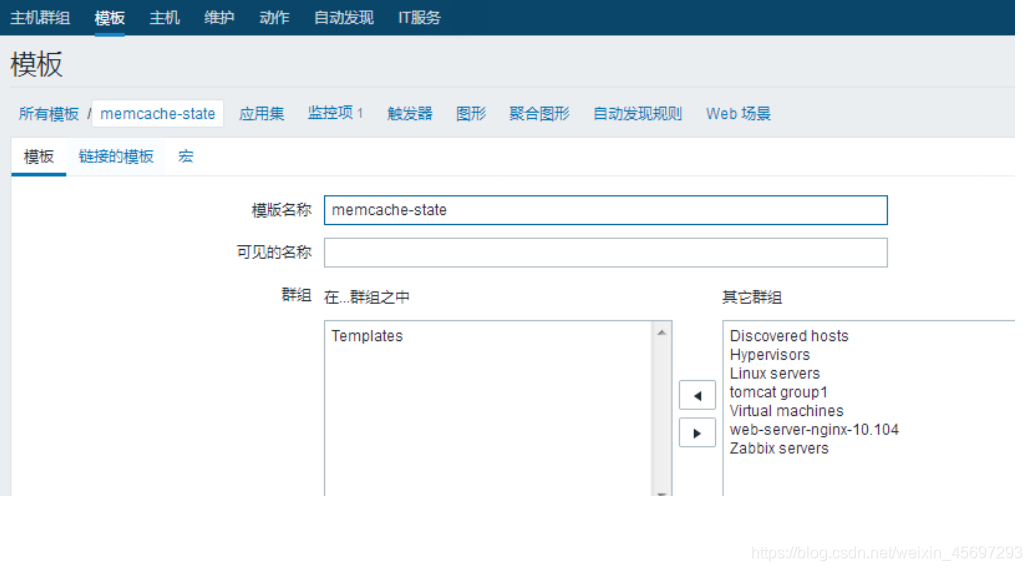
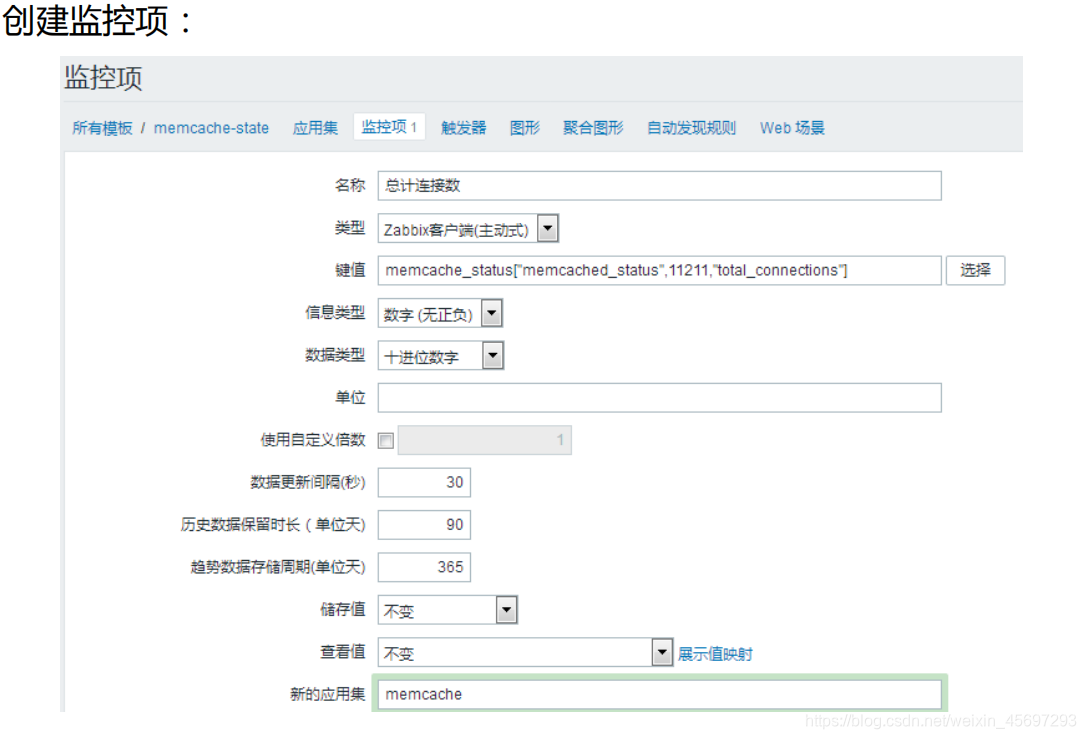
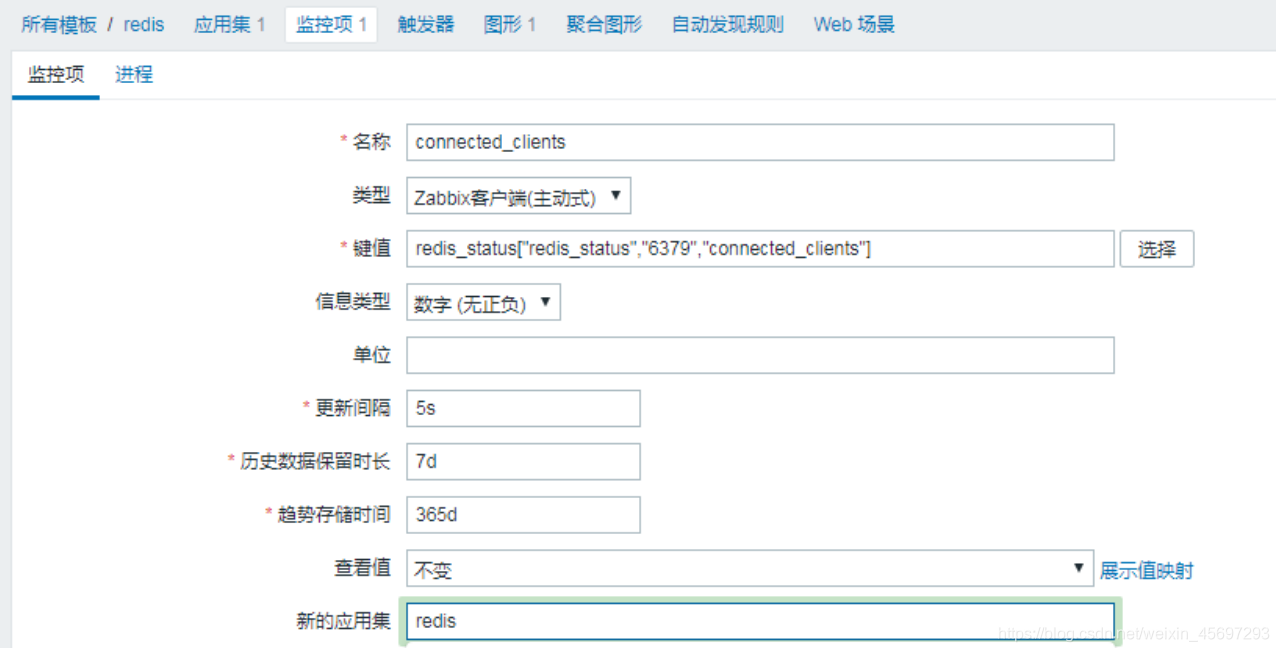
直接创建一个监控模板(可以监控到其他主机)
监控memcache


三. 监控redis
在agent机器中
redis-cli
  >info
vim redis.sh
#!/bin/bash
redis_status(){
	R_PORT=$1
	R_COMMAND=$2
	(echo -en "INFO \r\n";sleep 1;) | nc 127.0.0.1 "$R_PORT" > /tmp/redis_"$R_PORT".tmp
	REDIS_STAT_VALUE=$(grep -w ""$R_COMMAND":" /tmp/redis_"$R_PORT".tmp | cut -d ':' -f2)
	echo $REDIS_STAT_VALUE
}
help(){
	echo "${0} + redis_status + PORT + COMMAND"
}
main(){
	case $1 in
	redis_status)
		redis_status $2 $3
		;;
	*)
		help
		;;
	esac
}
main $1 $2 $3
#  $1为redis_status,$2端口,$3监控的值  才会执行
调用脚本:
[root@zabbix-web2 zabbix_agentd.conf.d]# cat redis.conf
UserParameter=redis_status[*],/usr/local/zabbix/etc/zabbix_agentd.conf.d/redis.sh "$1" "$2" "$3“
Server端验证脚本:
bash redis.sh redis_status 6379 connected_clients
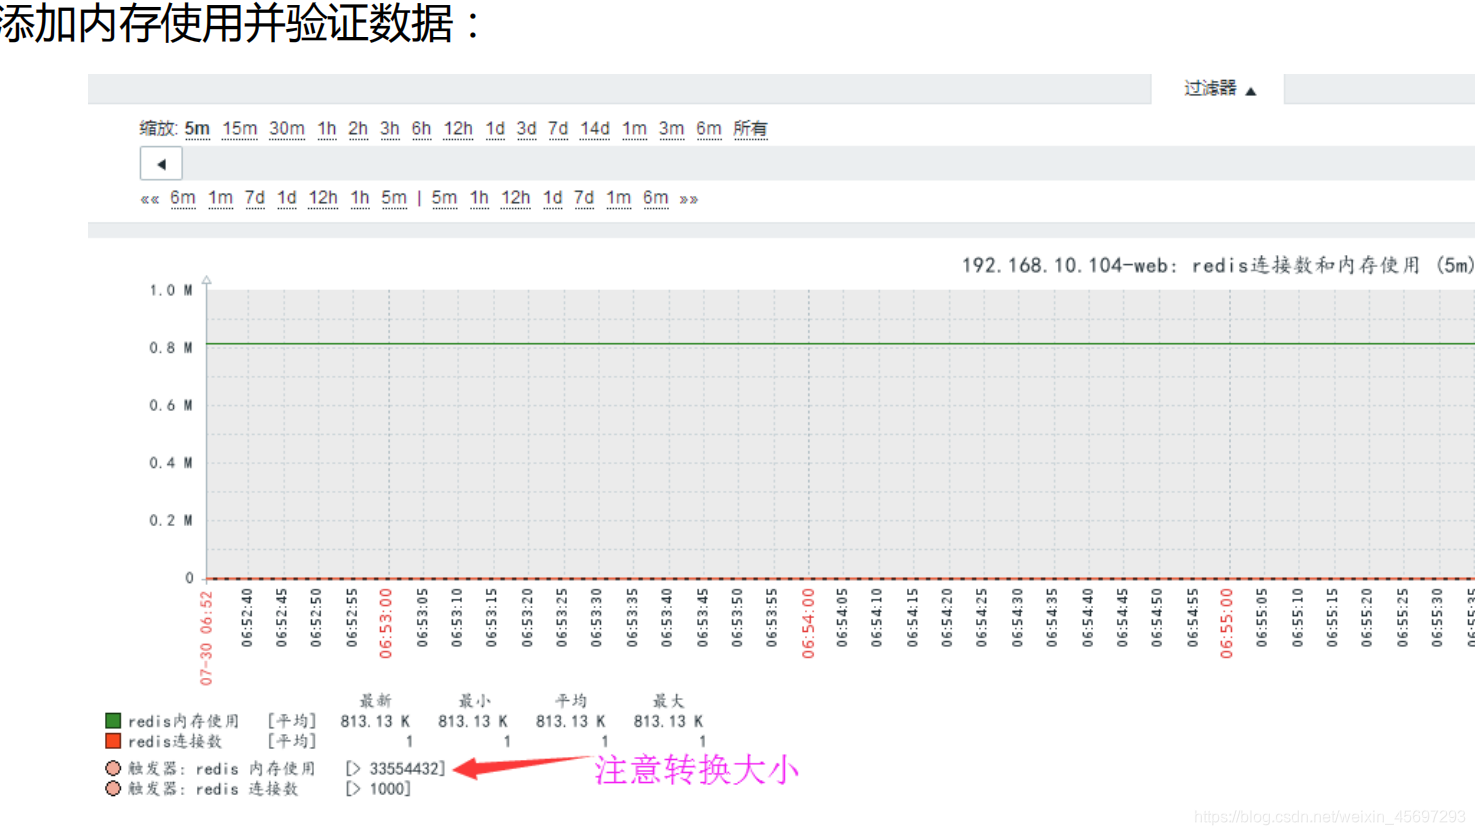
测试数据
在server端
 -s指定主机,或者主机名
 -p端口
 -k 测试具体的监控项

zabbix_get -s 192.168.15.205 -p 10050 -k "redis_status[redis_status,6379,connected_clients]"
四 . 监控nginx
在agent机器中
-
安装zabbix-agent
-
如果是源码安装nginx需要打开
--with-http_stub_status_module
也就是
tar xvf
cd nginx
./config --prefix=/usr/local/nginx  --with-http_stub_status_module

make && make install
打开监控状态页功能
参考
vim nginx.conf
location /nginx_status {
	stub_status;
	#allow 127.0.0.1;
	#allow 172.16.0.0/16;
	#deny all;
 }
 启动服务
访问www.qcq.com/nginx_status才有结果

nginx监控脚本
#取出nginx_status的值

将这个文件放到这儿可以世界使用agent监控

vim /etc/zabbix/zabbix_agentd.conf.d/check_status.sh
#!/bin/bash
#
host=${2:-'127.0.0.1'}
port=${3:-'80'}
page=${4:-'nginx_status'}
info=$(/usr/bin/curl --connect-timeout 5 -s http://${host}:${port}/${page} 2>/dev/null)
code=$(/usr/bin/curl --connect-timeout 5 -o /dev/null -s -w %{http_code} http://${host}:${port}/${page})
proc=$(/usr/bin/pgrep nginx | wc -l)

case "$1" in
  status)
    echo "$code $proc" | awk '{code=$1}{proc=$2}END{if(code == "200" && proc != 0){printf("%d\n",1)}else{printf("%d\n",0)}}'
    ;;
  active)
    echo "$info" | awk '/^Active/{var=$NF}END{if(var~/^[0-9]+$/){printf("%d\n",var)}else{printf("%d\n",0)}}'
    ;;
  reading)
    echo "$info" | awk '/Reading/ {print $2}'
    ;;
  writing)
    echo "$info" | awk '/Writing/ {print $4}'
    ;;
  waiting)
    echo "$info" | awk '/Waiting/ {print $6}'
    ;;
  accepts)
    echo "$info" | awk 'NR==3 {print $1}'
    ;;
  handled)
    echo "$info" | awk 'NR==3 {print $2}'
    ;;
  requests)
    echo "$info" | awk 'NR==3 {print $3}'
    ;;
  restimes)
    echo "$info" | awk 'BEGIN{OFMT="%.3f"} NR==3 {print $4/$3}'
    ;;
  *)
    echo "ZBX_NOTSUPPORTED"
    ;;
esac


#使用方式 check_status.sh  status|active|....

chmod a+x check_status.sh
高级脚本
#!/bin/bash

nginx_status_fun(){ #函数内容
	NGINX_PORT=$1 #端口,函数的第一个参数是脚本的第二个参数,即脚本的第二个参数是段端口号
	NGINX_COMMAND=$2 #命令,函数的第二个参数是脚本的第三个参数,即脚本的第三个参数是命令
	nginx_active(){ #获取nginx_active数量,以下相同,这是开启了nginx状态但是只能从本机看到
        /usr/bin/curl "http://127.0.0.1:"$NGINX_PORT"/nginx_status/" 2>/dev/null| grep 'Active' | awk '{print $NF}'
        }
	nginx_reading(){ #获取nginx_reading状态的数量
        /usr/bin/curl "http://127.0.0.1:"$NGINX_PORT"/nginx_status/" 2>/dev/null| grep 'Reading' | awk '{print $2}'
       }
	nginx_writing(){
        /usr/bin/curl "http://127.0.0.1:"$NGINX_PORT"/nginx_status/" 2>/dev/null| grep 'Writing' | awk '{print $4}'
       }
	nginx_waiting(){
        /usr/bin/curl "http://127.0.0.1:"$NGINX_PORT"/nginx_status/" 2>/dev/null| grep 'Waiting' | awk '{print $6}'
       }
	nginx_accepts(){
        /usr/bin/curl "http://127.0.0.1:"$NGINX_PORT"/nginx_status/" 2>/dev/null| awk NR==3 | awk '{print $1}'
       }
	nginx_handled(){
        /usr/bin/curl "http://127.0.0.1:"$NGINX_PORT"/nginx_status/" 2>/dev/null| awk NR==3 | awk '{print $2}'
       }
	nginx_requests(){
        /usr/bin/curl "http://127.0.0.1:"$NGINX_PORT"/nginx_status/" 2>/dev/null| awk NR==3 | awk '{print $3}'
       }
  	case $NGINX_COMMAND in
		active)
			nginx_active;
			;;
		reading)
			nginx_reading;
			;;
		writing)
			nginx_writing;
			;;
		waiting)
			nginx_waiting;
			;;
		accepts)
			nginx_accepts;
			;;
		handled)
			nginx_handled;
			;;
		requests)
			nginx_requests;
		esac
}

main(){ #主函数内容
	case $1 in #分支结构,用于判断用户的输入而进行响应的操作
		nginx_status) #当输入nginx_status就调用nginx_status_fun,并传递第二和第三个参数
			nginx_status_fun $2 $3;
			;;
		*) #其他的输入打印帮助信息
			echo $"Usage: $0 {nginx_status key}"
	esac #分支结束符
}

main $1 $2 $3
# $1必须为nginx_status $2为端口   $3为状态
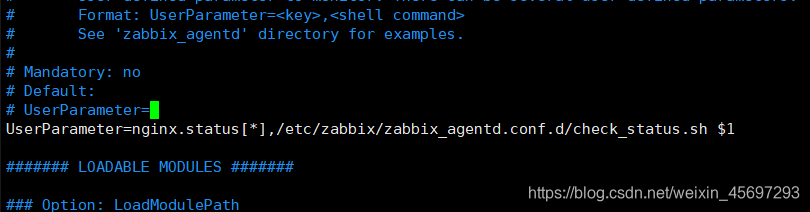
在agent配置文件中
加入监控
具体看实际监控模板里面监控项的键值
版本不同,可能监控项也不同
vim /etc/zabbix/zabbix_agent.conf

测试数据
yum install zabbix-get -y

 -s指定主机,或者主机名
 -p端口
 -k 测试具体的监控项

zabbix_get -s 192.168.15.204 -p 10050 -k "nginx.status[writing]"
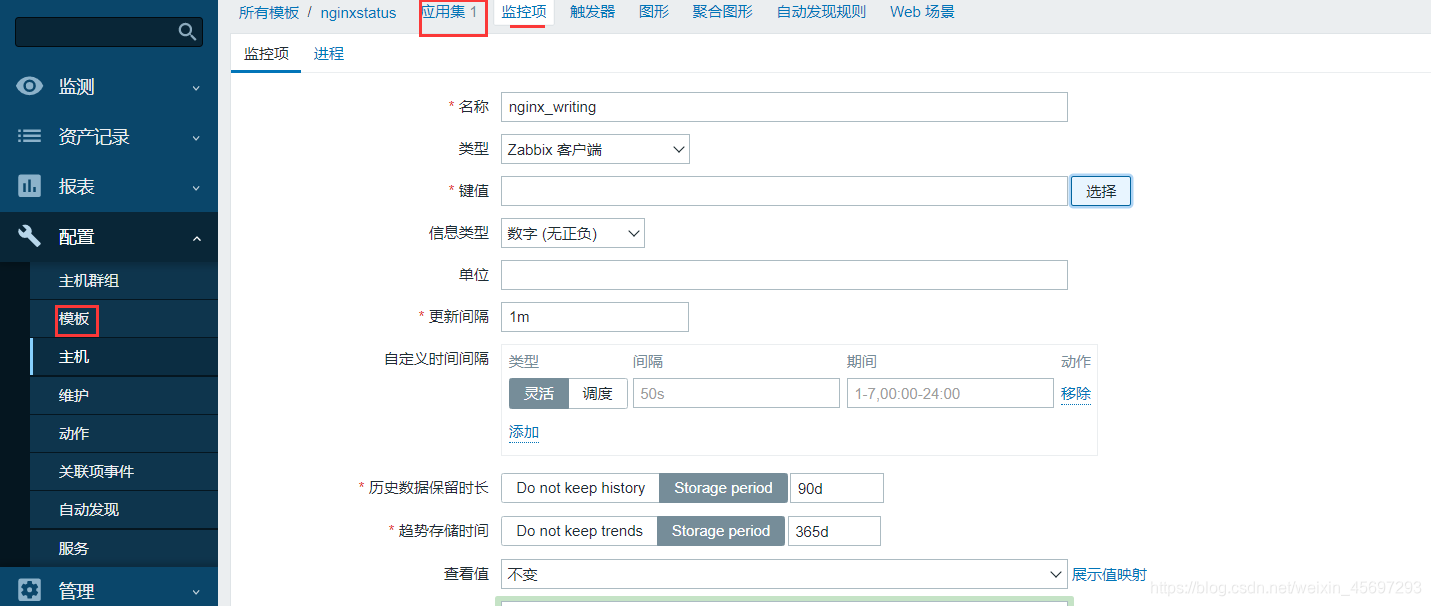
在web页面
创建自定义模板—创建应用集—创建监控项(由具体的键值)
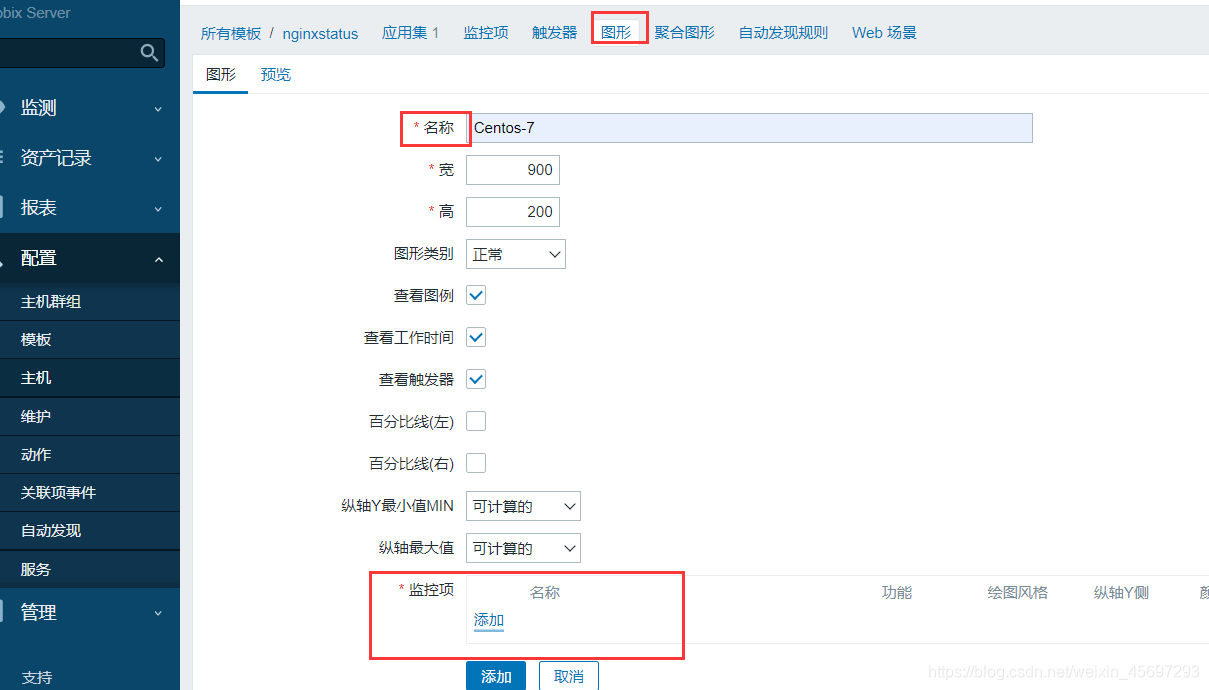
添加–模板—监控项—图形—触发器(报警) 等等
添加监控图形
五 . 导入监控模板
在web中
模板–>导入–>选择
然后可以使用
创建模板


 471
471


 被折叠的 条评论
为什么被折叠?
被折叠的 条评论
为什么被折叠?
 到【灌水乐园】发言


