


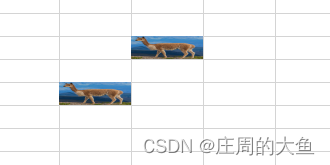
一般当我们使用easyExcel填充图片时,图片会刚好填满excel中对象的单元格,这个情况下图片的比例就被压缩或拉伸为单元格的比例。如下:
如果我们要在填充图片时维持图片的原比例,并且使其不超出填充的单元格大小,需要使用easyExcel中ImageData的setTop(),setRight(),setBottom(),setLeft()方法
这是我的test.java,在填充图片之前我们要先取得图片的字节数组FileUtils.getBytes(imageFile),图片高度height和图片宽度width,以及excel对象单元格的长度1.9cm和宽度0.6cm,然后传入我自定义的工具类TemplateExcelUtils的imageCells方法中
public class test {
    @Test
    public void testTwo(){
        Map<String, Object> map = new HashMap<>();
        InputStream is = null;
        try{
            is = new FileInputStream("C:\\Users\\65534\\Desktop\\TestTamplate.xlsx");
            String fileName = "C:\\Users\\65534\\Desktop\\demo.xlsx";

            String imagePath = "C:\\Users\\65534\\Desktop\\1704422874246.png";
            File imageFile = new File(imagePath);
            //获取图片宽高,用以计算比例
            BufferedImage image = ImageIO.read(imageFile);
            Double width = Double.valueOf(image.getWidth());
            Double height = Double.valueOf(image.getHeight());
            WriteCellData<Void> voidWriteCellData = TemplateExcelUtils.imageCells(FileUtils.getBytes(imageFile),width,height,0.6,1.9);
            map.put("img",voidWriteCellData);
            ExcelWriter excelWriter = EasyExcel.write(fileName).withTemplate(is).excelType(ExcelTypeEnum.XLSX).build();
            WriteSheet writeSheet = EasyExcel.writerSheet().build();
            excelWriter.fill(map,writeSheet);
            excelWriter.finish();
        }catch(Exception e){
            e.printStackTrace();
        }finally {
            if(is != null){
                try{
                    is.close();
                }catch (IOException e){
                    e.printStackTrace();
                }
            }
        }
    }
}
这是我在上面的方法中用到的一个自定义的工具类TemplateExcelUtils.java
public class TemplateExcelUtils {
/**
* Excel所有图片设置
*
* @param bytes
* @return
* @throws IOException
*/
//参数依次为图片字节,图片宽度(像素),图片高度,行高(厘米),列宽
public static WriteCellData<Void> imageCells(byte[] bytes,Double imageWidth,Double imageHight,Double rowLength,Double columLength) throws IOException {
//等比例缩小图片,直到图片能放在单元格下,每次缩小20%
Integer top = 0;
Integer left = 0;
//厘米转换成像素
rowLength = rowLength*28;
columLength = columLength*28;
while (true){
if(imageHight < rowLength && imageWidth < columLength){
//计算边框值
top = Math.toIntExact(Math.round((rowLength - imageHight)/2));
left = Math.toIntExact(Math.round((columLength - imageWidth)/2));
break;
}else {
imageHight = imageHight*0.8;
imageWidth = imageWidth*0.8;
}
}
WriteCellData<Void> writeCellData = new WriteCellData<>();
// 这里可以设置为 EMPTY 则代表不需要其他数据了
//writeCellData.setType(CellDataTypeEnum.EMPTY);
// 可以放入多个图片
List<ImageData> imageDataList = new ArrayList<>();
writeCellData.setImageDataList(imageDataList);
ImageData imageData = new ImageData();
imageDataList.add(imageData);
// 设置图片
imageData.setImage(bytes);
// 图片类型
//imageData.setImageType(ImageData.ImageType.PICTURE_TYPE_PNG);
// 上 右 下 左 需要留空,这个类似于 css 的 margin;这里实测 不能设置太大 超过单元格原始大小后 打开会提示修复。暂时未找到很好的解法。
imageData.setTop(top);
imageData.setRight(left);
imageData.setBottom(top);
imageData.setLeft(left);
// * 设置图片的位置。Relative表示相对于当前的单元格index。first是左上点,last是对角线的右下点,这样确定一个图片的位置和大小。
// 目前填充模板的图片变量是images,index:row=7,column=0。所有图片都基于此位置来设置相对位置
// 第1张图片相对位置
imageData.setRelativeFirstRowIndex(0);
imageData.setRelativeFirstColumnIndex(0);
imageData.setRelativeLastRowIndex(0);
imageData.setRelativeLastColumnIndex(0);
return writeCellData;
}
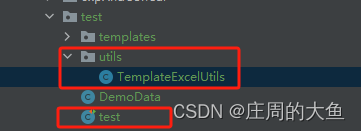
}这是我文件的存放目录:
这样就能实现最后的效果:
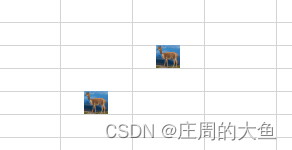
这种实现方式还有很多不足的地方,比如我们要自己测量对象单元格的长度宽度数据,当单元格比例改变的时候,我们也要重新测量修改代码。
如果需要自动获取真实的excel单元格数据可以使用其他的 Java 库,如 Apache POI,但是怎么自动定位到我们要填充图片的对象单元格也是一个问题,评论区欢迎友友们提出自己的见解!
参考:EasyExcel根据自定义模板导出Excel(包含图片、表格)_easyexcel模板导出excel文件-CSDN博客


 3099
3099

 被折叠的 条评论
为什么被折叠?
被折叠的 条评论
为什么被折叠?
 到【灌水乐园】发言


