


2021SC@SDUSC
这次博客主要分析各种对话框的实现,组件在dialog文件夹中,下面展开分析。约有140个dialog组件。(惊恐)类比下自己比较熟悉的VUE,这些组件就像是Element UI里提供的现成组件,只不过是由开发人员根据实际需求设计的各种dialog对话框。
在这里不可能所有的dialog都逐个分析,仅将一些拿出来作为例子分析使用方法,以便在以后开发中能够学到本项目的代码模式以及各个组件在什么时候使用。
先来看图中的几个按钮:标签,回收站,历史。主要还是标签组件对应的dialog。
这里涉及到的组件有cur-dir-path文件夹下的 三个组件,以及dialog文件夹下的ListTagDialog,CreateTagDialog,UpdateTagDialog,ListTaggedFilesDialog组件。
看下列代码:对于这三个按钮,回收站和历史主要是通过url跳转到指定页面的。 而tag按钮是调用一个函数,修改state里的某些属性,然后影响到dialog组件实现显示和隐藏。
<ul className="path-toolbar">
                <li className="toolbar-item"><a className="op-link sf2-icon-tag" onClick={this.onShowListRepoTag} title={gettext('Tags')} aria-label={gettext('Tags')}></a></li>
                <li className="toolbar-item"><a className="op-link sf2-icon-recycle" href={trashUrl} title={gettext('Trash')} aria-label={gettext('Trash')}></a></li>
                <li className="toolbar-item"><a className="op-link sf2-icon-history" href={historyUrl} title={gettext('History')} aria-label={gettext('History')}></a></li>
              </ul>
然后转到onShowListRepoTag函数:
constructor(props) {  //这是constructor里面属性的初始状态。
    super(props);
    this.state = {
      isRepoTagDialogShow: false,  //将是否显示设置为false
      currentTag: null,
      isListRepoTagShow: false,
      isUpdateRepoTagShow: false,
      isCreateRepoTagShow: false,
      isListTaggedFileShow: false,
    };
  }
onShowListRepoTag = () => {  //在点击tag后,也就调用这个函数,将属性更新,isRepoTagDialogShow: true, isListRepoTagShow: true
    this.setState({
      isRepoTagDialogShow: true,
      isListRepoTagShow: true,
      isUpdateRepoTagShow: false,
      isCreateRepoTagShow: false,
      isListTaggedFileShow: false
    });
  }
下面看一下dialog是怎么显示的。
看到下面第一行的&&,左边已经在点击tag后变成了true,右边的组件自然就会显示。
<ModalPortal>组件是一个自定义的组件,在内部组件将要渲染时,创建一个div用于装dialog,在将要卸载时,移除div。
然后下边是一个<Modal/>组件用来把<div> 的内容识别为模态框,isOpen属性设置为true。
{this.state.isRepoTagDialogShow && (
                <ModalPortal>
                  <Modal isOpen={true}>
                    {this.state.isListRepoTagShow && (
                      <ListTagDialog   //打开的就是这个dialog  传入组件本页面的属性。
                        repoID={repoID}
                        onListTagCancel={this.onCloseRepoTagDialog}
                        onCreateRepoTag={this.onCreateRepoTagToggle}
                        onUpdateRepoTag={this.onUpdateRepoTagToggle}
                        onListTaggedFiles={this.onListTaggedFileToggle}
                      />
                    )}
                    {this.state.isCreateRepoTagShow && (  //创建新tag对话框
                      <CreateTagDialog
                        repoID={repoID}
                        onClose={this.onCloseRepoTagDialog}
                        toggleCancel={this.onCreateRepoTagToggle}
                      />
                    )}
                    {this.state.isUpdateRepoTagShow && ( //更新tag状态dialog  主要是重命名
                      <UpdateTagDialog
                        repoID={repoID}
                        currentTag={this.state.currentTag}
                        onClose={this.onCloseRepoTagDialog}
                        toggleCancel={this.onUpdateRepoTagToggle}
                        onDeleteRepoTag={this.props.onDeleteRepoTag}
                        updateUsedRepoTags={this.props.updateUsedRepoTags}
                      />
                    )}
                    {this.state.isListTaggedFileShow && (
                      <ListTaggedFilesDialog    //每个tag下的文件
                        repoID={this.props.repoID}
                        currentTag={this.state.currentTag}
                        onClose={this.onCloseRepoTagDialog}
                        toggleCancel={this.onListTaggedFileToggle}
                        updateUsedRepoTags={this.props.updateUsedRepoTags}
                      />
                    )}
                  </Modal>
                </ModalPortal>
              )}
如图
ListTagDialog

对应的代码在list-tag-dialog.js中
componentDidMount() {  //在组件渲染上之后,调用seafileAPI将后端数据传到repotagList中。
    let repoID = this.props.repoID;   //从父组件中获取的repoID作为标识
    seafileAPI.listRepoTags(repoID).then(res => {
      let repotagList = [];
      res.data.repo_tags.forEach(item => {
        let repo_tag = new RepoTag(item);
        repotagList.push(repo_tag);
      });
      this.setState({
        repotagList: repotagList,  //更新state
      });
<Fragment>
        <ModalHeader toggle={this.toggle}>{gettext('Tags')}</ModalHeader>  //标签
        <ModalBody>
          <ul className="tag-list tag-list-container">
            {this.state.repotagList.map((repoTag, index) => {  //将标签列表遍历显示在dialog中
              return (
                <TagListItem
                  key={index}
                  item={repoTag}
                  onTagUpdate={this.props.onUpdateRepoTag}
                  onListTaggedFiles={this.props.onListTaggedFiles}
                />
              );
            })}
          </ul>
          <a href="#" className="add-tag-link" onClick={this.createNewTag}>{gettext('Create a new tag')}</a>   //新建标签按钮
        </ModalBody>
        <ModalFooter>
          <Button color="secondary" onClick={this.toggle}>{gettext('Close')}</Button> //关闭按钮
        </ModalFooter>
      </Fragment>
CreateTagDialog

{this.state.isCreateRepoTagShow && (
                      <CreateTagDialog
                        repoID={repoID}   //传入repoID,
                        onClose={this.onCloseRepoTagDialog}  //关闭上一个RepoTagDialog
                        toggleCancel={this.onCreateRepoTagToggle} // 去除关闭按钮。
                      />
                    )}
createTag = () => {  //将新标签的名字颜色repoID作为参数,通过API传到后端保存
    let name = this.state.tagName;
    let color = this.state.tagColor;
    let repoID = this.props.repoID;
    seafileAPI.createRepoTag(repoID, name, color).then((res) => {
      let repoTagID = res.data.repo_tag.repo_tag_id;
      if (this.props.onRepoTagCreated) this.props.onRepoTagCreated(repoTagID);
      this.props.toggleCancel();
    }).catch((error) => {   //创建新标签错误的提示
      let errMessage;
      if (error.response.status === 500) {
        errMessage = gettext('Internal Server Error');
      } else if (error.response.status === 400) {
        errMessage = gettext('Tag "{name}" already exists.');
        errMessage = errMessage.replace('{name}', Utils.HTMLescape(name));
      }
      this.setState({errorMsg: errMessage});
    });
  }
这一部分对应的还有<UpdateTagDialog>用来更新已创建的tag名称和颜色。代码主体和create-tag-dialog大同小异。就是调用的API不同。

这一块最后一个dialog就是显示打标签的文件列表。
getTaggedFiles = () => {
    let { repoID, currentTag } = this.props;
    seafileAPI.listTaggedFiles(repoID, currentTag.id).then(res => {  //调用API将后端传来的数据装到taggedFileList[]的数组中

      let taggedFileList = [];
      res.data.tagged_files !== undefined &&
      res.data.tagged_files.forEach(file => {
        let taggedFile = file;
        taggedFileList.push(taggedFile);
      });
      this.setState({
        taggedFileList: taggedFileList,
      });
    }).catch(error => {
      let errMessage = Utils.getErrorMsg(error);
      toaster.danger(errMessage);
    });
  }
<Modal isOpen={true}>
        <ModalHeader toggle={this.props.onClose}>{gettext('Tagged Files')}</ModalHeader>
        <ModalBody className="dialog-list-container">
          <table>
            <thead>
              <tr>
                <th width='45%' className="ellipsis">{gettext('Name')}</th>
                <th width='27%'>{gettext('Size')}</th>
                <th width='18%'>{gettext('Last Update')}</th>
                <th width='10%'></th>
              </tr>
            </thead>
            <tbody>
              {taggedFileList.map((taggedFile, index) => { //遍历显示在dialog中。
                return (
                  <TaggedFile
                    key={index}
                    repoID={this.props.repoID}
                    taggedFile={taggedFile}
                    onDeleteTaggedFile={this.onDeleteTaggedFile}
                  />
                );
              })}
            </tbody>
          </table>
        </ModalBody>
        <ModalFooter>
          <Button color="secondary" onClick={this.props.toggleCancel}>{gettext('Close')}</Button>
        </ModalFooter>
      </Modal>
以上这一部分通过dialog代替了pages,简化了代码。这一部分像是vue element ui的底层源码,还是比较复杂的。
下边再看一些页面上其他的dialog:
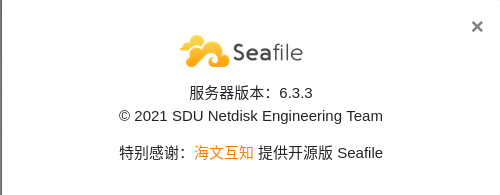
这是“关于”dialog,学长已经在上次将copyright改成了SDU并加上了特别感谢(偷笑)
这是创建新library的dialog,可以选是否加密
这是不勾选加密时的dialog:

这是勾选加密后的:
有对密码格式的严格要求。
if (this.state.encrypt) {
      let password1 = this.state.password1.trim(); //去除密码中的空格字符
      let password2 = this.state.password2.trim();
      if (!password1.length) {
        errMessage = gettext('Please enter password');
        this.setState({errMessage: errMessage});
        return false;
      }
      if (!password2.length) {
        errMessage = gettext('Please enter the password again');
        this.setState({errMessage: errMessage});
        return false;
      }
      if (password1.length < repoPasswordMinLength) { //小于预定长度报错
        errMessage = gettext('Password is too short');
        this.setState({errMessage: errMessage});
        return false;
      }
      if (password1 !== password2) {     //两次不一样报错。
        errMessage = gettext('Passwords don\'t match');
        this.setState({errMessage: errMessage});
        return false;
      }
    }
这一部分代码对应的内容是群组共享资料库中,用户对从属于自己的资料库权限进行修改的dialog
可以设置读写权限。
通过这部分代码判断是私人资料库还是共享资料库。
if (libraryType === 'group') {
      repo = {
        repo_name: repoName,
        password: password,
        permission: permission,
      };
    }

            {this.props.libraryType === 'group' && (
              <FormGroup>
                <Label for="exampleSelect">{gettext('Permission')}</Label>
                <Input type="select" name="select" id="exampleSelect" onChange={this.onPermissionChange} value={this.state.permission}>
                  <option value='rw'>{gettext('Read-Write')}</option>
                  <option value='r'>{gettext('Read-Only')}</option>
                </Input>
              </FormGroup>
            )}
除了上面的创建资料库,还有创建群组,创建文件和文件夹的dialog。这里不再逐一列举分析。
这是删除功能对应的dialog代码,其中区分了是文件还是目录
let currentNode = this.props.currentNode;
    let name = currentNode.object.name;
    let title = gettext('Delete File');  //删除文件
    if (currentNode.object.isDir()) {
      title = gettext('Delete Folder');  //删除文件夹
    }
    return (
      <Modal isOpen={true} toggle={this.toggle}>
        <ModalHeader toggle={this.toggle}>{title}</ModalHeader>
        <ModalBody>
          <p>{gettext('Are you sure to delete')}{' '}<b>{name}</b> ?</p>
        </ModalBody>
        <ModalFooter>
          <Button color="secondary" onClick={this.toggle}>{gettext('Cancel')}</Button>
          <Button color="primary" onClick={this.props.handleSubmit}>{gettext('Delete')}</Button>
        </ModalFooter>
      </Modal>
    );
  }
}
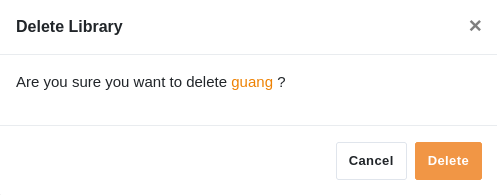
上图是删除资料库的dialog,还有解散群组dialog……

几百种dialog组件,这里只简单分析了创建,删除的对话框,以后遇到更有学习借鉴价值的仍会更新在这。


 1323
1323


 被折叠的 条评论
为什么被折叠?
被折叠的 条评论
为什么被折叠?
 到【灌水乐园】发言


