


 本文详细介绍了在Android平台上进行蓝牙模块的声明权限、设置、设备查找、连接以及数据传输的步骤。包括获取BluetoothAdapter、启用蓝牙、查找已配对和新设备、建立及断开连接,以及发送数据的函数示例。同时提到了Android12及以上版本的权限变更,并提供了蓝牙传输的测试方法和潜在的应用场景,如蓝牙小车和智能家居控制。
目录直达
蓝牙模块
声明蓝牙权限
如果您想让应用启动设备发现或操纵蓝牙设置,则除了
BLUETOOTH权限以外,您还必须声明BLUETOOTH_ADMIN权限。大多数应用只是需利用此权限发现本地蓝牙设备。
在AndroidManifest.xml文件中添加以下权限
  	<!-- 安卓12之前的蓝牙权限需求-->
    <uses-permission android:name="android.permission.BLUETOOTH" />
    <uses-permission android:name="android.permission.BLUETOOTH_ADMIN" />
    <!-- 安卓12新增的蓝牙权限-->
    <uses-permission android:name="android.permission.BLUETOOTH_ADVERTISE" />
    <uses-permission android:name="android.permission.BLUETOOTH_CONNECT" />
    <uses-permission android:name="android.permission.BLUETOOTH_SCAN" />
    <!-- 定位权限, 蓝牙搜索需要-->
    <uses-permission android:name="android.permission.ACCESS_FINE_LOCATION" />
    <uses-permission android:name="android.permission.ACCESS_COARSE_LOCATION" />
设置蓝牙
1、获取BluetoothAdapter
所有蓝牙 Activity 都需要
BluetoothAdapter。如要获取BluetoothAdapter,请调用静态的getDefaultAdapter()方法。此方法会返回一个BluetoothAdapter对象,表示设备自身的蓝牙适配器(蓝牙无线装置)。整个系统只有一个蓝牙适配器,并且您的应用可使用此对象与之进行交互。如果getDefaultAdapter()返回null,则表示设备不支持蓝牙。
 	/**
     * 获取BluetoothAdapter对象,并判断蓝牙是否获取到
     */
    public boolean isBlueToothAvailable() {
        //获取BluetoothAdapter对象
        bluetoothAdapter = BluetoothAdapter.getDefaultAdapter();
        // 判断蓝牙是否可用
        return bluetoothAdapter != null;
    }
2、启用蓝牙
下一步,您需要确保已启用蓝牙。调用
isEnabled(),以检查当前是否已启用蓝牙。如果此方法返回 false,则表示蓝牙处于停用状态。如要请求启用蓝牙,请调用startActivityForResult(),从而传入一个ACTION_REQUEST_ENABLEIntent 操作。此调用会发出通过系统设置启用蓝牙的请求(无需停止应用)
 	/**
     * 启用蓝牙
     *
     * @param activity 启动该方法的Activity
     */
    public void openBlueTooth(Activity activity) {
        if (!bluetoothAdapter.isEnabled()) {
            Intent enableIntent = new Intent(BluetoothAdapter.ACTION_REQUEST_ENABLE);
            activity.startActivityForResult(enableIntent, REQUEST_ENABLE_BT);
        } else {
            Toast.makeText(activity, "蓝牙已打开", Toast.LENGTH_SHORT).show();
        }
    }
查找设备
1、查询已配对设备
在执行设备发现之前,您必须查询已配对的设备集,以了解所需的设备是否处于已检测到状态。为此,请调用
getBondedDevices()。此方法会返回一组表示已配对设备的BluetoothDevice对象。例如,您可以查询所有已配对设备,并获取每台设备的名称和 MAC 地址
 	/**
     * 打印已配对设备
     */
    public void printDevice() {
        //打印出已配对的设备
        Set<BluetoothDevice> pairedDevices = bluetoothAdapter.getBondedDevices();
        if (pairedDevices.size() > 0) {
            for (BluetoothDevice device : pairedDevices) {
                listAdapter.add(device.getName() + "\n" + device.getAddress());
            }
        } else {
            listAdapter.add("没有已配对设备");
        }
    }
2、发现设备
 	/**
     * 广播接收者
     * 接收发现蓝牙设备和蓝牙设备扫描结束的广播
     */
    private final BroadcastReceiver bluetoothReceiver = new BroadcastReceiver() {
        @Override
        public void onReceive(Context context, Intent intent) {
            String action = intent.getAction();//获取蓝牙设备
            if (BluetoothDevice.ACTION_FOUND.equals(action)) {  //发现设备
                BluetoothDevice device = intent.getParcelableExtra(BluetoothDevice.EXTRA_DEVICE);
                assert device != null;
                if (device.getBondState() != BluetoothDevice.BOND_BONDED) {  //如果设备未绑定
                    listAdapter.add(device.getName() + "\n" + device.getAddress());
                }
            } else if (BluetoothAdapter.ACTION_DISCOVERY_FINISHED.equals(action)) {  //扫描设备结束
                if (listAdapter.getCount() == 0) {  //没有设备
                    Toast.makeText(BluetoothDeviceListActivity.this, "没有设备",
                            Toast.LENGTH_SHORT).show();
                }
            }
        }
    };

    @Override
    public void setRequestedOrientation(int requestedOrientation) {
        super.setRequestedOrientation(ActivityInfo.SCREEN_ORIENTATION_LANDSCAPE);
    }

    @Override
    protected void onCreate(Bundle savedInstanceState) {
        super.onCreate(savedInstanceState);
        setContentView(R.layout.activity_list);
        //注册广播
        IntentFilter filter = new IntentFilter(BluetoothDevice.ACTION_FOUND);
        this.registerReceiver(bluetoothReceiver, filter);

        filter = new IntentFilter(BluetoothAdapter.ACTION_DISCOVERY_FINISHED);
        this.registerReceiver(bluetoothReceiver, filter);

        bluetoothAdapter = BluetoothAdapter.getDefaultAdapter();

        listAdapter = new ArrayAdapter<>(this, R.layout.device_name);
        ListView lv_device = findViewById(R.id.listView);
        Button bt_find = findViewById(R.id.bt_find);
        lv_device.setAdapter(listAdapter);

        printDevice();

        bt_find.setOnClickListener(new OnClickListener() {
            @Override
            public void onClick(View arg0) {
                bluetoothAdapter.startDiscovery();   //开始扫描
            }
        });

        //选择连接设备
        lv_device.setOnItemClickListener(new OnItemClickListener() {
            @Override
            public void onItemClick(AdapterView<?> arg0, View v, int arg2,
                                    long arg3) {
                String info = ((TextView) v).getText().toString();
                if (info.equals("没有已配对设备")) {
                    Toast.makeText(getApplicationContext(), "没有已配对设备", Toast.LENGTH_LONG)
                            .show();
                } else {
                    String address = info.substring(info.length() - 17);   //获取蓝牙设备地址

                    Intent intent = new Intent();
                    intent.putExtra(EXTRA_DEVICE_ADDRESS, address);   //将地址装入EXTRA_DEVICE_ADDRESS
                    setResult(Activity.RESULT_OK, intent); //将地址传送回MainActivity
                    finish();
                }
            }
        });

    }
连接
1、连接设备
    /**
     * 连接设备
     * @param device 蓝牙设备
     * @return 连接状态
     */
    public boolean connectThread(BluetoothDevice device) {
        try {
            bluetoothSocket = device.createRfcommSocketToServiceRecord(MY_UUID);
            bluetoothAdapter.cancelDiscovery();
            bluetoothSocket.connect();
            connectStatus = true;  //连接成功
            // 接收数据进程
            new Thread(new Runnable() {  //读线程
                @Override
                public void run() {
                    int bytes;
                    byte[] buffer = new byte[256];
                    while (true) {
                        if (bluetoothSocket != null && bluetoothSocket.isConnected()) {
                            try { // 接收数据
                                bytes = bluetoothSocket.getInputStream().read(buffer);
                                final String readStr = new String(buffer, 0, bytes); //读出的数据
                            } catch (IOException e) {
                                e.printStackTrace();
                            }
                        }
                    }
                }
            }).start();
        } catch (IOException e) {
            connectStatus = false;  //连接失败
            try {
                bluetoothSocket.close();
            } catch (IOException e2) {
                e.printStackTrace();
            }
        }
        return connectStatus;
    }
2、取消连接
 /**
     * 取消连接
     */
    public void cancelConnect() {
        try {
            bluetoothSocket.close();
            connectStatus = false;
        } catch (IOException e) {
            e.printStackTrace();
        }
    }
数据传输
1、蓝发送数据
 /**
     * 蓝牙发送数据
     *
     * @param str 待发送的字符串
     */
    public void write(String str) {
        if (connectStatus) {
            byte[] buffer = str.getBytes();
            try {
                bluetoothSocket.getOutputStream().write(buffer);
            } catch (IOException e) {
                e.printStackTrace();
            }
        }
    }
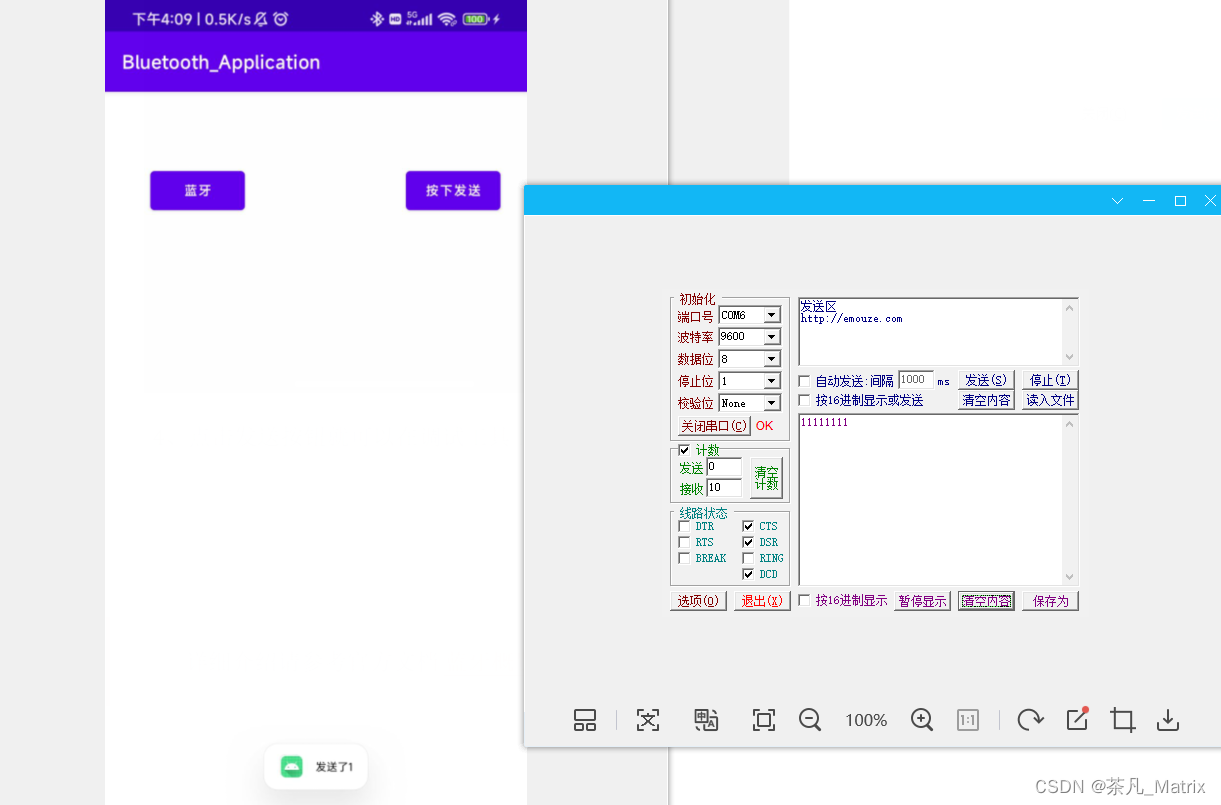
蓝牙传输测试效果
注意sdk版本33的坑
- andriod 12 以上需要动态权限申请,不然再收索连接的蓝牙设备时会报错闪退。
- 代码会有报红,只需要在调用蓝牙前配置好动态权限申请,就可以使用。应该有更好的解决方案,待解决…
1、先看看文件目录
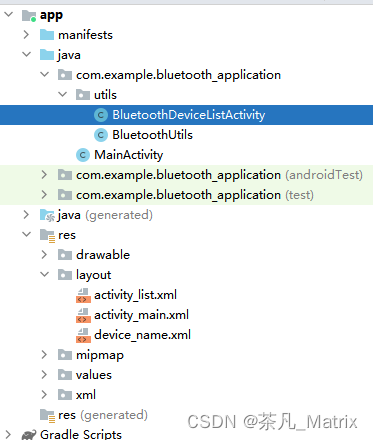
- BluetoothUtils 蓝牙初始话配置的一些方法
- BluetoothDeviceListActivity 蓝牙连接列表展示
- MainActivity 首页
- layout 下的就是UI界面。
2、测试方法
1、用手机连接笔记本蓝牙,并且按照下面打开一个传入com端口
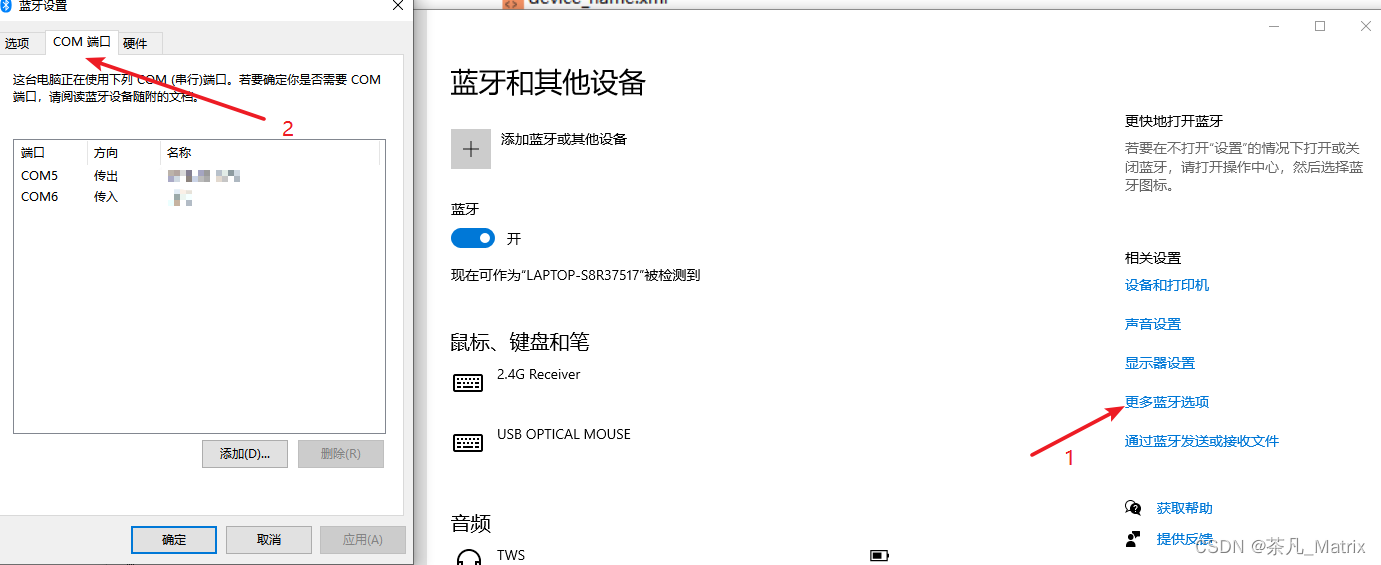
2、打开串口调试工具,选择端口号端口,例如我的是COM6 口,然后打开串口
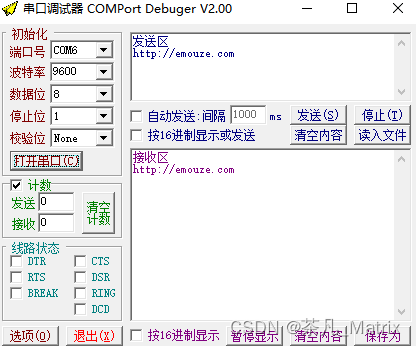
3、将Android程序编译安装到手机上,点击左侧的连接蓝牙,选择右边自己电脑的蓝牙设备。
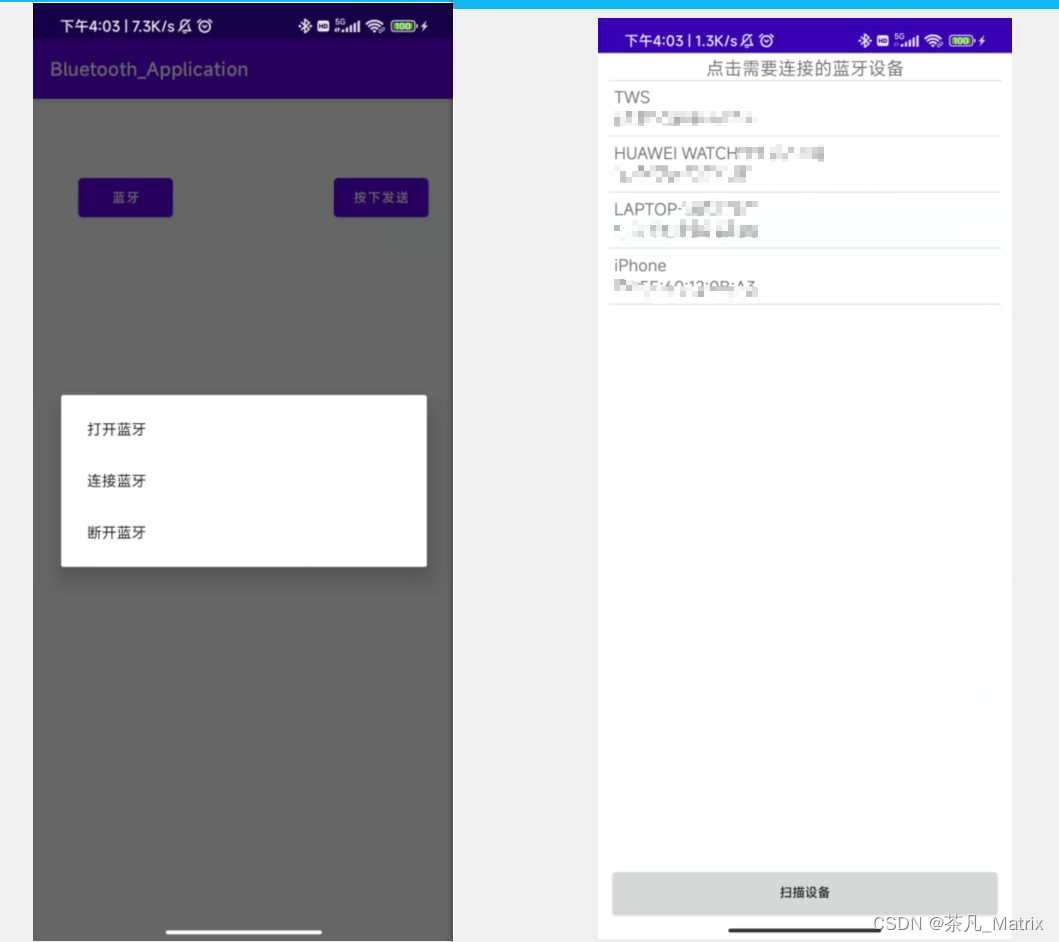
4、点击发送按钮就可以在调试工具上看到效果了
拓展
当我们成功在andriod端实现蓝牙数据传输后我们可以整合硬件实现一些功能
- 蓝牙小车,通过发送指令来控制小车行驶。
- 智能家居,比如控制开灯,关灯,空调,窗帘这种,当然只能知识单片机上玩玩,离实际使用还是很遥远。
详细介绍请参考官方文档: 蓝牙概览 | Android 开发者 | Android Developers (google.cn)
完整代码仓库:https://gitee.com/chafaner


 803
803

 被折叠的 条评论
为什么被折叠?
被折叠的 条评论
为什么被折叠?
 到【灌水乐园】发言


