


一、创建一个普通Java项目

1. 修改pom.xml文件
<?xml version="1.0" encoding="UTF-8"?>
<project xmlns="http://maven.apache.org/POM/4.0.0"
         xmlns:xsi="http://www.w3.org/2001/XMLSchema-instance"
         xsi:schemaLocation="http://maven.apache.org/POM/4.0.0 http://maven.apache.org/xsd/maven-4.0.0.xsd">
    <modelVersion>4.0.0</modelVersion>

    <groupId>com.kenewstar</groupId>
    <artifactId>springboot-springsecurity</artifactId>
    <version>1.0-SNAPSHOT</version>
    <parent>
        <groupId>org.springframework.boot</groupId>
        <artifactId>spring-boot-starter-parent</artifactId>
        <version>2.2.6.RELEASE</version>
    </parent>
    <dependencies>
        <dependency>
            <groupId>org.springframework.boot</groupId>
            <artifactId>spring-boot-starter-web</artifactId>
        </dependency>
<!--        spring security -->
        <dependency>
            <groupId>org.springframework.boot</groupId>
            <artifactId>spring-boot-starter-security</artifactId>
        </dependency>
    </dependencies>

</project>
2.创建一个控制器类UserController
代码如下:
/**
 * @Author: kenewstar
 * @Description: 控制器
 * @Date:Created in 2020/6/15
 */
@RestController
@RequestMapping("/user")
public class UserController {

    @GetMapping
    public String HelloSpringSecurity(){

        return "Hello Spring Security";
    }

}
3.创建启动类
/**
 * @Author: kenewstar
 * @Description:
 * @Date:Created in 2020/6/28
 */
@SpringBootApplication
public class App {

    public static void main(String[] args) {
        //启动SpringBoot
        SpringApplication.run(App.class,args);
    }
}
4.访问接口
启动SpringBoot应用程序,从浏览器中访问:

从浏览器输入http://localhost:8080/user
会自动调准到该页面,访问需要被验证
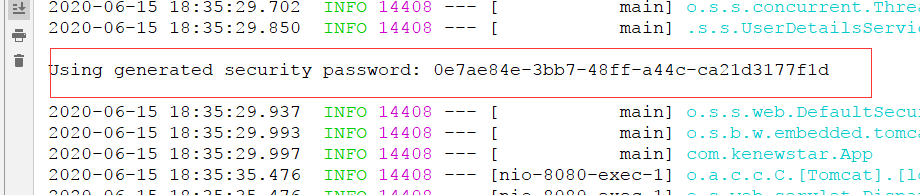
此时默认用户名为user 密码在控制台自动生成:

输入用户名与密码

如图访问成功
二、自定义登录验证
我们不可能使用上面中user用户名,以及一长串的密码来登录,因此我们需要自定义登录信息
1.创建MySecurityConfig类
该类的名称自定义,但是必须继承WebSecurityConfigurerAdapter类,代码如下:
/**
 * @Author: kenewstar
 * @Description: 自定义用户认证 必须 继承WebSecurityConfigurerAdapter类
 * @Date:Created in 2020/6/28
 */
@Configuration
@EnableWebSecurity
public class MySecurityConfig extends WebSecurityConfigurerAdapter {

    //重写方法
    @Override
    protected void configure(HttpSecurity http) throws Exception {
        http.authorizeRequests()
                .antMatchers("/").permitAll()
                .anyRequest().authenticated()
                .and()
                .logout().permitAll()
                .and()
                .formLogin();
        http.csrf().disable();
    }

    @Override
    protected void configure(AuthenticationManagerBuilder auth) throws Exception {
        auth.inMemoryAuthentication()
                .passwordEncoder(new MyPasswordEncoder())
                .withUser("kenewstar").password("123456").roles("USER");
    }
}
如上代码中kenewstar为用户名,123456,为密码
2.创建PasswordEncoder实现类
内存用户验证时,Spring boot 2.0.1引用的security 依赖是 spring security 5.x版本,此版本需要提供一个PasswordEncorder的实例,否则后台会报异常:
java.lang.IllegalArgumentException: There is no PasswordEncoder mapped for the id "null"
并且页面毫无响应。
由于我使用的是springboot 2.2.6 因此必须实现该接口
代码如下:
/**
 * @Author: kenewstar
 * @Description:
 * @Date:Created in 2020/6/28
 */
public class MyPasswordEncoder implements PasswordEncoder {
    @Override
    public String encode(CharSequence rawPassword) {
        return rawPassword.toString();
    }

    @Override
    public boolean matches(CharSequence rawPassword, String encodedPassword) {
        return encodedPassword.equals(rawPassword);
    }
}
3.启动SpringBoot

输入上面设置的用户名和密码kenewstar ,123456


正常访问
三、自定义登录界面
上面使用的都是自带的登录界面,我们在开发应用时都会有自己的登录界面
添加thymeleaf模板支持
<!--        thymeleaf模板   -->
        <dependency>
            <groupId>org.springframework.boot</groupId>
            <artifactId>spring-boot-starter-thymeleaf</artifactId>
            <version>2.2.6.RELEASE</version>
        </dependency>
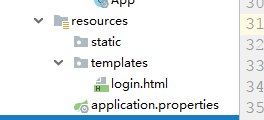
1.创建application.properties配置文件
spring.thymeleaf.prefix=classpath:/templates/
spring.thymeleaf.suffix=.html
2.编写登录界面login.html
代码如下:
<!DOCTYPE html>
<html lang="en" xmlns:th="http://www.w3.org/1999/xhtml">
<head>
    <meta charset="UTF-8">
    <title>用户登录</title>
</head>
<body>
    <h2>用户登录</h2>
    <hr/>
    <form th:action="@{/user/login}" method="post">
        用户名:<input type="text" name="username"/><br/>
        密码:<input type="password" name="password"/><br/>
        <input type="submit" value="登录"/>
    </form>
</body>
</html>
3.编写主页面
<!DOCTYPE html>
<html lang="en">
<head>
    <meta charset="UTF-8">
    <title>主页面</title>
</head>
<body>
    <h2>欢迎访问SpringBoot+SpringSecurity</h2>
</body>
</html>
4.配置SpringSecurity
/**
 * @Author: kenewstar
 * @Description: 自定义用户认证 必须 继承WebSecurityConfigurerAdapter类
 * @Date:Created in 2020/6/28
 */
@Configuration
@EnableWebSecurity
public class MySecurityConfig extends WebSecurityConfigurerAdapter {

    //重写方法
    @Override
    protected void configure(HttpSecurity http) throws Exception {
        http.authorizeRequests() // 定义哪些URL需要被保护、哪些不需要被保护
                //.antMatchers("/login").permitAll()// 设置所有人都可以访问登录页面
                .anyRequest().authenticated()  // 任何请求,登录后可以访问
                .and()
                .formLogin()
                .loginPage("/login")    //登录页
                .loginProcessingUrl("/user/login") //action="url"
                .defaultSuccessUrl("/main")   //登录成功后的主页面
                .permitAll();    //登录成功后可访问所有页面
        //关闭csrf跨域攻击防御
        http.csrf().disable();
    }

    @Override
    protected void configure(AuthenticationManagerBuilder auth) throws Exception {
        auth.inMemoryAuthentication()
                .passwordEncoder(new MyPasswordEncoder())
                .withUser("kenewstar").password("123456").roles("USER");
    }


}
创建PasswordEncoder实现类与前面的代码相同
5.创建UserController
/**
 * @Author: kenewstar
 * @Description: 控制器
 * @Date:Created in 2020/6/28
 */
@Controller
public class UserController {

    @RequestMapping("/login")
    public String showLogin(){
        return "login";
    }
    @RequestMapping("/main")
    public String showMain(){
        return "main";
    }

}
6.创建启动类
/**
 * @Author: kenewstar
 * @Description:
 * @Date:Created in 2020/6/15
 */
@SpringBootApplication
public class App {

    public static void main(String[] args) {
        //启动SpringBoot
        SpringApplication.run(App.class,args);
    }
}
7.运行结果
登录访问,跳转到自定义页面

输入用户名和密码,跳转至主页面


 242
242


 被折叠的 条评论
为什么被折叠?
被折叠的 条评论
为什么被折叠?
 到【灌水乐园】发言


