


一、管道
管道的作用是格式化组件模版的数据。管道是在模板表达式中使用的简单函数,用于接受输入值并返回转换后的值。
管道官网地址
(一)内置管道
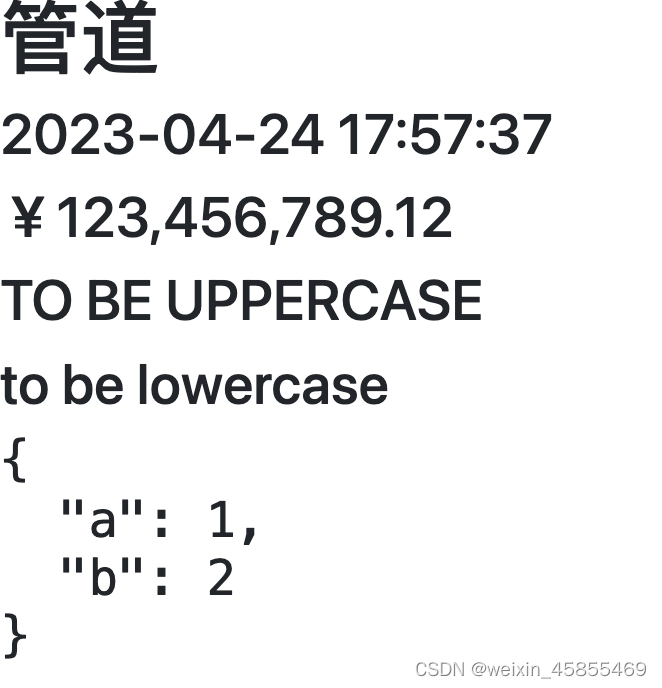
组件模版:
<h1>管道</h1>
<!--1、时间格式化-->
<h3>{{now|date:"YYYY-MM-dd HH:mm:SS"}}</h3>
<!--2、货币格式化-->
<h3>{{money|currency:"¥"}}</h3>
<!--3、转换成大写-->
<h3>{{'to be uppercase'|uppercase}}</h3>
<!--4、转换成小写-->
<h3>{{'TO BE LOWERCASE'|lowercase}}</h3>
<!--5、将对象显示为json格式-->
<h3><pre>{{obj|json}}</pre></h3>
组件类:
import {Component} from '@angular/core';

@Component({
  selector: 'app-layout',
  templateUrl: './layout.component.html',
})

export class LayoutComponent {
  public now = new Date();
  public money = 123456789.123456789;
  public obj = {
    a: 1,
    b: 2,
  }

}
实现效果:
(二)自定义管道
- 运行命令行:
ng g p pipes/base,终端输出:

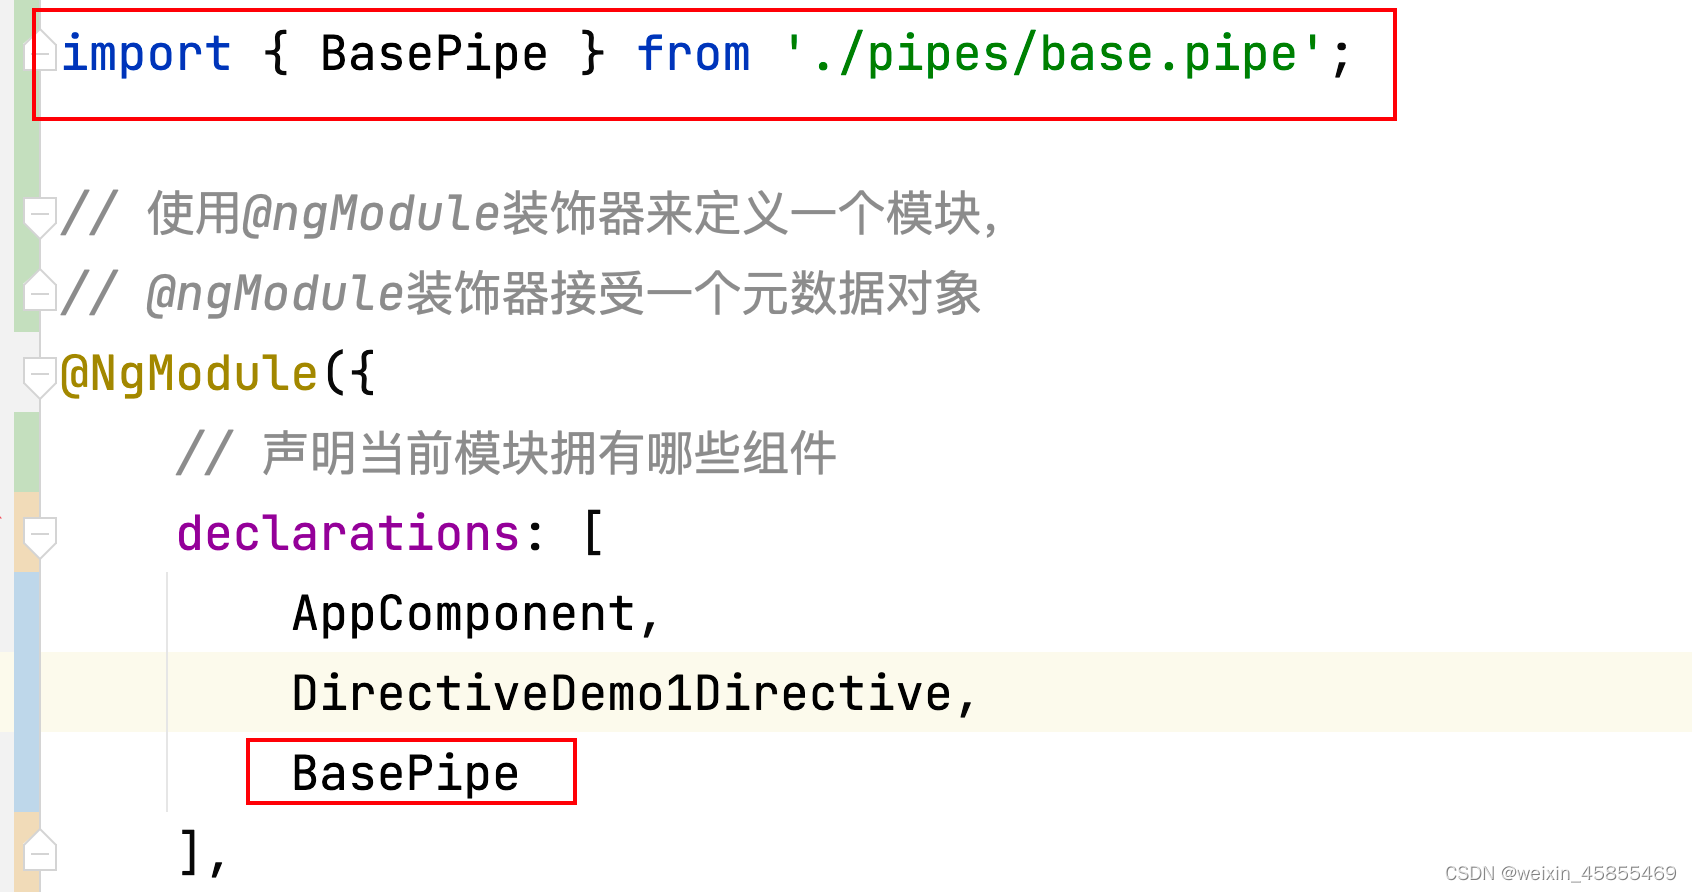
会创建一个管道的类文件:

并且,在根组件中自动引入和声明这个管道。管道也必须包含在某一个模块中,如果需要再组件中使用管道,就必须在模块中引入并声明。
- 在管道类中书写我们需要的逻辑,在这里进行一个简单的字符串拼接
import { Pipe, PipeTransform } from '@angular/core';

@Pipe({
  name: 'base'
})
export class BasePipe implements PipeTransform {
  // 管道运行的时候就会执行这个方法
    // value: 要处理的数据
    // ...args: 参数列表
  transform(value: string, ...args: string[]): unknown {
    return value+'有很多爱好:'+args;
  }

}
- 在根组件模版中使用管道
<h1>{{'小花' | base:'喜欢🛹':'喜欢💃🏻':'喜欢健身'}}</h1>
- 实现效果:

二、组件通讯
(一)父组件向子组件传递数据
- 父组件模版中:
<app-layout
        [name]="'张三'"
        [age]="23"
></app-layout>
- 子组件类中:
export class LayoutComponent {
  // 括号里是接受的变量名
  // 先使用@Input获取父组件传递过来的数据
  // 再创建一个拥有默认值的变量
  // 如果父组件传递过来了数据,就给这个变量赋值
  @Input("name")
  public name: string = "";
  @Input("age")
  public age: number = 0;
}
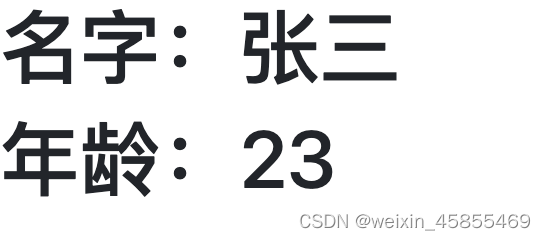
- 子组件模版中:
<h1>名字:{{name}}</h1>
<h1>年龄:{{age}}</h1>
显示效果:
(二)子组件向父组件传递数据
- 子组件类中
export class LayoutComponent {
  @Output()
  public sendData = new EventEmitter();// 创建一个事件发射器,用来向父组件传递数据
  public onClick(){
    this.sendData.emit('向父组件传递的数据');
  }
}
- 子组件模版中:
<!--点击调用事件向父组件发送数据-->
<button (click)="onClick()">向父组件传递数据</button>
- 父组件模版中
<h1>{{title}}</h1>
<!--监听sendData事件,绑定处理函数receiveData,参数用来接收子组件传递过来的数据-->
<app-layout (sendData)="receiveData($event)"></app-layout>
- 父组件类中
export class AppComponent {
  public title: string = '等待接收子组件传递过来的数据';
  public receiveData(e: string){
    this.title = e;
  }
}
- 实现效果:
初始状态:

点击按钮之后:

(三)组件通讯中的装饰器与API
- @Input()装饰器
用来把某个类字段标记为输入属性,并提供配置元数据。 该输入属性会绑定到模板中的某个 DOM 属性。当变更检测时,Angular 会自动使用这个 DOM 属性的值来更新此数据属性。 - @Output()装饰器
一个装饰器,用于把一个类字段标记为输出属性,并提供配置元数据。 凡是绑定到输出属性上的 DOM 属性,Angular 在变更检测期间都会自动进行更新。子组件使用 @Output() 属性来引发事件,以通知父组件这一变化。为了引发事件,@Output() 必须是 EventEmitter 类型,它是 @angular/core 中用来发出自定义事件的类。 - EventEmitter
用在带有 @Output 指令的组件中,以同步或异步方式发出自定义事件
class EventEmitter<T> extends Subject<T> {
  constructor(isAsync?: boolean): EventEmitter<T>
  emit(value?: T): void
  subscribe(next?: (value: T) => void, error?: (error: any) => void, complete?: () => void): Subscription
}
constructor:传递参数true时表示是异步发出自定义事件,默认同步
emit:发出参数值
subscribe:注册此实例发出事件的处理器,接收三个函数作为参数
- 参数一:处理器,发出事件成功或失败都会调用
- 参数二:发出事件执行失败的处理函数
- 参数三:发出事件执行成功后的处理函数
三、生命周期
(一)挂载阶段
挂载阶段的函数只会在视图初始化的时候调用一次,后续的数据更新不会引发这几个函数的调用。
- constructor构造函数。在构造函数中,只推荐注入服务,不推荐进行其他的操作。
- ngOnint() 接收到@Input()输入的属性值时执行,在此处可以执行请求操作
- ngAfterContentInit()内容投影渲染完成之后调用。内容投影是组件模版的一部分,所以会先初始化内容投影
- ngAfterViewInit()模版渲染完毕之后调用
- 父组件模版:
<app-layout [msg]="'摩斯电码'">
    <div #a class="a">hhh</div>
    <div #b id="b">xxx</div>
</app-layout>
- 子组件模版:
<h1 #title>layout works!</h1>
<ng-content select=".a"></ng-content>
<ng-content select="#b"></ng-content>
<h1>{{msg}}</h1>
- 子组件类:
import {
    AfterContentInit,
    AfterViewInit,
    Component,
    ContentChild, ElementRef,
    EventEmitter,
    Input,
    OnInit,
    Output, ViewChild
} from '@angular/core';
import {TestService} from "../../../test.service";

@Component({
    selector: 'app-layout',
    templateUrl: './layout.component.html',
})

export class LayoutComponent implements OnInit, AfterContentInit, AfterViewInit{
    constructor(private testService: TestService) {
        // TestService:自定义的服务
        // 组件类构造函数,只用来接收服务实例对象
        console.log('constructor')
        this.testService.test();
        console.log('在constructor中获取不到@Input输入的值:'+this.msg)
        console.log('------------------------------------------------------')
    }
    @Input() public msg: string = "";
    ngOnInit(): void {
        console.log('ngOnInit','组件初始化完毕')
        console.log('在ngOnInit中可以获取到@Input输入的值:'+this.msg)
        console.log('在ngOnInit中获取不到内容投影的元素'+this.aContainer)
        console.log('------------------------------------------------------')
    }
    @ContentChild('a') aContainer: ElementRef<HTMLElement> | undefined;
    ngAfterContentInit() {
        console.log('ngAfterContentInit','内容投影渲染完毕')
        console.log('在ngAfterContentInit中可以获取到内容投影的元素'+this.aContainer)
        console.log('在ngAfterContentInit中获取不到组件视图中的元素'+this.title)
        console.log('------------------------------------------------------')
    }
    @ViewChild('title') title: ElementRef<HTMLElement> | undefined;
    ngAfterViewInit() {
        console.log('ngAfterViewInit','组件视图渲染完毕')
        console.log('在ngAfterViewInit中可以获取到组件视图中的元素'+this.title)
    }
}
(二)更新阶段
- ngOnChanges()
 ngOnChanges(changes:SimpleChanges){
        console.log(changes);
    }
输入的属性变化时触发,初始化时会触发一次;
接受一个参数,参数中保存所有修改的属性的信息,不修改不会记录;
基本数据类型的修改和引用数据类型引用地址的变化会触发,但引用数据类型中属性变化不会触发。
输出参数:
初始化的输出firstChange为true,之后的修改firstChange都为false。

- ngDoCheck()所有的变化都会触发这个生命周期,不建议使用,因为调用的太频繁。可以在这个生命周期中定义ngOnChanges捕捉不到的修改,比如对某一个对象中的属性的修改。
- ngAfterContentChecked()内容投影发生变化时触发。
- ngAfterViewChecked()组件模版发生变化时触发。
(三)卸载阶段
卸载:组件模版对应的HTML元素在页面上被移除,典型场景就是页面切换
ngOnDestroy()发生在组件销毁之前,在这里取消订阅和事件绑定


 1402
1402


 被折叠的 条评论
为什么被折叠?
被折叠的 条评论
为什么被折叠?
 到【灌水乐园】发言


