


SpringBoot详细简介以及两种创建项目的方式
SpringBoot框架简介
什么是springboot
Spring Boot 是 Spring 开源组织下的子项目,是 Spring 组件一站式解决方案,它的产⽣简化了框架的使⽤,所谓简化,是指简化了 使用 Spring 的难度,简省了繁重的配置,提供了各种启动器,开发者能快速上手,所以 SpringBoot 是⼀个服务于框架的框架,服务范围是简化配置⽂件。
springboot优点
① 创建独立的 Spring 应用程序
② 嵌入的 Tomcat,无需部署 WAR 文件
③ 简化 Maven 配置
④ 自动配置 Spring
⑤ 开箱即用,没有代码生成,也无需 XML 配置。
简单来说就是:
(1)独立运行(2)简化配置(3)自动配置
(4)无代码生成和XML配置(5)应用监控(6)上手容易
springboot快速入门
(1)JDK 环境必须是 1.8 及以上,传送门:jdk1.8.191 下载
(2)后面要使用到 Maven 管理工具 3.2.5 及以上版本.
(3)开发工具建议使用 IDEA,
第一种快捷创建SpringBoot项目方式
第一步:

第二步:
1.Group:一般为逆向域名格式,包名格式
2.Artifact:唯一标识,一般为项目名称具体 maven 相关信息,可自行搜索
3.Tpye: 项目类型 此处选择 maven project
4.Language: 编程语言 此处使用 JAVA
5.Packaging : 打包类型
6.Java Version : jdk 版本
7.Version: 项目版本号
8.Name: 项目名称
9.Description: 项目描述
10.Package: 包名,一般默认

注意:一定要删掉demo,主启动类才会在外面

第三步

第四步

项目目录简介如下:

第二种创建SpringBoot项目方式
第一步:

第二步

第三步:在pom.xml中配置
<!--①继承父类工程-->
    <parent>
        <artifactId>spring-boot-starter-parent</artifactId>
        <groupId>org.springframework.boot</groupId>
        <version>2.4.4</version>
    </parent>


    <groupId>com.zz</groupId>
    <artifactId>springBoot02</artifactId>
    <version>1.0-SNAPSHOT</version>
<!--②springboot-starter-web-->
    <dependencies>
        <dependency>
            <groupId>org.springframework.boot</groupId>
            <artifactId>spring-boot-starter-web</artifactId>
            <version>2.4.4</version>
        </dependency>
    </dependencies>
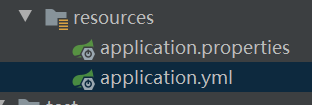
第四步:在resource包下新建application.properties
application.properties这个里面写springboot的配置文件
注意:名字一定是这个,不能更改

第五步:新建DemoApplicatiom主启动类
在里面写运行springboot的主函数。主启动类就建好啦

springboot两种配置文件
两种配置文件:
两种配置文件的写法有些不同
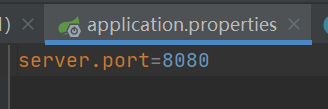
#springboot的配置文件
server.port=8080
#配置应用程序的根路径
server.servlet.context-path=/springboot02
properties属性文件
用 .和= 连接
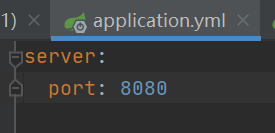
yml文件
通过缩进的格式,不需要=
java类读取配置文件的内容
1.ConfigurationProperties注解 从配置文件读取属性值,放到对象里面,推荐使用,复杂的结构也适用例如map,list对象,支持 校验@Validated
2.通过@value注解获取配置文件的值,不适合做复杂类型值得获取,不支持@Validated,支持
1.第一种通过ConfigurationProperties 来读取相关的配置内容
(1)定义Studnet类
@Component
@Data
//通过ConfigurationProperties来读取相关的配置内容
@ConfigurationProperties(prefix = "student")//前缀
public class Student {
    private String name;
    private int age;
    private String address;
//    private String[] hobby;//list和集合
//    private Map<String, Object> map;
}
(2)自定义配置属性,数组/list,map 把student类,交给spring管理,并设置默认值
student.name=张三
student.age=13
student.address=河南

student.hobby[0]=游泳
student.hobby={唱歌,跳舞}
student.map.name=沙雕
student.map.age=2
(3)在controller层读取 从spring中取对象
@RestController
public class HelloController {

    @Autowired
    private Student student;

    @GetMapping("/student")
    public Student student(){
        return student;
    }
}
2.第二种读取配置文件的内容
(1)定义student1类
通过@Value从配置文件中赋值
这种方式只能读取基本类型以及字符串类型。
@Component
@Data
//通过ConfigurationProperties来读取相关的配置内容
public class Student1 {
    @Value("${student1.name}")
    private String name;
    @Value("${student1.age}")
    private int age;
    @Value("${student1.address}")
    private String address;
  /*  @Value("${student1.hobby}")
    private String[] hobby;//list和集合
    @Value("${student1.map}")
    private Map<String, Object> map;*/
}
(2)自定义配置属性
student1.name=李四
student1.age=12
student1.address=上海
(3)在controller层读取 从spring中取对象
    @Autowired
    private Student1 student1;
    @GetMapping("/student1")
    public Student1 student1(){
        return student1;
    }
profiles配置详解
为什么使用profiles?
在开发中,一般有两种环境
1,生产环境 [项目上线,客户在使用中,就是生产环境]
2,开发环境[就是开发环境,不解释]
有时候开发环境和生产环境的配置方法是不一样的,那么如何快速的切换呢,这里就要使用profiles文件

只需要在application中添加
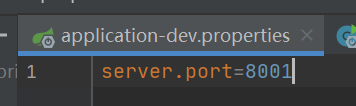
(1)在application-dev.properties写入端口号
(2)在application.properties里写入以下代码
#当前被激活的是哪个配置文件
#表示开发中
spring.profiles.active=dev
#表示测试
spring.profiles.active=test
#这两种都表示线上
spring.profiles.active=online
spring.profiles.active=pro
(3)测试运行

springboot要注册web的三大组件
(1)注册serlvet
①. 创建一个servlet类
public class MyServlet extends HttpServlet {
    @Override
    protected void service(HttpServletRequest req, HttpServletResponse resp) throws ServletException, IOException {

        System.out.println("---------service调用----------");
    }
}
②. 创建一个MyConfig 类
@Configuration//等价于spring的配置文件 application.xml
public class MyConfig {
//    ServletRegistrationBean表示用来注册servlet类的
   @Bean//表示配置文件的bean标签
    public ServletRegistrationBean getServlet(){
       ServletRegistrationBean registrationBean = new ServletRegistrationBean();
//      设置一个servlet
       registrationBean.setServlet(new MyServlet());//
       registrationBean.addUrlMappings("/myservlet");
       return registrationBean;
   }
}
③. 启动springboot
(2)注册Filter
①. 创建一个Filter类
public class MyFilter implements Filter {
    @Override
    public void doFilter(ServletRequest servletRequest, ServletResponse servletResponse, FilterChain filterChain) throws IOException, ServletException {
//
        System.out.println("过滤器");
        filterChain.doFilter(servletRequest,servletResponse);
    }
}
②. 创建一个MyConfig 类
@Configuration//等价于spring的配置文件 application.xml
public class MyConfig {
    @Bean
    public FilterRegistrationBean getFilter(){
        FilterRegistrationBean registrationBean=new FilterRegistrationBean();
      //相当于<filterclass>com.springboot.example.demo.servlets.MyFilter</filter-class>
        registrationBean.setFilter(new MyFilter());
        //相当于<url-pattern>/MyFilter</url-pattern>
        registrationBean.addUrlPatterns("/*");
        return registrationBean;
    }
}
③. 启动springboot
(3)注册Linster
①. 创建一个Linster类
public class MyListener implements ServletContextListener {

    @Override
    public void contextInitialized(ServletContextEvent sce) {
        System.out.println("监听器初始化");
    }

    @Override
    public void contextDestroyed(ServletContextEvent sce) {
        System.out.println("监听器被销毁");
    }
}
②. 创建一个MyConfig 类
    @Bean
    public ServletListenerRegistrationBean getListener(){
        ServletListenerRegistrationBean registrationBean=new ServletListenerRegistrationBean();
         //注册自定义MyListener
        registrationBean.setListener(new MyListener());
        //执行顺序
        registrationBean.setOrder(1);
        return registrationBean;
    }
③. 启动springboot


 489
489


 被折叠的 条评论
为什么被折叠?
被折叠的 条评论
为什么被折叠?
 到【灌水乐园】发言


