


个人学习笔记,可能暂时不全!尚待完善…
1 SpringFramework
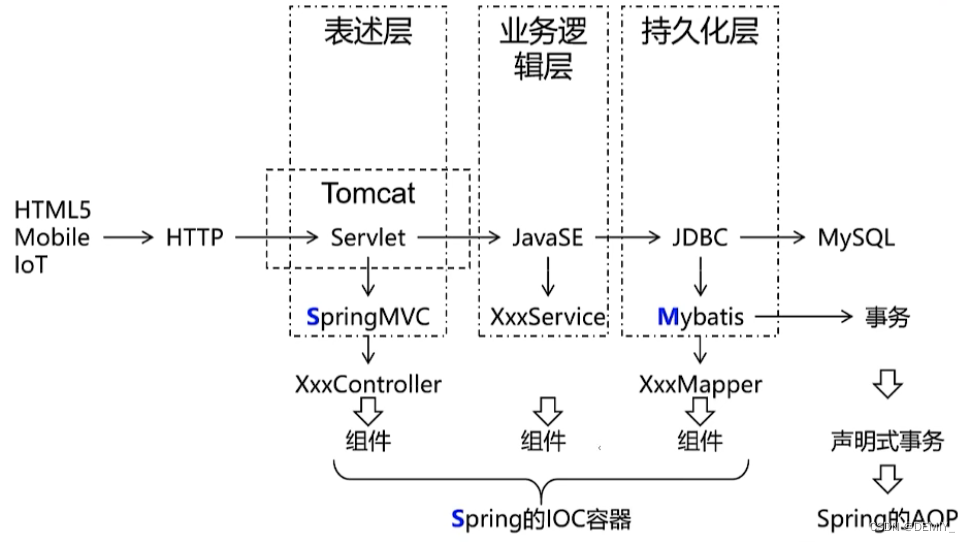
1.1 技术体系架构
-
单一架构,主要技术框架为:Spring , SpringMVC , Mybatis,javaweb的三个框架有
- 持久层(dao) jdbc,mybatis 数据库
- 业务层(service/逻辑层)
- 表述层(controller/servlet/tomcat/handler) SpringMVC 前后端的交互
其中,Spring比较特殊,没有对应特定的一层。Spring的两大核心为IOC和AOP。分为以上这三层的容器建模,属于Spring中的IOC;声明式事务属于Spring中的AOP
- 分布式架构,主要技术架构为:SpringBoot (SSM), SpringCloud , 中间件

1.2 SpringFramework总体介绍
1.2.1 Spring和SpringFramework的区别
- Spring是腾讯
- SpringFramework是QQ
1.2.2 SpringFramework的主要功能
- IOC(Core Container) 控制反转、依赖注入
- AOP(Aspects) 代理服务
- TX 声明式事务管理
2 MyBatis
2.1 总体介绍
2.2 掌握要求
- 基础应用
- 使用流程:
- 核心配置文件mybatis-config.xml
- Mapper接口
- mapper配置文件(与Mapper接口同名的xml文件)
- 参数输入:
- ${}:字符串拼接
- #{}:占位符
- 参数输出
- 使用流程:
- 多表
- 实体类设计:
- 一对一:对象
- 一对多:集合
<collection property="emps" select="com.atguigu.mybatis.mapper.EmployeeMapper.getEmployByDid" column="did"> </collection>- 多对一:对象
<association property="dept" select="com.atguigu.mybatis.mapper.DeptMapper.getDeptByDid" column="did"> </association> - resultMap
<id property="eid" column="eid"></id><result property="empName" column="emp_name"></result>
- 多表结果映射
- 实体类设计:
- 动态语句
- 【where】
<select id="getEmpListByMoreTJ2" resultType="Emp"> select * from t_emp <where> <if test="ename != '' and ename != null"> ename = #{ename} </if> <if test="age != '' and age != null"> and age = #{age} </if> <if test="sex != '' and sex != null"> and sex = #{sex} </if> </where> </select> - 【if】
<!--List<Emp> getEmpListByMoreTJ(Emp emp);--> <select id="getEmpListByMoreTJ" resultType="Emp"> select * from t_emp where 1=1 <if test="ename != '' and ename != null"> and ename = #{ename} </if> <if test="age != '' and age != null"> and age = #{age} </if> <if test="sex != '' and sex != null"> and sex = #{sex} </if> </select> - 【trim】
<select id="getEmpListByMoreTJ" resultType="Emp"> select * from t_emp <trim prefix="where" suffixOverrides="and"> <if test="ename != '' and ename != null"> ename = #{ename} and </if> <if test="age != '' and age != null"> age = #{age} and </if> <if test="sex != '' and sex != null"> sex = #{sex} </if> </trim> </select> - 【foreach】
<!--int insertMoreEmp(List<Emp> emps);-->
<insert id="insertMoreEmp">
insert into t_emp values
<foreach collection="emps" item="emp" separator=",">
(null,#{emp.ename},#{emp.age},#{emp.sex},#{emp.email},null)
</foreach>
</insert>
<!--int deleteMoreByArray(int[] eids);-->
<delete id="deleteMoreByArray">
delete from t_emp where
<foreach collection="eids" item="eid" separator="or">
eid = #{eid}
</foreach>
</delete>
<!--int deleteMoreByArray(int[] eids);-->
<delete id="deleteMoreByArray">
delete from t_emp where eid in
<foreach collection="eids" item="eid" separator="," open="(" close=")">
#{eid}
</foreach>
</delete>
- 【where】
- 扩展应用
- 批量处理
- 分页插件
- 添加依赖:com.github.pagehelper
- 配置插件:在mybatis-config.xml中添加
<plugins> <!--设置分页插件--> <plugin interceptor="com.github.pagehelper.PageInterceptor"></plugin> </plugins> - 实际应用
- 在进行查询之前打开分页
PageHelper.startPage(int pageNum, int pageSize) - 查询之后
PageInfo<T> pageInfo = new PageInfo<>(List<T> list, int navigatePages)
- 在进行查询之前打开分页
- 逆向工程
-
添加依赖与插件:org.mybatis(核心包)和org.mybatis.generator
-
依赖配置文件generatorConfig.xml
-
使用maven工程-plugins-generator进行逆向

-
实际应用举例
EmpMapper mapper = sqlSession.getMapper(EmpMapper.class);
EmpExample empExample = new EmpExample();
//创建条件对象,通过andXXX方法为SQL添加查询添加,每个条件之间是and关系
empExample.createCriteria().andEnameLike("a").andAgeGreaterThan(20).andDidIsNot
Null();
//将之前添加的条件通过or拼接其他条件
empExample.or().andSexEqualTo("男");
List<Emp> list = mapper.selectByExample(empExample);
for (Emp emp : list) {
System.out.println(emp);
}
-
3 SpringMVC
3.1 总体介绍
- 作用于表述层
- 简化接收前端参数,调用业务逻辑,响应前端数据的过程
3.2 主要功能
- SpringMVC框架


- DispatcherServlet : SpringMVC提供,我们需要使用web.xml配置使其生效,它是整个流程处理的核心,所有请求都经过它的处理和分发![ CEO ]
- HandlerMapping : SpringMVC提供,我们需要进行IoC配置使其加入IoC容器方可生效,它内部缓存handler(controller方法)和handler访问路径数据,被DispatcherServlet调用,用于查找路径对应的handler![秘书]
- HandlerAdapter : SpringMVC提供,我们需要进行IoC配置使其加入IoC容器方可生效,它可以处理请求参数和处理响应数据数据,每次DispatcherServlet都是通过handlerAdapter间接调用handler,他是handler和DispatcherServlet之间的适配器![经理]
- Handler : handler又称处理器,他是Controller类内部的方法简称,是由我们自己定义,用来接收参数,向后调用业务,最终返回响应结果![打工人]
- ViewResovler : SpringMVC提供,我们需要进行IoC配置使其加入IoC容器方可生效!视图解析器主要作用简化模版视图页面查找的,但是需要注意,前后端分离项目,后端只返回JSON数据,不返回页面,那就不需要视图解析器!所以,视图解析器,相对其他的组件不是必须的![财务]
- 简化参数接收
在 GET 请求中采用 param 类型的参数,而在 POST 请求中采用 JSON 类型的参数传递。- param参数接收:
- 特殊情况有多选框,提交的数据的时候一个key对应多个值,可以使用集合进行接收;实体类接收
- GET,POST,PUT,DELETE
- 参数接收方式
- @RequestMapping(“Param”)要求名字等于请求参数名
- @RequestParam 可以指定接收参数名
- 路径参数接收:
- @PathVariable
/** * 动态路径设计: /user/{动态部分}/{动态部分} 动态部分使用{}包含即可! {}内部动态标识! * 形参列表取值: @PathVariable Long id 如果形参名 = {动态标识} 自动赋值! * @PathVariable("动态标识") Long id 如果形参名 != {动态标识} 可以通过指定动态标识赋值! * * 访问测试: /param/user/1/root -> id = 1 uname = root */ @GetMapping("/user/{id}/{name}") @ResponseBody public String getUser(@PathVariable Long id, @PathVariable("name") String uname) { System.out.println("id = " + id + ", uname = " + uname); return "user_detail"; } - json数据接收:
- 增加配置依赖
com.fasterxml.jackson.core - 注解@EnableWebMvc来接收json数据,使其转换为java对象
- 在控制器中,使用 @RequestBody 注解来接收 JSON 数据,并将其转换为 Java 对象
@PostMapping("/person") @ResponseBody public String addPerson(@RequestBody Person person) { // 在这里可以使用 person 对象来操作 JSON 数据中包含的属性 return "success"; }- @RestController 这个注解用来修饰类,说明该类下的每个方法都为加了@ResponseBody的Controller
- 增加配置依赖
- cookie数据接收:@CookieValue
@GetMapping("/demo") public void handle(@CookieValue("JSESSIONID") String cookie) { //... }- 请求头数据接收:@RequestHeader
@GetMapping("/demo") public void handle( @RequestHeader("Accept-Encoding") String encoding, @RequestHeader("Keep-Alive") long keepAlive) { //... }- 共享域对象:常见的共享域有四种:ServletContext、HttpSession、HttpServletRequest、PageContext
- Request共享域
- Model
@RequestMapping("/attr/request/model") @ResponseBody public String testAttrRequestModel( // 在形参位置声明Model类型变量,用于存储模型数据 Model model) { // 我们将数据存入模型,SpringMVC 会帮我们把模型数据存入请求域 // 存入请求域这个动作也被称为暴露到请求域 model.addAttribute("requestScopeMessageModel","i am very happy[model]"); return "target"; }- ModelMap
@RequestMapping("/attr/request/model/map") @ResponseBody public String testAttrRequestModelMap( // 在形参位置声明ModelMap类型变量,用于存储模型数据 ModelMap modelMap) { // 我们将数据存入模型,SpringMVC 会帮我们把模型数据存入请求域 // 存入请求域这个动作也被称为暴露到请求域 modelMap.addAttribute("requestScopeMessageModelMap","i am very happy[model map]"); return "target"; }- Map
@RequestMapping("/attr/request/map") @ResponseBody public String testAttrRequestMap( // 在形参位置声明Map类型变量,用于存储模型数据 Map<String, Object> map) { // 我们将数据存入模型,SpringMVC 会帮我们把模型数据存入请求域 // 存入请求域这个动作也被称为暴露到请求域 map.put("requestScopeMessageMap", "i am very happy[map]"); return "target"; }- 原生request HttpServletRequest
@RequestMapping("/attr/request/original") @ResponseBody public String testAttrOriginalRequest( // 拿到原生对象,就可以调用原生方法执行各种操作 HttpServletRequest request) { request.setAttribute("requestScopeMessageOriginal", "i am very happy[original]"); return "target"; }- ModelAndView
@RequestMapping("/attr/request/mav") public ModelAndView testAttrByModelAndView() { // 1.创建ModelAndView对象 ModelAndView modelAndView = new ModelAndView(); // 2.存入模型数据 modelAndView.addObject("requestScopeMessageMAV", "i am very happy[mav]"); // 3.设置视图名称 modelAndView.setViewName("target"); return modelAndView; }- Session共享域
@RequestMapping("/attr/session") @ResponseBody public String testAttrSession(HttpSession session) { //直接对session对象操作,即对会话范围操作! return "target"; } ``` - Application共享域
@Autowired
private ServletContext servletContext;
@RequestMapping("/attr/application")
@ResponseBody
public String attrApplication() {
    servletContext.setAttribute("appScopeMsg", "i am hungry...");
    return "target";
}
- Request共享域
- param参数接收:


 63万+
63万+


 被折叠的 条评论
为什么被折叠?
被折叠的 条评论
为什么被折叠?
 到【灌水乐园】发言


