


Spring框架之注入方式
文章目录
提示:以下是本篇文章正文内容,下面案例可供参考
一、依赖注入
什么是依赖注入:依赖注入(DI)是一个过程,其中对象只通过构造函数参数、工厂方法的参数或在对象实例构造或从工厂方法返回后在对象实例上设置的属性来定义它们的依赖项(即它们所使用的其他对象)。容器然后在创建bean时注入这些依赖性。这个过程基本上是bean本身的逆过程(换言之,控制反转),它通过使用类的直接构造或服务定位器模式来控制依赖项的实例化或位置。
使用DI原则,代码更简洁,当对象与其依赖项一起提供时,去耦更有效。对象不查找其依赖项,并且不知道依赖项的位置或类。因此,您的类变得更容易测试,特别是当依赖关系位于接口或抽象基类上时,这些接口或抽象基类允许在单元测试中使用存根或模拟实现。
下面我们来学习如何使用依赖注入:
首先我们需要新建俩个类:address类和student类
address类
public class Address {
    private String address;

    public String getAddress() {
        return address;
    }

    public void setAddress(String address) {
        this.address = address;
    }

    @Override
    public String toString() {
        return "Address{" +
                "address='" + address + '\'' +
                '}';
    }
}
student类,并实现他的set和get方法以及构造函数,下面声明了各种属性,我们要如何取注入呢?我们往下看
public class Student {
    private String name;        //name属性
    private Address address;    //对象
    private String [] books;    //String 数组
    private List<String> list;    //list集合
    private Map<String,String> map;   //Map集合
    private Set<String> set;      //set集合
    private String wife;         //null
    private Properties info;

    public String getName() {
        return name;
    }

    public void setName(String name) {
        this.name = name;
    }

    public Address getAddress() {
        return address;
    }

    public void setAddress(Address address) {
        this.address = address;
    }

    public String[] getBooks() {
        return books;
    }

    public void setBooks(String[] books) {
        this.books = books;
    }

    public List<String> getList() {
        return list;
    }

    public void setList(List<String> list) {
        this.list = list;
    }

    public Map<String, String> getMap() {
        return map;
    }

    public void setMap(Map<String, String> map) {
        this.map = map;
    }

    public Set<String> getSet() {
        return set;
    }

    public void setSet(Set<String> set) {
        this.set = set;
    }

    public String getWife() {
        return wife;
    }

    public void setWife(String wife) {
        this.wife = wife;
    }

    public Properties getInfo() {
        return info;
    }

    public void setInfo(Properties info) {
        this.info = info;
    }

    @Override
    public String toString() {
        return "Student{" +
                "name='" + name + '\'' +
                ", address=" + address +
                ", books=" + Arrays.toString(books) +
                ", list=" + list +
                ", map=" + map +
                ", set=" + set +
                ", wife='" + wife + '\'' +
                ", info=" + info +
                '}';
    }
}
我们需要创建Spring核心配置文件application.xml
<?xml version="1.0" encoding="UTF-8"?>
<beans xmlns="http://www.springframework.org/schema/beans"
       xmlns:xsi="http://www.w3.org/2001/XMLSchema-instance"
       xsi:schemaLocation="http://www.springframework.org/schema/beans
        https://www.springframework.org/schema/beans/spring-beans.xsd">

</beans>
创建好核心配置文件之后我们就需要取注入了,下面看看我们如何取注入不同属性的值吧
<bean id="address" class="pojo.Address">

        <property name="address" value="石楼"/>
    </bean>

    <bean id="student" class="pojo.Student">
        <!--第一种  普通值注入方式-->
        <property name="name" value="雅典娜"/>
        <!--第二种  bean注入-->
        <property name="address" ref="address"/>
        <!--数组注入 ref-->
        <property name="books">
            <array>
                <value>魁拔</value>
                <value>一念永恒</value>
                <value>斗破苍穹</value>
            </array>
        </property>
        <!--List注入-->
        <property name="list">
            <list>
                <value>游戏</value>
                <value>学习</value>
                <value>挣钱</value>
                <value>未来</value>
            </list>
        </property>
        <!--map注入-->
        <property name="map">
            <map>
                <entry key="身份证:" value="123456789101213140"/>
                <entry key="银行卡号:" value="1234567891012131415"/>
            </map>
        </property>

        <!--set注入-->
        <property name="set">
            <set>
                <value>王者</value>
                <value>天天酷跑</value>
                <value>CS Go</value>
            </set>
        </property>

        <!--null注入-->
        <property name="wife">
            <null/>
        </property>

        <!--Properties注入-->
        <property name="info">
            <props>
                <prop key="学号:">2133021000</prop>
                <prop key="姓名:">张三</prop>
                <prop key="年龄">23</prop>
            </props>
        </property>
    </bean>
最后我们使用单元测试来测试一下结果
public class MyText {
    @Test
    public void text(){
        ApplicationContext context = new ClassPathXmlApplicationContext("applicationContext.xml");
        Student student = context.getBean("student", Student.class);
        System.out.println(student.toString());              //简写
    }
}
那么依赖注入就分享到这里啦!
二、命名空间的xml注入方式
首先新建User类
public class User {
    private String name;
    private int age;

    public User() {
    }

    public User(String name, int age) {
        this.name = name;
        this.age = age;
    }

    public String getName() {
        return name;
    }

    public void setName(String name) {
        this.name = name;
    }

    public int getAge() {
        return age;
    }

    public void setAge(int age) {
        this.age = age;
    }


    @Override
    public String toString() {
        return "User{" +
                "name='" + name + '\'' +
                ", age=" + age +
                '}';
    }
}
创建Spring核心配置文件bean1.xml
<?xml version="1.0" encoding="UTF-8"?>
<beans xmlns="http://www.springframework.org/schema/beans"
      xmlns:xsi="http://www.w3.org/2001/XMLSchema-instance"
       xsi:schemaLocation="http://www.springframework.org/schema/beans http://www.springframework.org/schema/beans/spring-beans.xsd">

</beans>
1.p命名头文件
定义:p命名空间允许您使用bean元素的属性(而不是嵌套的元素)来描述协作bean(或两者)的属性值。
Spring支持可扩展的配置格式使用名称空间,它们基于XML架构定义。这个beans本章讨论的配置格式是在XML模式文档中定义的。但是,p-namespace不是在XSD文件中定义的,它只存在于Spring的核心中。
注意:p命名空间 需要在头文件加约束条件
<?xml version="1.0" encoding="UTF-8"?>
<beans xmlns="http://www.springframework.org/schema/beans"
       xmlns:p="http://www.springframework.org/schema/p"
       xmlns:xsi="http://www.w3.org/2001/XMLSchema-instance"
       xsi:schemaLocation="http://www.springframework.org/schema/beans http://www.springframework.org/schema/beans/spring-beans.xsd">

<!--p命名空间    可以注解注入属性的值-->
    <bean id="user" class="pojo.User" p:name="雅典娜" p:age="18">
    </bean>

</beans>
2.c命名头文件
定义:类似于带有p命名空间的XML快捷方式,Spring3.1中引入的c-namespace允许内联属性来配置构造函数参数,而不是嵌套时constructor-arg元素
注意:c命名空间 需要在头文件加约束条件
<?xml version="1.0" encoding="UTF-8"?>
<beans xmlns="http://www.springframework.org/schema/beans"
       xmlns:p="http://www.springframework.org/schema/p"
       xmlns:c="http://www.springframework.org/schema/c"
       xmlns:xsi="http://www.w3.org/2001/XMLSchema-instance"
      xsi:schemaLocation="http://www.springframework.org/schema/beans http://www.springframework.org/schema/beans/spring-beans.xsd">

      <!--c命名空间  是通过构造器注入   因为是构造器注入,所以要对User类创建构造函数(有参和无参)-->
    <bean id="user2" class="pojo.User" c:name="vivo" c:age="18">
    </bean>
</beans>
3.bean的作用域
3.1单例模式
定义:一个单例bean只有一个共享实例被管理,所有对具有一个或多个与该bean定义相匹配的ID的bean请求都会导致Spring容器返回一个特定的beaninstance。
换句话说,当您定义一个bean定义并且它的作用域为singleton时,springioc容器只创建由该bean定义定义的对象的一个实例。这个单独的实例存储在suchsingleton bean的缓存中,并且该名称bean的所有后续请求和引用都将返回缓存的对象。下图显示了singleton作用域的工作方式:
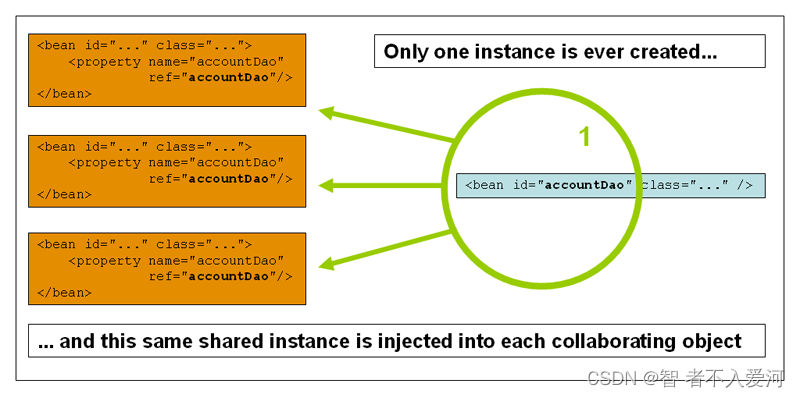
单例:取得是一个值(singleton)
<bean id="user3" class="pojo.User" c:name="IQOO" c:age="18" scope="singleton"></bean>
且他们的hashCode的值是相同的
3.2原型模式
定义:bean部署的非单例原型范围导致每次对特定bean发出请求时都会创建一个newbean实例。也就是说,将bean注入另一个bean中,或者通过getBean()方法调用容器。通常,您应该为所有有状态bean使用prototype范围,而为无状态bean使用singleton范围。
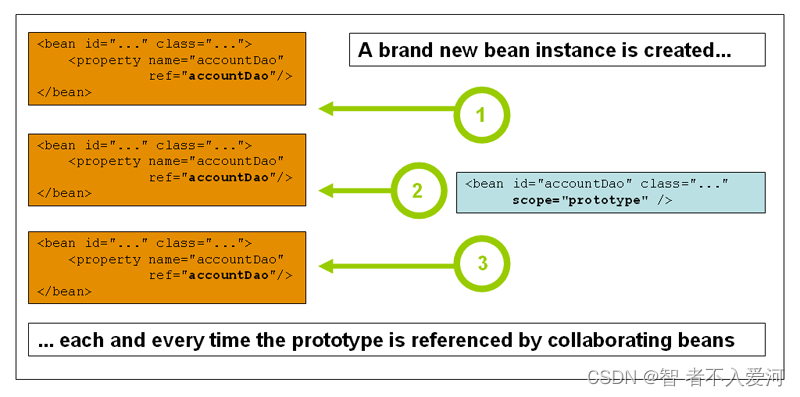
原型:取得是多个值(prototype)
<bean id="user3" class="pojo.User" c:name="IQOO" c:age="18" scope="prototype"></bean>
且他们的hashCode值是不相同的
三、自动装配
首先新建类:Dog类、Cat类、User类
Dog类
public class Dog {
    public void show(){
        System.out.println("汪汪汪.........");
    }
}
Cat类
public class Cat {
    public void show(){
        System.out.println("喵喵..........");
    }
}
User类
public class User {
    private Cat cat;
    private Dog dog;
    private String name;

    public User() {
    }

    public User(Cat cat, Dog dog, String name) {
        this.cat = cat;
        this.dog = dog;
        this.name = name;
    }

    public Cat getCat() {
        return cat;
    }

    public void setCat(Cat cat) {
        this.cat = cat;
    }

    public Dog getDog() {
        return dog;
    }

    public void setDog(Dog dog) {
        this.dog = dog;
    }

    public String getName() {
        return name;
    }

    public void setName(String name) {
        this.name = name;
    }
}
创建Spring核心配置文件applicationContext.xml
<?xml version="1.0" encoding="UTF-8"?>
<beans xmlns="http://www.springframework.org/schema/beans"
       xmlns:xsi="http://www.w3.org/2001/XMLSchema-instance"
       xsi:schemaLocation="http://www.springframework.org/schema/beans
        https://www.springframework.org/schema/beans/spring-beans.xsd">

</beans>
1.显示在xml文件中装配
<bean id="dog" class="pojo.Dog"/>
 <bean id="cat" class="pojo.Cat"/>
 <bean id="user" class="pojo.User">
        <property name="name" value="雅典娜"/>
        <property name="dog" ref="dog"/>
        <property name="cat" ref="cat"/>
    </bean>
2.按名称自动装配
byName:会自动在容器上下文中查找,和自己对象set方法后面的值对应的bean id
简单来说就是通过id去查找set方法中对应的名称
 <bean id="dog" class="pojo.Dog"/>
 <bean id="cat" class="pojo.Cat"/>
<!--byType: 按照类型 会自动在容器上下文中查找,和自己对象类型相同的bean-->
    <bean id="user" class="pojo.User" autowire="byName">
        <property name="name" value="雅典娜"/>
        <property name="dog" ref="dog"/>
        <property name="cat" ref="cat"/>
    </bean>
总结:byName的时候,需要保证bean唯一,并且这个bean需要和自动注入的属性set方法一致
byType: 按照类型查找 会自动在容器上下文中查找,和自己对象类型相同的bean
 <bean id="dog" class="pojo.Dog"/>
 <bean id="cat" class="pojo.Cat"/>
<!--byType: 按照类型 会自动在容器上下文中查找,和自己对象类型相同的bean-->
    <bean id="user" class="pojo.User" autowire="byType">
        <property name="name" value="雅典娜"/>
        <property name="dog" ref="dog"/>
        <property name="cat" ref="cat"/>
    </bean>
总结:byType的时候,需要保证bean的class唯一,并且这个bean需要和自动注入的属性类型一致
3.使用注解自动装配
注:注解自动注入 jdk1.5 spring2.5支持注解
自动注解会在Spring核心配置文件中加入约束头文件,即:context和aop约束,如下图所示:
 <?xml version="1.0" encoding="UTF-8"?>
<beans xmlns="http://www.springframework.org/schema/beans"
       xmlns:context="http://www.springframework.org/schema/context"
       xmlns:aop="http://www.springframework.org/schema/aop"
       xmlns:xsi="http://www.w3.org/2001/XMLSchema-instance"
       xsi:schemaLocation="
       http://www.springframework.org/schema/beans
       https://www.springframework.org/schema/beans/spring-beans.xsd
       http://www.springframework.org/schema/context
       https://www.springframework.org/schema/context/spring-context.xsd
       http://www.springframework.org/schema/aop
       https://www.springframework.org/schema/aop/spring-aop.xsd">

</beans>
配置注解的支持:<context:annotation-config/>
    <context:annotation-config/>
    <bean id="dog" class="pojo.Dog"/>
    <bean id="cat" class="pojo.Cat"/>
    <bean id="user" class="pojo.User">
        <property name="name" value="雅典娜"/>
    </bean>
注入注解:
public class User {
    @Autowired
    private Cat cat;
    @Autowired
    private Dog dog;
    private String name;

    public User() {
    }

    public User(Cat cat, Dog dog, String name) {
        this.cat = cat;
        this.dog = dog;
        this.name = name;
    }

    public Cat getCat() {
        return cat;
    }

    public void setCat(Cat cat) {
        this.cat = cat;
    }

    public Dog getDog() {
        return dog;
    }

    public void setDog(Dog dog) {
        this.dog = dog;
    }

    public String getName() {
        return name;
    }

    public void setName(String name) {
        this.name = name;
    }
}
感谢各位大佬的观看,如果有问题请及时指正 谢谢~


 1303
1303


 被折叠的 条评论
为什么被折叠?
被折叠的 条评论
为什么被折叠?
 到【灌水乐园】发言


