


一、XMLHttpRequest对象
通过XMLHttpRequest对象来向服务器发送异步请求,从服务器获取数据。然后用JavaScript来操作DOM而更新页面。XMLHttpRequest是ajax的核心机制,它是IE5中首先引入的,是一种支持异步请求的技术。
简单的说,也就是JavaScript可以及时的向服务器提出请求并及时响应。而不阻塞用户。达到无刷新效果。
二、Ajax使用过程
1、创建XMLHttpRequest对象
var xhr = new XMLHttpRequest();2、给定请求方式以及请求地址
xhr.open("get","http://v1.yiketianqi.com/api?unescape=1&version=v91&appid=43656176&appsecret=I42og6Lm&ext=&cityid=&city="); 后端服务 ip地址+端口号+资源路径
3、发送请求
xhr.send();4、获取服务器端给客户端的响应数据
xhr.onreadystatechange = function(){
  //0:open()没有被调用
  //1:open()正在被调用
  //2:send()正在被调用
  //3:服务端正在返回结果
  //4:请求结束,并且服务端已经结束发送数据到客户端
  if (this.readyState == 4 && this.status == 200) {
      document.getElementById("demo").innerHTML = this.responseText;
     }
}
三、实战案例
需求:创建User类,包含id,age属性。
在用户管理界面中通过Ajax技术完成对用户数据载入、添加用户、更新用户、删除用户操作。
1、新建web项目,层级如下
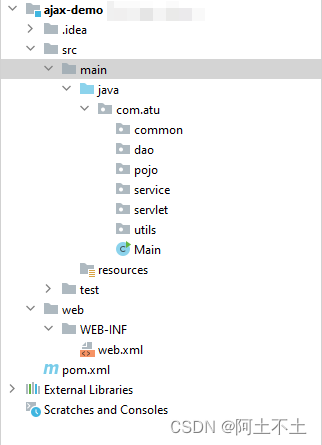
common(公共实体):用于存放公共实体类
dao(数据访问层):用于存放应用程序的数据访问类,负责与数据库或其他数据源进行交互。
pojo(模型层):用于存放应用程序的数据模型类,表示应用程序中的实体对象。
service(服务层):用于存放应用程序的服务类,负责实现业务逻辑。
servlet(控制器层):用于存放应用程序的控制器类,负责处理请求和控制应用程序的流程。
utils(工具类):用于存放应用程序的工具类,包含各种通用的辅助方法。
2、搭建环境
-
数据库创建用户表
# 创建用户表
CREATE TABLE `user` (
 `id` int NOT NULL AUTO_INCREMENT,
 `name` varchar(255) DEFAULT NULL,
 `age` int DEFAULT NULL,
 PRIMARY KEY (`id`)
) ENGINE=InnoDB AUTO_INCREMENT=7 DEFAULT CHARSET=utf8mb4 COLLATE=utf8mb4_0900_ai_ci;


DELETE FROM `user`;
# 添加用户
INSERT INTO `user` (id, name, age) VALUES
(1, 'Jone', 18),
(2, 'Jack', 20),
(3, 'Tom', 28),
(4, 'Sandy', 21),
(5, 'Billie', 24);
-
创建实体类
/**
 * 用户表模型
 */
public class User {


  // 序号
  private Integer id;
  // 名字
  private String name;
  // 年龄
  private Integer age;
  // 邮箱


  public User(Integer id, String name, Integer age, String email) {
    this.id = id;
    this.name = name;
    this.age = age;
   }


  public User() {
   }


  public Integer getId() {
    return id;
   }


  public void setId(Integer id) {
    this.id = id;
   }


  public String getName() {
    return name;
   }


  public void setName(String name) {
    this.name = name;
   }


  public Integer getAge() {
    return age;
   }


  public void setAge(Integer age) {
    this.age = age;
   }


  @Override
  public String toString() {
    return "User{" +
        "id=" + id +
        ", name='" + name + ''' +
        ", age=" + age +
        '}';
   }
}
-
统一结果返回集
/**
 * 统一结果返回集
 */
public class ResultAjax {

    //状态码 200 成功 500 失败
    private Integer code;

    //返回消息
    private String message;

    //返回对象
    private Object data;

    //成功返回
    public static ResultAjax ok(String message,Object data){
        ResultAjax resultAjax = new ResultAjax();
        resultAjax.setCode(200);
        resultAjax.setMessage(message);
        resultAjax.setData(data);
        return resultAjax;
    }
    //失败返回
    public static ResultAjax error(String message){
        ResultAjax resultAjax = new ResultAjax();
        resultAjax.setCode(500);
        resultAjax.setMessage(message);
        return resultAjax;
    }
    public Integer getCode() {
        return code;
    }

    public void setCode(Integer code) {
        this.code = code;
    }

    public String getMessage() {
        return message;
    }

    public void setMessage(String message) {
        this.message = message;
    }

    public Object getData() {
        return data;
    }

    public void setData(Object data) {
        this.data = data;
    }
}-
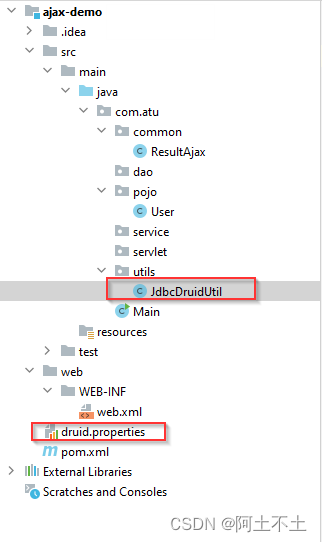
编写数据库连接工具
1)创建数据库连接信息文件
在src目录下创建druid.properties,基于Druid连接池获取数据库连接工具类。
driverClassName=com.mysql.jdbc.Driver
url=jdbc:mysql://localhost:3306/test?useSSL=false
username=root
password=123456
initialSize=10
maxActive=20
2) 创建工具类
/**
 * 基于Druid连接池获取数据库连接工具类
 */
public class JdbcDruidUtil {
   //数据库连接池对象
   private static DataSource dataSource;
   static{
     try {
       //获取读取配置文件的字节输入流对象
       InputStream is = JdbcDruidUtil.class.getClassLoader().getResourceAsStream("druid.properties");
       //创建Properties对象
       Properties pop = new Properties();
       //加载配置文件
       pop.load(is);
       //创建连接池对象
       dataSource = DruidDataSourceFactory.createDataSource(pop);
     }catch(Exception e){
       e.printStackTrace();
     }
   }
  //获取数据库连接对象
  public static Connection getConnection(){
    Connection connection = null;
    try {
      connection = dataSource.getConnection();
     } catch (SQLException throwables) {
      throwables.printStackTrace();
     }
    return connection;
   }
  //关闭连接对象
  public static void closeConnection(Connection connection){
    try {
      connection.close();
     } catch (SQLException throwables) {
      throwables.printStackTrace();
     }
   }
  //关闭Statement对象
  public static void closeStatement(Statement statement){
    try {
      statement.close();
     } catch (SQLException throwables) {
      throwables.printStackTrace();
     }
   }
  //关闭ResultSet
  public static void closeResultSet(ResultSet resultSet) {
    try {
      resultSet.close();
     } catch (SQLException throwables) {
      throwables.printStackTrace();
     }
   }
  //DML操作时关闭资源
  public static void closeResource(Statement statement,Connection connection){
    //先关闭Statement对象
    closeStatement(statement);
    //在关闭Connection对象
    closeConnection(connection);
   }


  //查询时关闭资源
  public static void closeResource(ResultSet resultSet,Statement statement,Connection connection){
    if (resultSet != null){
      //先关闭ResultSet
      closeResultSet(resultSet);
     }
    if (statement != null){
      //在闭Statement对象
      closeStatement(statement);
     }
    if (connection != null){
      //最后关闭Connection对象
      closeConnection(connection);
     }
   }
}
3)用户持久层新建查询接口
新建用户持久层文件UsersDao接口
public class UserDao {
    /**
     * 查询所有数据
     * @return
     */
    List<User> findByAll();
}
4) 用户持久层实现查询接口
**
 * 操作用户表持久层
 */
public class UsersDaoImpl implements UsersDao {

/**
   * 查询所有用户
   * @return
   */
  @Override
  public List<User> findByAll() {
    Connection conn =null;
    Statement s = null;
    ResultSet rs = null;
    List<User> userList = new ArrayList<>();
    try{
      conn = JdbcDruidUtil.getConnection();
      String sql = "select * from user";
      s = conn.createStatement();
      rs = s.executeQuery(sql);
      while(rs.next()){
        //手动orm映射
        User u = new User();
        u.setId(rs.getInt("id"));
        u.setName(rs.getString("name"));
        u.setAge(rs.getInt("age"));
        userList.add(u);
       }
     }catch(Exception e){
      e.printStackTrace();
     }finally{
      JdbcDruidUtil.closeResource(s,conn);
     }
    return userList;
   }

}
5)编写用户管理前端页面
<%@ page isELIgnored="false" contentType="text/html;charset=UTF-8" language="java" %>
<html>
<head>
  <title>用户管理</title>
  <style>
    div{
      padding:20px 10px 0 10px;
     }
    .total_content{
      display: flex; / 创建 Flexbox 布局 /
      justify-content: center; / 水平居中对齐 /
      align-items: center; / 垂直居中对齐 /
     }
  </style>
</head>
<body>
<div class="total_content">
  <h1 >用户管理系统</h1>
</div>
  <div>
    <table align="center" width="60%" border="0" cellspacing="1" bgcolor="#000000">
      <tr bgcolor="#FFFFFF">
        <td>ID:</td>
        <td><input type="text" name="id" id="userId"/></td>
        <td>姓名:</td>
        <td><input type="text" name="name" id="name"/></td>
        <td>年龄:</td>
        <td><input type="number" name="age" id="age"/></td>
      </tr>
      <tr align="center" bgcolor="#FFFFFF">
        <td colspan="6">
          <input type="button" value="添加用户" onclick="addUser()" />
          <input type="button" value="更新用户" onclick="updateUser()"/>
        </td>
      </tr>
    </table> <hr/>
    <table align="center" width="60%" bgcolor="#000000" border="0" id="myTable" cellpadding="0" cellspacing="1">
      <thead>
      <tr align="center" bgcolor="#FFFFFF">
        <td>ID</td>
        <td>姓名</td>
        <td>年龄</td>
        <td>操作</td>
      </tr>
      </thead>
      <tbody id="tBody"></tbody>
    </table>
  </div>
</body>
</html>
6)编写用户查询servlet
用户业务层新增查询接口---UsersService
public interface UsersService {

  /**
   * 查询所有数据
   * @return
   */
  List<User> findByAll();
}
创建用户业务层接口实现类-----UsersServiceImpl。
/**
 * 用户业务层
 *
 */
public class UsersServiceImpl implements UsersService {


  /**
   * 查询全部用户
   * @return
   */
  @Override
  public List<User> findByAll() {
    UsersDao usersDao = new UsersDaoImpl();
    return usersDao.findByAll();
   }

}
用户查询控制层编写---创建UserListServlet控制器类
@WebServlet("/user.do")
public class UserListServlet extends HttpServlet {


  @Override
  protected void doGet(HttpServletRequest req, HttpServletResponse resp) throws ServletException, IOException {
    this.doPost(req, resp);
   }
   @Override
  protected void doPost(HttpServletRequest req, HttpServletResponse resp) throws ServletException, IOException {
    String flag = req.getParameter("flag");
    switch (flag){
      case "getData":
        this.getData(req,resp);
        break;
     }
   }
   // 获取页面初始化数据
  private void getData(HttpServletRequest req, HttpServletResponse resp) throws IOException {
    UsersService usersService = new UsersServiceImpl();
    List<User> userList = usersService.findByAll();
    ResultAjax success = ResultAjax.success(userList);
    writerTopage(resp,success);
   }

   /**
   * 输出至页面方法
   * @param resp
   * @param data
   * @throws IOException
   */
  private void writerTopage(HttpServletResponse resp,Object data) throws IOException {
    String s = JSON.toJSONString(data);
    resp.setContentType("application/json");
    resp.setCharacterEncoding("UTF-8");
    PrintWriter pw = resp.getWriter();
    pw.print(s);
    pw.flush();
    pw.close();
   }

}
前端实现显示用户数据
<script type="text/javascript" src="jquery路径"></script>
<script>
$(function() {
//初始化用户数据
getData();
});
// 获取页面初始化数据
function getData(){
$.getJSON("user.do",{flag:"getData"},function (result) {
listUser(result);
});
}
// 遍历数据生成数据
function listUser(obj){
var str ="";
$.each(obj.data,function(){
str+= "<tr align='center' bgcolor=\"#FFFFFF\">" +
"<td id='"+this.id+"'>"+this.id +"</td>"+
"<td>"+this.name+"</td>" +
"<td>"+this.age+"</td>" +
"<td><a href='#' >更新</a> <a href='#'>删除 </a></td></tr>"
});
$("#tBody").prepend(str);
}
</script>7)用户添加
<%@ page isELIgnored="false" contentType="text/html;charset=UTF-8" language="java" %>
<html>
<head>
  <title>用户管理</title>
  <style>
    div{
      padding:20px 10px 0 10px;
     }
     .total_content{
      display: flex; / 创建 Flexbox 布局 /
      justify-content: center; / 水平居中对齐 /
      align-items: center; / 垂直居中对齐 /
     }
  </style>
</head>
<body>
<div class="total_content">
  <h1 >用户管理系统</h1>
</div>
  <div>
    <table align="center" width="60%" border="0" cellspacing="1" bgcolor="#000000">
      <tr bgcolor="#FFFFFF">
        <td>ID:</td>
        <td><input type="text" name="id" id="userId"/></td>
        <td>姓名:</td>
        <td><input type="text" name="name" id="name"/></td>
        <td>年龄:</td>
        <td><input type="number" name="age" id="age"/></td>
      </tr>
      <tr align="center" bgcolor="#FFFFFF">
        <td colspan="6">
          <input type="button" value="添加用户" onclick="addUser()" />
          <input type="button" value="更新用户" onclick="updateUser()"/>
        </td>
      </tr>
    </table> <hr/>
    <table align="center" width="60%" bgcolor="#000000" border="0" id="myTable" cellpadding="0" cellspacing="1">
      <thead>
      <tr align="center" bgcolor="#FFFFFF">
        <td>ID</td>
        <td>姓名</td>
        <td>年龄</td>
        <td>操作</td>
      </tr>
      </thead>
      <tbody id="tBody"></tbody>
    </table>
  </div>
</body>
<script>
 // 用户添加
  function addUser(){
    // 从页面中获取数据
    var name = $("#name").val();
    var age = $("#age").val();
    if (name == ''){
      alert("请输入名字")
      return
     }
    if ( age == ''){
      alert("请输入年龄")
      return
     }
    var data = {
      name:name,
      age:age,
      flag : "addUser"
     }
    // 发送请求
    $.post("user.do",data,function(result){
      console.log(result)
      if (result.code == 200){
        alert(result.message)
        location.reload()
       }
     });
   }


</script>
其他同理不再赘述。。。


 879
879


 被折叠的 条评论
为什么被折叠?
被折叠的 条评论
为什么被折叠?
 到【灌水乐园】发言


